


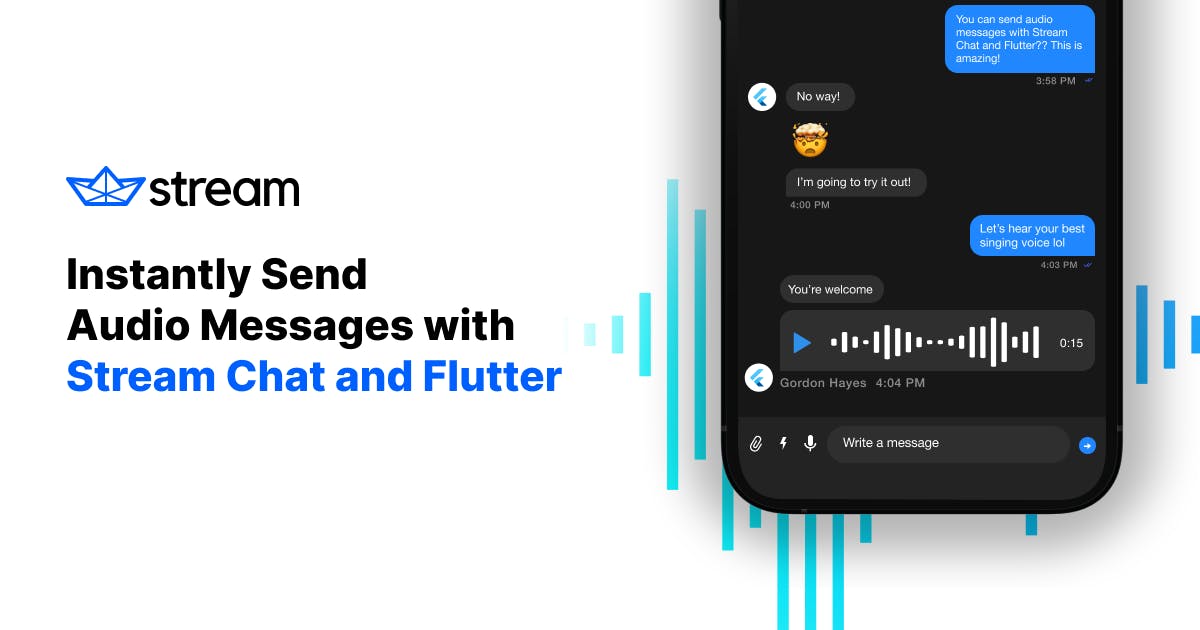
Many chat applications today allow users to send voice notes as messages. In this tutorial, you'll learn how to send voice notes, or audio attachments, in your Stream Chat Flutter app. By the end, your app will feature a chat experience similar to the shown here.
This tutorial will cover the following sections in detail:
- Set Up Your Stream Account
- Create Demo User Accounts
- Disable Authentication for Development
- Set Up Your Flutter Account
- Create a Channel List Page
- Create a Channel Page to View Messages
- Add a Custom Action Widget to Record a Voice Note
- Add a Custom Attachment Builder
Set Up Your Stream Account
To get started, you'll need a Stream account to access the Stream Chat API. If you don't have a Stream account already, you can sign up for a free 30-day trial.
If you're working on a personal project or own a small business, you can register for a Stream Maker Account and access Stream Chat for free indefinitely.

After creating your account, create an app and name it:
- Go to your Stream dashboard.
- Select Create App.
- Enter an App Name (like Audio Attachment Demo).
- Set your Server Location.
- Set the Environment to Development.
- Select Create App.

After creating your app, you should see it listed in your Stream dashboard with your app's respective API KEY and Secret.

Your API Key is only an app identifier and safe to share publicly. Your Secret helps generate authenticated user tokens and should be kept private.
From this dashboard, you can edit the app, access data, and create new apps.
Create Demo User Accounts
Stream offers many methods to create user accounts. In a production environment, you'd ideally manage user account creation and token generation server side.
However, for demo purposes, it's easier to create accounts on your Stream dashboard.
To create demo accounts for your Steam app:
- Go to your Audio Attachment Demo app.
- Select Options.
- Select Open in Chat Explorer. (This will direct you to the Explorer dashboard, where you can create channels and users.)

- Select Users, then Create New User.
- In the Create New User window, enter a User Name and User Id.
- In the User Application Role dropdown menu, select user.

You can create as many users as you'd like for your demo app.
Disable Authentication for Development
Any user accounts you create will require authentication tokens to access the Stream API. For demo purposes, you should disable these authentication checks and use developer tokens instead.
To disable authentication for your app:
- Go to your Audio Attachment Demo app.
- In the dashboard nav menu, select Chat.
- From the Chat dropdown, select Overview.
- Scroll to the Authentication section.
- Select the Disable Auth Checks toggle button.

If you don't want to disable authentication, you can easily generate tokens using Stream's User JWT Generator.

Note: In a production scenario, you must generate a token using your server and one of Stream's server SDKs. You should never hardcode user tokens in a production application.
Set Up Your Flutter App
If you're new to Stream, see the Stream Flutter Chat tutorial for a more thorough introduction to all the basic components available to you.
Otherwise, go ahead and create a new Flutter application from your terminal or preferred IDE with the following command:
1Flutter create audio_attachment_tutorial
Note: This tutorial was tested using version 3.19.4 of Flutter.
Open the project and add the following code to your pubspec.yaml file:
123just_audio: ^0.9.36
record: ^4.4.3
stream_chat_flutter: ^7.1.0
Note: Future versions may have breaking changes. To follow this tutorial we recommend using these versions.
Create a config.dart file with the following code:
1234567891011121314151617181920212223242526272829// Stream config import 'package:flutter/material.dart'; const streamKey = 'YOUR_KEY'; // TODO: Enter your Stream Application key here const userGordon = DemoUser( id: 'gordon', name: 'Gordon Hayes', image: 'https://avatars.githubusercontent.com/u/13705472?v=4', ); const userSalvatore = DemoUser( id: 'salvatore', name: 'Salvatore Giordano', image: 'https://avatars.githubusercontent.com/u/20601437?v=4', ); class DemoUser { final String id; final String name; final String image; const DemoUser({ required this.id, required this.name, required this.image, }); }
In the snippet above, you:
- Set your unique App Key to
streamKey. (You can get this unique key from your app's dashboard on Stream.) - Created a DemoUser model to store user information.
- Created two demo users. These should use the same ids that you set on your Stream dashboard. (Note that you're hardcoding a name and image; ideally, these values should be set using your server and one of Stream's server SDKs.)
Replace the code inside main.dart with the following:
1234567891011121314151617181920212223242526272829303132333435363738394041424344454647484950515253545556575859606162636465666768697071727374757677787980818283848586878889909192import 'package:flutter/material.dart'; import 'package:stream_chat_flutter/stream_chat_flutter.dart'; import 'channel_list_page.dart'; import 'config.dart'; void main() { WidgetsFlutterBinding.ensureInitialized(); final client = StreamChatClient(streamKey); runApp(MyApp(client: client)); } class MyApp extends StatelessWidget { const MyApp({Key? key, required this.client}) : super(key: key); final StreamChatClient client; Widget build(BuildContext context) { return MaterialApp( builder: (context, widget) { return StreamChat( child: widget!, client: client, ); }, debugShowCheckedModeBanner: false, home: const SelectUserPage(), ); } } class SelectUserPage extends StatelessWidget { const SelectUserPage({Key? key}) : super(key: key); Widget build(BuildContext context) { return MaterialApp( home: Scaffold( body: Center( child: Column( mainAxisAlignment: MainAxisAlignment.center, children: const [ Padding( padding: EdgeInsets.all(8.0), child: Text( 'Select a user', style: TextStyle(fontSize: 24), ), ), SelectUserButton(user: userGordon), SelectUserButton(user: userSalvatore), ], ), ), ), ); } } class SelectUserButton extends StatelessWidget { const SelectUserButton({ Key? key, required this.user, }) : super(key: key); final DemoUser user; Widget build(BuildContext context) { return ElevatedButton( onPressed: () async { final client = StreamChat.of(context).client; await client.connectUser( User( id: user.id, extraData: { 'name': user.name, 'image': user.image, }, ), client.devToken(user.id).rawValue, ); Navigator.of(context).pushReplacement( MaterialPageRoute(builder: (context) => const ChannelListPage()), ); }, child: Text(user.name), ); } }
In the above snippet, you:
- Instantiated a StreamChatClient using Stream's Flutter SDK.
- Created a MyApp widget with the home attribute set to SelectUserPage, and wrapped the application with a builder that creates a StreamChat widget, which handles a lot of the chat logic out of the box.
- Created the SelectUserPage and SelectUserButton widgets, which show two demo accounts to select from.
- Created an onPressed handler to connect a user using the Stream client. (You can only call
client.devToken(user.id)-devTokenif you disabled Authentication.) - Navigate the user to the ChannelListPage after connecting them. The ChannelListPage lists all the channels for your Stream app.

Create a Page to List All Channels
Next, you'll display a list of channels where the current user is a member. It's better to separate the code into multiple files so that it's easier to maintain as the code grows.
Create a new file called channel_list_page.dart and add the following code:
123456789101112131415161718192021222324252627282930313233343536373839404142434445464748495051525354555657585960616263646566676869707172737475767778798081828384858687import 'package:audio_attachment_tutorial/config.dart'; import 'package:audio_attachment_tutorial/main.dart'; import 'package:flutter/material.dart'; import 'package:stream_chat_flutter/stream_chat_flutter.dart'; import 'channel_page.dart'; class ChannelListPage extends StatefulWidget { const ChannelListPage({ Key? key, }) : super(key: key); State<ChannelListPage> createState() => _ChannelListPageState(); } class _ChannelListPageState extends State<ChannelListPage> { late final _controller = StreamChannelListController( client: StreamChat.of(context).client, filter: Filter.in_('members', [StreamChat.of(context).currentUser!.id]), channelStateSort: const [SortOption('last_message_at')], limit: 30, ); void dispose() { _controller.dispose(); super.dispose(); } Widget build(BuildContext context) { return Scaffold( appBar: AppBar( title: const Text('Stream Chat'), actions: [ GestureDetector( onTap: () async { await StreamChat.of(context).client.disconnectUser(); Navigator.of(context).pushReplacement( MaterialPageRoute(builder: (context) => const SelectUserPage()), ); }, child: const Padding( padding: EdgeInsets.all(8.0), child: Center( child: Text('Switch user'), ), ), ) ], ), body: StreamChannelListView( controller: _controller, emptyBuilder: (conext) { return Center( child: ElevatedButton( onPressed: () async { final channel = StreamChat.of(context).client.channel( "messaging", id: "test-gordon", extraData: { "name": "Flutter Chat", "image": "https://flutter.dev/assets/images/shared/brand/flutter/logo/flutter-lockup.png", "members": [userGordon.id, userSalvatore.id] }, ); await channel.create(); }, child: const Text('Create channel'), ), ); }, onChannelTap: (channel) => Navigator.push( context, MaterialPageRoute( builder: (_) => StreamChannel( channel: channel, child: const ChannelPage(), ), ), ), ), ); } }
In the snippet above, you:
- Created a Scaffold with the body set to the list of channels and a button in the actions attribute to disconnect the current user and navigate back to the SelectUserPage.
- Created a StreamChannelListView widgets (provided by the Stream package) that will display all channels for your Stream app. This widget requires a StreamChannelListController, which is created and disposed in the stateful widget.
- Created an emptyBuilder, which will return if there are no channels for your app. In the emptyBuilder, you return a button that creates a new group channel and sets the members to the users you created.
- Provided the
onChannelTapbehaviour, which will open the ChannelPage (a custom widget you'll create next). - Added a filter to only show channels where the current user is a member.
- Added sort and limit, which you can customize as needed.

Create a Channel Page to View Messages
To display the message list view, create a new file called channel_page.dart and add the following code:
123456789101112131415161718192021222324252627import 'package:flutter/material.dart'; import 'package:stream_chat_flutter/stream_chat_flutter.dart'; class ChannelPage extends StatefulWidget { const ChannelPage({ Key? key, }) : super(key: key); _ChannelPageState createState() => _ChannelPageState(); } class _ChannelPageState extends State<ChannelPage> { Widget build(BuildContext context) { return Scaffold( appBar: const StreamChannelHeader(), body: Column( children: <Widget>[ Expanded( child: StreamMessageListView(), ), StreamMessageInput(), ], ), ); }
In this snippet, you:
- Created a Scaffold for the new page.
- Set the appBar to be a StreamChannelHeader (this shows the channel name and image).
- Created a Column with an expanded StreamMessageListView (a list that displays all channel messages, images, and custom attachments).
- Created a StreamMessageInput at the bottom of the Column, which is used to send new messages and attachments to the channel.
If you run the app now, you'll find-with only a small amount of code-that you have a pretty robust messaging app complete with all the necessary functionality.
Now, you're at the point where you can add the functionality to support audio messaging.
Add a Custom Action Widget to Record a Voice Note
To support audio messaging, you'll add a custom action widget so users can record a voice note and send it as a message. At the end of this section, your widget should look like this:

In your MessageInput provide the following custom action:
123456789StreamMessageInput(
  actionsBuilder: (context, list) {
    return [
      RecordButton(
        recordingFinishedCallback: _recordingFinishedCallback,
      ),
    ];
  },
),
You'll create the _recordingFinishedCallback method later. First, create a new file called record_button.dart and add the following code:
12345678910111213141516171819202122232425262728293031323334353637383940414243444546474849505152535455565758596061626364656667import 'package:flutter/material.dart'; import 'package:record/record.dart'; import 'package:stream_chat_flutter/stream_chat_flutter.dart'; typedef RecordCallback = void Function(String); class RecordButton extends StatefulWidget { const RecordButton({ Key? key, required this.recordingFinishedCallback, }) : super(key: key); final RecordCallback recordingFinishedCallback; _RecordButtonState createState() => _RecordButtonState(); } class _RecordButtonState extends State<RecordButton> { bool _isRecording = false; final _audioRecorder = Record(); Future<void> _start() async { try { if (await _audioRecorder.hasPermission()) { await _audioRecorder.start(); bool isRecording = await _audioRecorder.isRecording(); setState(() { _isRecording = isRecording; }); } } catch (e) { print(e); } } Future<void> _stop() async { final path = await _audioRecorder.stop(); widget.recordingFinishedCallback(path!); setState(() => _isRecording = false); } Widget build(BuildContext context) { late final IconData icon; late final Color? color; if (_isRecording) { icon = Icons.stop; color = Colors.red.withOpacity(0.3); } else { color = StreamChatTheme.of(context).primaryIconTheme.color; icon = Icons.mic; } return GestureDetector( onTap: () { _isRecording ? _stop() : _start(); }, child: Icon( icon, color: color, ), ); } }
In this widget, you:
- Created an instance of Record called _audioRecorder, which uses the Record package to make it easy to capture audio recordings in Flutter. (The record package requires some minimal iOS and Android set up to use; read the Flutter Package docs for more information.)
- Created _start and _stop methods to control the audio recording.
- Created a build method that uses a GestureDetector to start stop a recording.
- Used a RecordCallback type definition to send back the string path of the recorded file (called in the _stop method).
Go back to the channel_page.dart and create the _recordingFinishedCallback method in the _ChannelPageState class:
123456789101112131415161718192021void _recordingFinishedCallback(String path) {
  final uri = Uri.parse(path);
  File file = File(uri.path);
  file.length().then(
    (fileSize) {
      StreamChannel.of(context).channel.sendMessage(
            Message(
              attachments: [
                Attachment(
                  type: 'voicenote',
                  file: AttachmentFile(
                    size: fileSize,
                    path: uri.path,
                  ),
                )
              ],
            ),
          );
    },
  );
}
When the recording is finished, the _recordingFinishedCallback will be called. It does the following:
- Parses the path to the URI.
- Creates a new File from the
uri.path. - Uses the then callback on
file.lengthto handle the file length as it's retrieved (the file length is needed to upload the attachment to Stream). - Gets the current channel using
StreamChannel.of(context).channel. - Calls sendMessage on the channel and provides a Message with the Attachment.
- Sets the type to voicenote (this can be any identifier) and creates an AttachmentFile with the path and size of the file.
Now, you have the necessary functionality to record an audio file and upload it to Stream.
Add a Custom Attachment Builder
With the current code, the StreamMessageListView still doesn't know how to render attachments with the type: 'voicenote'. You must tell it how with the messageBuilder argument.
In channel_page.dart, change your StreamMessageListView to the following:
123456789101112StreamMessageListView(
  messageBuilder: (context, details, messages, defaultMessage) {
    return defaultMessage.copyWith(
      attachmentBuilders: [
        AudioAttachmentBuilder(),
        ...StreamAttachmentWidgetBuilder.defaultBuilders(
          message: details.message,
        ),
      ],
    );
  },
),
The messageBuilder gets the defaultMessage, which has a copyWith method to override the attachmentBuilders for the list view. You're creating a custom builder named AudioAttachmentBuilder for the voicenote type (a type you specified). To do this, you can extend the StreamAttachmentWidgetBuilder class:
123456789101112131415161718192021222324252627class AudioAttachmentBuilder extends StreamAttachmentWidgetBuilder { Widget build(BuildContext context, Message message, Map<String, List<Attachment>> attachments) { final url = attachments['voicenote']?.first.assetUrl; late final Widget widget; if (url == null) { widget = const AudioLoadingMessage(); } else { widget = AudioPlayerMessage( source: AudioSource.uri(Uri.parse(url)), id: message.id, ); } return SizedBox( width: 250, height: 50, child: widget, ); } bool canHandle(Message message, Map<String, List<Attachment>> attachments) { final audioAttachments = attachments['voicenote']; return audioAttachments != null && audioAttachments.length == 1; } }
In the builder, you check to see that the first attachment's assetUrl isn't null. If it is null, you return AssetLoadingMessage. Otherwise, you return AudioPlayerMessage and specify the AudioSource. (The AudioSource is a class that comes from the just_audio package and uses the attachment URL to load the audio.)
Next, create a new file called audio_loading_message.dart and add the following:
12345678910111213141516171819202122232425262728293031import 'package:flutter/material.dart'; class AudioLoadingMessage extends StatelessWidget { const AudioLoadingMessage({ Key? key, }) : super(key: key); Widget build(BuildContext context) { return Padding( padding: const EdgeInsets.all(8.0), child: Row( mainAxisSize: MainAxisSize.min, crossAxisAlignment: CrossAxisAlignment.center, children: const [ SizedBox( height: 20, width: 20, child: CircularProgressIndicator( strokeWidth: 3, ), ), Padding( padding: EdgeInsets.only(left: 16.0), child: Icon(Icons.mic), ), ], ), ); } }
This code will show a loading indicator as the asset sends.
Finally, create a file called audio_player_message.dart and add the following code:
123456789101112131415161718192021222324252627282930313233343536373839404142434445464748495051525354555657585960616263646566676869707172737475767778798081828384858687888990919293949596979899100101102103104105106107108109110111112113114115116117118119120121122123124125126127128129import 'dart:async'; import 'package:audio_attachment_tutorial/audio_loading_message.dart'; import 'package:flutter/cupertino.dart'; import 'package:flutter/material.dart'; import 'package:just_audio/just_audio.dart'; class AudioPlayerMessage extends StatefulWidget { const AudioPlayerMessage({ Key? key, required this.source, required this.id, }) : super(key: key); final AudioSource source; final String id; AudioPlayerMessageState createState() => AudioPlayerMessageState(); } class AudioPlayerMessageState extends State<AudioPlayerMessage> { final _audioPlayer = AudioPlayer(); late StreamSubscription<PlayerState> _playerStateChangedSubscription; late Future<Duration?> futureDuration; void initState() { super.initState(); _playerStateChangedSubscription = _audioPlayer.playerStateStream.listen(playerStateListener); futureDuration = _audioPlayer.setAudioSource(widget.source); } void playerStateListener(PlayerState state) async { if (state.processingState == ProcessingState.completed) { await reset(); } } void dispose() { _playerStateChangedSubscription.cancel(); _audioPlayer.dispose(); super.dispose(); } Widget build(BuildContext context) { return FutureBuilder<Duration?>( future: futureDuration, builder: (context, snapshot) { if (snapshot.hasData) { return Row( mainAxisSize: MainAxisSize.min, children: <Widget>[ _controlButtons(), _slider(snapshot.data), ], ); } return const AudioLoadingMessage(); }, ); } Widget _controlButtons() { return StreamBuilder<bool>( stream: _audioPlayer.playingStream, builder: (context, _) { final color = _audioPlayer.playerState.playing ? Colors.red : Colors.blue; final icon = _audioPlayer.playerState.playing ? Icons.pause : Icons.play_arrow; return Padding( padding: const EdgeInsets.all(4.0), child: GestureDetector( onTap: () { if (_audioPlayer.playerState.playing) { pause(); } else { play(); } }, child: SizedBox( width: 40, height: 40, child: Icon(icon, color: color, size: 30), ), ), ); }, ); } Widget _slider(Duration? duration) { return StreamBuilder<Duration>( stream: _audioPlayer.positionStream, builder: (context, snapshot) { if (snapshot.hasData && duration != null) { return CupertinoSlider( value: snapshot.data!.inMicroseconds / duration.inMicroseconds, onChanged: (val) { _audioPlayer.seek(duration * val); }, ); } else { return const SizedBox.shrink(); } }, ); } Future<void> play() { return _audioPlayer.play(); } Future<void> pause() { return _audioPlayer.pause(); } Future<void> reset() async { await _audioPlayer.stop(); return _audioPlayer.seek(const Duration(milliseconds: 0)); } }
This widget controls the audio playback for a voice note, allowing you to play, pause, and skip to different parts of the audio file with a slider.
For more information on how to use this package, see the just_audio package documentation.
By the end, your channel_page.dart imports should look similar to this:
123456789import 'dart:io';

import 'package:audio_attachment_tutorial/audio_loading_message.dart';
import 'package:flutter/material.dart';
import 'package:just_audio/just_audio.dart';
import 'package:stream_chat_flutter/stream_chat_flutter.dart';

import 'audio_player_message.dart';
import 'record_button.dart';
Wrapping Up
That's it ! You should see a channel page like the one below that allows you to record and send voice notes:

To see the full source code for this Stream Chat Flutter app, see the Stream Audio Attachment Tutorial GitHub.
There are several other Stream Flutter packages that provide various levels of UI and low-level chat control, including offline support and localization. See the Stream Chat Flutter GitHub for more information.
Lastly, you can also subscribe to the Stream Developers YouTube channel for more exclusive dev content.
Happy coding!