
Welcome to our fourth tutorial of the seven-part TwitterClone app series. We covered Enabling Support For Media Tweets and Video Playback in part three of the series. In this part of the series, we will dive into how to build a fully functional search to find and follow users using Algolia's search API. You will also learn how we built the follow and unfollow users functionality.
You must have a free account and API key from Algolia before continuing. Check out their website for more details.
Find the project demo and download the source code from GitHub.
What is Algolia?
Algolia is a powerful search engine that provides developers with the tools they need to build customized search experiences for their applications. With Algolia, you can easily create search functionality incorporating features such as autocomplete, typo tolerance, and ranking. Furthermore, Algolia's API is designed to be easy to integrate into your existing application architecture, making it simple to add advanced search capabilities to your app without having to reinvent the wheel. If you're interested in learning more about how Algolia can help you create a world-class search experience for your users, be sure to check out their website and documentation for more information.
They even wrote a blog post on building a Twitter-style Autocomplete with Mentions!
Why Use Algolia?
When using Algolia, the focus is on feeding data into the index and running queries against it. Algolia takes care of hosting and making the index available, which allows us to deliver a powerful search feature without worrying about the complexity of running such a service. Additionally, Algolia provides convenient UI integration libraries that make integration relatively easy.
Install the Algolia InstantSearch iOS
To power your iOS/SwiftUI application with a full Algolia search experience, you should install the InstantSearch iOS package. Visit their getting started guide to begin integrating it with your app. You can use dependency managers like Cocoapods or Carthage to install the InstantSearch library. We add Algolia's dependencies as a Swift Packages to our Tuist dependencies.swift file.
123456789101112var swiftPackageManagerDependencies = SwiftPackageManagerDependencies(
        [
     ...
     .remote(url: "https://github.com/algolia/instantsearch-ios", requirement: .range(from: "7.0.0", to: "8.0.0")),
     ...
    ],
    productTypes: [
        ...
        "AlgoliaSearchClient": .framework,
        ...
    ]
)
We then add the dependency on the Tuist project, in project.swift, to a target.
123456789let searchTarget =
    Project.makeFrameworkTargets(name: searchName,
                                 platform: .iOS,
                                 dependencies: [
                                    .target(name: feedsName),
                                    .target(name: authName),
                                    .external(name: "InstantSearchSwiftUI"),
                                    .external(name: "InstantSearchInsights"),
                                 ])
We now fetch the dependency by running.
1tuist fetch
And make sure to generate the Xcode project again by running:
1tuist generate
Implementation Details
To implement search in the TwitterClone we selected Algolia. As stated on Algolia's website:
Algolia is a hosted search engine offering full-text, numerical, and faceted search, capable of delivering real-time results from the first keystroke. Algolia's powerful API lets you quickly and seamlessly implement search within your websites and mobile applications. Our search API powers billions of queries for thousands of companies every month, delivering relevant results in under 100ms anywhere in the world.
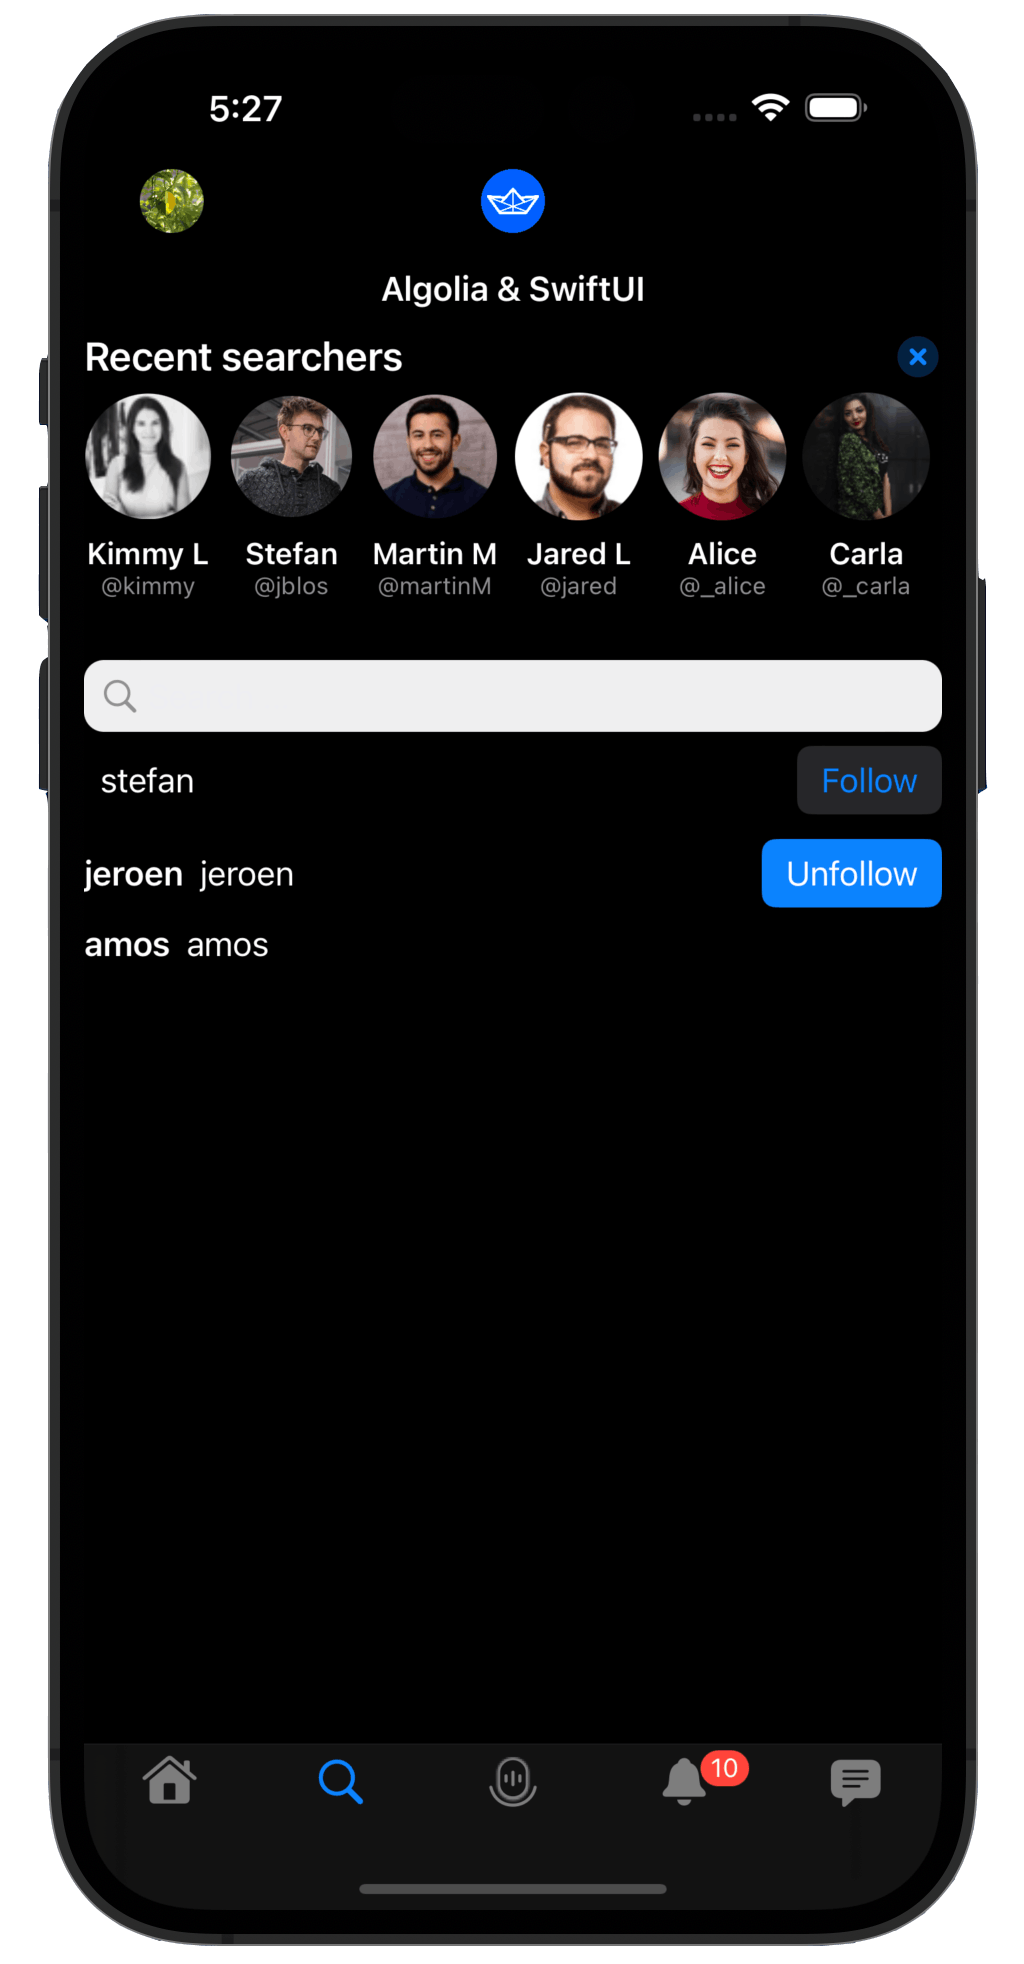
To implement the search experience in our TwitterClone app, we built a simple search field UI with a list of search results for users. To set the business logic behind the search, we implemented the three main search components, HitsSearcher, SearchBoxInteractor, and HitsInteractor, for our business logic. The implementation uses the setupConnections method to link the search UI controllers to the above three search components. When a user submits a search input, we retrieve a list of other users marching the search input using our feed client.
What is an Index?
Before you can integrate Algolia with your app, it requires you to create an index. An index is nothing more than a location for storing information to be used by search engines.
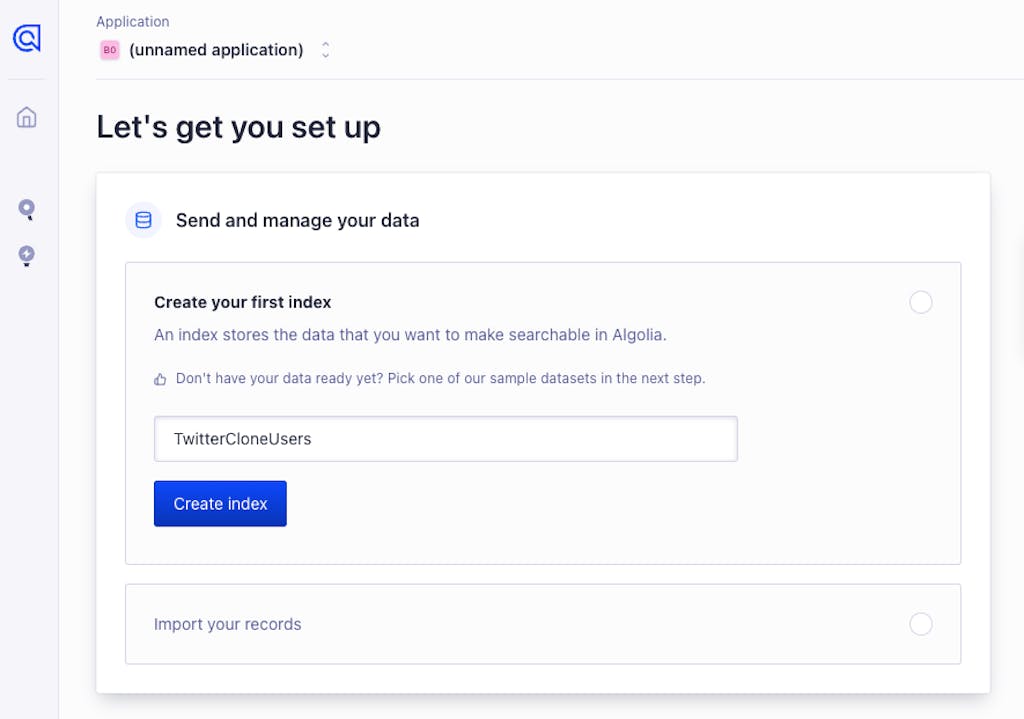
Create an Index in Your Algolia Dashboard
Sign up for an Algolia dashboard account on their website. Then, select the Index category and add a new index to store the data you want users to search. The example below creates the new index TwitterCloneUsers.
Send Data to Algolia's Servers
The first thing to do to create your search experience with Algolia is to communicate your data with Algolia's servers. You can generate data on the dashboard for the index or upload data files like JSON and CSV. In the example below, we created a JSON file and uploaded it to the TwitteCloneUsers index on the dashboard.
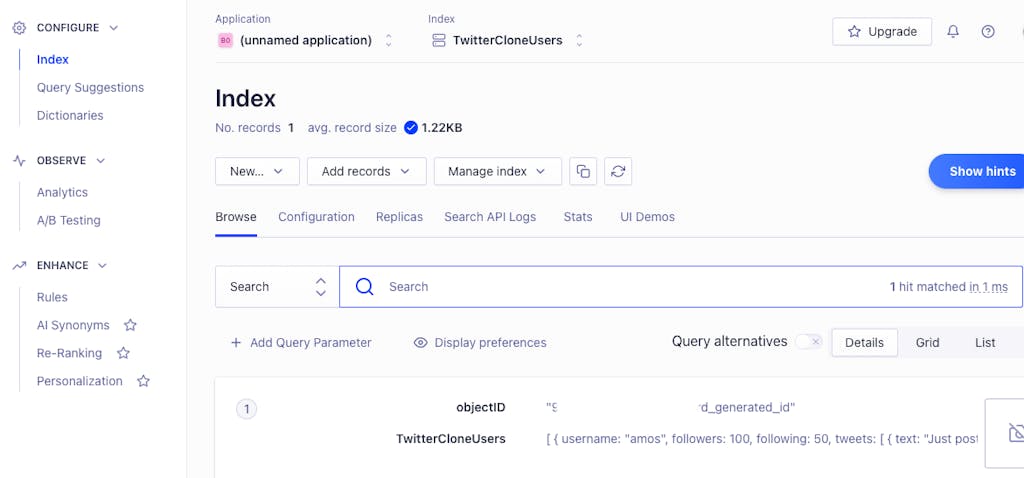
After adding your data, you can search through it on the dashboard as shown below.

Connect the Stream Backend to Algolia
To continuously feed our data into Algolia we opted for a straightforward webhook. The Stream Feedbackend supports webhooks and we configured those to forward the webhook calls toward the Algolia API using a dedicated ingestion credential. This also allows us to some light modifications of the webhook data where needed.

The code in our Node backend is very straightforward when receiving these webhooks.
1234567891011121314151617181920212223242526272829303132333435363738394041424344454647484950515253545556575859const algoliasearch = require('algoliasearch');

require("dotenv").config();

...

const feedWebhook = async (req, res) => {
    const webhook_token = process.env.WEBHOOK_TOKEN;
    const algolia_app_id = process.env.ALGOLIA_APP_ID;
    const algolia_api_key = process.env.ALGOLIA_API_KEY;
    const algolia_index_name = process.env.ALGOLIA_INDEX_NAME;
    const algolia_users_index_name = process.env.ALGOLIA_USERS_INDEX_NAME;

    if (req.query.webhook_token != webhook_token) {
        res.status(403).send('Forbidden');
        return;
    }
    if (req.method == "GET") {
        res.status(200).send('dn4mpr346fns');
        return;
    }
    try {
        const client = algoliasearch(algolia_app_id, algolia_api_key);
        const index = client.initIndex(algolia_index_name);
        console.log(JSON.stringify(req.body));
        req.body.forEach(element => {
            const newItems = element.new;
            const deletedItems = element.deleted;
            const updatedUser = element.generic
            if (updatedUser != null) {
                const usersIndex = client.initIndex(algolia_users_index_name);

                updatedUser.objectID = updatedUser.id;
                usersIndex.saveObjects([updatedUser], { autoGenerateObjectIDIfNotExist: false }).catch((err) => {
                    console.log(err);
                });
            }
            if (newItems != null) {
                newItems.forEach(item => {
                   item.objectID = item.id;
                   // delete item.actor["data"];
                   item.time = new Date(item.time).getTime();
                   item.actor.created_at = new Date(item.actor.created_at).getTime();
                  item.actor.updated_at = new Date(item.actor.updated_at).getTime();
                  // console.log(JSON.stringify(item));
                });

                index.saveObjects(newItems, { autoGenerateObjectIDIfNotExist: false }).catch((err) => {
                    console.log(err);
                });

            }
        });
        res.status(200).json(req.body)
    } catch (error) {
        console.log(error);
        res.status(500).json({ message: error.message });
    }
};
Creating a UI in Our App
In your TwitterClone Project Navigator, open SearchView.swift under the Search -> Sources folder to explore the implementation in detail.
Notice how we send a signal to Algolia's insights feature in the follow and unfollow functions, allowing us to see conversion events on our search. Algolia highly recommends you implement such signals in your implementation to help you get insight into your end-user behavior.
123456789101112131415161718192021222324252627282930313233343536373839404142434445464748495051525354555657585960616263646566676869707172737475767778798081828384858687888990919293949596979899100101102103104105106107108109110111112113114115116117118119120121122123124125126127128129130131132133134135136137138139140141142143144145146147148149150151152153154155156157158159160161162163164165166167168169170171172173174175176177178179import SwiftUI

import Feeds
import Combine
import Auth
import InstantSearchCore
import InstantSearchInsights
import InstantSearchSwiftUI

@MainActor
class AlgoliaController: ObservableObject {
    let searcher: HitsSearcher
    let insights: Insights
    let searchBoxInteractor: SearchBoxInteractor
    let searchBoxController: SearchBoxObservableController

    let hitsInteractor: HitsInteractor<FeedUser>
    let hitsController: HitsObservableController<FeedUser>

    var feedsClient: FeedsClient
    var auth: TwitterCloneAuth

    private let indexName: IndexName = "TwitterCloneUsers"

    func submit() {
        searchBoxController.submit()
        Task {
            let feedFollowers: [FeedFollower]
            followedUserFeedIds.removeAll()
            feedFollowers = try await feedsClient.following()
            feedFollowers.forEach { followedUserFeedIds.insert($0.targetId) }
        }
    }

    @Published var followedUserFeedIds = Set<String>()

    init(feedsClient: FeedsClient, auth: TwitterCloneAuth) {
        self.feedsClient = feedsClient
        self.auth = auth
        let appID: ApplicationID = "BGP9QX4VDE"
        let apiKey: APIKey = "d50d7e16b4341c04814ef66977faa4c2"
        let userToken = UserToken(rawValue: feedsClient.authUser.userId)
        self.searcher = HitsSearcher(appID: appID,
                                 apiKey: apiKey,
                                 indexName: indexName)
        self.insights = Insights.register(appId: appID, apiKey: apiKey, userToken: userToken)
        self.searchBoxInteractor = .init()
        self.searchBoxController = .init()
        self.hitsInteractor = .init()
        self.hitsController = .init()
        setupConnections()
    }

    func setupConnections() {
      searchBoxInteractor.connectSearcher(searcher)
      searchBoxInteractor.connectController(searchBoxController)
      hitsInteractor.connectSearcher(searcher)
      hitsInteractor.connectController(hitsController)
    }

    func isFollowing(user: FeedUser) -> Bool {
        return followedUserFeedIds.contains("user:" + user.userId)
    }

    func unfollow(user: FeedUser) {
        Task {
            do {
                try await feedsClient.unfollow(target: user.userId, keepHistory: true)
                insights.clicked(eventName: EventName(rawValue: "unfollow"), indexName: indexName, objectID: ObjectID(rawValue: user.userId), userToken: UserToken(rawValue: feedsClient.authUser.userId))
                followedUserFeedIds.remove("user:" + user.userId)
            } catch {
                print(error)
            }
        }
    }

    func follow(user: FeedUser) {
        Task {
            do {
                try await feedsClient.follow(target: user.userId, activityCopyLimit: 100)
                insights.clicked(eventName: EventName(rawValue: "follow"), indexName: indexName, objectID: ObjectID(rawValue: user.userId), userToken: UserToken(rawValue: feedsClient.authUser.userId))
                followedUserFeedIds.insert("user:" + user.userId)
            } catch {
                print(error)
            }
        }
    }

}

public struct SearchView: View {

    @StateObject var algoliaController: AlgoliaController

    @ObservedObject var searchBoxController: SearchBoxObservableController
    @ObservedObject var hitsController: HitsObservableController<FeedUser>

    @State private var isEditing = false

    public init(feedsClient: FeedsClient, auth: TwitterCloneAuth) {
        let algoliaController = AlgoliaController(feedsClient: feedsClient, auth: auth)
        _algoliaController = StateObject(wrappedValue: algoliaController)
        _searchBoxController = ObservedObject(wrappedValue: algoliaController.searchBoxController)
        _hitsController = ObservedObject(wrappedValue: algoliaController.hitsController)
    }

    public var body: some View {
        NavigationView {
            VStack(spacing: 7) {
                HStack {
                    Text("Recent searchers")
                        .font(.title3)
                        .bold()

                    Spacer()

                    Button {
                        // Clear recent searches
                    } label: {
                        Image(systemName: "xmark.circle.fill")
                            .symbolRenderingMode(.hierarchical)
                            .font(.title3)
                            .bold()
                    }
                }

                ScrollView(.horizontal) {
                    RecentSearchesView()
                }
                .padding(.top, -24)

                SearchBar(text: $searchBoxController.query,
                          isEditing: $isEditing,
                          onSubmit: {
                    algoliaController.submit()
                })
                .autocapitalization(.none)
                .foregroundColor(Color(.systemGray))
                .padding(.bottom)

                HitsList(hitsController) { user, _ in
                    if let user {
                        HStack {
                            Text(user.username)
                                .font(.headline)
                            Text(user.userId)
                            Spacer()
                            if user.userId != algoliaController.auth.authUser?.userId {
                                if algoliaController.isFollowing(user: user) {
                                    Button("Unfollow") {
                                        algoliaController.unfollow(user: user)
                                    }
                                    .buttonStyle(.borderedProminent)

                                } else {
                                    Button("Follow") {
                                        algoliaController.follow(user: user)
                                    }
                                    .buttonStyle(.bordered)
                                }
                            }
                        }
                    }

                } noResults: {
                    Text("No Results")
                        .frame(maxWidth: .infinity, maxHeight: .infinity)
                }
                .listStyle(.plain)
                .navigationBarTitleDisplayMode(.inline)
                .task {
                    algoliaController.submit()
                }
            }
            .padding()
            .navigationBarTitle("Algolia & SwiftUI")
        }
    }
}
Conclusion
We have shown you how we used Algolia to implement a seamless search experience in the TwitterClone app. Consider reading the Messaging, and DMs, to learn how we integrated Stream Chat SwiftUI into the TwitterClone to provide a real-time chat messaging experience.