Our previous tutorial showed you Searching and Finding Users with the TwitterClone app. Since you are here, we believe you enjoyed all the previous tutorials. In this tutorial, you will learn about Messaging and DMs by integrating the Stream Chat SwiftUI SDK with this project.
Find the project demo and download the source code from GitHub.
Why Stream Chat for Messages?
The iOS/SwiftUI Chat SDK on Stream’s Global Edge Network allows developers to build faster, more reliable, real-time, and fully functional chat messaging experiences similar to WhatsApp, Facebook Messenger, and Telegram. You can create SwiftUI and UIKit-based conversational experiences in no time using high-level UI components.
Stream' SwiftUI Chat SDK helps developers to build chat messaging apps with as minimal code as possible. The SDK provides several customization options as well as offline support, which makes it possible for users to browse channels and send messages when they are offline. You can easily create a chat experience with a fully custom-made UI. Get started with the UIKit-based or SwiftUI SDK by reading the SwiftUI Chat App Tutorial. To build a sample chat app, you can fetch the SwiftUI SDK from GitHub.
The Integration Process
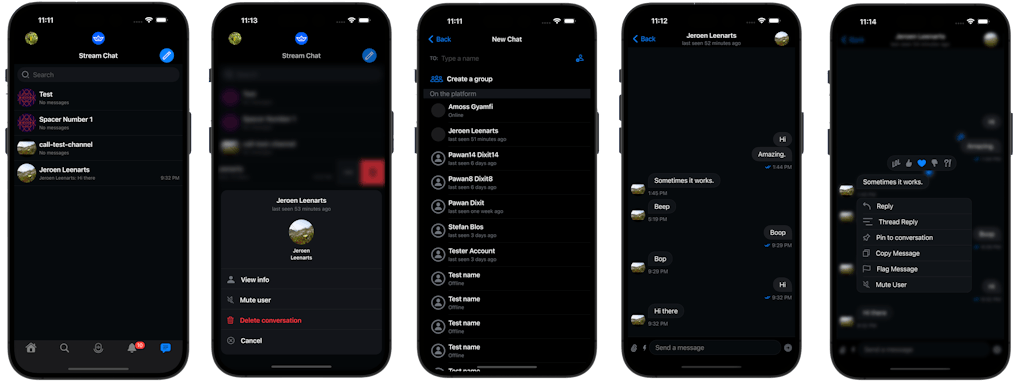
An essential part of our implementation was allowing users to interact with each other directly through direct messages. To implement the massaging feature, we relied on Stream Chat. We were able to create the initial chat experience in under two hours. After the initial implementation, we only needed to refine it and ensure everything worked as intended.
Install The SDK in TwitterClone
The guide Build a SwiftUI Chat Messaging App demonstrate how to integrate the SwiftUI SDK with a blank SwiftUI app. You can integrate the Stream Chat SwiftUI SDK with the TwitterClone app using dependency managers such as CocoaPods, Carthage, or Swift Package Manager. Let's keep it simple by following the steps below to fetch the SDK from GitHub using SPM.
Add Stream Chat’s dependency as a Swift Package to our Tuist dependencies.swift file.
            var swiftPackageManagerDependencies = SwiftPackageManagerDependencies(
         [.remote(url: "https://github.com/GetStream/stream-chat-swiftui.git", requirement: .upToNextMajor(from: "4.0.0")),
     .remote(url: "https://github.com/GetStream/stream-chat-swift.git", requirement: .upToNextMajor(from: "4.0.0")),
    ],
    productTypes: [
        "StreamChatSwiftUI" : .framework,
        "StreamChat": .framework,
        …
    ]
)
We then add the dependency on the Tuist project, in project.swift, to a target.
            let messagesTarget =
    Project.makeFrameworkTargets(name: messagesName,
                                 platform: .iOS,
                                 dependencies:
                                    [
                                        .external(name: "StreamChatSwiftUI"),
                                        .external(name: "StreamChat"),
                                        .target(name: authName),
                                        .target(name: feedsName),
                                        .target(name: chatName),
                                        .target(name: uiName)
                                    ])
let chatTarget =
    Project.makeFrameworkTargets(name: chatName,
                                 platform: .iOS,
                                 dependencies:
                                    [
                                        .external(name: "StreamChatSwiftUI"),
                                        .external(name: "StreamChat"),
                                        .target(name: authName),
                                        .target(name: feedsName),
                                        .target(name: uiName)
                                    ])
…
let spacesTarget =
    Project.makeFrameworkTargets(name: spacesName,
                                 platform: .iOS,
                                 dependencies: [
                                    .external(name: "StreamChatSwiftUI"),
                                    .external(name: "StreamChat"),
                                    .target(name: uiName),
                                    .target(name: authName),
                                    .target(name: chatName),
                                    .external(name: "HMSSDK")
                                 ])
Notice how the dependencies are added to multiple targets. This is possible and causes no issues due to the StreamChat dependencies being declared dynamic frameworks
We now fetch the dependency by running
tuist fetch
And make sure to generate the Xcode project again by running:
tuist generate
Implementation
There are a few steps you should follow and set up the SDK to work with our TwitterClone. From the Xcode Project Navigator, open ChatModel.swift under the folders Chat -> Sources.
            // ChatModel.swift

import Foundation
import StreamChat
import StreamChatSwiftUI
import Auth
import Feeds
import NetworkKit

@MainActor
public class ChatModel: ObservableObject {
    // This is the `StreamChat` reference we need to add
    internal var streamChat: StreamChat

    public init() {
        streamChat = StreamChat(chatClient: self.chatClient)
    }

    // This is the `chatClient`, with config we need to add
    internal var chatClient: ChatClient = {
        //For the tutorial we use a hard coded api key and application group identifier
        var config = ChatClientConfig(apiKey: .init(TwitterCloneNetworkKit.apiKey))
        config.applicationGroupIdentifier = "group.io.getstream.twitterclone.TwitterClone"

        // The resulting config is passed into a new `ChatClient` instance.
        let client = ChatClient(config: config)
        return client
    }()

    public func logout() {
        chatClient.logout(completion: {})
    }

    // The `connectUser` function we need to add.
    public func connectUser(authUser: AuthUser, feedUser: FeedUser) throws {

        // This is a hardcoded token valid on Stream's tutorial environment.
        let token = try Token(rawValue: authUser.chatToken)
        let feedUserProfilePictureUrl = feedUser.profilePicture.flatMap { URL(string: $0) }

        // Call `connectUser` on our SDK to get started.
        chatClient.connectUser(
            userInfo: .init(id: authUser.userId,
                            name: feedUser.fullname,
                            imageURL: feedUserProfilePictureUrl),
                token: token
        ) { error in
            // TODO improve error handling
            if let error {
                // Some very basic error handling only logging the error.
                log.error("connecting the user failed \(error)")
                return
            }
        }
    }
}
Here is how it works. In ChatModel.swift, we define the class ChatModel and create a streamChat instance. To access the SDK, we should add a chatClient and initialize it with an API key. A hard-coded API key is used in this tutorial, but you can obtain your API key by creating an account on Stream Dashboard.
We use the connectUser function to obtain the credentials from the user. Next, we send the user information to our backend infrastructure for authentication by calling the connectUser function on the SDK.
Go Further
To explore direct messaging further in our codebase, open the folders DirectMessages -> Sources and look at all the Swift files to learn more about the implementation.
DirectMessagesView.swift
            import SwiftUI
import StreamChatSwiftUI
import Chat

public struct DirectMessagesView: View {

    public init() {}

    public var body: some View {
        ChatChannelListView(viewFactory: DemoAppFactory.shared)
    }
}

struct DirectMessagesView_Previews: PreviewProvider {
    static var previews: some View {
        DirectMessagesView()
    }
}
NewChatView.swift
            //
// Copyright © 2023 Stream.io Inc. All rights reserved.
//
import StreamChat
import StreamChatSwiftUI
import SwiftUI

struct NewChatView: View, KeyboardReadable {

    @Injected(\.fonts) var fonts
    @Injected(\.colors) var colors

    @StateObject var viewModel = NewChatViewModel()

    @Binding var isNewChatShown: Bool

    @State private var keyboardShown = false

    let columns = [GridItem(.adaptive(minimum: 120), spacing: 2)]

    var body: some View {
        VStack(spacing: 0) {
            HStack {
                Text("TO:")
                    .font(fonts.footnote)
                    .foregroundColor(Color(colors.textLowEmphasis))

                VStack {
                    if !viewModel.selectedUsers.isEmpty {
                        LazyVGrid(columns: columns, alignment: .leading) {
                            ForEach(viewModel.selectedUsers) { user in
                                SelectedUserView(user: user)
                                    .onTapGesture(
                                        perform: {
                                            withAnimation {
                                                viewModel.userTapped(user)
                                            }
                                        }
                                    )
                            }
                        }
                    }

                    SearchUsersView(viewModel: viewModel)
                }
            }
            .padding()

            if viewModel.state != .channel {
                CreateGroupButton(isNewChatShown: $isNewChatShown)
                UsersHeaderView()
            }

            if viewModel.state == .loading {
                VerticallyCenteredView {
                    ProgressView()
                }
            } else if viewModel.state == .loaded {
                List(viewModel.chatUsers) { user in
                    Button {
                        withAnimation {
                            viewModel.userTapped(user)
                        }
                    } label: {
                        ChatUserView(
                            user: user,
                            onlineText: viewModel.onlineInfo(for: user),
                            isSelected: viewModel.isSelected(user: user)
                        )
                        .onAppear {
                            viewModel.onChatUserAppear(user)
                        }
                    }
                }
                .listStyle(.plain)
            } else if viewModel.state == .noUsers {
                VerticallyCenteredView {
                    Text("No user matches these keywords")
                        .font(.title2)
                        .foregroundColor(Color(colors.textLowEmphasis))
                }
            } else if viewModel.state == .error {
                VerticallyCenteredView {
                    Text("Error loading the users")
                        .font(.title2)
                        .foregroundColor(Color(colors.textLowEmphasis))
                }
            } else if viewModel.state == .channel, let controller = viewModel.channelController {
                Divider()
                ChatChannelView(
                    viewFactory: DemoAppFactory.shared,
                    channelController: controller
                )
            } else {
                Spacer()
            }
        }
        .navigationTitle("New Chat")
        .onReceive(keyboardWillChangePublisher) { visible in
            keyboardShown = visible
        }
        .modifier(HideKeyboardOnTapGesture(shouldAdd: keyboardShown))
    }
}

struct SelectedUserView: View {

    @Injected(\.colors) var colors

    var user: ChatUser

    var body: some View {
        HStack {
            MessageAvatarView(
                avatarURL: user.imageURL,
                size: CGSize(width: 20, height: 20)
            )

            Text(user.name ?? user.id)
                .lineLimit(1)
                .padding(.vertical, 2)
                .padding(.trailing)
        }
        .background(Color(colors.background1))
        .cornerRadius(16)
    }
}

struct SearchUsersView: View {

    @StateObject var viewModel: NewChatViewModel

    var body: some View {
        HStack {
            TextField("Type a name", text: $viewModel.searchText)
            Button {
                if viewModel.state == .channel {
                    withAnimation {
                        viewModel.state = .loaded
                    }
                }
            } label: {
                Image(systemName: "person.badge.plus")
            }
        }
    }
}

struct VerticallyCenteredView<Content: View>: View {

    var content: () -> Content

    var body: some View {
        VStack {
            Spacer()
            content()
            Spacer()
        }
    }
}

struct CreateGroupButton: View {

    @Injected(\.colors) var colors
    @Injected(\.fonts) var fonts

    @Binding var isNewChatShown: Bool

    var body: some View {
        NavigationLink {
            CreateGroupView(isNewChatShown: $isNewChatShown)
        } label: {
            HStack {
                Image(systemName: "person.3")
                    .renderingMode(.template)
                    .foregroundColor(colors.tintColor)

                Text("Create a group")
                    .font(fonts.bodyBold)
                    .foregroundColor(Color(colors.text))

                Spacer()
            }
            .padding()
        }
        .isDetailLink(false)
    }
}

struct ChatUserView: View {

    @Injected(\.colors) var colors
    @Injected(\.fonts) var fonts

    var user: ChatUser
    var onlineText: String
    var isSelected: Bool

    var body: some View {
        HStack {
            LazyView(
                MessageAvatarView(avatarURL: user.imageURL)
            )

            VStack(alignment: .leading, spacing: 4) {
                Text(user.name ?? user.id)
                    .lineLimit(1)
                    .font(fonts.bodyBold)
                Text(onlineText)
                    .font(fonts.footnote)
                    .foregroundColor(Color(colors.textLowEmphasis))
            }
            Spacer()

            if isSelected {
                Image(systemName: "checkmark")
                    .renderingMode(.template)
                    .foregroundColor(colors.tintColor)
            }
        }
    }
}

struct UsersHeaderView: View {

    @Injected(\.colors) var colors
    @Injected(\.fonts) var fonts

    var title = "On the platform"

    var body: some View {
        HStack {
            Text(title)
                .padding(.horizontal)
                .padding(.vertical, 2)
                .font(fonts.body)
                .foregroundColor(Color(colors.textLowEmphasis))

            Spacer()
        }
        .background(Color(colors.background1))
    }
}
Conclusion
Congratulations on completing the firth part of the TwitterClone tutorial series. Check out our documentation to learn more about our SwiftUI and UIKit-based chat messaging components. The next tutorial is about integrating the Twitter Spaces clone into the project. Head to the next tutorial to learn Conversations with Spaces.