Scaling activity feeds is hard when you have many users. Stream’s API leverages Go, RocksDB & Raft to ensure great performance (<10ms) and scalability. It hides the complexity of push, pull, fanout on read, and fanout on write behind an easy-to-use API. Apps such as Soundcloud, eToro, Under Armour, and Dana rely on Stream for their activity feeds.
In this second part of the Twitter Clone tutorial series we’ll add Stream feeds to enable users to send, receive, subscribe, or unsubscribe from others' timelines. Refer to the first part of the this tutorial, Building the Timeline, to learn about the overview of the project's architecture and the setup process.
💡 You must have a Stream account and API key for Feeds before continuing. You can create a free account on Stream here.
Find the project demo and download the source code from GitHub.
Overview of Stream Feeds
Using the Stream's Activity Feeds components, you can build timeline feeds with real-time updates that support likes and comments, similar to the timelines of Instagram or Twitter.
Feeds Setup
The main component of the app is a Twitter-like user experience where users can post messages, and other people can subscribe to receive those messages. It may sound like something perfectly suited for Stream’s feed product. The Stream Feeds App will handle all the heavy lifting as a backend to ensure users can create activities, subscribe/unsubscribe to other users’ updates, and more.
We created three feed groups in Stream Feeds’ backend to get the functionality. In the application, we need to have a:
- "timeline" feed group for activities made by users that a user follows
- "user" feed group for activities by a user
- "notification" feed group for notification activities originating from follow or reaction actions
The biggest thing to understand is that a user follows another user by subscribing to their timeline feed to another user’s user feed.

In the timeline and user group, we use a flat feed type and a notification group with a notification feed type.
In our codebase, everything directly related to Feeds is in the TimelineUI and the Feeds Packages. In your downloaded TwitterClone project, find the TimelineUI in the Project Navigator. Open the following Swift files to explore the code samples related to feeds. Below are a few examples
FeedsView.swift
            import SwiftUI

import Feeds

public struct FeedsView: View {
    @EnvironmentObject var feedClient: FeedsClient

    @State private var selection = 0

    public init() {}

    public var body: some View {
        VStack {
            ForYouFeedsView()
        }
    }
}
ProfileInfoAndTweets.swift
            import SwiftUI

import TwitterCloneUI
import Feeds
import Profile

struct ProfileInfoAndTweets: View {
    var userId: String
    var profilePicture: String?

    @EnvironmentObject var feedsClient: FeedsClient
    @State private var selection = 0

    @StateObject var profileInfoViewModel = ProfileInfoViewModel()

    var body: some View {
        ScrollView {
            VStack(alignment: .leading) {
                HStack {
                    ProfileImage(imageUrl: profilePicture, action: {})
                        .scaleEffect(1.2)

                    Spacer()

                    Button {
                        print("receives notifications from this user")
                    } label: {
                        Image(systemName: "bell.badge.circle.fill")
                            .symbolRenderingMode(.hierarchical)
                            .font(.title)
                    }

                    Button {
                        print("")
                    } label: {
                        Image(systemName: "message.circle.fill")
                            .symbolRenderingMode(.hierarchical)
                            .font(.title)
                    }

                    Button {
                        print("")
                    } label: {
                        Text("Following")
                            .font(.subheadline)
                            .fontWeight(.bold)
                    }
                    .buttonStyle(.bordered)
                }

                ProfileInfoView(viewModel: profileInfoViewModel)

                ForYouFeedsView(feedType: .user(userId: userId))
                    .frame(height: UIScreen.main.bounds.height)
            }.padding()
        }
        .task {
            profileInfoViewModel.feedUser = try? await feedsClient.user(id: userId)
        }
    }
}
MyProfileInfoAndTweets.swift
            import SwiftUI
import TwitterCloneUI
import Feeds
import Auth
import Profile

public struct MyProfileInfoAndTweets: View {
    private var feedsClient: FeedsClient

    @State private var isShowingEditProfile = false

    @EnvironmentObject var profileInfoViewModel: ProfileInfoViewModel

    @State private var selection = 0

    public init(feedsClient: FeedsClient) {
        self.feedsClient = feedsClient
    }

    public var body: some View {
        ScrollView {
            VStack(alignment: .leading) {
                HStack {
                    ProfileImage(imageUrl: profileInfoViewModel.feedUser?.profilePicture, action: {})
                            .scaleEffect(1.2)

                    Spacer()

                    Button {
                        isShowingEditProfile.toggle()
                        print("Navigate to edit profile page")
                    } label: {
                        Text("Edit profile")
                            .font(.subheadline)
                            .fontWeight(.bold)
                    }
                    .sheet(isPresented: $isShowingEditProfile, content: {
                        if let feedUser = profileInfoViewModel.feedUser {
                            EditProfileView(feedsClient: feedsClient, currentUser: feedUser)
                        }
                    })
                    .buttonStyle(.borderedProminent)
                }

                ProfileInfoView(viewModel: profileInfoViewModel)

                ForYouFeedsView(feedType: .user(userId: feedsClient.authUser.userId))
                    .frame(height: UIScreen.main.bounds.height)
            }.padding()
        }
    }
}
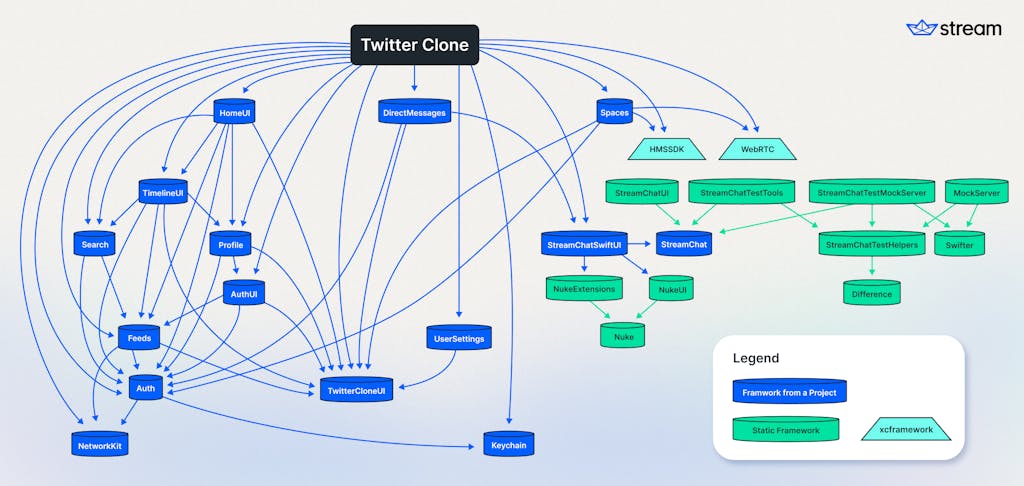
From our dependency graph below, the app's targets depend on the HomeUI package. The HomeUI package is the central hub of our app. Everything starts from the HomeUI. Additionally, the HomeUI is only invoked by the app class if the user has logged in. Otherwise, we send the user to the signup/login flow.

NodeJS Server
Next to the Stream backend, we need a way to authenticate users and fetch Tokens on their behalf. To facilitate this, we created a small NodeJS backend, which we deployed to Digital Ocean. It is not much more than a Database with a user table and some code to isolate this database from the internet. In a previous blog post, Minimal Node Integration to Get You Started with Stream, we wrote about this integration layer.
To have convenient persistent availability of our NodeJS backend, we opted to deploy to Digital Ocean using a managed PostgreSQL instance combined with their “App” offering. It brings us two benefits. First, we get access to a scalable infrastructure with the convenience of Git push deployment. Check Digital Ocean’s offerings to see a lot of powerful components at several levels of abstraction.
As mentioned, we use the NodeJS server described as described in our previous blog post. But we did extend the its functionality a lot. Most important, the version in the blog post uses a local SQLite database for convenience. Since we are deploying to Digital Ocean and are using their PostgreSQL offering, we migrated the code of the NodeJS server to work on this infrastructure. On top of that we extended the NodeJS codebase significantly to facilitate in several backend related tasks we need to have for our implementation. Things like feeding Stream Feed Webhook calls into our search API provider Algolia. All code related to our additional work is being kept on a separate branch to make sure the basic SQLite implementation remains untouched. To have a look at our actual backend code deployed to Digital Ocean, have a look at the “postgresql” branch of the GetStream/stream-node-simple-integration-sample repository.
Build the Add a New Tweet View

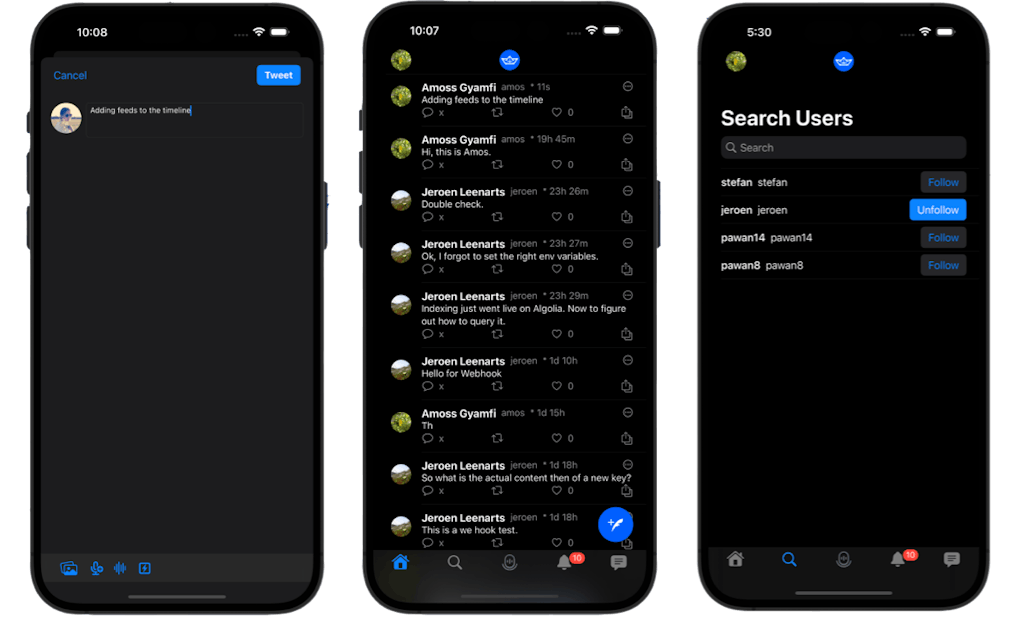
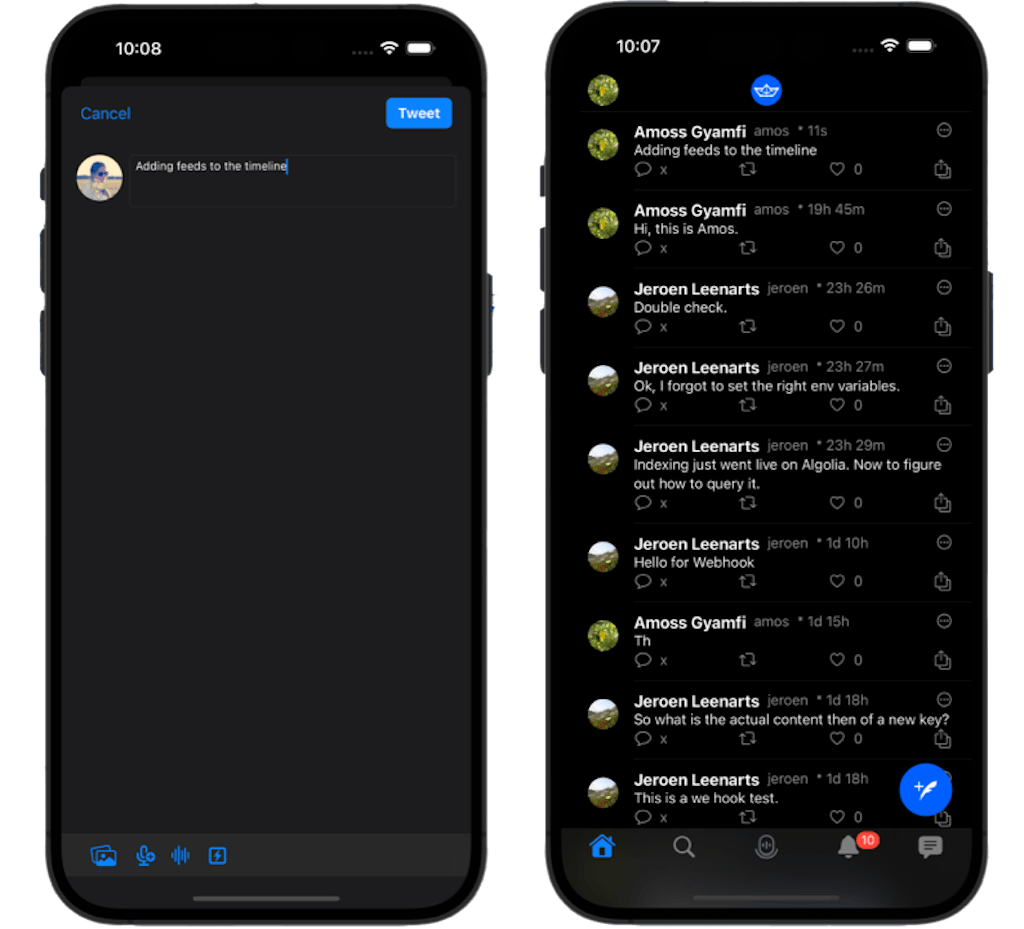
You can add a new tweet to the timeline using the floating Add a new tweet button at the bottom right of the home view. Tapping the button launches a new screen to compose your tweet. When you send the tweet, it appears as the most recent timeline item. Check out the code below from the HomeUI in the Project Navigator and explore how we build the add a new tweet view.
The code below uses hard-coded data, but we will update this to use dynamic data once we implement user profiles.
AddNewTweetView.swift
            import SwiftUI
import TwitterCloneUI
import Profile
import Auth
import PhotosUI
import os.log

import Feeds

let logger = Logger(subsystem: "AddNewTweetView", category: "main")

public struct AddNewTweetView: View {
    @EnvironmentObject var feedsClient: FeedsClient
    @Environment(\.presentationMode) var presentationMode

    @State private var isShowingComposeArea = ""
    @State private var isRecording = false

    @State var selectedItems: [PhotosPickerItem] = []
    @State var selectedPhotosData = [Data]()

    var profileInfoViewModel: ProfileInfoViewModel

    public init(profileInfoViewModel: ProfileInfoViewModel) {
        self.profileInfoViewModel = profileInfoViewModel
    }

    public var body: some View {
        NavigationStack {
            VStack {
                HStack(alignment: .top) {

                    ProfileImage(imageUrl: profileInfoViewModel.feedUser?.profilePicture, action: {})
                    TextField("What's happening?", text: $isShowingComposeArea, axis: .vertical)
                        .textFieldStyle(.roundedBorder)
                        .lineLimit(3, reservesSpace: true)
                        .font(.caption)
                        .keyboardType(.twitter)
                }
                .toolbar {
                    ToolbarItem(placement: .navigationBarLeading) {
                        Button("Cancel") {
                            presentationMode.wrappedValue.dismiss()
                        }
                    }

                    ToolbarItem(placement: .navigationBarTrailing) {
                        AsyncButton("Tweet") {
                            do {
                                var tweetPhotoUrlString: String?
                                logger.debug("add tweet photo identifier: \(selectedItems.first?.itemIdentifier ?? "", privacy: .public)")

                                if let item = selectedItems.first, let mimeType = item.supportedContentTypes.first?.preferredMIMEType, let imageData = selectedPhotosData.first {

                                    tweetPhotoUrlString = try await feedsClient.uploadImage(fileName: item.itemIdentifier ?? "filename", mimeType: mimeType, imageData: imageData).absoluteString
                                    logger.debug("add tweet photo url: \(tweetPhotoUrlString ?? "", privacy: .public)")

                                }

                                let activity = PostActivity(actor: feedsClient.authUser.userId, object: isShowingComposeArea, tweetPhotoUrlString: tweetPhotoUrlString)
                                try await feedsClient.addActivity(activity)
                                presentationMode.wrappedValue.dismiss()
                            } catch {
                                print(error)
                            }

                            print("tap to send tweet")
                        }
                        .font(.subheadline)
                        .fontWeight(.bold)
                        .buttonStyle(.borderedProminent)
                        .disabled(isShowingComposeArea.isEmpty)
                    }

                    // Photo picker view
                    ToolbarItem(placement: .keyboard) {
                        Button {
                            print("tap to upload an image")
                        } label: {
                            VStack {
                                PhotosPicker(
                                    selection: $selectedItems,
                                    maxSelectionCount: 1,
                                    matching: .any(of: [.images, .not(.livePhotos)])
                                ) {
                                    Image(systemName: "photo.on.rectangle.angled")
                                        .accessibilityLabel("Photo picker")
                                        .accessibilityAddTraits(.isButton)
                                }
                                .onChange(of: selectedItems) { newItems in
                                    selectedPhotosData.removeAll()
                                    for newItem in newItems {
                                        Task {
                                            if let data = try? await newItem.loadTransferable(type: Data.self) {
                                                selectedPhotosData.append(data)
                                            }
                                        }
                                    }
                                }
                            }
                        }
                    }

                    ToolbarItem(placement: .keyboard) {
                        Button {
                            print("tap to initiate a new Space")
                        } label: {
                            Image(systemName: "mic.badge.plus")
                                .font(.subheadline)
                                .fontWeight(.bold)
                        }

                    }

                    ToolbarItem(placement: .keyboard) {
                        Button {
                            self.isRecording.toggle()
                        } label: {
                            Image(systemName: "waveform")
                                .font(.subheadline)
                                .fontWeight(.bold)
                        }
                        .fullScreenCover(isPresented: $isRecording) {
                            RecordAudioView(profileInfoViewModel: profileInfoViewModel)
                        }
                    }

                    ToolbarItem(placement: .keyboard) {
                        Button {
                            print("tap to record audio")
                        } label: {
                            Image(systemName: "bolt.square")
                                .font(.subheadline)
                                .fontWeight(.bold)
                        }
                    }

                    // For the sake of keeping the 4 above icons on the left of the keyboard
                    ToolbarItem(placement: .keyboard) {
                        Button {
                            print("tap to record audio")
                        } label: {
                            Image(systemName: "")
                                .font(.subheadline)
                                .fontWeight(.bold)
                        }
                    }
                }
                ForEach(selectedPhotosData, id: \.self) { photoData in
                    if let image = UIImage(data: photoData) {
                        Image(uiImage: image)
                            .resizable()
                            .scaledToFit()
                            .cornerRadius(10.0)
                            .padding(.horizontal)
                    }
                }

                Spacer()
            }
            .padding()
        }
    }
}
Build the For You Feeds View
In the For You Feeds View, we fetch two feed categories from our feed client. Here, we display user-specific feeds and timeline feeds. Open ForYouFeedsView.swift from the Sources folder under HomeUI to explore the code.
ForYouFeedsView.swift
            import Feeds

import SwiftUI

public enum FeedType {
    case user(userId: String?)
    case timeline
}
@MainActor
private class ForYouFeedsViewModel: ObservableObject {
    internal var type: FeedType = .timeline
    internal var feedClient: FeedsClient?

    @Published public var activities: [EnrichedPostActivity] = []

    func refreshActivities() {
        Task {
            do {
                if let feedClient = self.feedClient {
                    activities.removeAll()
                    switch type {
                    case .timeline:
                        activities = try await feedClient.getTimelineActivities()
                    case .user(let userId):
                        if let userId {
                            activities = try await feedClient.getUserActivities(userId: userId)
                        }
                    }
                }
            } catch {
                print(error)
            }
        }
    }
}

public struct ForYouFeedsView: View {
    @EnvironmentObject var feedClient: FeedsClient
    @StateObject private var viewModel = ForYouFeedsViewModel()

    private let feedType: FeedType

    public init(feedType: FeedType = .timeline) {
        self.feedType = feedType
    }

    public var body: some View {
        List(viewModel.activities) { item in
            let model = PostRowViewViewModel(item: item)
            PostRowView(model: model).onReceive(model.$liked) { liked in
                if liked {
                    Task {
                        try await feedClient.addLike(item.id)
                    }
                }
            }
        } // LIST STYLES
        .listStyle(.plain)
        .task {
            viewModel.type = feedType
            viewModel.feedClient = feedClient
            viewModel.refreshActivities()
        }
        .refreshable {
            viewModel.refreshActivities()
        }
    }
}
As you can see from the code above, the UI is displayed using a list and the content from PostRowView.swift. The list of items gets updated by fetching data about the updated activities from the feed client.
Create the Post Row View
The Post Row View shows data about a single tweet, like user name, profile image, number of likes, and retweets. The PostRowViewViewModel contains the data used to populate the post-row UI. To create this view, refer to PostRowView.swift in the HomeUI of the Project Navigator.
            import Feeds

import SwiftUI
import TwitterCloneUI
import Profile

class PostRowViewViewModel: ObservableObject {
    var item: EnrichedPostActivity

    @Published
    var liked: Bool

    init(item: EnrichedPostActivity) {
        liked = false
        self.item = item
    }
}

struct PostRowView: View {

    var model: PostRowViewViewModel

    @State private var isShowingActivityProfile = false

    var body: some View {
        HStack(alignment: .top) {
            ProfileImage(imageUrl: model.item.actor.profilePicture, action: {
                self.isShowingActivityProfile.toggle()
            })
            .accessibilityLabel("Profile of \(model.item.actor.fullname)")
            .accessibilityAddTraits(.isButton)
            .sheet(isPresented: $isShowingActivityProfile, content: {
                ProfileFollower(contentView: {
                    AnyView(ProfileInfoAndTweets(userId: model.item.actor.userId, profilePicture: model.item.actor.profilePicture))
                })
            })

            VStack(alignment: .leading) {
                HStack(alignment: .top) {
                    Text(model.item.actor.fullname)
                        .fontWeight(.bold)
                        .lineLimit(1)
                        .layoutPriority(1)

                    Text(model.item.actor.username)
                        .font(.subheadline)
                        .foregroundColor(.secondary)
                        .lineLimit(1)
                        .layoutPriority(1)

                    Text("* " + model.item.postAge)
                        .font(.subheadline)
                        .lineLimit(1)
                        .foregroundColor(.secondary)

                    Spacer()

                    Image(systemName: "ellipsis.circle")
                        .font(.subheadline)
                        .foregroundColor(.secondary)
                        .buttonStyle(.borderless)
                        .contextMenu {
                            Button(role: .destructive) {
                                // TODO implement activity deletion
                                print("Delete")
                            } label: {
                                Label("Delete activity", systemImage: "trash")
                            }
                        }
                }

                HStack(alignment: .bottom) {
                    Text(model.item.object)
                        .layoutPriority(2)
                }.font(.subheadline)

                if let tweetPhoto = model.item.tweetPhoto {
                    AsyncImage(url: URL(string: tweetPhoto)) { loading in
                        if let image = loading.image {
                            image
                                .resizable()
                                .scaledToFit()
                        } else if loading.error != nil {
                            Image(systemName: "exclamationmark.icloud")
                                .resizable()
                                .scaledToFit()
                        } else {
                            ProgressView()
                        }
                    }
                    .frame(width: nil, height: 180)
                    .cornerRadius(16)
                    .accessibilityLabel("Tweet with photo")
                    .accessibilityAddTraits(.isButton)
                }

                HStack {
                    Image(systemName: "message")
                    Text("\(model.item.numberOfComments ?? "x")")
                    Spacer()
                    Image(systemName: "arrow.2.squarepath")
                    Spacer()
                    Button {
                        model.liked.toggle()
                    } label: {
                        HStack {
                            Image(systemName: "heart")
                            Text("\(model.item.numberOfLikes ?? "0")")
                        }
                    }
                    Spacer()
                    Image(systemName: "square.and.arrow.up.on.square")
                }
                .font(.subheadline)
                .foregroundColor(.secondary)
            }
        }
    }
}
Conclusion
This tutorial introduced you to adding Stream Feeds to the timeline to build a twitter-like home page feeds experience. To get the best out of the TwitterClone tutorial series, we encourage you to read the following tutorial about Enabling Support For Media Tweets and Video Playback.