export type Action = {
  name?: string;
  style?: string;
  text?: string;
  type?: string;
  value?: string;
};Attachment Actions
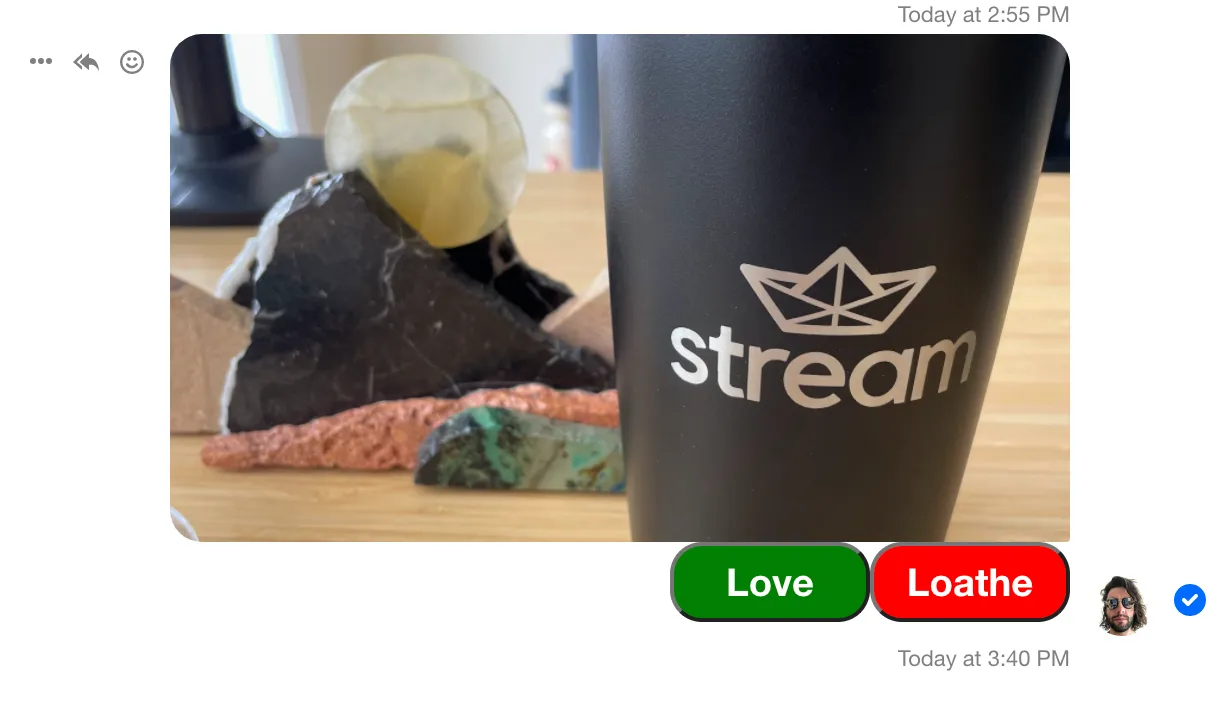
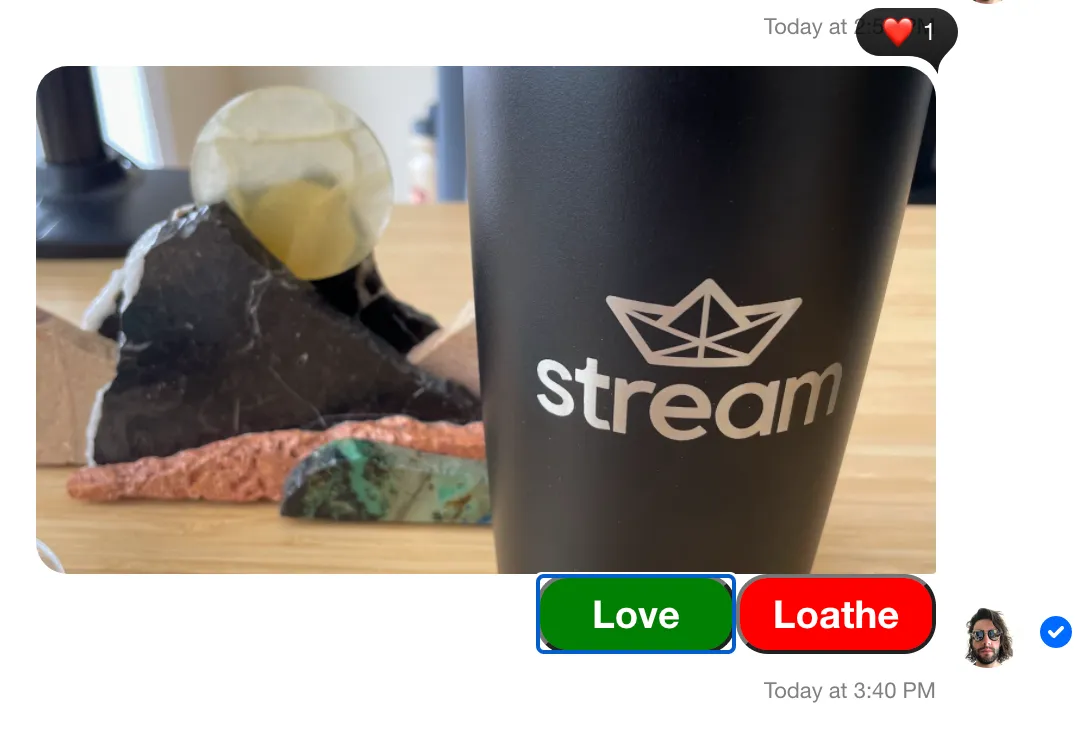
This example shows how to add custom attachment actions to uploaded images. Images will render “Love” and “Loathe” buttons that post reactions on click. It’s a demo of extensibility rather than a common use case.
Best Practices
- Keep attachment actions minimal and clearly labeled.
- Use message composer middleware to enrich attachments consistently.
- Fall back to default
AttachmentActionsfor unsupported types. - Handle reaction errors gracefully to avoid broken UI.
- Ensure custom actions align with moderation rules.
Custom Actions
First, create an array of custom actions to populate AttachmentActions for image attachments. The Action type comes from stream-chat:
Action has no required fields. We’ll simulate a voting feature with “Love” and “Loathe” actions:
const attachmentActions: Action[] = [
  { name: "vote", value: "Love" },
  { name: "vote", value: "Loathe" },
];
Custom AttachmentActions
Next, create a custom AttachmentActions. If the attachment is an image, render our custom actions; otherwise fall back to the default component.
The component receives type and actions via props. We’ll inject those actions later in the demo.
For images, map the custom actions to buttons. On click, post reactions via handleReaction from useMessageContext.
import React from "react";
import { AttachmentActions } from "stream-chat-react";
import type { AttachmentActionsProps } from "stream-chat-react";

const CustomAttachmentActions = (props: AttachmentActionsProps) => {
  const { actions, type } = props;

  const { handleReaction } = useMessageContext();

  const handleClick = async (
    event: React.MouseEvent<HTMLButtonElement, MouseEvent>,
    value?: string,
  ) => {
    try {
      if (value === "Love") await handleReaction("love", event);
      if (value === "Loathe") await handleReaction("angry", event);
    } catch (err) {
      console.log(err);
    }
  };

  if (type === "image") {
    return (
      <>
        {actions.map((action) => (
          <button
            className={`action-button ${action.value === "Love" ? "love" : ""}`}
            onClick={(event) => handleClick(event, action.value)}
          >
            {action.value}
          </button>
        ))}
      </>
    );
  }

  return <AttachmentActions {...props} />;
};
Custom Attachment
To render CustomAttachmentActions, pass it as a prop to
Attachment
component. Then add CustomAttachment to Channel so it’s injected into ComponentContext and used by the Message UI component.
const CustomAttachment: React.FC<AttachmentProps> = (props) => (
  <Attachment {...props} AttachmentActions={CustomAttachmentActions} />
);

<Channel Attachment={CustomAttachment}>
  {/* children of Channel component */}
</Channel>;
Enrich attachments before message submission
To attach attachmentActions to image uploads (so CustomAttachmentActions renders), add custom composition logic before sending:
import { isImageAttachment } from "stream-chat";
import type {
  Action,
  Attachment,
  MessageComposerMiddlewareState,
  MessageDraftComposerMiddlewareValueState,
  MiddlewareHandlerParams,
} from "stream-chat";

const attachmentActions: Action[] = [
  { name: "vote", value: "Love" },
  { name: "vote", value: "Loathe" },
];

const enrichAttachmentsWithActions = (attachments: Attachment[]) =>
  attachments.map((att) =>
    isImageAttachment(att) ? { ...att, actions: attachmentActions } : att,
  );

const attachmentEnrichmentMiddleware = {
  id: "custom/message-composer-middleware/attachments-enrichment",
  handlers: {
    compose: ({
      state,
      next,
      forward,
    }: MiddlewareHandlerParams<MessageComposerMiddlewareState>) => {
      const attachments = enrichAttachmentsWithActions(state.attachments ?? []);

      if (!attachments.length) return forward();

      return next({
        ...state,
        localMessage: {
          ...state.localMessage,
          attachments,
        },
        message: {
          ...state.message,
          attachments,
        },
      });
    },
  },
};

const draftAttachmentEnrichmentMiddleware = {
  id: "custom/message-composer-middleware/draft-attachments-enrichment",
  handlers: {
    compose: ({
      state,
      next,
      forward,
    }: MiddlewareHandlerParams<MessageDraftComposerMiddlewareValueState>) => {
      const attachments = enrichAttachmentsWithActions(state.attachments ?? []);

      if (!attachments.length) return forward();

      return next({
        ...state,
        draft: {
          ...state.draft,
          attachments,
        },
      });
    },
  },
};

const App = () => {
  const client = useCreateChatClient({
    apiKey,
    tokenOrProvider: userToken,
    userData: { id: userId },
  });

  useEffect(() => {
    if (!client) return;

    client.setMessageComposerSetupFunction(({ composer }) => {
      composer.compositionMiddlewareExecutor.insert({
        middleware: [attachmentEnrichmentMiddleware],
        position: {
          after: "stream-io/message-composer-middleware/attachments",
        },
      });
      composer.draftCompositionMiddlewareExecutor.insert({
        middleware: [draftAttachmentEnrichmentMiddleware],
        position: {
          after: "stream-io/message-composer-middleware/draft-attachments",
        },
      });
    });
  }, [client]);

  if (!client) return <>Loading...</>;

  return (
    <Chat client={client}>
      <ChannelList />
      <Channel Attachment={CustomAttachment}>
        {/* children of Channel component */}
      </Channel>
    </Chat>
  );
};
Implementation
Now that each individual piece has been constructed, we can assemble all of the snippets into the final code example.
The Code
.action-button {
  height: 40px;
  width: 100px;
  border-radius: 16px;
  color: #ffffff;
  background: red;
  font-weight: 700;
  font-size: 1.2rem;
}

.action-button.love {
  background-color: green;
}
import React from "react";
import { isImageAttachment } from "stream-chat";
import {
AttachmentActions,
Attachment as AttachmentComponent,
} from "stream-chat-react";
import type {
Action,
Attachment,
MessageComposerMiddlewareState,
MessageDraftComposerMiddlewareValueState,
MiddlewareHandlerParams,
} from "stream-chat";
import type { AttachmentActionsProps, AttachmentProps } from "stream-chat";
const CustomAttachmentActions = (props: AttachmentActionsProps) => {
const { actions, type } = props;
const { handleReaction } = useMessageContext();
const handleClick = async (
event: React.MouseEvent<HTMLButtonElement, MouseEvent>,
value?: string,
) => {
try {
if (value === "Love") await handleReaction("love", event);
if (value === "Loathe") await handleReaction("angry", event);
} catch (err) {
console.log(err);
}
};
if (type === "image") {
return (
<>
{actions.map((action) => (
<button
className={`action-button ${action.value === "Love" ? "love" : ""}`}
onClick={(event) => handleClick(event, action.value)}
>
{action.value}
</button>
))}
</>
);
}
return <AttachmentActions {...props} />;
};
const CustomAttachment = (props: AttachmentProps) => (
<AttachmentComponent {...props} AttachmentActions={CustomAttachmentActions} />
);
const attachmentActions: Action[] = [
{ name: "vote", value: "Love" },
{ name: "vote", value: "Loathe" },
];
const enrichAttachmentsWithActions = (attachments: Attachment[]) =>
attachments.map((att) =>
isImageAttachment(att) ? { ...att, actions: attachmentActions } : att,
);
const attachmentEnrichmentMiddleware = {
id: "custom/message-composer-middleware/attachments-enrichment",
handlers: {
compose: ({
state,
next,
forward,
}: MiddlewareHandlerParams<MessageComposerMiddlewareState>) => {
const attachments = enrichAttachmentsWithActions(state.attachments ?? []);
if (!attachments.length) return forward();
return next({
...state,
localMessage: {
...state.localMessage,
attachments,
},
message: {
...state.message,
attachments,
},
});
},
},
};
const draftAttachmentEnrichmentMiddleware = {
id: "custom/message-composer-middleware/draft-attachments-enrichment",
handlers: {
compose: ({
state,
next,
forward,
}: MiddlewareHandlerParams<MessageDraftComposerMiddlewareValueState>) => {
const attachments = enrichAttachmentsWithActions(state.attachments ?? []);
if (!attachments.length) return forward();
return next({
...state,
draft: {
...state.draft,
attachments,
},
});
},
},
};
const App = () => {
useEffect(() => {
if (!client) return;
client.setMessageComposerSetupFunction(({ composer }) => {
composer.compositionMiddlewareExecutor.insert({
middleware: [attachmentEnrichmentMiddleware],
position: {
after: "stream-io/message-composer-middleware/attachments",
},
});
composer.draftCompositionMiddlewareExecutor.insert({
middleware: [draftAttachmentEnrichmentMiddleware],
position: {
after: "stream-io/message-composer-middleware/draft-attachments",
},
});
});
}, [client]);
return (
<Chat client={client}>
<ChannelList />
<Channel Attachment={CustomAttachment}>
{/* children of Channel component */}
</Channel>
</Chat>
);
};The Result
The rendered message before action click:

The rendered message after action click:
