
Welcome to part five of our series about building a Discord clone using Next.js and TailwindCSS. We have already covered many customization options while using Stream’s Chat SDK. This covered the basic setup process, creating a server list, building a list of channels with categories, and finally, the message list.
For the last part of the series, we will leave chat and focus on audio and video calling. Discord is widely used for community building and bringing people together. Chat is a powerful tool that makes this possible and allows a wide range of asynchronous communication.
However, seeing other humans or even just talking to them adds a more personal touch to a conversation. This is not always possible, but it adds more layers to our interactions and allows us to have intimate moments together.
Our project wouldn’t be complete without this feature. We will build the option to create and join audio channels and seamlessly transform them into video calls whenever we want. We will integrate this into the existing project to create a natural way of interaction, just like Discord does.
We use Stream’s Video & Audio SDK, specifically the React SDK. We create a separate category of channels, such as audio channels. When users join them, they are on a call with only audio features enabled. With video disabled per default, we allow them to activate it later if they want to add this dimension to their calls.
Here we can see a demo of the final result:
That said, we get started with the implementation. The whole project, including all the code, can be found on GitHub.
Integrate the Video SDK
The first step in integrating the SDK into the project is to install it. For that, we can use one of the following commands:
12345# using yarn
yarn add @stream-io/video-react-sdk

# using npm
npm install @stream-io/video-react-sdk
Now that we’ve added the SDK, we need to initialize it. For the chat client, we created a separate hook called useClient. Here, we will do something very similar.
We create a new file inside the hooks folder and call it useVideoClient.ts. It gets three parameters:
- an
apiKey: similar to chat, we use the API key to identify which project on the Stream Dashboard to connect to. This is the same as chat, as it shares the same project internally. - A
userobject: We need a registered user on the Stream backend to authenticate and have all the necessary privileges to perform actions, such as creating audio and video calls. - A
tokenOrProvider: as with chat, we need a JWT to authenticate on the backend. We can either hand in a token or use a function that gets called whenever a previous token expires and generates a new one.
Once we have those parameters, we create a StreamVideoClient object and make sure we connect the user upon initialization. We also want to disconnect the user when unmounting. We use a useEffect hook for both of these operations. Consider looking at the project setup part, where we reviewed this in more detail.
Here’s the full code for the useVideoClient hook:
1234567891011121314151617181920212223242526272829303132333435export const useVideoClient = ({
  apiKey,
  user,
  tokenOrProvider,
}: UseClientOptions): StreamVideoClient | undefined => {
  const [videoClient, setVideoClient] = useState<StreamVideoClient>();

  useEffect(() => {
    const streamVideoClient = new StreamVideoClient({ apiKey });
    // prevents application from setting stale client (user changed, for example)
    let didUserConnectInterrupt = false;

    const videoConnectionPromise = streamVideoClient
      .connectUser(user, tokenOrProvider)
      .then(() => {
        if (!didUserConnectInterrupt) {
          setVideoClient(streamVideoClient);
        }
      });

    return () => {
      didUserConnectInterrupt = true;
      setVideoClient(undefined);
      // wait for connection to finish before initiating closing sequence
      videoConnectionPromise
        .then(() => streamVideoClient.disconnectUser())
        .then(() => {
          console.log('video connection closed');
        });
    };
    // eslint-disable-next-line react-hooks/exhaustive-deps -- should re-run only if user.id changes
  }, [apiKey, user.id, tokenOrProvider]);

  return videoClient;
};
With that, we jump to the MyChat.tsx file. Here, we initialize the chatClient, and directly after doing that, we add the code for creating a videoClient object:
123456789const videoClient = useVideoClient({
  apiKey,
  user,
  tokenOrProvider: token,
});

if (!videoClient) {
  return <div>Video Error, please try again later.</div>;
}
If anything fails, we want to display an error in the UI.
Lastly, we wrap our entire component with a
Creating Calls in the Discord Context
With the video SDK initialized, we can start implementing the logic. We will add this logic inside the DiscordContext to clearly separate things. We need to implement two mechanisms.
The first is creating a call where we create a createCall function for the DiscordState. We will represent each call as a (audio) channel. This means that users can give them a name and add users to the channel (the call). We also need to know which server to create the channel on to include that in the filtering channels we display, depending on the currently selected server for the user.
The second mechanism we want to implement will be used for entering and leaving calls. We add a callId to the DiscordState type, which can either be a string or undefined. If it’s undefined we display the usual chat window configured in the previous parts. Otherwise, we will show a call object and use that callId to join a call inside the component. We also need to add a setCall function to the DiscordState for the toggling.
We first start by adding the new properties to the DiscordState inside DiscordContext.tsx:
1234567891011type DiscordState = {
    /** previous code **/
  callId: string | undefined;
  createCall: (
    client: StreamVideoClient,
    server: DiscordServer,
    channelName: string,
    userIds: string[]
  ) => Promise<void>;
  setCall: (callId: string | undefined) => void;
};
Of course, we also need to update the initialValue with empty initializations of the new properties:
123456const initialValue: DiscordState = {
    /** previous code **/
  callId: undefined,
  createCall: async () => {},
  setCall: () => {},
};
Next, we can implement the functions inside our DiscordContextProvider. We start with the createCall function.
All it does is create a call, and for that, we need a number of parameters. We generate a unique callId to create a bare audioCall object using an instance of the StreamVideoClient. We receive an array of userIds that we map to the right array type of MemberRequest. With that, we can call the audioCall.create function and hand in the channel and the server name to the custom data object of the call, together with the members.
Here is the code for the createCall function that we wrap in a useCallback hook:
123456789101112131415161718192021222324252627282930const createCall = useCallback(
  async (
    client: StreamVideoClient,
    server: DiscordServer,
    channelName: string,
    userIds: string[]
  ) => {
    const callId = uuid();
    const audioCall = client.call('default', callId);
    const audioChannelMembers: MemberRequest[] = userIds.map((userId) => {
      return {
        user_id: userId,
      };
    });
    try {
      const createdAudioCall = await audioCall.create({
        data: {
          custom: {
            serverName: server?.name,
            callName: channelName,
          },
          members: audioChannelMembers,
        },
      });
    } catch (err) {
      console.log(err);
    }
  },
  []
);
The setCall function is far easier. We update our state object with the new value (again, wrapped in a useCallback hook):
12345678const setCall = useCallback(
  (callId: string | undefined) => {
    setMyState((myState) => {
      return { ...myState, callId };
    });
  },
  [setMyState]
);
The last thing to do is add these new functions to our store object. This is how it looks now:
12345678910const store: DiscordState = {
  server: myState.server,
  callId: myState.callId,
  channelsByCategories: myState.channelsByCategories,
  changeServer: changeServer,
  createServer: createServer,
  createChannel: createChannel,
  createCall: createCall,
  setCall: setCall,
};
Our app compiles again, but we are never calling the new functions. We want to change this by creating an audio channel whenever we create a new server, which we’re doing inside the createServer function.
Therefore, we must update the function signature inside DiscordState to include a videoClient parameter of type StreamVideoClient. We need this to initialize a call:
1234567891011type DiscordState = {
    /* ... */
  createServer: (
    client: StreamChat,
    videoClient: StreamVideoClient,
    name: string,
    imageUrl: string,
    userIds: string[]
  ) => void;
    /* ... */
};
Then, inside the createServer function itself, after we create the messagingChannel, we can first check if we have the necessary server data available in myState, and then create a new call that we call General Voice Channel.
Here’s what they add to the createServer function:
123456789101112/* ... */
const response = await messagingChannel.create();
if (myState.server) {
  await createCall(
    videoClient,
    myState.server,
    'General Voice Channel',
    userIds
  );
}
changeServer({ name, image: imageUrl }, client);
/* ... */
For this to work, we jump into CreateServerForm.tsx, and after we initialize the chat client, we also use the useStreamVideoClient hook to get access to a videoClient variable:
1234/* ... */
const { client } = useChatContext();
const videoClient = useStreamVideoClient();
/* ... */
Finally, in the createClicked function at the bottom of the file, we add the videoClient to the parameters of the createServer function:
1234567createServer( client, videoClient, formData.serverName, formData.serverImage, formData.users.map((user) => user.id) );
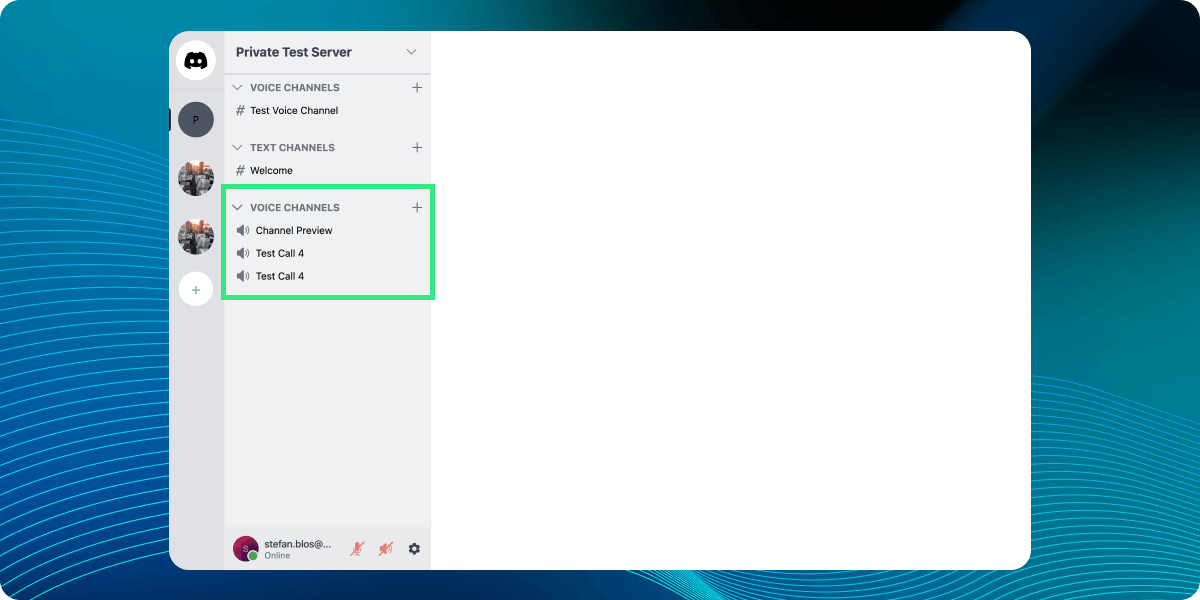
We create a new voice channel whenever we create a new server.
Showing the Call List in the Channel List
Creating a call is possible, but at the moment, we are not showing the calls and cannot join them. We will first create a list of all the calls and audio channels present on a server. A good place for that is next to the regular text channels; this is exactly how Discord does it.
We create a new folder inside ChannelList, call it CallList, and create a file inside called CallList.tsx. We fill it with initialization code first and add the rest step-by-step:
1export default function CallList(): JSX.Element {}
Inside this component, we first load all calls for the server using the queryCalls function on the video client. The rest is similar to our regular channel list, with a chevron to toggle the list's visibility while showing a title (Voice Channels). To mark the audio channels visually different, we add a speaker icon before them instead of the hashmark that we use for the text channels.
First, import the necessary data and create the state variables we need. This property is called isOpen to track whether all calls should be shown or minimized. Also, we need a calls property that we can update after querying all calls. Here are the properties we add to the top of the CallList:
12345const { server, callId, setCall } = useDiscordContext();
const client = useStreamVideoClient();

const [isOpen, setIsOpen] = useState<boolean>(true);
const [calls, setCalls] = useState<Call[]>([]);
Next, we create a function to load the audio channels and wrap it in a useCallback hook. We query for the calls that are created for the specific server that is currently active. We sort them by creation date, and the watch: true parameter tells the SDK we want to be notified when properties change on these calls.
We update the calls property with the result of the query call. We want to call this upon initialization of the component, so we wrap the function call in a useEffect hook:
12345678910111213141516const loadAudioChannels = useCallback(async () => {
  const callsRequest = await client?.queryCalls({
    filter_conditions: {
      'custom.serverName': server?.name || 'Test Server',
    },
    sort: [{ field: 'created_at', direction: 1 }],
    watch: true,
  });
  if (callsRequest?.calls) {
    setCalls(callsRequest?.calls);
  }
}, [client, server]);

useEffect(() => {
  loadAudioChannels();
}, [loadAudioChannels]);
We can now focus on the UI with the logic out of the way. It will be very similar to the elements in the regular channel list, so I will review it more quickly. If you want more detail, please check the section in the channel list post.
We first create a button that rotates and toggles the isOpen property to show or hide the audio channel list. We wrap it in a container <div> and put a Link element in the same line, which opens up the CreateChannelForm:
1234567891011121314151617181920<div className='w-full my-2'>
    <div className='flex text-gray-500 items-center mb-2 pr-2'>
      <button
        className='flex w-full items-center justify-start px-2'
        onClick={() => setIsOpen((currentValue) => !currentValue)}
      >
        <div
          className={`${
            isOpen ? 'rotate-90' : ''
          } transition-all ease-in-out duration-200`}
        >
          <ChevronRight />
        </div>
        <h2 className='inline-block uppercase text-sm font-bold px-2'>
          Voice Channels
        </h2>
      </button>
      <Link
        className=''
        href={
Note that we are adding a new parameter to the link. We put the isVoice=true option in the URL, which we will use later to pre-populate the CreateChannelForm with voice channel creation.
Next, if the isOpen parameter is true, we want to show a list of the audio channels. As already mentioned, we show a speaker icon (that we get from heroicons; see the code for it here) and the name of the channel (or, technically speaking, the call).
We add the code inside our container <div> after the first one:
12345678910111213{isOpen && (
  <div className='px-2'>
    {calls.map((call) => (
      <button
        key={call.id}
        className='w-full flex items-center my-1 px-2 py-1 hover:bg-gray-200 rounded-md'
        onClick={() => {
          setCall(call.id);
        }}
      >
        <Speaker className='w-5 h-5 text-gray-500 mr-2' />
        <span
          className={
The component is ready, but we still need to show it. We open up the CustomChannelList.tsx and insert the CallList element right before the CreateChannelForm:
1234/* ... */
<CallList />
<CreateChannelForm />
/* ... */
We now show a list of audio channels next to the text channels.
Updating the Form to Create Audio Channels
When creating a server, we automatically add a new default audio channel. But we want to be able to create audio channels manually. For that, we need to update the CreateChannelForm. Remember that we already added a new parameter to the Link element in the CallList. We’re not using that yet. Let’s change that.
We open CreateChannelForm.tsx and update the FormState with a channelType parameter. This can either be 'text' or 'voice':
123456type FormState = {
  channelType: 'text' | 'voice';
  channelName: string;
  category: string;
  users: UserObject[];
};
We update the initialState to have a text channel type set per default:
123456const initialState: FormState = {
  channelType: 'text',
  channelName: '',
  category: '',
  users: [],
};
To know whether we plan to create an audio channel, we added the isVoice parameter to the URL. We must read that and update the channelType in our state accordingly. We use a useEffect hook for that:
12345678910useEffect(() => {
  const category = params.get('category');
  const isVoice = params.get('isVoice');
  setFormData({
    channelType: isVoice ? 'voice' : 'text',
    channelName: '',
    category: category ?? '',
    users: [],
  });
}, [setFormData, params]);
Now, we want to add a new section to the form. We want to toggle between creating a text or an audio channel. A radio menu is perfect for this, so we use this. Here is the code that we add as the first element inside the form element of the CreateChannelForm:
12345678910111213141516171819202122232425262728293031323334353637383940414243444546474849<div className='space-y-4'>
    <h3 className='labelTitle'>Channel Type</h3>
  <div className='w-full flex space-x-4 items-center bg-gray-100 px-4 py-2 rounded-md'>
    <label
      htmlFor='text'
      className='flex flex-1 items-center space-x-6'
    >
      <span className='text-4xl text-gray-400'>#</span>
      <div>
        <p className='text-lg text-gray-700 font-semibold'>Text</p>
        <p className='text-gray-500'>
          Send messages, images, GIFs, emoji, opinions, and puns
        </p>
      </div>
    </label>
    <input
      type='radio'
      id='text'
      name='channelType'
      value='text'
      checked={formData.channelType === 'text'}
      onChange={() => setFormData({ ...formData, channelType: 'text' })}
    />
  </div>
  <div className='w-full flex space-x-4 items-center bg-gray-100 px-4 py-2 rounded-md'>
    <label
      htmlFor='voice'
      className='flex flex-1 items-center space-x-4'
    >
      <Speaker className='text-gray-400 w-7 h-7' />
      <div>
        <p className='text-lg text-gray-700 font-semibold'>Voice</p>
        <p className='text-gray-500'>
          Hang out together with voice, video, and screen share
        </p>
      </div>
    </label>
    <input
      type='radio'
      id='voice'
      name='channelType'
      value='voice'
      checked={formData.channelType === 'voice'}
      onChange={() =>
        setFormData({ ...formData, channelType: 'voice' })
      }
    />
  </div>
</div>
We add a simple customization in globals.css for the radio input:
1234input[type='radio'] {
  @apply w-8 h-8 mb-0;
  accent-color: black;
}
Before looking at the finished component, we update the createClicked function to create a text channel using the createChannel function or a call using the createCall function. Here is the updated code:
12345678910111213141516171819202122function createClicked() {
  switch (formData.channelType) {
    case 'text':
      createChannel(
        client,
        formData.channelName,
        formData.category,
        formData.users.map((user) => user.id)
      );
    case 'voice':
      if (videoClient && server) {
        createCall(
          videoClient,
          server,
          formData.channelName,
          formData.users.map((user) => user.id)
        );
      }
  }
  setFormData(initialState);
  router.replace('/');
}
With that, we have the code working and can take a look at the result:
We are now able to create calls and audio channels with them and list them for the respective server, but we can’t join a call yet.
Building and Showing the Calls
The only thing remaining for us is to show up and join a call. We want to join calls as audio experiences and enable the camera only when the users explicitly click on it. For that, we will use a lot of pre-built UI components from Stream’s React SDK. Feel free to add customization on your own if you want. It’s perfectly possible; we won’t cover it because it breaks the scope of this article.
We start by creating a new folder inside the components folder and calling it CallLayout.tsx. Here, we sketch out most of the UI for our call. For styling reasons, we need to wrap it with a StreamTheme. Then, we use the SpeakerLayout element to show all the call participants.
We also use the CallControls element. This packs a lot of functionality in:
- toggling and selecting audio input
- toggling and selecting video input
- enabling screen sharing
- recording
- emoji reactions
The only thing we need to customize here is to add our functionality to the onLeave parameter. We need to update the call inside our DiscordContext to be undefined whenever we leave a call. This will update the UI to show the previous text channel again.
Here is the full code for our CallLayout component:
12345678910111213141516171819202122export default function CallLayout(): JSX.Element {
  const { setCall } = useDiscordContext();
  const { useCallCallingState, useParticipantCount } = useCallStateHooks();
  const participantCount = useParticipantCount();
  const callingState = useCallCallingState();

  if (callingState !== CallingState.JOINED) {
    return <div>Loading...</div>;
  }

  return (
    <StreamTheme>
      <h2>Participants: {participantCount}</h2>
      <SpeakerLayout participantsBarPosition='bottom' />
      <CallControls
        onLeave={() => {
          setCall(undefined);
        }}
      />
    </StreamTheme>
  );
}
We covered the layout with that. What’s missing is the entire logic of joining calls when a user clicks on an audio channel. First, we create a new file in the MyCall folder called MyCall.tsx. We create an empty component first and fill it up in a second:
123export default function MyCall({ callId }: {
    callId: string
}): JSX.Element {}
We need access to an instance of the StreamVideoClient using the useStreamVideoClient hook. We define two state properties: a call and one called joining that allows the display a loading state while the process of joining the call is happening:
1234const client = useStreamVideoClient();

const [call, setCall] = useState<Call | undefined>(undefined);
const [joining, setJoining] = useState(false);
Then, we create a function called createCall, which we call the join function after disabling the camera of the call we want to create. We wrap it in a useCallback hook:
1234567const createCall = useCallback(async () => {
  const callToCreate = client?.call('default', callId);
  await callToCreate?.camera.disable();
  await callToCreate?.join({ create: true });
  setCall(callToCreate);
  setJoining(false);
}, [client, callId]);
When the component is mounted, we want to call this function. However, we must check if we are already in a call to avoid infinite re-renders. Here’s the call for this in a useEffect hook:
1234567891011121314useEffect(() => {
  if (!client) {
    console.error('No client in MyCall component');
    return;
  }

  if (!call) {
    if (joining) {
      createCall();
    } else {
      setJoining(true);
    }
  }
}, [call, client, createCall, joining]);
We want to render a loading state, so when the call object is undefined, we will render the text of the Joining call .... If a call object is present, we display our newly created CallLayout component wrapped in a StreamCall element, that will inject all the necessary data and provide it to its child components.
Here is the UI code:
12345678910111213if (!call) {
  return (
    <div className='w-full h-full text-xl font-semibold flex items-center justify-center animate-pulse'>
      Joining call ...
    </div>
  );
}

return (
  <StreamCall call={call}>
    <CallLayout />
  </StreamCall>
);
The last step is to show this MyCall component if we are in a call and show the Channel element otherwise. We can use the callId from the DiscordContext to determine if we are in a call and use that to toggle the UI.
We open up MyChat.tsx and after we show the element, we now conditionally show either the MyCall or the Channel depending on the value of the callId
Here’s the code:
12345678910111213141516171819/* ... */
<ChannelList List={CustomChannelList} sendChannelsToList={true} />
{callId && <MyCall callId={callId} />}
{!callId && (
  <Channel
    Message={CustomMessage}
    Input={MessageComposer}
    DateSeparator={CustomDateSeparator}
    reactionOptions={customReactionOptions}
    HeaderComponent={CustomChannelHeader}
  >
    <Window>
      <MessageList />
      <MessageInput />
    </Window>
    <Thread />
  </Channel>
)}
/* ... */
This is the final piece that we needed. Now that we can join calls, our UI will update, and once we leave a call, it will show the previously selected text channel again.
Here is a demo of how this looks in the end:
Summary
In this last series post, we left the chat realm and incorporated audio channels into our Discord clone. We used Stream’s new Video & Audio SDK, which allowed us to easily extend our DiscordContext to account for the new functionality.
We decided to use many of the built-in UI we get for free. This provides powerful capabilities, such as screen sharing and recording. First, our users are put into a call using only their audio stream while seamlessly switching to a video call by clicking a simple button to activate their camera.
Using the tools provided by React and Stream’s SDKs, we’ve integrated this into our existing app without much effort.
This marks the end of our journey to create a clone of Discord. We think this demonstrated many of our SDKs' functionalities and how far we can go with customization. We highly value the fact that we allow customization where needed while effortlessly dropping in pre-built components.
Again, the full code for the project can be found on GitHub. Thanks for following us in this series of posts. If you have other ideas and/or wishes about what other clones we should create, you can always reach out on X, and we’ll do our best to cover that.