Overview
In the previous lessons, we delved into the fundamental concepts required to comprehend WebRTC, including SDP messages, ICE candidates, and peer connections. Now, in this lesson, we will focus on creating a signaling server using Socket.IO and Node.js to facilitate the WebRTC communication process.
What’s the Signaling Server?
In Lesson 2, we covered the process of establishing WebRTC calls between multiple peers on a local device. However, in real-world scenarios, the complexity of connecting multiple peers is significantly heightened.
Peers face challenges in determining where to send and receive stream data, especially considering various barriers like firewalls that can obstruct communication paths. These complexities make implementing WebRTC communication beyond the local environment a more intricate task. So we can resolve this technical problems by using the signaling server.
The signaling server plays a crucial role in resolving and establishing connections between peers, enabling them to connect with each other while minimizing the exposure of private information, as depicted in the figure below:
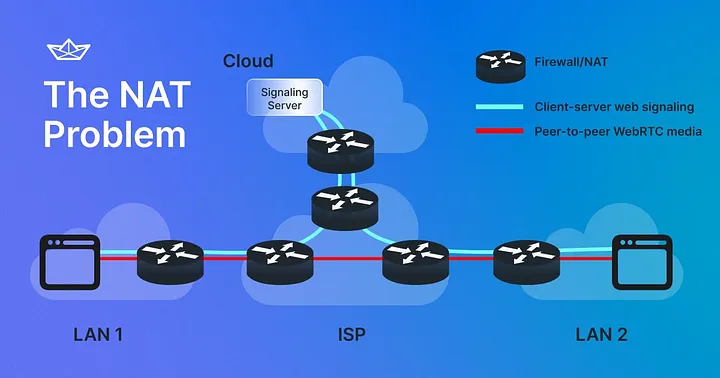
Indeed, building a signaling server and designing signaling protocols are essential steps to exchange connectivity information between peers. However, unlike traditional server-based communication, after the initial exchange of connectivity information, peers can communicate directly with each other in real-time, bypassing the need to involve a server.
This peer-to-peer communication approach offers significant advantages, such as reduced latency and lower costs compared to server-based communication methods. By leveraging this direct communication, you can achieve faster and more cost-effective data transmission.
Setting Up Prerequisites
Before building your own signaling server, you need to set up prerequisites below to build your signaling server:
1. Setting Up a Node.js On macOS
To set up a Node.js environment on macOS, you'll need to install two main components: Node.js and npm (Node Package Manager). Node.js is a runtime environment that allows you to run JavaScript code outside the browser, while npm serves as a package manager specifically designed for Node.js. You can download Node.js on the website or easily install using Homebrew with the command line below:
brew install node
2. Installing Socket.io
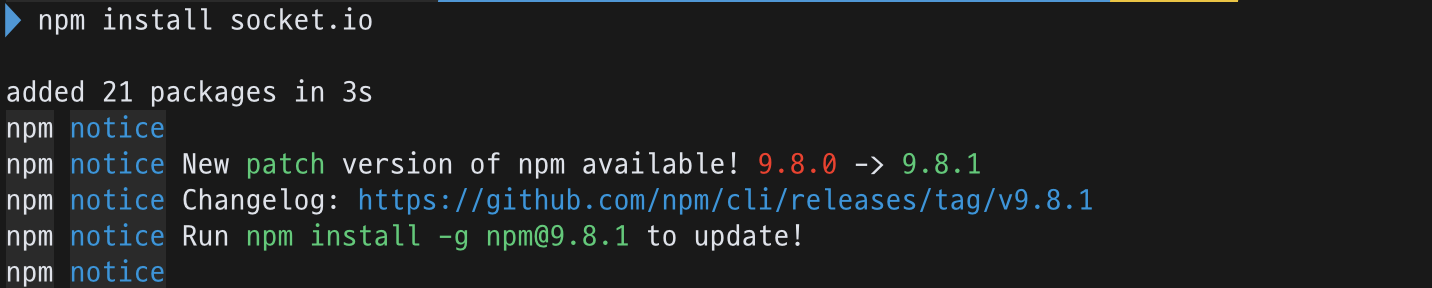
Next, you should install Socket.IO with an npm command line below:
npm install socket.io
If you installed socket.io successfully, you will see the message below on your terminal and be ready to build your own socket server.
Now, let’s build your own signaling server.
Build Your Own Signaling Server
As elucidated in the preceding sections, it's important to note that even with peer-to-peer connections, a signaling server remains imperative for orchestrating communication, facilitating destination exchange, and transmitting control messages. It's essential to understand that the signaling process is not a part of the RTCPeerConnection API, so we should build our own signaling server.
1. Create an HTTTP server and Socket
First and foremost, your initial step involves crafting an HTTP server using Express.
Express is a popular web application framework for Node.js, designed to facilitate the development of web applications and APIs. It's known for being minimal, flexible, and providing a robust set of features for both web and mobile applications.
You can effortlessly establish an HTTP server that awaits incoming requests on port 3000 using the listen() function, as demonstrated in the example below:
            const express = require('express');
const app = express();
app.use(cors());
app.get('/', (req, res) => {
    res.send('hello, word!');
})

const server = app.listen(3000, () => {
    console.log('server is running on http://localhost:3000')
})
Next, your task involves the creation of a socket.io instance, which you will seamlessly integrate with the previously established HTTP server.
            const express = require('express');
const socketIo = require('socket.io')

const io = socketIo(server);
io.on("connection", socket => {
  ..
}
Now, you’re able to communicate with clients with this io , such as managing connection and disconnection of clients, and exchanging SDP messages.
2. Manage a New User Joining the Room
Now’ let’s implement the handling of joining requests from clients. We’re going to use an “room” approach, which contains user information and allows you to manage the connection and disconnection of users. Each distinct room is identified by its dedicated room id, ensuring clear differentiation among multiple rooms.
            let rooms = {};
let socketToRoom = {};

io.on("connection", socket => {
    socket.on("join", data => {
        // let a new user join to the room
        const roomId = data.room
        socket.join(roomId);
        socketToRoom[socket.id] = roomId;

        // persist the new user in the room
        if (rooms[roomId]) {
            rooms[roomId].push({id: socket.id, name: data.name});
        } else {
            rooms[roomId] = [{id: socket.id, name: data.name}];
        }

        // sends a list of joined users to a new user
        const users = rooms[data.room].filter(user => user.id !== socket.id);
        io.sockets.to(socket.id).emit("room_users", users);
        console.log("[joined] room:" + data.room + " name: " + data.name);
    });
});
We’ve created some properties below:
rooms: This collection comprises several distinct rooms, which contains user information independently.socketToRoom: This mapping pairs a socket id with a corresponding room id. This mechanism enables us to discern the specific room associated with a disconnected client. As a result, we can effectively manage and clear user information within that room.
In the provided code snippet, the process of handling a join request from clients with data is delineated through the following three steps:
- The socket establishes a connection for a new user within the designated room. This can be accomplished using the
socket.joinmethod. - The user's details are consistently maintained within the room.
- An inventory of previously joined users is dispatched to the new user, thereby furnishing them with a roster of existing room participants. This facilitates awareness about those already present in the room. You can send the existing room participants to only the new user using the
io.sockets.to(socket.id).emitmethod.
3. Handle SDP Messages
Now it’s time to handle SDP messages. The signaling server assumes the role of orchestrating SDP messages among peers, encompassing crucial components like offer, answer, and ice candidate. You can seamlessly facilitate these interactions by devising signaling protocols, much like the exemplar below:
            io.on("connection", socket => {
    socket.on("offer", sdp => {
        socket.broadcast.emit("getOffer", sdp);
        console.log("offer: " + socket.id);
    });

    socket.on("answer", sdp => {
        socket.broadcast.emit("getAnswer", sdp);
        console.log("answer: " + socket.id);
    });

    socket.on("candidate", candidate => {
        socket.broadcast.emit("getCandidate", candidate);
        console.log("candidate: " + socket.id);
    });
});
As evident in the provided code snippet, you have the capability to disseminate SDP messages to other participants, excluding the message sender. This can be achieved through the utilization of the socket.broadcast.emit method.
4. Handle Disconnecting
Lastly, it's essential to handle the disconnection of users to ensure the removal of user information from the room. By establishing a mapping between the socket id and room id when a new user joins a room, we can effectively determine which participants within a specific room should be notified when a user exits.
            io.on("connection", socket => {
    socket.on("disconnect", () => {
        const roomId = socketToRoom[socket.id];
        let room = rooms[roomId];
        if (room) {
            room = room.filter(user => user.id !== socket.id);
            rooms[roomId] = room;
        }
        socket.broadcast.to(room).emit("user_exit", {id: socket.id});
        console.log(`[${socketToRoom[socket.id]}]: ${socket.id} exit`);
    });
});
As illustrated in the following example, you can discern the room id to which a user has joined. This enables you to pinpoint the particular room and subsequently inform the remaining room participants about the departure of the user.
Run The Signaling Server
Now you can run the signaling server very easily with the command lines below:
node signaling-server
After running the command line you’ll see the signaling server is operated with the port number 3000.

Conclusion
This concludes how to build the signaling server based on peer-to-peer. You can check all source of the lesson 5 on the GitHub repository. In the next lesson, you will learn how to build the signaling client.