
Understanding the MediaStream API
The MediaStream API is your gateway to real-time media capture in web browsers. Think of it as a pipeline that carries live audio and video data from input devices (like cameras and microphones) to your web application.
Each MediaStream object acts as a container holding multiple media tracks. These tracks, which extend the MediaStreamTrack interface, represent individual media sources - for example, one track might carry video data from your webcam while another carries audio from your microphone.
Why This Matters: Understanding MediaStream is crucial because it's the foundation for all WebRTC functionality. Whether you're building video calls, screen sharing, or media recording features, you'll always start with capturing media streams.
Accessing User Media: The getUserMedia() Method
The core of media capture lies in the MediaDevices.getUserMedia() method. This powerful API allows you to access various media sources:
Video Sources:
- Physical cameras (front-facing, rear-facing)
- Virtual cameras (software-based video sources)
- Screen sharing streams
- Video recording devices
Audio Sources:
- Built-in microphones
- External microphones
- Virtual audio devices
- System audio (with proper permissions)
Security and Privacy: Modern browsers require explicit user permission before accessing camera or microphone. This is a critical security feature that protects users from malicious websites. Additionally, getUserMedia() only works on secure contexts (HTTPS) in production environments, though it functions on localhost for development.
Configuring Media Constraints
Before requesting media access, you need to define what type of media you want and how it should be configured. This is done through MediaStreamConstraints, which acts as a specification document for your media requirements.
1234const videoConstraints = {
  audio: false,
  video: { width: 1280, height: 720 },
};
Understanding Constraints:
- Audio: Set to
falsewhen you only need video, or provide an object for audio-specific settings - Video: Can be
truefor default settings, or an object for detailed configuration
Advanced Constraint Options (for future exploration):
frameRate: Control video smoothness (e.g.,{min: 24, ideal: 30, max: 60})facingMode: Choose camera on mobile devices ("user"for front,"environment"for rear)aspectRatio: Maintain specific width-to-height ratiosdeviceId: Target specific cameras or microphones
The beauty of constraints is their flexibility - browsers will try to match your "ideal" settings but fall back to supported alternatives if needed.
Building Your First WebRTC Application
Now let's put theory into practice by building a complete video streaming application. This example demonstrates the essential WebRTC workflow: request permissions, capture media, and display the stream.
HTML Structure
12345678910111213141516171819202122232425262728293031<!DOCTYPE html>
<html lang="en">
<head>
    <meta charset="utf-8">
    <meta name="viewport" content="width=device-width, user-scalable=yes, initial-scale=1, maximum-scale=1">
    <meta id="theme-color" name="theme-color" content="#ffffff">
    <title>getUserMedia</title>

    <link rel="stylesheet" href="https://fonts.googleapis.com/icon?family=Material+Icons">
    <link rel="stylesheet" href="https://code.getmdl.io/1.3.0/material.indigo-pink.min.css">
    <link rel="stylesheet" href="./css/main.css">
    <script defer src="https://code.getmdl.io/1.3.0/material.min.js"></script>
</head>

<body>
<div id="container">
    <h1><a href="#" title="WebRTC samples homepage">Get a Media Stream</a>
        <span>getUserMedia</span></h1>

    <video id="gum-local" content="width=device-width, initial-scale=0.5" autoplay playsinline></video>

    <button class="mdl-button mdl-js-button mdl-button--raised mdl-js-ripple-effect mdl-button--accent" id="showVideo">
        Open camera
    </button>

    <div id="errorMsg"></div>
</div>

<script src="js/main.js"></script>
</body>
</html>
Key HTML Elements Explained:
<video>element: The destination for our media streamautoplay: Starts playing immediately when media is loadedplaysinline: Prevents fullscreen mode on iOS Safari, keeping video inline
- Button: Triggers the media capture process (user interaction required for permissions)
- Error container: Displays helpful messages when things go wrong
JavaScript Implementation
123456789101112131415161718192021222324252627282930313233343536"use strict";

// Define video constraints
const videoConstraints = {
  audio: false,
  video: { width: 1280, height: 720 },
};

// Add event listener to the button for triggering media stream initialization
document
  .querySelector("#showVideo")
  .addEventListener("click", (e) => initialize(e));

// Initialization function to request and handle media stream
async function initialize(e) {
  try {
    const stream = await navigator.mediaDevices.getUserMedia(videoConstraints);
    attachVideoStream(stream);
    e.target.disabled = true; // Disable the button after successful initialization
  } catch (error) {
    onCatch(error);
  }
}

// Function to handle successful acquisition of media stream
function attachVideoStream(stream) {
  const videoElement = document.querySelector("video");
  window.stream = stream; // Make variable available to the browser console
  videoElement.srcObject = stream;
}

// Function to handle errors during media stream acquisition
function onCatch(error) {
  const errorElement = document.querySelector("#errorMsg");
  errorElement.innerHTML += `<p>Something went wrong: ${error.name}</p>`;
}
Code Walkthrough:
-
Event-Driven Architecture: The camera activation requires user interaction (button click) to comply with browser security policies.
-
Async/Await Pattern: Modern JavaScript approach for handling the asynchronous
getUserMedia()call, making code more readable than callback-based alternatives. -
Stream Assignment:
window.stream = streamexposes the stream globally, enabling browser console debugging and potential cleanup operations. -
Button State Management: Disabling the button prevents multiple simultaneous media requests, which could cause conflicts.
-
Error Handling: Comprehensive error catching helps users understand what went wrong (permissions denied, no camera found, etc.).
Common Error Scenarios:
NotAllowedError: User denied permissionNotFoundError: No camera/microphone availableNotReadableError: Hardware already in use by another applicationOverconstrainedError: Requested constraints cannot be satisfied
If you want to apply some styles for the demo application, you can download the main.css and save it into the css folder.
Note: You can download the full source code of Lesson 1 on GitHub.
Running the WebRTC demo application
If you run the index.html file, you will see the initial application interface with a video element and the "Open camera" button ready for interaction.
Get a Media StreamgetUserMedia
Testing Your Application:
-
Initial State: When you first load the page, you'll see a video element (initially empty) and an "Open camera" button.
-
Activation: Click the "Open camera" button to trigger the media capture process.
-
Permission Request: Your browser will display a permission dialog asking for camera access.
Next, click the Open camera button to display a video stream from the local camera. If you click the button, you will see the popup below that asks you to get access permission for your local camera.
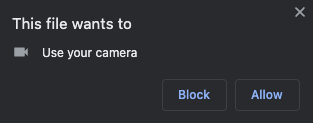
Understanding Permission Scenarios:
If you click the Block or cancel the popup, you will see the error message like the screenshot below:

Blocked Access: When users deny permission, your error handling gracefully informs them what happened. In production applications, you might want to provide instructions on how to re-enable camera access or offer alternative functionality.
If you click the Allow button on the popup, you will see the real-time video stream screen on your screen like the below:
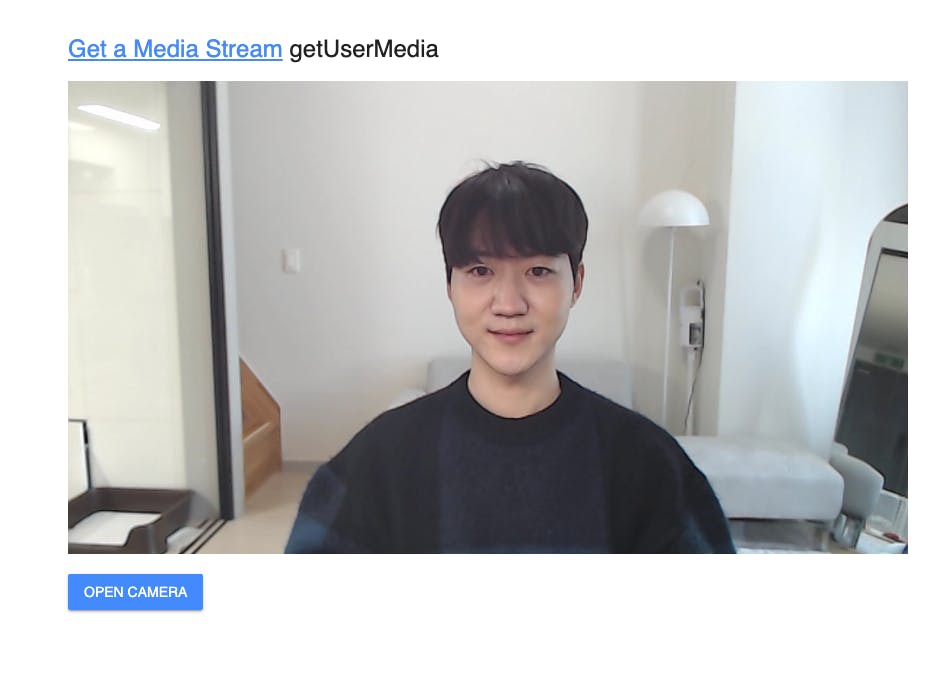
Success State: Once permission is granted, the live video stream appears immediately. The video element automatically adjusts to display your camera feed in real-time.
Note: You can demonstrate and test the sample project about Get a Media Stream on your web browser without building the project.
Working with MediaStream Methods
The MediaStream object provides several essential methods that you'll use throughout your WebRTC journey. Understanding these methods is crucial for building more complex applications:
Track Management:
- MediaStream.getVideoTracks(): Returns an array of video tracks
- MediaStream.getAudioTracks(): Returns an array of audio tracks
addTrack()andremoveTrack(): Dynamically modify stream contents
Practical Applications:
- Multi-camera setups: Switch between different video sources
- Audio mixing: Combine multiple audio sources
- Stream composition: Create complex media arrangements
- Remote track integration: Add tracks received from other peers
Stream State Management:
- Monitor track states (live, ended, muted)
- Handle device changes (camera unplugged, etc.)
- Implement graceful degradation when media sources fail
If you want to learn more about the methods of MediaStream APIs, check out the Instance methods for MediaStream.
Debugging with Chrome WebRTC Internals
Professional WebRTC development requires robust debugging tools. Chrome provides a powerful built-in debugging interface that's essential for troubleshooting and optimization.
If you want to debug your WebRTC application, you can easily debug your WebRTC application on the chrome://webrtc-internals/ page, a WebRTC inspection tool by Chrome.
How to Use WebRTC Internals:
- Setup: Run your WebRTC application in one tab
- Access: Open chrome://webrtc-internals/ in another tab
- Monitor: Watch real-time statistics and connection details
Firstly, run the Get a Media Stream example application, and go into the chrome://webrtc-internals/ page, and you will see the inspection page below:
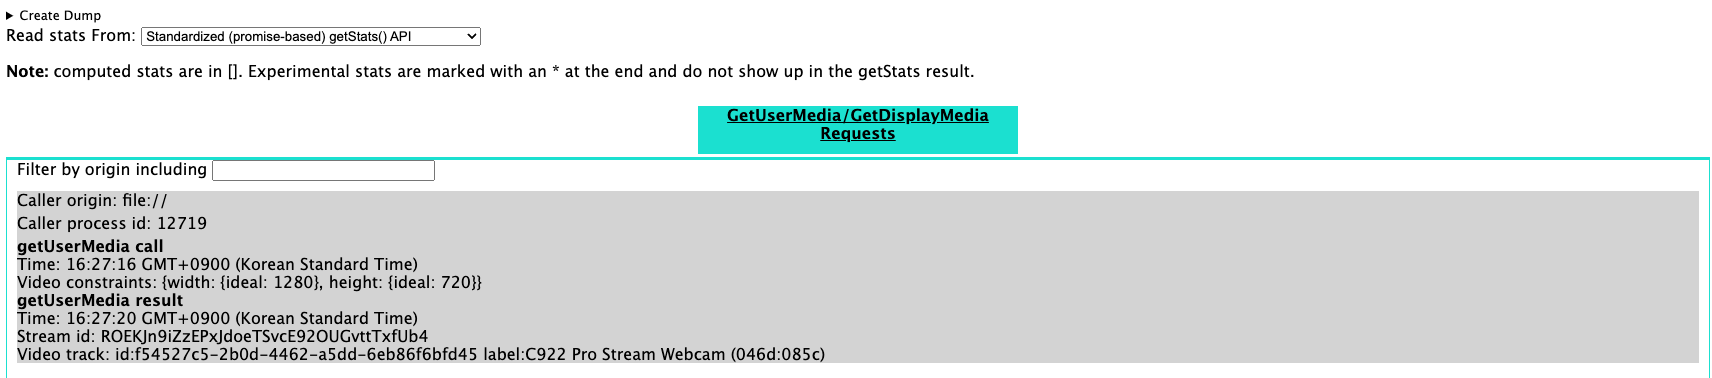
What You Can Debug:
- Media Stream Details: Track information, constraints, and capabilities
- Connection Statistics: Bandwidth usage, packet loss, latency
- ICE Candidate Information: Network connectivity details
- Codec Performance: Video/audio encoding statistics
- Error Tracking: Detailed error logs and timing information
Pro Tips for Debugging:
- Compare working vs. broken implementations side-by-side
- Monitor performance metrics during development
- Use the export feature to share debugging information with team members
- Watch for memory leaks in long-running applications
You can trace the WebRTC request details on the page. If you want to learn more about the debugging WebRTC, check out the WebRTC in chrome browser.
Best Practices and Next Steps
Performance Considerations:
- Always clean up streams when no longer needed:
stream.getTracks().forEach(track => track.stop()) - Consider lower resolutions for better performance on mobile devices
- Test across different browsers and devices for compatibility
User Experience Guidelines:
- Provide clear feedback during permission requests
- Offer graceful fallbacks when camera access is denied
- Consider accessibility needs (audio descriptions, keyboard navigation)
Security Reminders:
- Only request permissions when actually needed
- Inform users why you need camera/microphone access
- Respect user privacy choices and provide easy opt-out mechanisms