Create a Video Call Page
You've learned all essential concepts to implement a video call, such as RTCPeerConnection API, SDP message exchanges, ICE candidates to establish a peer connection. Now let's create a HTML page that renders video streams between a local peer and a remote peer.
Creating a functional video call page requires careful consideration of the HTML structure to provide an optimal user experience. The page must accommodate multiple video streams while maintaining responsive design principles that work across different screen sizes and orientations. Modern video calling applications often implement sophisticated layouts that dynamically adjust based on the number of participants and available screen real estate.
The HTML structure serves as the foundation for all WebRTC interactions, providing the necessary DOM elements that JavaScript will manipulate to control media streams, connection states, and user interactions. Proper semantic markup ensures accessibility compliance and enables assistive technologies to properly interpret the video calling interface.
First, create an index.html HTML file that contains two video tags to render a local peer and a remote peer and button tags to control video actions like the example below:
            <video id="localVideo" playsinline autoplay muted></video>
<video id="remoteVideo" playsinline autoplay></video>

<div class="box">
    <button id="call_pc1">Call PC1</button>
    <button id="call_pc2">Call PC2</button>
    <button id="disconnect">Disconnect</button>
</div>
The video element attributes serve specific purposes in WebRTC applications. The playsinline attribute prevents mobile browsers from entering fullscreen mode automatically, maintaining the intended user interface layout. The autoplay attribute ensures video streams begin playing immediately when assigned to the video element, providing seamless user experience without requiring manual playback initiation.
The muted attribute on the local video prevents audio feedback loops that would occur when the local microphone picks up audio from the local speakers. This is a critical consideration in video calling applications, as acoustic echo can severely degrade call quality and user experience. Remote video elements typically don't include the muted attribute, allowing users to hear incoming audio from other participants.
The button structure provides a clear user interface for controlling the video call workflow. Each button represents a distinct phase of the WebRTC connection process, guiding users through media acquisition, peer connection establishment, and call termination. Proper button labeling and state management help users understand the current connection status and available actions.
Next, you should import an additional script, adapter-latest.js. The adapter.js is a shim to insulate apps from spec changes and prefix differences. In fact, the standards and protocols used for WebRTC implementations are highly stable now, so there are only a few prefix differences and you can resolve it by using this script:
<script src="https://webrtc.github.io/adapter/adapter-latest.js"></script>
The WebRTC adapter library provides crucial cross-browser compatibility by normalizing API differences between different browser implementations. While WebRTC standards have stabilized significantly, subtle differences in API behavior, method signatures, and event handling still exist between Chrome, Firefox, Safari, and Edge. The adapter library abstracts these differences, allowing developers to write code that works consistently across all supported browsers.
Modern adapter implementations also provide polyfills for newer WebRTC features that may not be available in older browser versions. This enables applications to use cutting-edge WebRTC capabilities while maintaining backward compatibility with browsers that haven't yet implemented the latest specifications. The library automatically detects browser capabilities and provides appropriate fallbacks when necessary.
The adapter library also handles vendor prefix management, ensuring that WebRTC APIs work correctly regardless of whether browsers use prefixed or standard API names. This is particularly important for maintaining compatibility as browsers transition from experimental implementations to standard compliance.
Finally, the index.html HTML file should now look like this:
            <!DOCTYPE html>
<html>
<head>
    <meta charset="utf-8">
    <meta name="viewport" content="width=device-width, user-scalable=yes, initial-scale=1, maximum-scale=1">
    <meta id="theme-color" name="theme-color" content="#ffffff">

    <title>Peer connection</title>

    <link rel="stylesheet" href="./css/main.css">
    <link rel="stylesheet" href="https://fonts.googleapis.com/icon?family=Material+Icons">
    <link rel="stylesheet" href="https://code.getmdl.io/1.3.0/material.indigo-blue.min.css">
    <script defer src="https://code.getmdl.io/1.3.0/material.min.js"></script>
</head>

<body>

<div id="container">
    <h4><a href="https://github.com/GetStream/webrtc-for-the-brave" title="WebRTC samples homepage">WebRTC samples</a>
        <span>Peer connection</span>
    </h4>

    <video id="localVideo" playsinline autoplay muted></video>
    <video id="remoteVideo" playsinline autoplay></video>

    <div class="box">
        <button class="mdl-button mdl-js-button mdl-button--raised mdl-js-ripple-effect mdl-button--accent" id="call_pc1">Call PC1</button>
        <button class="mdl-button mdl-js-button mdl-button--raised mdl-js-ripple-effect mdl-button--accent" id="call_pc2">Call PC2</button>
        <button class="mdl-button mdl-js-button mdl-button--raised mdl-js-ripple-effect mdl-button--accent" id="disconnect">Disconnect</button>
    </div>

    <div id="errorMsg"></div>
</div>

<script src="https://webrtc.github.io/adapter/adapter-latest.js"></script>
<script src="js/main.js" async></script>

</body>
</html>
This complete HTML structure incorporates Material Design components to provide a polished, professional appearance that follows modern web design principles. The Material Design Library (MDL) provides consistent styling, animations, and interaction patterns that users expect from contemporary web applications. The responsive design ensures the application works effectively across desktop, tablet, and mobile devices.
The viewport meta tag configuration ensures proper mobile rendering by controlling the initial zoom level and allowing user scaling when appropriate. The theme color meta tag provides native mobile browser integration, allowing the application to blend seamlessly with the device's interface chrome.
The error message container provides a dedicated space for displaying connection issues, media access problems, or other runtime errors. Proper error handling and user feedback are essential for WebRTC applications, as network conditions and device capabilities can vary significantly across different environments.
Complete a Peer Connection
Now let's put together the creating a peer connection, exchanging SDP messages and ICE candidates, and finally establishing a peer connection like the example below:
            'use strict';

const callPc1Button = document.getElementById('call_pc1');
const callPc2Button = document.getElementById('call_pc2');
const disconnectButton = document.getElementById('disconnect');
const localVideo = document.getElementById('localVideo');
const remoteVideo = document.getElementById('remoteVideo');

callPc1Button.addEventListener('click', attachLocalMedia);
callPc2Button.addEventListener('click', peerConnection);
disconnectButton.addEventListener('click', disconnect);
callPc2Button.disabled = true;
disconnectButton.disabled = true;

let localStream, pc1, pc2;

// Define video constraints
const videoConstraints = {
    audio: false,
    video: {width: 1280, height: 720}
};

async function attachLocalMedia() {
    callPc1Button.disabled = true;
    try {
        const stream = await navigator.mediaDevices.getUserMedia(videoConstraints);
        localVideo.srcObject = stream;
        localStream = stream;
        callPc2Button.disabled = false;
    } catch (e) {
        onCatch(e)
    }
}

async function peerConnection() {
    callPc2Button.disabled = true;
    disconnectButton.disabled = false;

    pc1 = new RTCPeerConnection();
    pc1.addEventListener('icecandidate', e => onIceCandidate(pc1, e));
    pc1.addEventListener('iceconnectionstatechange', e => onIceStateChange(pc1, e));

    pc2 = new RTCPeerConnection();
    pc2.addEventListener('icecandidate', e => onIceCandidate(pc2, e));
    pc2.addEventListener('iceconnectionstatechange', e => onIceStateChange(pc2, e));
    pc2.addEventListener('track', gotRemoteStream);

    localStream.getTracks().forEach(track => pc1.addTrack(track, localStream));

    try {
        console.log('pc1 createOffer start');
        const offer = await pc1.createOffer({
            iceRestart: true,
            offerToReceiveAudio: true,
            offerToReceiveVideo: true
        });
        await onCreateOfferSuccess(offer);
    } catch (e) {
        onCatch(e);
    }
}

async function onCreateOfferSuccess(desc) {
    console.log(`Offer from pc1\nsdp: ${desc.sdp}`);
    try {
        await pc1.setLocalDescription(desc);
    } catch (e) {
        onCatch(e)
    }

    try {
        await pc2.setRemoteDescription(desc);
    } catch (e) {
        onCatch(e)
    }

    try {
        const answer = await pc2.createAnswer();
        await onCreateAnswerSuccess(answer);
    } catch (e) {
        onCatch(e);
    }
}

function gotRemoteStream(e) {
    if (remoteVideo.srcObject !== e.streams[0]) {
        remoteVideo.srcObject = e.streams[0];
    }
}

async function onCreateAnswerSuccess(desc) {
    try {
        await pc2.setLocalDescription(desc);
    } catch (e) {
        onCatch(e)
    }

    try {
        await pc1.setRemoteDescription(desc);
    } catch (e) {
        onCatch(e)
    }
}

async function onIceCandidate(pc, event) {
    try {
        await (getOtherPc(pc).addIceCandidate(event.candidate));
        console.log(`${getName(pc)} addIceCandidate success`);
    } catch (e) {
        onCatch(pc, e);
    }
    console.log(`${getName(pc)} ICE candidate:\n${event.candidate ? event.candidate.candidate : '(null)'}`);
}

function onIceStateChange(pc, event) {
    if (pc) {
        console.log(`${getName(pc)} ICE state: ${pc.iceConnectionState}`);
        console.log('ICE state change event: ', event);
    }
}

function getName(pc) {
    return (pc === pc1) ? 'pc1' : 'pc2';
}

function getOtherPc(pc) {
    return (pc === pc1) ? pc2 : pc1;
}

// Function to handle errors during media stream acquisition
function onCatch(error) {
    const errorElement = document.querySelector('#errorMsg');
    errorElement.innerHTML += `<p>Something went wrong: ${error.name}</p>`;
}

function disconnect() {
    pc1.close();
    pc2.close();
    pc1 = null;
    pc2 = null;
    localVideo.srcObject = null;
    callPc1Button.disabled = false;
    disconnectButton.disabled = true;
}
This comprehensive implementation demonstrates a complete WebRTC video calling application that orchestrates all the concepts covered in previous lessons. The code follows a structured approach that separates media acquisition, peer connection establishment, and connection teardown into distinct phases, making it easier to understand and maintain.
The application implements proper state management through button enabling and disabling, ensuring users can only perform valid actions based on the current connection state. This prevents common user errors like attempting to establish connections before media is available or trying to disconnect when no connection exists.
The event-driven architecture leverages WebRTC's asynchronous nature, allowing multiple processes like ICE gathering and SDP negotiation to proceed concurrently. The comprehensive error handling ensures that any failures during connection establishment are properly caught and reported to users, facilitating debugging and improving user experience.
Let's break down the functions above one by one:
start(): This function will be called when you click theStartbutton on the web page. It gets aMediaStreamand initializes the local video and stream.call(): This function will be called when you click theCallbutton on the web page. It establishes a peer connection between a local and a remote peer and processes everything you need to create a peer connection, such as exchanging SDP messages and ICE candidates.onCreateOfferSuccess(): This is called to create an offer and set a local description to the local peer. The remote peer sets the offer as a remote description and create an answer. This function is called in thecall()function.onCreateAnswerSuccess(): This is called to set an answer as a local description to the remote peer and set the answer as a remote description to the local peer.hangup(): Close peer connections and clear all connect resources.
The attachLocalMedia() function implements the critical first step of any WebRTC application by requesting access to the user's camera and microphone. This function handles the asynchronous nature of media device access and provides appropriate error handling for scenarios where users deny permissions or devices are unavailable. The function also demonstrates proper constraint configuration, specifying desired video resolution that balances quality with bandwidth requirements.
The peerConnection() function orchestrates the complex process of establishing a peer-to-peer connection by creating two RTCPeerConnection instances and configuring all necessary event listeners. This function demonstrates how to properly sequence SDP negotiation and ICE candidate exchange, ensuring that all components work together to establish connectivity.
The gotRemoteStream() function handles incoming media streams from remote peers, demonstrating how to connect WebRTC media streams to HTML video elements. The function includes proper stream checking to prevent unnecessary DOM updates and ensure smooth media playback transitions.
The connection state monitoring functions (onIceStateChange()) provide valuable debugging information and enable applications to respond to connectivity changes. ICE connection states include "checking", "connected", "completed", "failed", and "disconnected", each providing insight into the current connectivity status.
The disconnect() function demonstrates proper WebRTC resource cleanup, including closing peer connections, releasing media streams, and resetting the user interface state. Proper cleanup is essential for preventing memory leaks and ensuring that device resources like cameras and microphones are released when no longer needed.
If you want to apply styles for the demo application, you can download the main.css and save it into the css folder.
Note: You can download the full source code of Lesson 2 on GitHub.
Running The WebRTC Demo Application
If you run the index.html file, you will see the demo below:
This interactive demonstration provides a hands-on experience with WebRTC peer connection establishment, allowing developers to observe the complete workflow from media acquisition through connection establishment to call termination. The demo environment simulates real-world WebRTC behavior while providing detailed logging and state information for educational purposes.
The runnable code environment enables experimentation with different WebRTC configurations and provides immediate feedback on how changes affect connection behavior. Developers can modify constraints, experiment with different SDP options, and observe how these changes impact the connection establishment process.
Next, click the CALL PC1 button to display a video stream from the local camera. If you click the button, you will see the popup below that asks you to get access permission for your local camera and microphone.
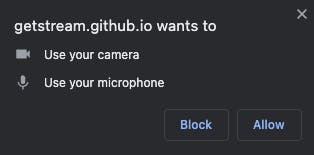
The browser permission system provides essential privacy protection by requiring explicit user consent before accessing sensitive device capabilities like cameras and microphones. This permission model ensures users maintain control over their privacy while enabling rich media experiences in web applications.
The permission prompt includes important information about which site is requesting access and what capabilities are being requested. Users can grant temporary access for the current session or provide persistent permissions that apply to future visits. Modern browsers also provide fine-grained control over these permissions through their settings interfaces.
If you click the Allow button on the popup, you will see the real-time video stream screen on your screen like the below:

The local video display demonstrates successful media acquisition and stream rendering within the HTML video element. The video stream shows the user's camera feed in real-time, providing immediate feedback that the WebRTC media pipeline is functioning correctly. The local video is typically muted to prevent audio feedback, but the visual feedback confirms that media capture and rendering systems are operational.
The interface at this stage shows the progression from initial page load through successful media acquisition, with appropriate button state changes that guide users through the next steps of the connection process. The disabled and enabled button states provide clear visual feedback about available actions and prevent users from attempting invalid operations.
You are connected to only the local video stream, so another screen that represents a remote peer is black. If you want to create a peer connection for exchanging media data with a remote peer, click the CALL PC2 button, and now you'll see the video call result below:

The completed peer connection demonstrates successful establishment of a bidirectional media channel where the same video stream appears in both the local and remote video elements. In this demonstration environment, both video streams show the same content because they originate from the same camera, but the underlying WebRTC infrastructure is fully operational and would support distinct video streams from different sources in a real-world scenario.
This visual confirmation indicates that all WebRTC components are functioning correctly: media capture has acquired the video stream, SDP negotiation has established compatible session parameters, ICE connectivity establishment has found a viable network path, and media transport is successfully delivering video frames between the peer connections.
The successful connection also demonstrates that the DTLS handshake has completed, establishing secure media transport, and that RTP packet flow is operational in both directions. Performance metrics like frame rate, resolution, and bitrate adaptation are all functioning within the established peer connection.
If you want to disconnect the peer connections between 2 pcs, you can achieve it by clicking the DISCONNECT button on the page.
The disconnect functionality demonstrates proper WebRTC resource management by cleanly terminating all active connections and releasing associated system resources. The disconnect process closes both peer connections, stops media streams, and resets the user interface to its initial state, allowing users to restart the connection process if desired.
Proper disconnection handling is crucial for WebRTC applications because it ensures that system resources like network connections, media device access, and memory allocations are properly released. This prevents resource leaks that could accumulate over multiple connection cycles and potentially impact system performance.
This tutorial connects and renders a local peer and a remote peer on the same computer and the browser, so it's not much practical use, but now you have a better grasp of how WebRTC works.
Note: You can demonstrate and test the sample application about Create a Peer Connection on your web browser without building the project.
Debugging WebRTC in Chrome Browser
If you want to debug your WebRTC application, you can easily debug your WebRTC application on the chrome://webrtc-internals/ page, a WebRTC inspection tool by Chrome.
The Chrome WebRTC internals page provides comprehensive diagnostic information that enables developers to understand connection behavior, diagnose connectivity issues, and optimize application performance. This built-in debugging tool offers real-time insights into ICE candidate gathering, SDP negotiation progress, media stream statistics, and network quality metrics.
The internals page presents information in multiple organized sections including peer connection summaries, detailed ICE candidate information, media stream statistics, and historical performance data. Each section provides different levels of detail, from high-level connection status to granular packet-level statistics that enable deep troubleshooting of complex connectivity issues.
Advanced developers can use this tool to analyze bandwidth utilization, packet loss rates, jitter measurements, and codec performance metrics. The tool also provides insights into ICE gathering timing, candidate prioritization, and connectivity check results that help optimize ICE server configurations and network traversal strategies.
Firstly, run the Create a Peer Connection example application, and go into the chrome://webrtc-internals/ page, and you will see the inspection page below:

The WebRTC internals interface displays active peer connections with expandable sections that reveal detailed connection information. Each peer connection appears as a separate entry with associated statistics, event logs, and configuration details. The interface updates in real-time as connections progress through their various states, providing immediate feedback on connection health and performance.
The debugging interface becomes particularly valuable when troubleshooting connectivity issues in complex network environments. Developers can observe ICE gathering progress, analyze which candidates are being generated and tested, and identify potential bottlenecks in the connection establishment process. The tool also provides historical data that helps identify patterns in connection behavior and performance over time.
Professional WebRTC developers rely on this tool for production debugging, performance optimization, and network configuration validation. The detailed statistics enable proactive identification of quality issues before they impact user experience, and the comprehensive logging facilitates root cause analysis of complex connectivity problems.
In this tutorial, you've learned how to establish a peer connection. Now, let's learn how to exchange plain messages or media data via a media channel using WebRTC.