
Composable UI and APIs enable you to build software faster and more scalable than ever before. This 7-part tutorial series shows you how to build your own Twitter in 4 days. We're going to leverage Stream for chat, and scalable activity feeds. Algolia for search, 100ms for audio rooms, Mux for video processing, and RevenueCat for your blue badges.
Bravo! You have reached the final tutorial of our seven-part TwitterClone series. The previous tutorial showed you how to integrate Conversations with Spaces. We believe you now know how to build an audio room-based application like Club House. In the final tutorial, we introduce you to an in-app subscription using RevenueCat to implement TwitterBlue to provide seamless support for in-app purchases. Of course, Twitter these days would not be complete without those signature blue checkmarks appearing everywhere .
Find the project demo and download the source code from GitHub. The following links are the various parts of the tutorial series on TwitterClone.
- Building the Timeline
- Adding Stream Feeds to the Timeline
- Enabling Support For Media Tweets and Video Playback
- Searching and Following Users
- Messaging and DMs
- Conversations With Spaces
- Twitter Blue and In-app Subscriptions
What is an In-App Subscription?
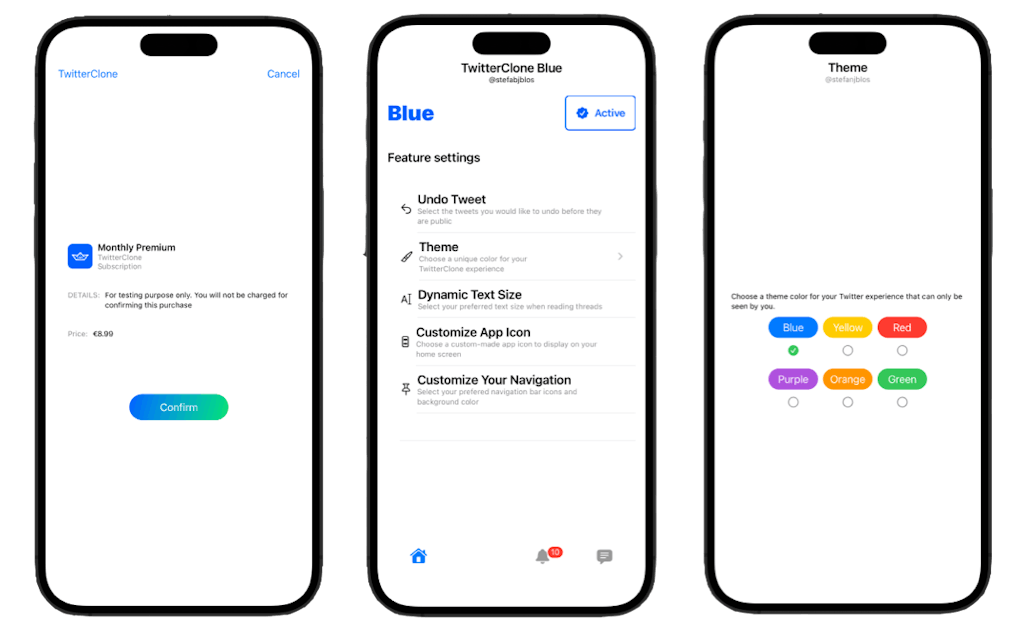
In-app subscriptions allow users to purchase additional features of an app. In the case of our TwitterClone app, these extra unique features or content include allowing users to:
- Undo and redo tweets
- Select a unique color for their TwitterClone experience via themes
- Adjust text size when reading tweets and threads
- Choose a custom-made app icon to display on their home screen
- Select their preferred navigation bar icons and background color
Why RevenueCat?
The concept of in-app purchases for subscription apps can be tedious since it involves the management of subscribers' data, revenue management, and analytics. Because of these reasons, we decided to integrate RevenueCat with our TwitterClone to do the heavy lifting and take complete care of the subscription management. Also, RevenueCat makes it easy to get started with the mobile SDK with minimal code.
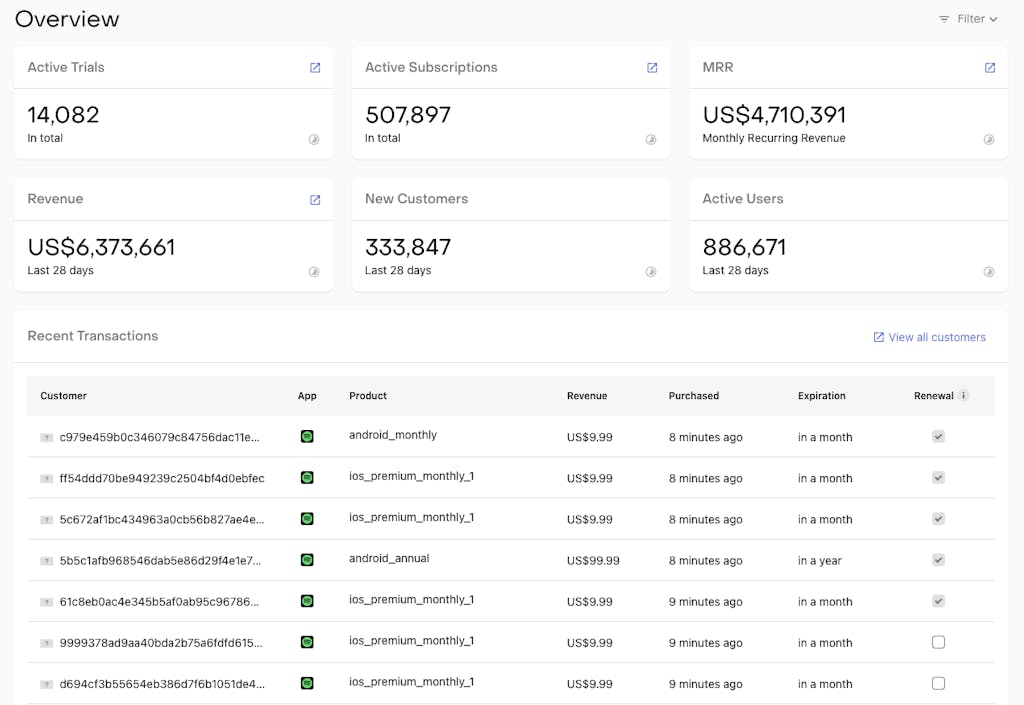
The RevenueCat Dashboard
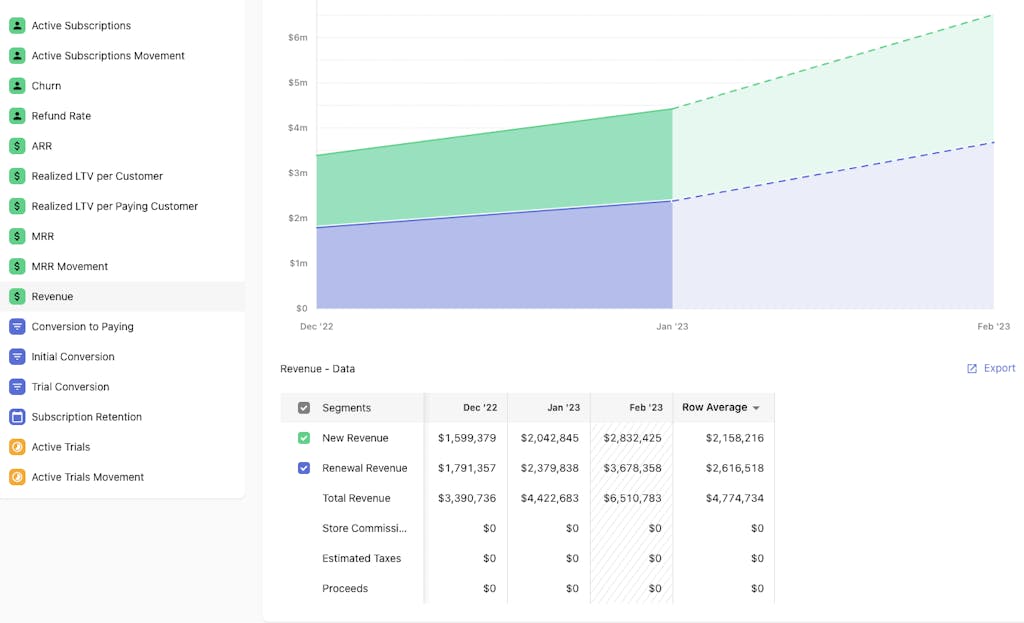
In managing in-app subscriptions, some developers rely on App Store Connect to view sales reports and access app analytics. What sets RevenueCat apart from App Store Connect is its dashboard. Using RevenueCat's dashboard, you get real-time reporting of users who have subscribed to your paid features. According to the RevenueCat website, its dashboard's receipt validation, status tracking, and customer timelines unique features are not present in similar platforms Apple, Google, and Stripe provide.
The integration process of RevenueCat
To integrate RevenueCat's in-app subscription service into your app, you could install their SDK. They have a comprehensive quickstart guide to get you started. Since we use Tuist, our package integration is slightly different.
In summary, you should:
- Create a RevenueCat dashboard account.
- Create a project on the dashboard and select the platform of your app.
- Configure your product in App Store Connect.
- Install and configure the SDK.
We add RevenueCat's dependencies as a Swift Packages to our Tuist dependencies.swift file.
1234567891011var swiftPackageManagerDependencies = SwiftPackageManagerDependencies(
        [
     ...
         .remote(url: "https://github.com/RevenueCat/purchases-ios.git", requirement: .range(from: "4.0.0", to: "5.0.0")),     ...
    ],
    productTypes: [
        ...
        "RevenueCat": .framework,
        ...
    ]
)
We then add the dependency on the Tuist project, in project.swift, to a target.
12345678910let profileTarget =
    Project.makeFrameworkTargets(name: profileName,
                                 platform: .iOS,
                                 dependencies: [
                                    .target(name: authName),
                                    .target(name: authUiName),
                                    .target(name: messagesName),
                                    .target(name: uiName),
                                    .external(name: "RevenueCat")
                                 ])
We now fetch the dependency by running.
1tuist fetch
And make sure to generate the Xcode project again by running:
1tuist generate
From our codebase, you can find and explore how we implemented RevenueCat in the following Swift files in the folders Profile -> Sources from the Project Navigator.
PurchaseViewModel.swift
12345678910111213141516171819202122232425262728293031323334353637383940414243import SwiftUI
import Foundation
import RevenueCat
import Auth

public class PurchaseViewModel: ObservableObject {
    @Published
    var offerings: Offerings?

    @Published
    var isSubscriptionActive = false

    public init() {
//        Purchases.logLevel = .debug
    }

        // Configure the SDK
    public func configure(userId: String?) {
        let configuration = Configuration.Builder(withAPIKey: "appl_ffoirKXwYnVnlhIlEaExRfMZxxf")
            .with(appUserID: userId)
            .with(usesStoreKit2IfAvailable: true)
            .build()
        Purchases.configure(with: configuration)

                // Check users' subscription status
        Purchases.shared.getCustomerInfo { customerInfo, error in
            self.isSubscriptionActive = customerInfo?.entitlements.all["blue"]?.isActive == true
            if let error {
                print(error)
            }

        }
        // Retrieve and display information about what you are offering
        Purchases.shared.getOfferings { offerings, error in
            if let offerings {
                self.offerings = offerings
            }
            if let error {
                print(error)
            }
        }
    }
}
From the code above, we first initialized the SDK using the public API key obtained from RevenueCat and configured the shared instance of the purchase during the app launch. Check out https://docs.revenuecat.com/docs/configuring-sdk for more information about configuring the SDK. For any subscription app, it is necessary to get the users' subscription status. The RevenueCat SDK makes this easy using the customer information object Purchases.shared.getCustomerInfo, as shown in the code above. Next, we retrieved and displayed information about TwitterClone's available in app purchases from App Store Connect using RevenueCat. Doing that allows subscribers to see the purchased items on the purchase screen.
SubscribeBlue.swift
To make a purchase, we initialized the mobile SDK's purchase:package object.
1234var package: Package
    public init(package: Package) {
        self.package = package
    }
Then, we implemented the code sample below demonstrating purchasing a package using a subscribe button.
12345678910111213Button {
          Purchases.shared.purchase(package: package) { transaction, customerInfo, error, userCancelled in
             if customerInfo?.entitlements.all["blue"]?.isActive == true {
                  print("Bought")
             }
         }

      } label: {
          Text("Subscribe for $2.99/month")
          Image(systemName: "checkmark.seal.fill")
      }
      .buttonStyle(.bordered)
      .padding(.top, 32)
See the full implementation in the code sample below.
SubscribeBlue.swift
1234567891011121314151617181920212223242526272829303132333435363738394041424344454647484950515253545556575859606162636465666768697071727374757677787980818283import SwiftUI
import RevenueCat

public struct SubscribeBlue: View {
    var package: Package
    public init(package: Package) {
        self.package = package
    }

    @State private var isShowingConfirmSheet = false

    public var body: some View {
        NavigationStack {
            VStack {
                VStack(alignment: .leading, spacing: 16) {
                    Text("Get more out of Twitter Blue with exclusive features")
                        .font(.title)
                        .multilineTextAlignment(.center)
                        .padding(.bottom)

                    HStack(alignment: .top) {
                        Image(systemName: "circle.slash")
                        VStack(alignment: .leading) {
                            Text("Ad-free articles")
                                .font(.headline)
                            Text("Read ad-free articles from popular websites with no pay walls")
                        }
                    }

                    HStack(alignment: .top) {
                        Image(systemName: "flame")
                        VStack(alignment: .leading) {
                            Text("Top articles")
                                .font(.headline)
                            Text("Read ad-free articles from popular websites with no pay walls")
                        }
                    }

                    HStack(alignment: .top) {
                        Image(systemName: "pin.circle")
                        VStack(alignment: .leading) {
                            Text("Custom navigation")
                                .font(.headline)
                            Text("Read ad-free articles from popular websites with no pay walls")
                        }
                    }

                    HStack(alignment: .top) {
                        Image(systemName: "theatermask.and.paintbrush")
                        VStack(alignment: .leading) {
                            Text("Custom app icon and themes")
                                .font(.headline)
                            Text("Read ad-free articles from popular websites with no pay walls")
                        }
                    }
                }
                .toolbar {
                    ToolbarItem(placement: .principal) {
                        HStack {
                            Image(systemName: "checkmark.seal.fill")
                            Text("Blue")
                        }
                        .foregroundColor(.streamBlue)

                    }
                }
                Button { // Make a purchase
                    Purchases.shared.purchase(package: package) { transaction, customerInfo, error, userCancelled in
                        if customerInfo?.entitlements.all["blue"]?.isActive == true {
                            print("Bought")
                        }
                    }

                } label: {
                    Text("Subscribe for $2.99/month")
                    Image(systemName: "checkmark.seal.fill")
                }
                .buttonStyle(.bordered)
                .padding(.top, 32)
            }
        }
    }
}
When the subscription is successful, the user gets the confirmation message "You are subscribed." Otherwise, we send the customer to the subscription screen (SubscribeBlue.swift).
12345678910if purchaseViewModel.isSubscriptionActive {
                    Text("You are subscribed")
                        .padding(.top)
                } else {
                    if let packages = purchaseViewModel.offerings?.current?.availablePackages {
                        ForEach(packages) { package in
                            SubscribeBlue(package: package)
                        }
                    }
                }
See the full implementation in our SettingsView.swift.
123456789101112131415161718192021222324252627282930313233343536373839404142434445464748495051525354555657585960616263646566676869707172737475767778798081828384858687888990919293949596979899100101102103104105106107108109110111112113import SwiftUI
import TwitterCloneUI
import AuthUI
import Auth
import Feeds
import Chat
import DirectMessages
import RevenueCat

public struct SettingsView: View {
    @EnvironmentObject var feedsClient: FeedsClient
    @EnvironmentObject var auth: TwitterCloneAuth
    @EnvironmentObject var chatModel: ChatModel
    @EnvironmentObject var purchaseViewModel: PurchaseViewModel
    @Environment(\.presentationMode) var presentationMode

    @StateObject var mediaPickerViewModel = MediaPickerViewModel()

    @State private var isEditingName = "Amos Gyamfi"
    @State private var isEditingUserName = false
    @State private var isEditingPassword = false
    @State private var isLoggedOut = false
    public init () {}

    public var body: some View {
        NavigationStack {
            List {
                HStack {
                    Button {
                        print("Open the photo picker")
                    } label: {
                        HStack {
                            ZStack {
                                ProfileImage(imageUrl: "https://picsum.photos/id/64/200", action: {})
                                    .opacity(0.6)
                                MediaPickerView(viewModel: mediaPickerViewModel)
                            }
                            Image(systemName: "pencil")
                                .fontWeight(.bold)
                        }
                    }

                    Spacer()
                }

                HStack {
                    Text("Change your Name")
                    TextField("Amos Gyamfi", text: $isEditingName)
                        .foregroundColor(.streamBlue)
                        .labelsHidden()
                }

                NavigationLink {
                    EditUserName()
                } label: {
                    Button {
                        self.isEditingUserName.toggle()
                    } label: {
                        HStack {
                            Text("Change your username")
                            Spacer()
                            Text("@stefanjblos")
                        }
                    }
                }

                NavigationLink {
                    EditPassword()
                } label: {
                    Button {
                        self.isEditingPassword.toggle()
                    } label: {
                        HStack {
                            Text("Change your password")
                            Spacer()
                        }
                    }
                }

                if purchaseViewModel.isSubscriptionActive {
                    Text("You are subscribed")
                        .padding(.top)
                } else {
                    if let packages = purchaseViewModel.offerings?.current?.availablePackages {
                        ForEach(packages) { package in
                            SubscribeBlue(package: package)
                        }
                    }
                }
            }
            .listStyle(.plain)
            .navigationTitle("")
            .navigationBarTitleDisplayMode(.inline)
            .frame(maxHeight: 280)
            .toolbar {
                ToolbarItem(placement: .principal) {
                    Text("Your acount settings")
                }
            }

            Button(role: .destructive) {
                presentationMode.wrappedValue.dismiss()
                auth.logout()
//                chatModel.logout()
            } label: {
                Image(systemName: "power.circle.fill")
                Text("Log out")
            }

            Spacer()
        }
    }
}
Conclusion
Congrats on completing our final article on the TwitterClone tutorial series. That was a lot to cover in using RevenueCat's mobile SDK for in-app purchasing and subscriptions. Check out their iOS/SwiftUI SDK to integrate in-app subscriptions into your app. Don't forget to download the source code from GitHub and explore the TwitterClone sample app.
With our application built, let's recap everything we learned in throughout the sereis. Check out our final post "Wrap up and Conclusion" where we bring everything together.