Composable UI and APIs enable you to build software faster and more scalable than ever before. This 7-part tutorial series shows you how to build your own Twitter in 4 days. We’re going to leverage Stream for chat, and scalable activity feeds. Algolia for search, 100ms for audio rooms, Mux for video processing, and RevenueCat for your blue badges.
This first tutorial focuses on the project's architecture, setup, and how to build the timeline using Stream Feeds. You will learn how to follow and unfollow other users, read, create, like, retweet, and delete tweets. You can find the project demo and download the source code from GitHub.
Introduction
Twitter, at its core, is a social media platform that allows users to post short messages with an optional attachment to their timeline. Users can indicate an interest in another user's messages by following a user. Users can interact with each other's messages by liking, replying, and reposting.
The essence of what makes Twitter, Twitter is relatively simple to implement. The real challenge lies in scaling such a platform to a global scale. The volume of all daily Twitter activity is mind-boggling. If you want to build something like Twitter, you better make sure the backend for the user's timelines can scale—and that's where Stream's Activity Feeds can help.
Stream Activity Feeds allows you to scale and maintain a reliable feeds-based backend. As a developer, it helps you focus on where to add value. This tutorial series demonstrates what you could create with Stream Activity Feeds.
Goals of the Series
The project is not a finished product ready for shipping to the App Store. Our goal is to show what is possible. To accelerate our development, we partnered with other API providers (100ms, Mux, Algolia, RevenueCat). Building each foundational piece from scratch would be daunting and add significant time and cost to the project. API services allow us to move quickly to create a solution and keep our development time/cost low.
We will focus on recreating Twitter’s signature home timeline, spaces, video playback, verification, and, of course, messaging.
Main Features
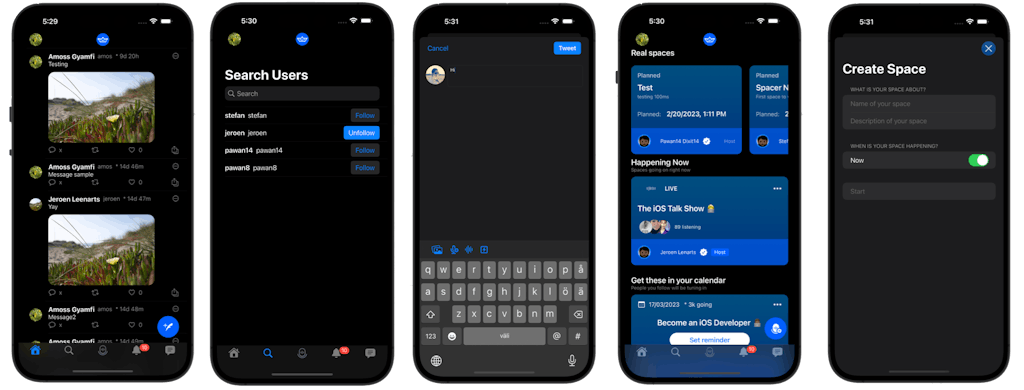
The following are the key features of the project.
- Home timeline - Powered by Stream Feeds
- Follow and unfollow users from a user page
- Create, read, update & delete "Tweets"
- Like and Retweet
- Upload Media tweets (video/pictures) - Mux
- Video with Mux
- Images/gifs with Chat CDN
- Timelines are user-specific and based on followed users
- Direct Message type chat - using Stream Chat
- Audio Spaces - using 100ms
- Create audio spaces
- Share audio spaces
- Playback spaces
- Search - using Algolia
- Profile page
- Subscribe and unsubscribe from Twitter blue - RevenueCat
- As little backend code as we can get away with
- NodeJS based
- Deployed to Digital Ocean with a hosted DB
- We have considered a PAAS solution. We had good results with Firebase, but we wanted to keep things as simple as possible.
- Do check out our Firebase extensions
We will try to see how far we can get with our plan of writing minimal code.
Prerequisites and What You Will Learn
To be able to understand the content related to this project, it is helpful to have some understanding of NodeJS, SwiftUI, and iOS App development.
Even if you have an elementary understanding of SwiftUI or another comparable framework like Flutter or even React, you should be able to follow along — we did our best to break down each major step in the process.
There is a lot of ground to cover. Some of the things you will learn are:
- How to create a new Stream application and how to set it up for our planned use case
- See an actual iOS codebase built with a microframework architecture.
- Using micro frameworks with the help of Tuist allows us to create strictly scoped components to isolate implementation details as much as possible. It helps promote better API boundaries. And for you, as a reader of our source code, it will be clear what parts of our codebase are responsible for the implementation details.
- Connect and authenticate users through a small registration/login API allowing users to register and reauthenticate themselves to fetch the API Tokens they need to connect to the Stream service.
Setting Up the iOS Project
As mentioned, we chose to work with a micro framework architecture within the iOS app. To help us achieve this, we will define our project structure in Swift code with the help of Tuist. You can learn more about Tuist and its benefits in an earlier blog. Learn How to Scale Your Xcode Projects With Tuist
To inspect the project structure as it is defined right now, it is best to start by cloning the repository from Git.
git clone <https://github.com/GetStream/twitter-clone.git>
Once cloned, change the directory into the repository and look at the Readme. The readme file states you will need Tuist to generate the project code. So let us do that right now. All you need to do is run the Tuist install script.
#!/bin/sh
curl https://mise.jdx.dev/install.sh | sh
mise install tuist
This command installs the tuistenv utility and immediately installs the latest Tuist version. The existence of the tuistenv is transparent most of the time. For now, be aware that Tuist comes with its version manager.
Once you have successfully installed Tuist it is time to explore. You need to let Tuist open up the project definition in Xcode. You can do that by running a simple command.
tuist edit
The edit command of the Tuist utility opens up Xcode with a temporary project containing only the files related to your project's definition.
Open up the file Manifests/Manifests/Project.swift.

            import ProjectDescription
import ProjectDescriptionHelpers

// MARK: - Project
public let projectVersionNumber = "0.1.0"

let networkKitName = "NetworkKit"
let uiName = "TwitterCloneUI"
let authName = "Auth"
let authUiName = "AuthUI"
let keychainName = "Keychain"

let messagesName = "DirectMessages"
let profileName = "Profile"
let searchName = "Search"
let settingsName = "UserSettings"
let spacesName = "Spaces"
let timelineUiName = "TimelineUI"
let homeUiName = "HomeUI"
let feedsName = "Feeds"
let chatName = "Chat"

let destinations: Destinations = [.iPhone, .iPad, .macWithiPadDesign]

let messagesTarget =
Project.makeFrameworkTargets(name: messagesName, destinations: destinations,
                                 platform: .iOS,
                                 dependencies:
                                    [
                                        .external(name: "StreamChatSwiftUI"),
                                        .external(name: "StreamChat"),
                                        .target(name: authName),
                                        .target(name: feedsName),
                                        .target(name: chatName),
                                        .target(name: uiName)
                                    ])
let chatTarget =
    Project.makeFrameworkTargets(name: chatName, destinations: destinations,
                                 platform: .iOS,
                                 dependencies:
                                    [
                                        .external(name: "StreamChatSwiftUI"),
                                        .external(name: "StreamChat"),
                                        .target(name: authName),
                                        .target(name: feedsName),
                                        .target(name: uiName)
                                    ])

let profileTarget =
    Project.makeFrameworkTargets(name: profileName, destinations: destinations,
                                 platform: .iOS,
                                 dependencies: [
                                    .target(name: authName),
                                    .target(name: authUiName),
                                    .target(name: messagesName),
                                    .target(name: uiName),
                                    .external(name: "RevenueCat")
                                 ])
let searchTarget =
    Project.makeFrameworkTargets(name: searchName, destinations: destinations,
                                 platform: .iOS,
                                 dependencies: [
                                    .target(name: feedsName),
                                    .target(name: authName),
                                    .external(name: "InstantSearchSwiftUI"),
                                    .external(name: "InstantSearchInsights"),
                                 ])
let settingsTarget =
    Project.makeFrameworkTargets(name: settingsName, destinations: destinations,
                                 platform: .iOS,
                                 dependencies: [
                                        .target(name: uiName)
                                 ])
let homeUiTarget =
    Project.makeFrameworkTargets(name: homeUiName, destinations: destinations,
                                 platform: .iOS,
                                 dependencies: [
                                    .target(name: authName),
                                    .target(name: feedsName),
                                    .target(name: searchName),
                                    .target(name: profileName),
                                    .target(name: timelineUiName),
                                    .target(name: messagesName),
                                    .target(name: spacesName),
                                    .target(name: chatName),
                                    .target(name: uiName)
                                 ])

let timelineUiTarget =
    Project.makeFrameworkTargets(name: timelineUiName, destinations: destinations,
                                 platform: .iOS,
                                 dependencies: [
                                    .target(name: authName),
                                    .target(name: feedsName),
                                    .target(name: searchName),
                                    .target(name: profileName),
                                    .target(name: uiName),
                                    .external(name: "MuxUploadSDK")
                                 ])
let spacesTarget =
    Project.makeFrameworkTargets(name: spacesName, destinations: destinations,
                                 platform: .iOS,
                                 dependencies: [
                                    .external(name: "StreamChatSwiftUI"),
                                    .external(name: "StreamChat"),
                                    .target(name: uiName),
                                    .target(name: authName),
                                    .target(name: chatName),
                                    .external(name: "HMSSDK")
                                 ])
let feedsTarget =
    Project.makeFrameworkTargets(name: feedsName, destinations: destinations,
                                 platform: .iOS,
                                 dependencies: [
                                    .target(name: uiName),
                                    .target(name: authName),
                                    .target(name: networkKitName)
                                 ])
let networkKitTarget =
    Project.makeFrameworkTargets(name: networkKitName, destinations: destinations,
                                 platform: .iOS,
                                 dependencies: [])
let uiTarget =
    Project.makeFrameworkTargets(name: uiName, destinations: destinations,
                                 platform: .iOS,
                                 dependencies: [])

let authUiTarget =
    Project.makeFrameworkTargets(name: authUiName, destinations: destinations,
                                 platform: .iOS,
                                 dependencies: [
                                    .target(name: authName),
                                    .target(name: feedsName),
                                    .target(name: uiName)])

let authorizationTarget =
    Project.makeFrameworkTargets(name: authName, destinations: destinations,
                                 platform: .iOS,
                                 dependencies: [
                                    .target(name: keychainName),
                                    .target(name: networkKitName) ])
let keychainHelperTarget =
    Project.makeFrameworkTargets(name: keychainName, destinations: destinations,
                                 platform: .iOS,
                                 dependencies: [])

// Creates our project using a helper function defined in ProjectDescriptionHelpers
let project = Project.app(name: "TwitterClone",
                          destinations: destinations,
                          versionNumber: projectVersionNumber,
                          platform: .iOS,
                          packages: [],
                          dependencies: [
//                            .external(name: "StreamChatSwiftUI"),
//                            .external(name: "HMSSDK")
                          ],
                          additionalTargets:
                            uiTarget +
                            authUiTarget +
                            authorizationTarget +
                            keychainHelperTarget +
                            messagesTarget +
                            profileTarget +
                            searchTarget +
                            settingsTarget +
                            homeUiTarget +
                            timelineUiTarget +
                            spacesTarget +
                            chatTarget +
                            feedsTarget +
                            networkKitTarget,
                          additionalFiles: ["graph.png", "../README.md", "TwitterCloneStoreKitTesting.storekit"])
Now that's a lot to take in. Just have a look at it and understand it is a dependency graph we are creating. It is a graph that resembles the one below.
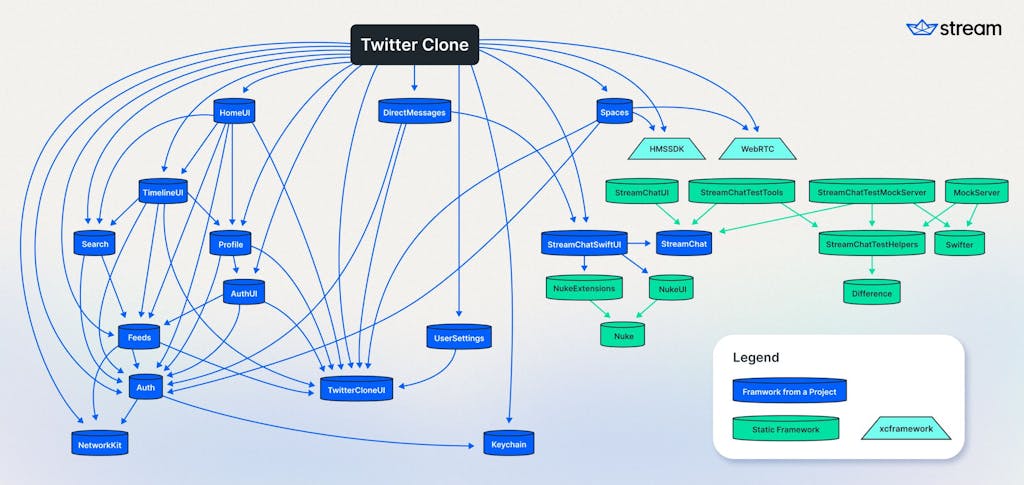
The command tuist graph --skip-test-targets generates this graph. I also applied the --skip-test-targets to prevent the display of testing frameworks. Otherwise, the image would look much more cluttered.
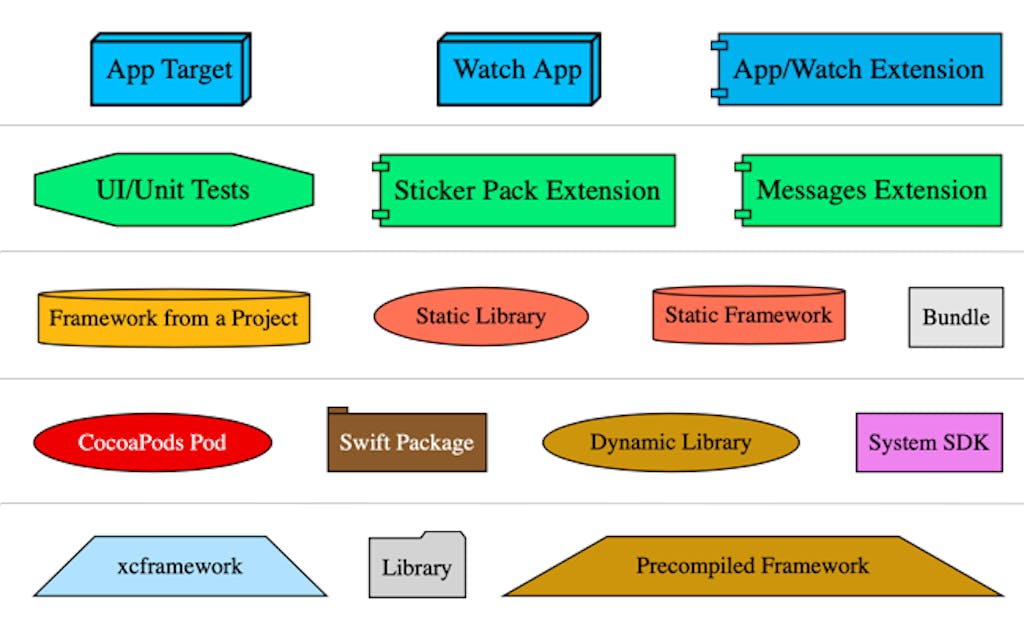
The Tuist website has a legend on what's what on this graph.
The red "static" frameworks relate to how Stream develops their product. They are not interesting to our codebase and will not be packaged into the resulting App bundle.
Micro Framework Architecture
By looking at the graph, you can quickly see Frameworks' specific area or feature of the app. That is an example of what's called a micro framework architecture. For Xcode projects, you could use Swift Package Manager directly to achieve similar results. Tuist has a few benefits over vanilla SPM. You can work on subsections of the codebase in isolation and pre-building other components.
Independent of how you set up your micro-framework architecture, what it allows you to do in all cases is increase the isolation of components in your solution. The internal keyword carries a lot more meaning between packages. When implementing this project, we get extra isolation between areas of our code. You can hide implementation details that are package wide from other packages.
Launch the iOS Project
To launch the iOS project, you should run the NodeJS server and use Tuist to generate the Xcode project.
Run the NodeJS Server
Use your favorite command line utility, navigate to the server, and run the following command to start it.
npm start
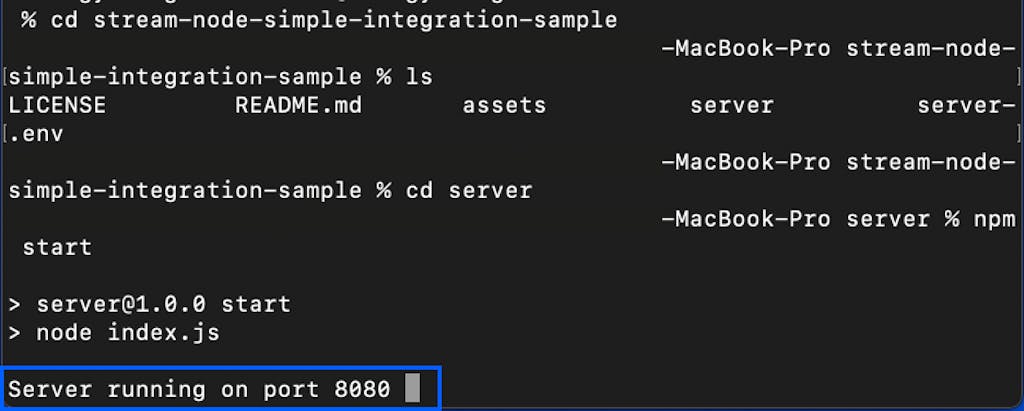
When the server runs successfully, you will see the success message "Server running on port 8080”
Generate the Xcode Project With Tuist
Keep the NodeJS server running and open a new command line window. After cloning the project from GitHub, use your command line utility to navigate to the folder TwitterClone. Use tuist generate to launch your project in Xcode.

Overview and Components of the Timeline
When you run the TwitterClone app and log in on the start page, the page that appears is the timeline feed. The timeline allows users to follow and unfollow one another. A logged-in user can create, update, delete, like tweets, and retweet.
Additionally, the timeline supports image and video uploads through Mux. The timeline is designed to be user-specific and based on who you follow.
Building the Layout of the Timeline
The homepage timeline has four main sections that are organized using SwiftUI layout containers and navigation stack. On the top is the navigation bar. There is a scrollable feeds section. The bottom part of the screen has a tab bar for navigating to the most important sections of the app and a button to initiate a new tweet.
In your Project Navigator, open HomeView.swift under the HomeUI folder and explore the timeline and the other sections of the screen.
            //  HomeView.swift

import SwiftUI
import TwitterCloneUI
import Auth
import Feeds
import Search
import Profile
import TimelineUI
import DirectMessages
import Spaces
import Chat
import StreamChat

public struct HomeView: View {
    @StateObject
    var feedsClient: FeedsClient

    @StateObject
    var chatModel = ChatModel()

    @EnvironmentObject
    var auth: TwitterCloneAuth

    @StateObject
    var profileInfoViewModel = ProfileInfoViewModel()

    @State
    private var isAddingTweet = false

    @State private var isShowingProfile = false

    public init(authUser: AuthUser) {
        _feedsClient = StateObject(wrappedValue: FeedsClient.productionClient(authUser: authUser))
    }

    @State private var spacesTapped = false

    public var body: some View {
        NavigationStack {
            VStack {
                TabView {
                    ZStack {
                        FeedsView()
                        VStack {
                            Spacer()
                            HStack {
                                Spacer()

                                Button {
                                    self.isAddingTweet.toggle()
                                } label: {
                                    Image("newTweetButton")
                                        .resizable()
                                        .scaledToFit()
                                        .frame(width: 64, height: 64)
                                        .padding(EdgeInsets(top: 0, leading: 0, bottom: 8, trailing: 16))
                                }
                                .sheet(isPresented: $isAddingTweet, content: {
                                    AddNewTweetView()
                                        .environmentObject(feedsClient)
                                })
                            }
                        }
                    }
                    .tabItem {
                        Image(systemName: "house")
                    }
                    SearchView(feedsClient: feedsClient, auth: auth)
                        .tabItem {
                            Image(systemName: "magnifyingglass")
                        }

                    SpacesTimelineView()
                        .tabItem {
                            ZStack {
                                if !spacesTapped {
                                    Image("spacesTabBarIcon1")
                                        .resizable()
                                        .scaledToFit()
                                } else {
                                    Image("spacesTabBarIcon2")
                                        .resizable()
                                        .scaledToFit()
                                }
                            }
                            .onTapGesture {
                                spacesTapped.toggle()
                            }
                        }

                    Text("")
                        .tabItem {
                            Image(systemName: "bell")
                        }
                        .badge(10)

                    DirectMessagesView()
                        .tabItem {
                            Image(systemName: "text.bubble")
                        }
                }
                //                TabBarView()
                //                    .frame(width: .infinity, height: 68)
            } // Header, scrollable feeds, tab bar
            .navigationBarTitleDisplayMode(.inline)
            .toolbar {
                ToolbarItem(placement: .navigationBarLeading) {
                    ProfileImage(imageUrl: profileInfoViewModel.feedUser?.profilePicture, action: {
                        self.isShowingProfile.toggle()
                    })
                    .sheet(isPresented: $isShowingProfile, content: {
                        MyProfile(contentView: { AnyView(MyProfileInfoAndTweets(feedsClient: feedsClient))
                        })
                        .environmentObject(feedsClient)
                    })
                }

                ToolbarItem(placement: .principal) {
                    Button {
                        print("TTwin logo pressed")
                    } label: {
                        TTwinLogo()
                    }
                }
            }
        }
        .environmentObject(feedsClient)
        .environmentObject(profileInfoViewModel)
        .environmentObject(chatModel)
        .task {
            do {
                let feedUser = try await feedsClient.user()
                profileInfoViewModel.feedUser = feedUser
                try chatModel.connectUser(authUser: feedsClient.authUser, feedUser: feedUser)
                try await feedsClient.follow(target: feedsClient.authUser.userId, activityCopyLimit: 10)
            } catch {
                // TODO better error handling
                print(error)
            }
        }
    }
}
The top leading in the sample code above has the user's profile image. When you tap the profile image, you can edit the profile and log out of the app. The middle section contains the scrollable feeds. The bottom-right section has a button to add a new tweet.
Run the App and Check the Timeline
Run the app using an Xcode simulator or an iOS device and log in to check the screen below.
Conclusion
In this tutorial, you discovered an overview of the project and how to set it up. We showed how to configure the homepage timeline feed and learned about some of the app's features. We also introduced the concept of Stream Feeds and how they can be used to enhance the user experience.
In the subsequent tutorials, we will dive deep into these features of the app. You will learn how to customize Stream Feeds, add new feeds, and use them to enhance the app's functionality. You will also learn about some of the app's more advanced features, such as real-time updates and push notifications.
So, keep reading the following tutorial to unlock Adding Stream Feeds to the Timeline and learn more about how Stream Feeds can help take your app to the next level.