import 'package:emojis/emoji.dart';
import 'package:flutter/material.dart';

import 'package:stream_chat_flutter/stream_chat_flutter.dart';
import 'package:substring_highlight/substring_highlight.dart';

/// Overlay for displaying emoji that can be used
class StreamEmojiAutocompleteOptions extends StatelessWidget {
  /// Constructor for creating a [StreamEmojiAutocompleteOptions]
  const StreamEmojiAutocompleteOptions({
    super.key,
    required this.query,
    this.onEmojiSelected,
    this.style = AutocompleteOptionsStyle.fixed,
  });

  /// Query for searching emoji.
  final String query;

  /// Callback called when an emoji is selected.
  final ValueSetter<Emoji>? onEmojiSelected;

  /// The visual style of the autocomplete options overlay.
  ///
  /// Defaults to [AutocompleteOptionsStyle.fixed].
  final AutocompleteOptionsStyle style;

  @override
  Widget build(BuildContext context) {
    final emojis = Emoji.all().where((it) {
      final normalizedQuery = query.toUpperCase();
      final normalizedShortName = it.shortName.toUpperCase();

      return normalizedShortName.contains(normalizedQuery);
    });

    if (emojis.isEmpty) return const SizedBox.shrink();

    final colorScheme = context.streamColorScheme;
    final textTheme = context.streamTextTheme;

    final (:elevation, :margin, :shape) = style.resolve(colorScheme.borderDefault);

    return StreamAutocompleteOptions<Emoji>(
      options: emojis,
      elevation: elevation,
      margin: margin,
      shape: shape,
      optionBuilder: (context, emoji) {
        return ListTile(
          dense: true,
          horizontalTitleGap: context.streamSpacing.sm,
          leading: StreamEmoji(emoji: StreamUnicodeEmoji(emoji.char), size: StreamEmojiSize.md),
          title: SubstringHighlight(
            text: emoji.shortName,
            term: query,
            textStyleHighlight: textTheme.bodyDefault.copyWith(
              color: colorScheme.accentPrimary,
              fontWeight: FontWeight.bold,
            ),
            textStyle: textTheme.bodyDefault.copyWith(
              color: colorScheme.textPrimary,
            ),
          ),
          onTap: onEmojiSelected == null ? null : () => onEmojiSelected!(emoji),
        );
      },
    );
  }
}Autocomplete Triggers
Introduction
The StreamMessageComposer widget provides a way to add custom autocomplete triggers using the StreamMessageComposer.customAutocompleteTriggers property.
By default we provide autocomplete triggers for mentions and commands, but it's very easy to add your custom ones.
Default Autocomplete Triggers
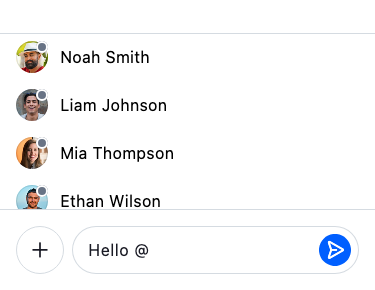
Mention Trigger (@)
Typing @ opens the mention autocomplete. See Mentions for the full list of mention variants and their customisation options.
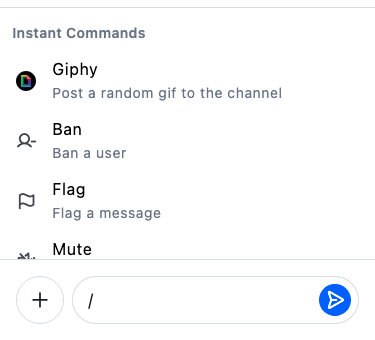
Commands Trigger (/)
Typing / at the start of a message opens the list of available channel commands. Each entry shows the command name and a short description of what it does.
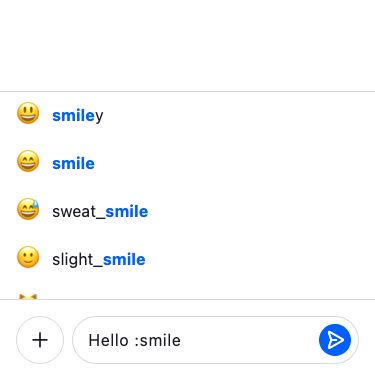
Add Emoji Autocomplete Trigger
To add a custom emoji autocomplete trigger, you must first create an AutoCompleteOptions widget.
This widget will be used to show the autocomplete options.
For this example we're using two external dependencies:
Now it's time to use the StreamEmojiAutocompleteOptions widget.
StreamMessageComposer(
  customAutocompleteTriggers: [
    StreamAutocompleteTrigger(
      trigger: ':',
      minimumRequiredCharacters: 2,
      optionsViewBuilder: (
        context,
        autocompleteQuery,
        messageEditingController,
      ) {
        final query = autocompleteQuery.query;
        return StreamEmojiAutocompleteOptions(
          query: query,
          onEmojiSelected: (emoji) {
            // accepting the autocomplete option.
            StreamAutocomplete.of(context).acceptAutocompleteOption(
              emoji.char,
              keepTrigger: false,
            );
          },
        );
      },
    ),
  ],
),