npm install @capacitor/push-notifications
npx cap syncPush notifications
This guide shows you how to add push notifications using Firebase Cloud Messaging to your Stream chat Ionic mobile apps (iOS and Android). This guide is based on the Capacitor Firebase push notification tutorial.
Before you start
If you want to follow this guide make sure to complete our Ionic mobile app tutorial first.
Using the Capacitor Push Notification API
First of all, we need to install the Capacitor Push Notifications Plugin
Let's integrate the Push Notification API in our app.component.ts file:
import { Component, OnInit } from "@angular/core";
import { environment } from "src/environments/environment";
import {
  ChatClientService,
  ChannelService,
  StreamI18nService,
} from "stream-chat-angular";
import {
  ActionPerformed,
  PushNotificationSchema,
  PushNotifications,
  Token,
} from "@capacitor/push-notifications";

@Component({
  selector: "app-root",
  templateUrl: "./app.component.html",
  styleUrls: ["./app.component.scss"],
})
export class AppComponent implements OnInit {
  constructor(
    private chatService: ChatClientService,
    private channelService: ChannelService,
    private streamI18nService: StreamI18nService,
  ) {
    const apiKey = environment.apiKey;
    const userId = environment.userId;
    const userToken = environment.userToken;
    this.chatService.init(apiKey, userId, userToken);
    this.streamI18nService.setTranslation();
  }

  async ngOnInit() {
    this.channelService.init({
      type: "messaging",
      members: { $in: [environment.userId] },
    });
    // Request permission to use push notifications
    // iOS will prompt user and return if they granted permission or not
    // Android will just grant without prompting
    PushNotifications.requestPermissions().then((result) => {
      if (result.receive === "granted") {
        // Register with Apple / Google to receive push via APNS/FCM
        PushNotifications.register();
      } else {
        // Show some error
      }
    });

    // On success, we should be able to receive notifications
    PushNotifications.addListener("registration", (token: Token) => {
      alert("Push registration success, token: " + token.value);
      // Register to Stream API
      this.chatService.chatClient.addDevice(
        token.value,
        "firebase",
        environment.userId,
      );
    });

    // Some issue with our setup and push will not work
    PushNotifications.addListener("registrationError", (error: any) => {
      alert("Error on registration: " + JSON.stringify(error));
    });

    // Show us the notification payload if the app is open on our device
    PushNotifications.addListener(
      "pushNotificationReceived",
      (notification: PushNotificationSchema) => {
        alert("Push received: " + JSON.stringify(notification));
      },
    );

    // Method called when tapping on a notification
    PushNotifications.addListener(
      "pushNotificationActionPerformed",
      (notification: ActionPerformed) => {
        alert("Push action performed: " + JSON.stringify(notification));
      },
    );
  }
}
We are adding alert calls to the various events to be able to observe the behaviour when the app is running on mobile devices.
After this, you'll want to generate a new build and let Capacitor know about the changes. You can do that with:
ionic build
npx cap copy
Creating a Firebase project
Complete the Creating a Project for your App on Firebase step in the Capacitor Push guide.
Integrate with Android
Complete the Android integration steps in the Capacitor Push guide.
Integrate with iOS
Complete the iOS integration steps in the Capacitor Push guide.
Integrate with Stream API
This guide doesn't give you an in-depth overview of the Stream Push API, if you want to know more about that visit our push documentation.
This guide uses the Push v2 Stream API.
Firebase configuration in Stream Dashboard
To be able to receive notifications from Stream, you need to provide your Firebase credentials to Stream.
Go to the Firebase Console, and select the project your app belongs to.
Click on the gear icon next to Project Overview and navigate to Project settings.
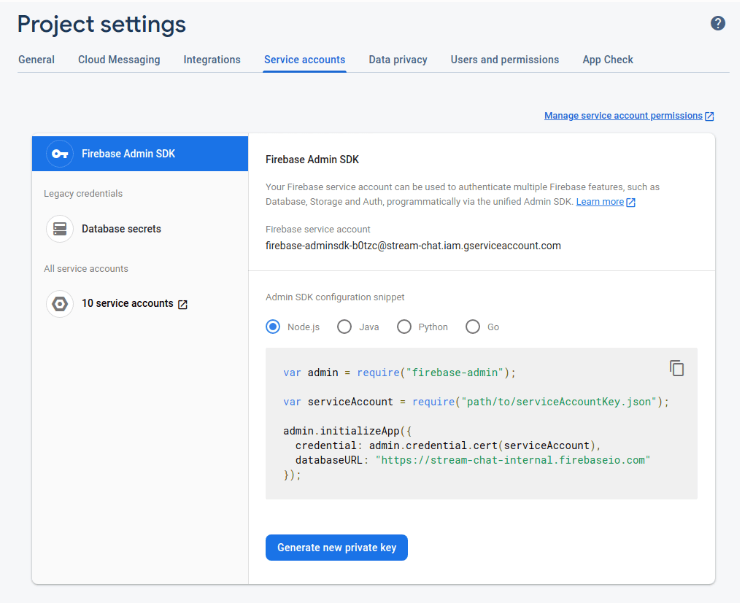
Navigate to the Service Accounts tab. Under Firebase Admin SDK section, click on Generate new private key button that will generate a JSON file with the Firebase Credentials.
Open the Stream Dashboard and navigate to your application.
Select Push notifications from the left menu.
Add a new Firebase configuration.
Upload the JSON file you created in the Firebase console.
For more information about push configurations see our Push Providers & Multi Bundle guide
Push templates in Stream Dashboard
The Capacitor Push API has some limitations around data-only notifications. The default Firebase APN notification payload works well with the Capacitor Push API, but if you need to send notifications for Android you have to update the Notification Template in the Push Notifications settings in the Stream Dashboard.
Here is an example Notification template
{
  "title": "{{ sender.name }} @ {{ channel.name }}",
  "body": "{{ truncate message.text 2000 }}",
  "click_action": "OPEN_ACTIVITY_1",
  "sound": "default"
}
You can read more about templates in our Push Templates in v2 guide.
Add the following code to your android/app/src/main/AndroidManifest.xml file to open the app if the notification is clicked:
<intent-filter>
  <action android:name="OPEN_ACTIVITY_1" />
  <category android:name="android.intent.category.DEFAULT" />
</intent-filter>
Add this element as a child to the activity element. "OPEN_ACTIVITY_1" is the "click_action" field from your Firebase Notification template.
On this page: