dependencies:
  flutter:
    sdk: flutter

  # Stream Chat SDK
  stream_chat_flutter: ^latest

  # Stream Video SDK
stream_video_flutter: ^latestBuilding Chat Apps With Video Support
One of the most common chat app use cases is having a chat feature in your app that allows users to engage in audio and video communication. This direct integration allows for a simple transition between text and images to more complex media.
Stream supports this use case, out-of-the-box. In this guide, you'll walk through all the steps required to integrate our Chat and Video Flutter SDKs into a cohesive whole. You'll cover the following:
- Adding Stream dependencies.
- Creating Stream clients.
- Authenticating Chat and Video users.
- Building custom Call attachments and "Start Call" UI.
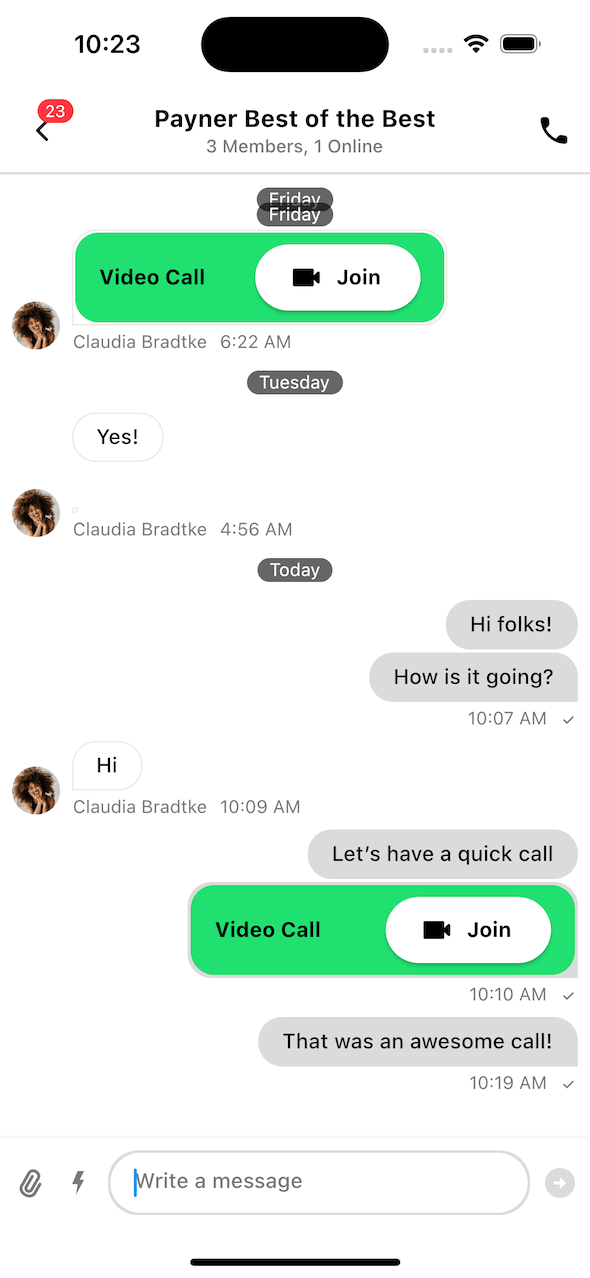
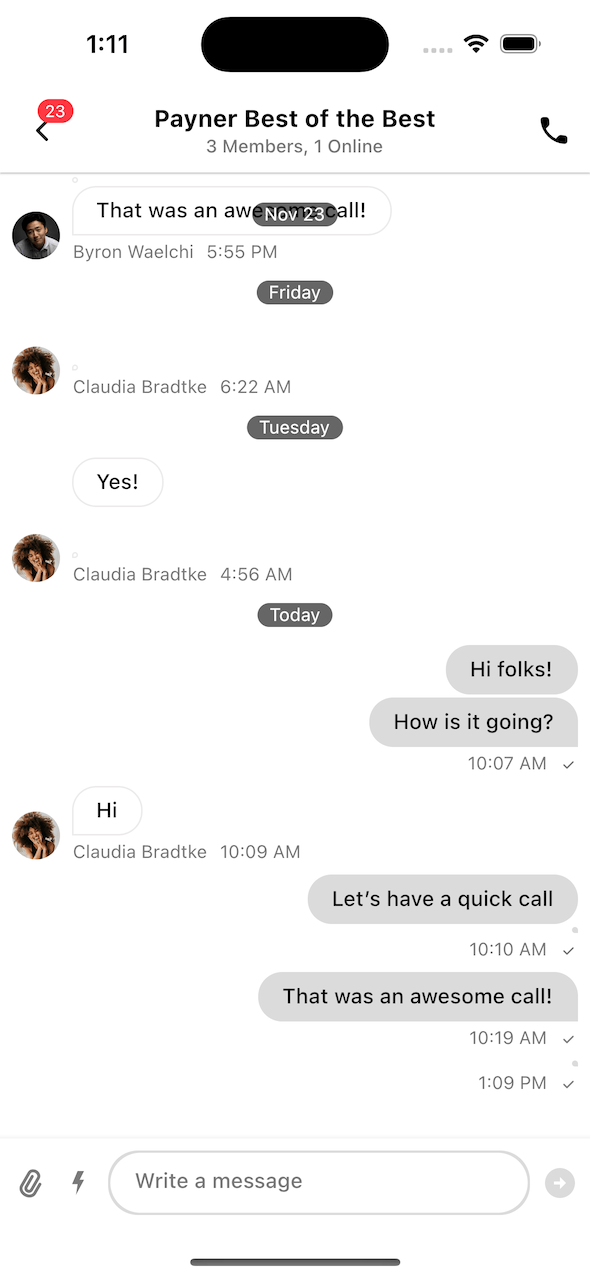
By the end of this guide, your app will look like this:
 |
|---|
You'll have the ability to create messaging conversations, in which you can start calls as a custom attachment. Anyone in the chat will then be notified accordingly and can join the call.
Let's see how to implement this.
Creating the project
The quickest way to get started is with our Starter Kit.
Note: The repo also includes a chat_with_video_call sample that contains the final code for this guide. If you want to jump straight to the finished implementation, you can open that project instead.
Run flutter pub get to install the dependencies declared in pubspec.yaml:
/pubspec.yaml
You'll be integrating two SDKs - Video and Chat. In the snippet above we declared dependencies for both of them.
The project already has a few screens set up for you with TODO items that you'll fill in later. Run the project and you should see the Login screen, followed by a blank Home screen after you select a user.
| Login Screen | Home Screen |
|---|---|
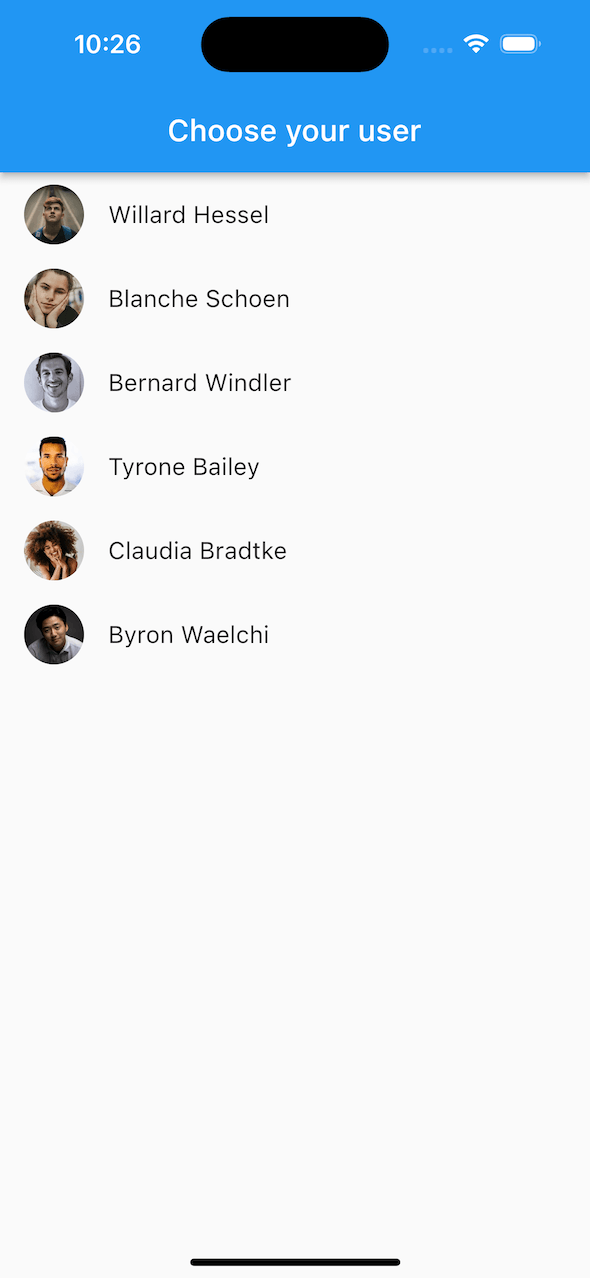 |  |
The pre-baked code contains all the logic that is not related to Stream, so that you can focus solely on integrating our two SDKs. We recommend exploring the project to learn how to navigate it and what each part of the predefined code does. Some of the notable functionality in the starter kit contains:
main.dartcontains an entry point for our application.app_config.dartcontains sample users, with Chat and Video tokens prepared.login_screen.dart,channel_list_screen.dartandchannel_screen.dartcontain screens for a default messaging app navigation. Most of these are empty for now, you'll fill them in.call_attachment_builder.dartcontains a custom attachment builder that users will use to join a call.
Now that you have an overview of the starter project, let's start integrating the SDKs.
Integrating the Chat SDK
The first step of integrating our Stream Chat SDK is initializing the StreamChatClient. You'll do that in the main.dart file, as it's recommended to initialize the client as soon as your app is launched. On top of that, you'll have to log in as a user, to fetch their information and conversations.
Creating the Client
Open the main.dart file and replace the Stream Chat SDK initialization section with the following:
/lib/main.dart
final client = StreamChatClient(
  Env.streamApiKey,
  logLevel: Level.INFO,
);
Then, you need to pass the client to MyApp widget and wrap the client into StreamChat widget:
/lib/main.dart
class MyApp extends StatelessWidget {
  const MyApp({
    Key? key,
    required this.chatClient,
  }) : super(key: key);

  final StreamChatClient chatClient;

  @override
  Widget build(BuildContext context) {
    return MaterialApp(
      builder: (context, child) => StreamChat(
        client: chatClient,
        child: child,
      ),
      home: LoginScreen(),
    );
  }
}
The final result should look like this:
/lib/main.dart
import 'package:chat_with_video_call/env/env.dart';
import 'package:chat_with_video_call/screens/login_screen.dart';
import 'package:flutter/material.dart';
import 'package:stream_chat_flutter/stream_chat_flutter.dart';

void main() {
  final client = StreamChatClient(
    Env.streamApiKey,
    logLevel: Level.INFO,
  );

  /// TODO: Initialize Stream Video SDK.

  runApp(MyApp(chatClient: client));
}

class MyApp extends StatelessWidget {
  const MyApp({
    Key? key,
    required this.chatClient,
  }) : super(key: key);

  final StreamChatClient chatClient;

  @override
  Widget build(BuildContext context) {
    return MaterialApp(
      builder: (context, child) => StreamChat(
        client: chatClient,
        child: child,
      ),
      home: LoginScreen(),
    );
  }
}
There are several important things to notice here:
- The Stream Chat API client is initialized with your API Key.
- The client is then passed to the top-level
StreamChatinherited widget that will provide the client to all the child widgets.
With this client initialization, you can proceed to log in a user when you choose them on the login screen.
Logging in a User
Open login_screen.dart and replace _connectChatUser with the following:
/lib/screens/login_screen.dart
Future<void> _connectChatUser(BuildContext context, SampleUser user) async {
  final chatClient = StreamChat.of(context).client;

  await chatClient.connectUser(
    user.toChatUser(),
    user.token,
  );
}
On the login screen, when you select a user, you call _connectChatUser. This lets you set up the user for Chat SDK. In this case, you're doing the following:
- You obtain the
StreamChatClientinstance fromStreamChat. - You map a
SampleUserinto aUserobject from the Chat SDK. - You pass in the
usertochatClient.connectUser().
To finish up, you can add the logging out counterpart, by replacing _disconnectChatUser with the following:
/lib/screens/login_screen.dart
Future<void> _disconnectChatUser(BuildContext context) async {
  final chatClient = StreamChat.of(context).client;

  await chatClient.disconnectUser();
}
With all this, you'll be able to log in and log out any user from our predefined data set. The next step is to display their conversations.
Implementing Channel List Screen
There isn't much to the channel list screen - it'll show a list of Channels the user is a member of and let them open those Channels. It'll also feature a custom header to allow the user to log out at will.
Most of the navigation functionality, like opening a Channel and logging out is already there, you just need to use our Flutter UI Components to implement the UI.
Open channel_list_screen.dart. Add the following code to _ChannelListScreenState, to initialize the StreamChannelListController, that'll help you load, fetch and display the required data:
/lib/screens/channel_list_screen.dart
late final _listController = StreamChannelListController(
  client: StreamChat.of(context).client,
  filter: Filter.in_(
    'members',
    [StreamChat.of(context).currentUser!.id],
  ),
  channelStateSort: const [SortOption.desc('last_message_at')],
);

@override
void dispose() {
  _listController.dispose();
  super.dispose();
}
While this is a simple piece of code, there are a few steps to analyze:
- You obtain the
StreamChatClientinstance fromStreamChat. - The controller requires the
StreamChatClientinstance to communicate with the API, achannelStateSortto define the order of theChannels andfilterto specify whichChannels we want to fetch. - Finally, we need to dispose the controller in the
dispose()method.
With the StreamChannelListController ready, add the following code to the build() method. Specifically, you'll add a header that will allow the user to log out and a component that shows a list of channels and lets you open the ChannelScreen. We will also include the floatingActionButton that will create a new channel for all of our users.
/lib/screens/channel_list_screen.dart
@override
Widget build(BuildContext context) {
  return Scaffold(
    appBar: StreamChannelListHeader(
      titleBuilder: (context, status, client) {
        return Text(
          "Chat with Video",
          style: StreamChatTheme.of(context).textTheme.headlineBold,
        );
      },
      actions: [
        IconButton(
          icon: const Icon(
            color: Colors.black,
            Icons.logout,
          ),
          onPressed: () async => widget.onLogout.call(),
        ),
      ],
    ),
    floatingActionButton: FloatingActionButton(
      onPressed: () async {
        final channel = StreamChat.of(context).client.channel(
          "messaging",
          extraData: {
            "members": sampleUsers.map((user) => user.id).toList(),
          },
        );

        await channel.create();
        _navigateToChannel(channel);
      },
      child: const Icon(Icons.add),
    ),
    body: StreamChannelListView(
      controller: _listController,
      onChannelTap: _navigateToChannel,
    ),
  );
}

void _navigateToChannel(Channel channel) {
  Navigator.of(context).push(
    MaterialPageRoute(
      builder: (context) {
        return StreamChannel(
          channel: channel,
          child: ChannelScreen(),
        );
      },
    ),
  );
}
The final result should look like this:
/lib/screens/channel_list_screen.dart
import 'package:chat_with_video_call/app_config.dart';
import 'package:flutter/material.dart';
import 'package:stream_chat_flutter/stream_chat_flutter.dart';

import 'channel_screen.dart';

class ChannelListScreen extends StatefulWidget {
  const ChannelListScreen({Key? key, required this.onLogout}) : super(key: key);

  final VoidCallback onLogout;

  @override
  State<ChannelListScreen> createState() => _ChannelListScreenState();
}

class _ChannelListScreenState extends State<ChannelListScreen> {
  late final _listController = StreamChannelListController(
    client: StreamChat.of(context).client,
    filter: Filter.in_(
      'members',
      [StreamChat.of(context).currentUser!.id],
    ),
    channelStateSort: const [SortOption.desc('last_message_at')],
  );

  @override
  void dispose() {
    _listController.dispose();
    super.dispose();
  }

  @override
  Widget build(BuildContext context) {
    return Scaffold(
      appBar: StreamChannelListHeader(
        titleBuilder: (context, status, client) {
          return Text(
            "Chat with Video",
            style: StreamChatTheme.of(context).textTheme.headlineBold,
          );
        },
        actions: [
          IconButton(
            icon: const Icon(
              color: Colors.black,
              Icons.logout,
            ),
            onPressed: () async => widget.onLogout.call(),
          ),
        ],
      ),
      floatingActionButton: FloatingActionButton(
        onPressed: () async {
          final channel = StreamChat.of(context).client.channel(
            "messaging",
            extraData: {
              "members": sampleUsers.map((user) => user.id).toList(),
            },
          );

          await channel.create();
          _navigateToChannel(channel);
        },
        child: const Icon(Icons.add),
      ),
      body: StreamChannelListView(
        controller: _listController,
        onChannelTap: _navigateToChannel,
      ),
    );
  }

  void _navigateToChannel(Channel channel) {
    Navigator.of(context).push(
      MaterialPageRoute(
        builder: (context) {
          return StreamChannel(
            channel: channel,
            child: ChannelScreen(),
          );
        },
      ),
    );
  }
}
There are only a few lines of code here that let you set up an entire screen and lots of functionality:
- You add the
StreamChannelListHeadercomponent that displays a title and allows for a few handlers and widget builders. In this case, you override theactionssection to show a button used to log out the user from the app. - Using the
_listController, you render aStreamChannelListView, which shows a list ofChannels. OverridingonChannelTap, lets you set up functionality when a user selects anyChannel. In your case, you navigate toChannelScreen. - Notice how the selected channel is provided to
ChannelScreenvia theStreamChannelinherited widget.
Now let's navigate to channel screen when the user logs in:
/lib/screens/login_screen.dart
Future<void> _login(BuildContext context, SampleUser user) async {
  _connectChatUser(context, user);
  _connectVideoUser(user);

  Navigator.push(
    context,
    MaterialPageRoute(
      builder: (context) => Material(
        child: ChannelListScreen(onLogout: () => _logout(context)),
      ),
    ),
  );
}
Build and run the app and you should be able to log in or out with a user, as well as see and open the Channels they're a part of.
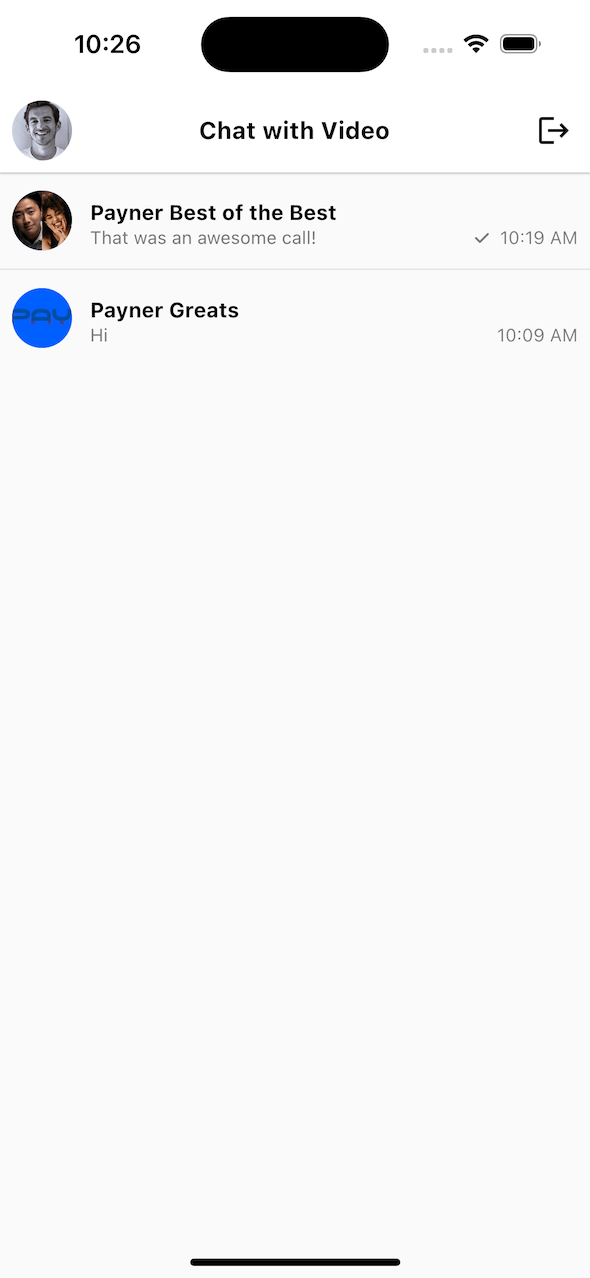 |
|---|
The next step to integrating the Chat SDK to replicate a chat-first-app that allows video calls, is to display the selected conversations and integrate custom attachments that render created calls.
Adding Messaging Functionality
You're able to open the ChannelScreen, but it's fully empty at the moment. Let's change that. Open ChannelScreen and at the very top of the class, add the UI code:
/lib/screens/channel_screen.dart
@override
Widget build(BuildContext context) {
  return Scaffold(
    appBar: StreamChannelHeader(
      actions: <Widget>[
        IconButton(
          icon: const Icon(
            Icons.call_rounded,
            color: Colors.black,
          ),
          onPressed: () async => _startCall(context),
        ),
      ],
    ),
    body: Column(
      children: <Widget>[
        Expanded(
          child: StreamMessageListView(
            messageBuilder: (context, details, messages, defaultMessage) {
              return defaultMessage.copyWith(
                attachmentBuilders: _customAttachmentBuilders(
                  defaultMessage.message,
                ),
              );
            },
          ),
        ),
        StreamMessageInput(),
      ],
    ),
  );
}
The block of code here is mostly straightforward, as you're just composing a ChannelScreen, with some custom UI. Let's go over it:
- You add an
appBarto theScaffold, usingStreamChannelHeader. Overriding theactionsallows you to set custom UI and behavior when the user interacts with that UI component, such as creating a Call. - You add
StreamMessageListView, with a list ofattachmentBuilders. This will be important, as you'll serve theChannelwith custom Call attachments that let users join a video call. - Finally, you add
StreamMessageInputwith no special customization.
Build and run the app now and try opening a channel. You should see something like this:
 |
|---|
You have a full integration of chat features in your app now. You can see channels, open them, send messages and attachments, start threads and much more. If you notice that some of the messages appear to be missing, that's because our SDK is trying to render custom Call attachments, but it doesn't yet know how.
For that to work, you need to add custom attachment builders to the SDK. There is already a custom attachment builder prepared for you, you just need to pass it to StreamMessageListView.
Supporting Custom Attachments
Open the call_attachment_builder.dart file. Explore it to familiarize yourself with the logic behind the UI it shows and the way it allows users to join the call.
It consumes the data stored in the custom attachment to join a call. Right now, the StreamVideo instance is not yet set up, as you'll do that in the final step of the guide.
To add the custom attachment builder, open the channel_screen.dart file and replace the _customAttachmentBuilders method with the following:
/lib/screens/channel_screen.dart
List<StreamAttachmentWidgetBuilder> _customAttachmentBuilders(
  Message message,
) {
  return [
    CallAttachmentWidgetBuilder(),
    ...StreamAttachmentWidgetBuilder.defaultBuilders(message: message),
  ];
}
Build and run the app now and your custom Call attachments should render properly.
Great, you're ready to join calls. But for that, you need to integrate the Stream Video Flutter SDK.
Integrating the Video SDK
To successfully connect to a Call, you need to use its id (and type) to get the detailed information and join it. The internal process of joining a Call has several steps, such as measuring the latency and choosing the best server to connect through, but all you care about now is the trigger to join a Call and show the corresponding UI.
Firstly, you need to initialize the Video client, aptly called StreamVideo.
Initializing StreamVideo and logging in a User
You're now ready to log in the user and connect to a call when tapping on the custom attachment or header action.
For the login aspect of StreamVideo, there's not much to think about. The StreamVideo client is tied to a user instance. You cannot access any potential Calls or join an audio/video call, unless you're logged in. It's a server requirement and it makes things easy to think about.
Open the login_screen.dart file and replace the _connectVideoUser code with the following:
/lib/screens/login_screen.dart
Future<void> _connectVideoUser(SampleUser user) async {
  final client = StreamVideo(
    Env.streamApiKey,
    user: user.toVideoUser(),
    userToken: user.token,
  );

  await client.connect();
}
It's very simple in what it does:
- You initialise
StreamVideousing your API key and pass along the user you want to connect. - You call the
connect()function to connect the video client. - The
StreamVideoclient created here is now accessible usingStreamVideo.instanceanywhere in your app.
With all of this, your attachments will be able to hit the Video API endpoints to join a call.
To finish up, you can add the logging out counterpart, by replacing _disconnectVideoUser with the following:
/lib/screens/login_screen.dart
Future<void> _disconnectVideoUser() async {
  final videoClient = StreamVideo.instance;
  await videoClient.disconnect();
}
Allowing Users To Start Calls
Open the channel_screen.dart file and find _startCall(). Within it, add the following code:
/lib/screens/channel_screen.dart
void _startCall(BuildContext context) async {
  final currentUser = StreamChat.of(context).currentUser;
  final channel = StreamChannel.of(context).channel;

  final call = StreamVideo.instance.makeCall(
    id: '${channel.id}_call${Random().nextInt(10000)}',
    callType: StreamCallType.defaultType(),
  );

  await call.getOrCreate();

  channel.sendMessage(
    Message(
      attachments: [
        Attachment(
          type: "custom",
          authorName: currentUser?.name ?? "",
          uploadState: UploadState.success(),
          extraData: {
            "callId": call.id,
            "callType": call.type.toString(),
          },
        ),
      ],
    ),
  );
}
This snippet is larger than the previous integration steps, but it packs a few things to keep in mind when creating a Call:
- You are able to
makeCall()by passing in a Call ID and itscallType. Then you need to create that call on Stream's backend by callingcall.getOrCreate(). If you want to create a ringing call passringingas true and addmemberIdsfor users you want to notify. For simplicity, you will create meeting calls, which don't require any initial members or ringing. - If the API call is successful, you can proceed to build the Call attachment. If the API call fails, you can show custom UI to the user, but in this case we'll just ignore that case.
- To build the
Attachment, you use its constructor, which lets you define the type of theAttachment, its author and anyextraDatayou might need to render the UI. In this case, you pass in thecall.idandcall.typeused to render the attachment. - Finally, when the attachment is ready, you can build a new
Messageand pass in yourcustomAttachment. By callingchannel.sendMessage(), you create a new message in the channel, with the details required to join the Call.
You could've approached this logic differently and shown a special dialog to the user for the call creation, give them more options for customization, like who to invite and similar. But for this basic use case of Chat + Video, you'll just create a simple call that's public in the Channel.
Now, you're fully ready to start and enjoy the Chat + Video experience. Build and run the app, log in and join any call attachment, or create a new call and join like that.
 |
|---|
Play around with the controls, the default StreamActiveCall and the SDK offer the following options:
- Enable or disable audio and video
- Switch to speakerphone
- Flip your camera
- Leave the call
- Observe participants and invite new people to the call
And much more. You've implemented everything you need to achieve a good Chat + Video use case.
On this page: