

An app like Telegram uses fine-grained animations to engage, entertain, and onboard users in many ways. In this article, you will learn how to build and integrate great SwiftUI animations and motion for your iOS apps to provide wow user experiences. You can use the animations in this article in, for example, live video streaming apps.
Continue reading to discover the techniques, tips, and tricks to create iOS with SwiftUI that look and feel fluid, intuitive, and natural.
What Will You Learn in This Tutorial?
The article guides you in creating emoji reaction animations for chat messaging and real-time or live video streaming apps. A video version of the article is available on the Stream Developers iOS series YouTube channel. These animations are similar to the animated emoji reactions in Facebook Live and [Skype], but a lot more fun than that. You will build keyframe-like comments animation, animated clapping hands emoji, revolving hearts animation, and many more.
The tutorial aims to make you gain the skills to build fun and meaningful SwiftUI animations without using animation tools like Rive or Lottie Files.
Getting Started
You can download the source code accompanying this tutorial from GitHub. The Xcode project contains all the SwiftUI animations, emojis, and image/illustration assets. When you run the Xcode project using an iOS device, the camera of the iPhone or iPad displays as the background of the animations. For more information about how to set up the live iOS camera, check Live iOS Device Camera on GitHub. Two of the animations (Clapping Hands and Revolving Hearts) in the project accompanying this tutorial are in an earlier article Learn How to Bring Your SwiftUI App to Life With Advanced Animations
You can also create a new SwiftUI project in Xcode to follow along with the tutorial.
A Tour of the Final Project
After downloading the project from GitHub, head to the Xcode Project Navigator, find the AllReactionWithComments.swift, and run it using the preview, simulator, or iPhone. The video below shows the output of AllReactionWithComments.swift, which contains all the animations you will build on a single screen.
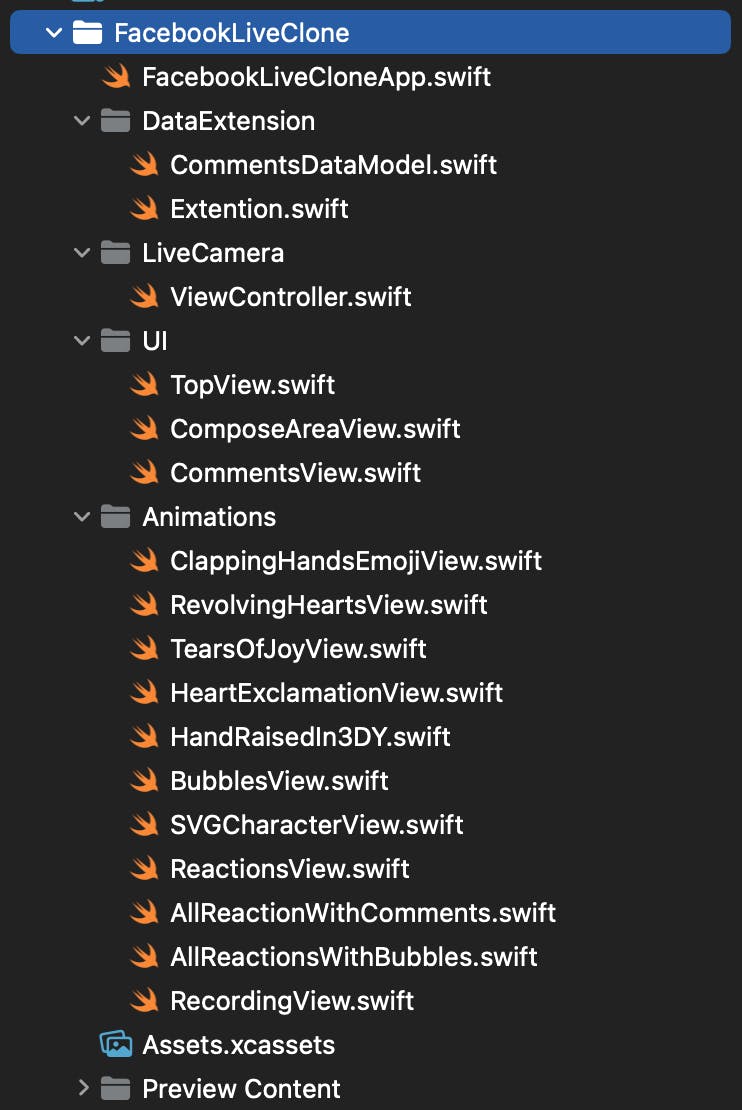
The comments data are pulled from CommentsDataModel.swift. Extension.swift contains an extension for rounding the corners of the comments compose area separately from one another. ViewController.swift is used to display the live camera. The UI is divided into three parts, top view, compose area and comments view as shown under the folder UI in the Project Navigator. The image below shows the project's folder structure.
Configure Your Xcode To Show the Device Camera
When you create an app that needs to access the user's camera, Apple requires you to seek users' permission about the camera usage when they launch your app for the first time. Select the main app folder in the Xcode project and click the Info tab to configure this privacy setting.
In the case of the sample app in this article, the root app folder name is FacebookLiveClone. Under the Info category, click any of the Key items and set its Type as a string. This app uses FacebookLiveClone would like to access your camera as the string.
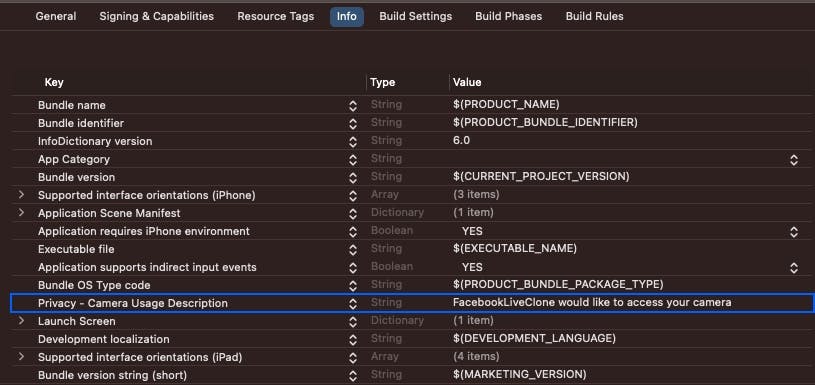
Note: Failure to add this privacy setting above will result in an inability to display the device camera in the background of the animations.
Create the Animations
When you download the project from GitHub, you can find all the animations in the folder Animations. In this section, you will create all the animations from scratch. So, add an empty folder Animations in the Project Navigator and follow the steps below to build the animations from scratch.
Tears of Joy Emoji Animation
The Tears of Joy emoji animation involve scaling and rotation. This animated emoji is normally used for teasing or joking in chat or live video messaging. The Tears of Joy emoji animation involve scaling and rotation. You can use this animated emoji for teasing or joking in chat or live video messaging. You can find the animation assets from the Fluent Emoji on GitHub or in the assets library of this Xcode project.
Note: When you download the asset from the Fluent Emoji repository, you should open the layers with your favorite design tools like Sketch or Figma to separate the layers.
Add a new file SwiftUI file TearsOfJoy.swift to the Animations folder. Replace the content of the file with the code below.
//
//  TearsOfJoyView.swift
//  FacebookLiveClone
//
import SwiftUI
struct TearsOfJoyView: View {
    @State private var isJoyful = false

    var body: some View {
        ZStack {
            Image("tearHead")

            VStack(spacing: -30) {
                Image("joyEyes")
.rotationEffect(.degrees(isJoyful ? -16 : 8))In this animation, you should define a state @State private var isJoyful = false to animate eyes, mouth, and tears. The eyes and the tears of the emoji animate with rotation using the state isJoyful along with ternary conditional operation. Animating the mouth by changing the height, scaling the size, and rotating it creates a nice effect.
Image("tearMouth")
     .resizable()
     .frame(width: 33, height: isJoyful ? 32 : 28)
     .scaleEffect(isJoyful ? 0.8 : 1)
     .rotationEffect(.degrees(isJoyful ? 8 : -8))
     .animation(.easeInOut(duration: 0.5).repeatForever(autoreverses: true), value: isJoyful)
Heart Exclamation Animation
In this section, you will use 3D rotation to animate a heart icon. When this animation is present in a messaging app, it can be used for expressing love or affection. In the Animations folder, create a new file HeartExclamationView.swift and add the code below as the content.
//  HeartExclamationView.swift
//  SwiftUICallingKit
//
import SwiftUI
struct HeartExclamationView: View {
    @State private var isYRotating: Double = 0.0

    var body: some View {
        Button {
            // Add tap action
        } label: {
            VStack(spacing: 0) {
                Image("heartExclamation")
                    .rotation3DEffect(.degrees(isYRotating), axis: (x: 0, y: 1, z: 0))
.font(.system(size: 128))The code above uses the 3D rotation modifier to spin the heart icon on the y-axis. To achieve this animation, you could define and set the initial angle of rotation as 0.0 @State private var isYRotating: Double = 0.0. Then, set the final angle of rotation to 360° when the views appear. To make the heart icon spin only on the y-axis, set the y coordinate of the 3D rotation modifier to one. Then, set x and z to zero .rotation3DEffect(.degrees(isYRotating), axis: (x: 0, y: 1, z: 0)). Finally, add the animation modifier and repeat the animation forever.
Hand-Raised Animation
This section shows you how to create a hand-raised SwiftUI animation using offset and 3D rotation. This animation is useful for drop-in audio applications like Twitter Spaces and Club House.
Create a new file HandRaisedIn3DY.swift in the Animations folder. Substitute the content of the file with the following code.
//
//  HandRaisedView.swift
//  SwiftUICallingKit
import SwiftUI
struct HandRaisedIn3DY: View {
    @State private var handIsRaised = false

    var body: some View {
        Button {
            // Add tap action
        } label: {
            Image("handRaised")
                .rotation3DEffect(.degrees(handIsRaised ? 0 : -180), axis: (x: 0, y: 1, z: 0))
                .offset(y: handIsRaised ? -150 : 0)
.onAppear{This animation is similar to the heart exclamation animation you built previously. There is also an offset animation.
The animation state variable handIsRaised in the code above flips the hand emoji on the y-axis from an angle of -180° to 0° .rotation3DEffect(.degrees(handIsRaised ? 0 : -180), axis: (x: 0, y: 1, z: 0)) using ternary operation. To raise the hand, you should animate the y-offset to move the hand emoji from the original position of 0 upwards at the position of -150 .offset(y: handIsRaised ? -150 : 0).
Creating Animated Bubbles: How to Create an Arc Motion
When you animate the position or offset modifiers in SwiftUI, they result in rectilinear motion and motion along a diagonal path.
As Edward Bulwer-Lytton once said, "In life, as in art, the beautiful moves in curves". In this section, you will discover a trick in SwiftUI that will allow you to move objects along an arc to create a beautifully curved motion.
Add a new file BubblesView.swift to the Animations folder of the Project Navigator and put the code below to replace its content.
//
//  BubblesView.swift
//  FacebookLiveClone
import SwiftUI
struct BubblesView: View {
    @State private var showBubbles = false

    var body: some View {
        ZStack {
            Image(systemName: "bubble.right.fill")
                .font(.system(size: 90))
                .overlay(Text("Nice").font(.title2).bold().foregroundColor(.white).padding(.bottom))
                .scaleEffect(showBubbles ? 1 : 0)
                .offset(y: showBubbles ? -200 : 0)
.rotationEffect(.degrees(showBubbles ? -25 : 0))All the bubbles animate in the same way but in different directions. Define @State private var showBubbles = false to set the starting animation value to false. Add the .onAppear() modifier to the ZStack containing all the bubbles to toggle the initial state you defined.
In SwiftUI, you can create a straight-line movement using the .offset() modifier. From the animation in this section, the code snippet below creates a rectilinear motion by moving the bubble image upward from its original position.
Image(systemName: "bubble.right.fill")
        .font(.system(size: 72))
        .overlay(Text("Super").font(.title2).bold().foregroundColor(.white).padding(.bottom))
        .scaleEffect(showBubbles ? 1 : 0)
        .offset(y: showBubbles ? -200 : 0)
        .animation(.easeIn(duration: 2).delay(3).repeatForever(autoreverses: false), value: showBubbles)
To convert the rectilinear motion to an arc movement, you can apply the CSS concept offset-rotate. This CSS property allows you to move objects on an arc to create a circular motion. To mimic this CSS arc motion in SwiftUI, you should place the .offset() modifier above the .rotationEffect() modifier.
Image(systemName: "bubble.right.fill")
        .font(.system(size: 90))
        .overlay(Text("Nice").font(.title2).bold().foregroundColor(.white).padding(.bottom))
        .scaleEffect(showBubbles ? 1 : 0)
        .offset(y: showBubbles ? -200 : 0)
        .rotationEffect(.degrees(showBubbles ? -25 : 0))
        .animation(.easeInOut(duration: 2).delay(5).repeatForever(autoreverses: false), value: showBubbles)
Four of the bubbles in the ZStack container animate using this technique but with different angles of rotation, which move them in different directions.
Creating the SVG Illustration Animation
In this example, you will learn how to animate the x and y coordinates of views separately. The animation also involves 2D rotation, hue rotation, eyeblink, and using a custom timing function from easings.net.
You can find the SVG illustration used in this section in the assets library of the Xcode project. You can also design one in your favorite design tools like Sketch or Figma and export each of the parts (layers) of the illustration as SVG, PDF, JPG, or PNG. As a recommendation, you should use SVG or PDF since they are vector formats.
To create the SVG illustration animation, add a new SwiftUI file SVGCharacterView.swift to the Animations folder. Use the code below to replace the content of the file.
//
//  SVGCharacterView.swift
//  FacebookLiveClone
//
import SwiftUI
struct SVGCharacterView: View {
    @State private var isShowing = false
    @State private var isBlinking = false
    @State private var isTalking = false

    var body: some View {
        HStack {
            BubblesView()
            ZStack {
VStack(alignment: .leading, spacing: -5) {The animation of the illustration uses the following three states.
@State private var isShowing = false
@State private var isBlinking = false
@State private var isTalking = false
The isShowing state variable creates offset, rotation, and hue rotation animations. The eye blink animation uses isBlinking while the mouth animation uses isTalking.
You should use the basic SwiftUI container views in the code above to arrange the illustration into one. In the code above, the character's right hand and the wand SF Symbol behind it animate using offset and rotation using a custom timing curve. Using .hueRotation(.degrees(isShowing ? 0 : 140)), the color value of the wand icon changes while rotating.
To create the eyeblink animation, you should use scale and a custom easing function.
.scaleEffect(isBlinking ? 0 : 1)
              .animation(.timingCurve(0.68, -0.6, 0.32, 1.6).delay(2).repeatForever(autoreverses: false), value: isBlinking)
You should animate the mouth by the scale effect modifier to animate the x and y coordinates separately as shown below.
Image("mouth2")
     .padding(.horizontal, -35)
     .scaleEffect(x: isTalking ? 1 : 0.8, anchor: .top)
     .animation(.easeIn.delay(0.01).repeatForever(autoreverses: true), value: isTalking)
     .scaleEffect(y: isTalking ? 0.8 : 1, anchor: .top)
     .animation(.easeOut.delay(0.01).repeatForever(autoreverses: true), value: isTalking)
Animating the x and y coordinates of the mouth separately with different timing functions creates a realistic mouth animation.
To move the hand slightly from the left to right, you should use the offset.
Image("handL")
     .padding(.top, 120)
     .offset(x: isShowing ? -2.5 : 2.5)
     .animation(.timingCurve(0.68, -0.9, 0.32, 1.6).delay(2).repeatForever(autoreverses: true), value: isBlinking)
Putting It All Together
To bring all the individual animations you have created together on one screen, create a new SwiftUI file AllReactionsWithBubbles.swift and replace the code template with the following code.
//
//  AllReactionWithComments.swift
//  FacebookLiveClone
//
import SwiftUI
struct AllReactionsWithBubbles: View {
    var body: some View {
        NavigationStack {
            ZStack {
                HostedViewController()
                    .ignoresSafeArea()
                VStack {
                    TopView()
                    Spacer()
SVGCharacterView()Note: You can find TopView() and ComposeAreaView() in the UI folder.
HostedViewController() is the view that displays the live camera. The device camera shows when you run the app on an iOS device. The top section of this screen has a toolbar populated with the content of RecordingView().
.toolbar {
        ToolbarItem(placement: .principal) {
          RecordingView()
        }
      }
You can find RecordingView.swift under the Animations folder in the Xcode Project Navigator.
Recap
In this tutorial, you discovered and learned about creating cute emoji reaction animations with SwiftUI, similar to Facebook Live. You animated an SVG illustration and so many different animatable properties in SwiftUI.
Using the SwiftUI animations techniques, tips, and tricks you learned in this article, you can start building beautiful SwiftUI animations for your iOS apps.
Where Do I Learn More?
As a recommendation, subscribe to the Stream Developers YouTube channel to learn more about SwiftUI and iOS animations. Grab the completed animations project from GitHub and explore all and additional ones. If you plan to build a real-time video application, you can check the Stream Video SDK and signup for early access. Read Learn How to Bring Your SwiftUI App to Life With Advanced Animations to take your animation skills to the next level.