

As a chat company, we naturally wanted to check out OpenAI's ChatGPT model (and have a little fun with it!) by trying to have it act as a chatbot in a conversation between friends.
Since ChatGPT does not have an official API yet, our work was cut out for us 😅.
Understanding the API

The default interface for interacting with ChatGPT is simplistic. It has a text box, some prompts, and an area for the conversation to live.
For our use case, we want to create our own interface and use ChatGPT as a server-side bot. With the lack of client-side SDKs, we are left to build this integration from scratch by examining the requests being sent in the browser.
With this, we are trying to identify a few things:
- Format of data being sent and received
- Authentication strategy
-
Feasibility of building our own client by reproducing the request in an environment outside of the browser
Looking at the network traffic from Chrome, we can get an idea of how the data is structured and processed.
The first thing that stands out is the number of headers being sent to follow-up requests. From the video above, we can see two main endpoints being called once a prompt is sent to the API:
- Moderation
- Conversations
The moderation endpoint is first called with the user input to presumably check for harm before contacting the chat model. The conversation endpoint is only triggered after a request is cleared from the moderation endpoint.
Conversation is the request we are interested in for our sample application. To better understand the data being sent and received, let’s import the request in Postman as a cURL:

Once imported, we can get more clarity on how the API works. For example, looking at the headers above, we can copy the authorization token to authenticate each request. When implementing the API through code, we will need the headers to call and receive responses from the API successfully.
💡 Note: If you were to examine the token further by pasting it into the JWT debugger, you’d notice a relatively short TTL. The token can be extended using the session_token as a refresh, but we will not cover that in this post.
As we move on to the body, the request requires us to supply three parameters as JSON:
- Action
- List of messages
- Conversation ID
- Parent Message
- GPT Model to be used

With our request added to Postman, we can cross our fingers and hope it successfully executes 😁🤞:

Looking at the response from the API for the first time was interesting! – it returns a stream of text data prefixed with the keyword data containing a message object with the response in parts.
Looking at the response in the context of the official demo, it likely allows for the “typing” effect seen when the AI replies to your prompt on the website.
For us, we don’t care too much about the data stream. We are mostly interested in the final object, which contains the completed response:
{
  "message": {
    "id": "5a5e0a89-99d0-4d9c-a8ec-765f5ea26b83",
    "role": "assistant",
    "user": null,
    "create_time": null,
    "update_time": null,
    "content": {
      "content_type": "text",
      "parts": [
        "I am an AI language model and do not have the ability to experience emotions or feelings. However, I am here to assist you with any questions or information you may need. How can I help you today?"
      ]
    },
    "end_turn": null,
"weight": "1.0",With our excellent understanding of the API, it’s time to start building our backend 😁.
Building our Backend

For our backend, we will build a simple NodeJS server that acts as a middle ground between our client application and the GPT API.
We will also be using Stream as our chat service since it already provides UI kits and SDKs pre-connected, saving us from writing these components from scratch.
The structure we will be going for is diagrammed below:
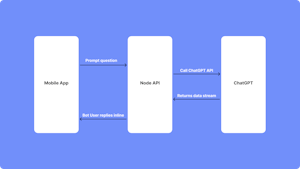
- Our app will trigger ChatGPT with a “slash command”
- The NodeJS server will respond to the command and pass the request on to the ChatGPT
- ChatGPT will return the data stream
- Node API will parse the stream and trigger a bot reply in the chat
Let’s start by creating a new NodeJS project and installing the required packages to build our server. You can fill in any name you like. For my project, I am keeping things simple with gpt-demo:
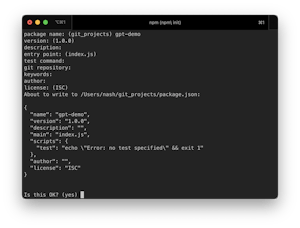
Once the directory and package.json are created, we can install the packages we need for our API:
npm install dotenv express node-fetch stream-chatPerfect! Now we can begin writing some code.
In our index.js file, let’s start by defining a very simple web server with a single “POST” route:
import express from "express";

const app = express();
app.use(express.json());

app.post("/gpt-request", async (request, response, next) => {
   response.status(200);
});

app.listen(3000, () => console.log(`Server running on 3000`));
Next, let’s configure our .env file with the secrets to make our project come to life:
OPENAI_AUTHORIZATION_KEY=YOUR-AUTH-TOKEN-COPIED-FROM-CHROME
OPENAI_COOKIE=YOUR-COOKIE-COPIED-FROM-CHROME

STREAM_API_KEY=YOUR-STREAM-KEY
STREAM_API_SECRET=YOUR-STREAM-SECRET
For Stream, you must create a free account on the website to get an API key and secret. You can follow the step-by-step guide here to create an account before continuing.
Once your .env is populated, we can move on to loading the values in our index.js file:
import * as dotenv from 'dotenv';

...

dotenv.config({path: "../.env"})

const OPENAI_AUTHORIZATION_KEY = process.env.OPENAI_AUTHORIZATION_KEY;
const OPENAI_COOKIE = process.env.OPENAI_COOKIE;
const STREAM_API_KEY = process.env.STREAM_API_KEY;
const STREAM_API_SECRET = process.env.STREAM_API_SECRET;
Registering our Webhook 🪝
A key part of our application relies on listening and replying to command triggers. These triggers can be created using webhooks and custom commands.
To create our webhook, let’s create a new instance of the StreamClient:
const serverClient = StreamChat.getInstance(STREAM_API_KEY, STREAM_API_SECRET);Next, we can query Stream to retrieve a list of commands and create a new one if our “gpt” command does not exist.
To test our local server and register a URL handler, we will need to use a tool like ngrok to serve our local server (unless you choose to deploy it somewhere):
export async function configureStream(serverClient) {
  const { commands } = await serverClient.listCommands();
  const commandExists = commands.find((command) => command.name === "gpt");
  if (!commandExists) {
    serverClient
      .createCommand({
        name: "gpt",
        description: "Have a question? Ask your friendly GPT AI for help!",
        args: "[question]",
      })
      .then((_) => console.log(`Added command for Gpt`))
      .catch((err) =>
        console.error(`Something went wrong adding Hugo custom command ${err}`),
      );

    serverClient
      .updateAppSettings({
        custom_action_handler_url: "YOUR-NGROK-ENDPOINT",
      })
      .then((r) => console.log(r))
      .catch((e) => console.error(`Unable to add custom action URL ${e}`));
  }
}
For the sake of simplicity, I refactored the method above into a dedicated file and called the method during the setup process. This step is a personal preference, but I think it keeps things organized and easier to follow:
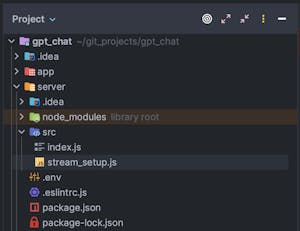
With our configuration method defined, we can run the server again with ngrok to create the custom command handler and URL.
Once everything runs successfully, we can add the command name to the channel type on Stream’s dashboard:

💡 Sidebar: There are many different channel types you can have using Stream. Each type is optimized for a different use case and may have some features turned on or off based on your preferences. For example, live streaming disables read receipts by default since they aren’t commonly used with live-stream apps.
Back in our code, we can begin implementing the /gpt-request route to handle connecting to ChatGPT:
app.post("/gpt-request", async (request, response, next) => {
  const message = request.body.message;
  if (message.command === "gpt") {
    try {
      const text = message.args;

      const aiResponse = await fetch(
        "https://chat.openai.com/backend-api/conversation",
        {
          headers: {
            authority: "chat.openai.com",
            accept: " text/event-stream",
            authorization: OPENAI_AUTHORIZATION_KEY,
            "content-type": "application/json",
cookie: OPENAI_COOKIE,Once an action is triggered in the frontend, we can handle the response by extracting the text, verifying it matches the command we would like to execute, and then storing the argument/text passed to the command.
Next, we will use the node-fetch package to call the ChatGPT API with the headers and format we copied from Google Chrome.
Note: Don’t forget to replace the Authorization token and cookie with your personal auth and cookie copied from Chrome or Postman.
💡 Pro Tip: If you right-click the network request in Chrome, you can copy the request as NodeJS fetch which will generate the code above.
if (aiResponse.status === 200) {
  const results = await aiResponse.text();
  const aiText = parseGPTResponse(results); // We will create this next
}
Once we get a response, we can check the response's status and then get the text sent back by the API.
If you remember from earlier, the API will return a stream of text containing the response in parts. For our app, we will need to parse that response and extract the final, completed value from the API.
To accomplish this objective, let’s create a new method, parseGPTResponse, to parse the response:
function parseGPTResponse(formattedString) {
  const dataChunks = formattedString.split("data:");
  const responseObjectText = dataChunks[dataChunks.length - 2].trim();
  const responseObject = JSON.parse(responseObjectText);
  return responseObject.message.content.parts[0];
}
We will split the data based on the data: prefix, which will leave us with an array of message objects. Once the array is created, we can extract the final value from the second to last value of the array.
With the object identified, we can parse the object and drill down to get the text 🙂.
Sending Messages
Returning back to our handler, we can take the parsed text and inject it into the message channel:
if (aiResponse.status === 200) {
  const results = await aiResponse.text();
  const aiText = parseGPTResponse(results);

  const channelSegments = message.cid.split(":");
  const channel = serverClient.channel(channelSegments[0], channelSegments[1]);
  message.text = "";
  channel
    .sendMessage({
      text: aiText,
      user: {
        id: "admin",
        image: "https://openai.com/content/images/2022/05/openai-avatar.png",
        name: "ChatGPT bot",
      },
    })
    .catch((error) => console.error(error));
  response.json({
    status: true,
    text: "",
  });
}
To send the message, we need to create a new channel object using Stream’s server-side SDK with the channel type and ID. These can be constructed by splitting the message.cid parameter of the incoming object.
Once the channel is created, we can call sendMessage, passing over the text and the user posting the response.
For the user object, we can have some fun with it and give it a name and photo URL. This will be displayed in the frontend as a user in the channel.
Building the Frontend
To keep things simple, we will use Stream’s UI SDK to quickly build an interface for interacting with the API. We will use the Flutter SDK for this tutorial, but the same result can be achieved using any of Stream’s other Frontend clients.
Let’s start by creating a new Flutter project and adding the relevant dependencies:
flutter create gpt_chatcd gpt_chat && flutter pub add stream_chat_flutterNext, let’s open the main.dart file and remove the generated code with the following:
import 'package:flutter/material.dart';
import 'package:gpt_chat/users.dart';
import 'package:stream_chat_flutter/stream_chat_flutter.dart';

// We set our Stream API Key as a `--dart-define` value
const String streamApi = String.fromEnvironment("STREAM_API");

Future<void> main() async {
  // Let's create our client passing it the API and setting the default log level
  final streamClient = StreamChatClient(
    streamApi,
    logLevel: Level.INFO,
  );

// Set the user for the current running application.The code above retrieves the application’s API key from the environment and then creates a new instance of the StreamChatClient class for us to interact with.
Next, we connect to the client, passing the user_id and token. I extracted the user information for the tutorial to a separate file, but you can generate this information using Stream’s JWT generator.
Finally, we can create a channel, give it a name, add the users we would like to chat with, and then call channel.watch.
On the Stream side, this action will create the channel if it does not exist, then listen for events on the channel, such as new messages, indicators, status changes, etc.
With the setup out of the way, we can move on to creating the top-level widget for our app. The code for this widget mostly contains the setup for our Flutter application. The chat client and channel we defined earlier in the main method are passed to our application as required constructor parameters.
Stream’s Flutter SDK relies on InheritedWidgets to propagate information throughout the application so before we can render any of our message lists or conversations, the home page/root widget must be wrapped with a StreamChat and StreamChannel:
class GTPChat extends StatefulWidget {
const GTPChat({
super.key,
required this.chatClient,
required this.chatChannel,
});
final StreamChatClient chatClient;
final Channel chatChannel;
State<GTPChat> createState() => _GTPChatState();
}
class _GTPChatState extends State<GTPChat> {Finally, we can move on to creating our App widget and implementing the UI we want our users to interact with:
class App extends StatefulWidget {
const App({Key? key}) : super(key: key);
State<App> createState() => _AppState();
}
class _AppState extends State<App> {
Widget build(BuildContext context) {
return const ChannelPage();
}
}
class ChannelPage extends StatelessWidget {For the interface, we will keep it very simple by using Stream’s default header, listview, and message input. For complex applications, these widgets can be fully customized to match your app’s branding and behavior, but for the purposes of this tutorial, the default behavior works perfectly fine.
With our code in place, let’s run our app and look at the results!

Bringing it all Together!
With both sides of our application complete, let’s run both our server and front-end apps to look at the results.
If everything worked as intended, when a user in the chat types /gpt hello, our NodeJS server should pick up the command and connect to ChatGPT for a response.
Of course, being a fully-fledged app, users in the channel can interact with the response by adding reactions, replies, and prompt follow-up questions.
If you do run into errors while invoking the command, be sure to double-check your authorization token and cookie. OpenAI has also started limited external API calls, so you may need to verify that the call still works outside of a browser. The project files can be found on my Github if you are interested in trying them out.
Build something cool with Stream or OpenAI? Tweet us @getstream_io or tag us on LinkedIn. We can’t wait to see what you build!
— Nash
