
WebRTC, an open-source protocol for video streaming developed and maintained by Google, facilitates real-time multimedia streaming directly through a web browser without additional plugins.
However, WebRTC isn't tailored for specific platforms such as Android, iOS, or Flutter. Historically, Google provided a WebRTC library for Android, but maintenance ceased in 2018, and the library is very outdated based on the latest updates. Moreover, the official prebuilt libraries were removed following the shutdown of the JCenter publication service.
No official pathway exists for integrating WebRTC APIs into Android projects. The need for more recent, comprehensive guides for constructing a prebuilt WebRTC library leaves developers navigating a complex process with little support.
To address these challenges, the Stream team has developed their own prebuilt WebRTC library for Android, designed to be integrated into the Stream Video SDK for Android. This library caters to the specific needs of real-time communication or video streaming services requiring bespoke WebRTC solutions, including features like simulcast support.
Stream's WebRTC Android library will meet your needs without further modifications for most scenarios. However, certain situations might demand a specific WebRTC version or the implementation of custom features tailored to your product. In such cases, creating your dedicated WebRTC library for Android is recommended. This lesson will guide you through building your prebuilt WebRTC library and leveraging it in Android applications by following the steps below.
Prerequisite
Before embarking on the creation of a WebRTC prebuilt library, it's essential to set up certain prerequisites, given the complexity of WebRTC's building systems. It's important to note that compiling the WebRTC library for Android is supported exclusively in Linux environments, such as Ubuntu.
Therefore, you'll need to prepare a suitable machine to handle the WebRTC source code. There are several methods to establish a Linux environment, with the following two being the primary options:
Remote Servers
The most recommended method to build WebRTC prebuilt library is setting up your own remote servers by using AWS CodeBuild or Digital Ocean. This approach is highly recommended, as the building process typically takes at least 2-3 hours, even in multicore environments.
Configuring a remote server might entail some expenses, but the investment is justified. This setup frees your device from the resource-intensive demands of running extensive WebRTC source code and enables seamless delivery of the build package to the appropriate destination. Additionally, it allows for automated build processes triggered by new commits or updates through integration with GitHub Actions, enhancing efficiency and workflow continuity.
Setting up the entire build process might require a significant time investment, but once established, it reduces the resources needed for future builds. Therefore, it is a strongly recommended approach, especially when you need to build and deliver the WebRTC prebuilt library periodically. This streamlined process ensures efficiency and consistency in your development workflow.
Local PC
If you don't have enough budget to configure the remote server or you don't need to build the WebRTC prebuilt library very frequently, you can build it on your local machine with a virtual machine, such as VMWare.
Therefore, you'll need to set up a virtual environment running a Linux OS to build the WebRTC library. However, this method is generally not recommended for routine cases, as the build time can extend anywhere from 3 to 5 hours, heavily dependent on the specifications of your PC.
PC & Linux Configuration
Before proceeding with the installation of a Linux OS, it's crucial to assess the specifications of the device intended for Linux installation, as outlined below:
- A hard disk space of approximately 100-150GB (with a minimum of 80GB)
- At least 8GB of RAM for adequate performance
At present, the only supported distros are: - Ubuntu 14.04 LTS (trusty with EoL April 2022)
- Ubuntu 16.04 LTS (xenial with EoL April 2024)
- Ubuntu 18.04 LTS (bionic with EoL April 2028)
- Ubuntu 19.04 (disco) Ubuntu 19.10 (eoan)
- Debian 8 (jessie) or later
Please note that choosing the latest Linux environment, such as Ubuntu 20.04, may lead to challenges in installing many of the necessary dependencies for building the library.
Install Required Packages
After setting up your Linux environment, the next step is to install the necessary packages to build the WebRTC libraries. Follow the steps below to ensure you have everything needed to compile the desired WebRTC libraries in your system.
Install OpenJDK
To get started, first install the OpenJDK and update modules by entering the following commands in your terminal:
1234sudo add-apt-repository ppa:openjdk-r/ppa
sudo apt-get install openjdk-8-jdk
sudo apt-get install pkg-config
sudo apt-get update
Configure the Chromium Dev Tool
After installing OpenJDK, you should configure depot_tools, a suite of tools essential for Chromium development. The depot_tools collection offers various utilities to enhance the development experience with Chromium. To install depot_tools, clone the repository from Chromium's Git remote using the command provided below:
1git clone https://chromium.googlesource.com/chromium/tools/depot_tools.git
Next, you should export the depot_tools as a path using the command lines below:
12export PATH="$PATH:$(pwd)/depot_tools"
echo "PATH is ${PATH}"
You have set up the Chromium development tool, essential for building WebRTC libraries.
Fetch The WebRTC Android Sources
Now, let's proceed to fetch the Android sources required to build the WebRTC libraries. Before initiating the fetch process, it's advisable to create a dedicated folder to organize the numerous files that will be downloaded. For example, you can create a folder like this:
1mkdir webrtc_android && cd webrtc_android
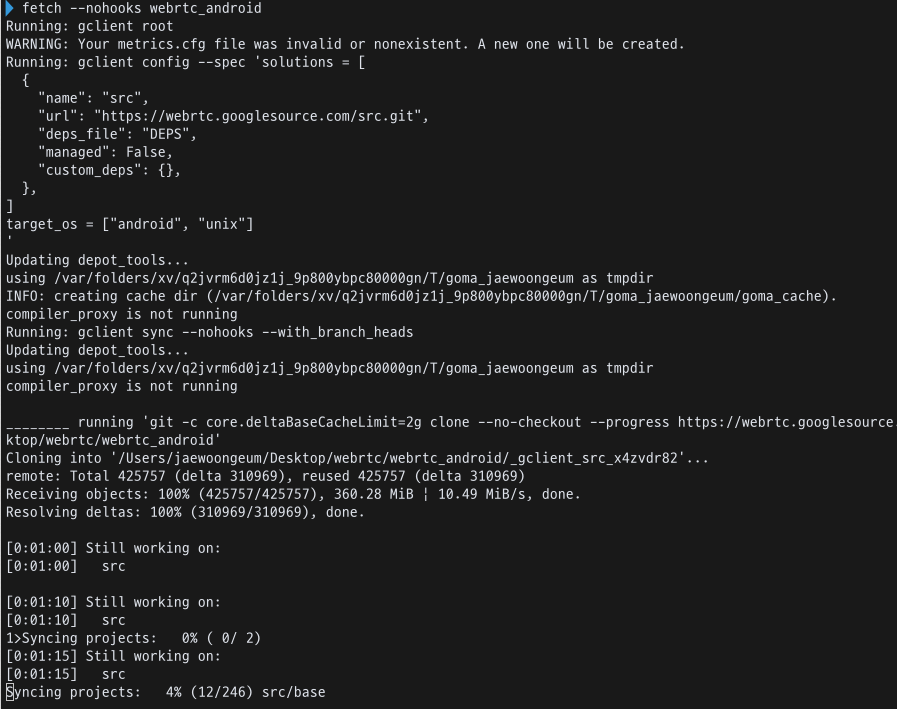
Next, you should fetch all Android WebRTC sources by using the command lines below:
12fetch --nohooks webrtc_android
gclient sync
Fetching and updating all Android WebRTC sources to the latest version may take a while. Please be patient as these operations complete. After running above commands, you'll see the result below:
Checkout To The Latest Commit
After obtaining all the Android WebRTC sources, switch to the latest commit to work with the most up-to-date version. For Linux users, especially on Ubuntu, a script is available to install all necessary dependencies, but it becomes accessible only after completing your initial gclient sync. Ensure you're in the webrtc_android/src/ directory, then execute the commands below to update:
123cd src/ && ./build/install-build-deps.sh
git checkout origin/master
gclient sync
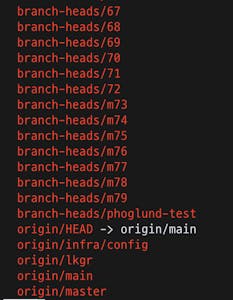
To select a specific branch rather than the latest commit for your build, you can switch to and build against that particular branch. To view the latest available branches, use the following command:
1git branch
You can see the latest available branches looks like the image below:
Next, to switch to a specific branch, like branch-heads/m118, and synchronize with the target branch, use the following command:
12git checkout -b refs/remotes/{branch_name}
gclient sync
Switching and synchronizing to the latest commit could take some time, especially if there are numerous updates since your last version. It's crucial to regularly check out or pull commits to incorporate the latest updates and patches into your WebRTC libraries before starting a new build.
Build The WebRTC Android Library
After following all the previous steps, you're ready to compile the Android WebRTC library. The compilation will produce an aar file encompassing the WebRTC core libraries tailored for various target CPUs based on Android ABIs such as:
- arm64-v8a
- armeabi-v7a
- x86
- x86_64
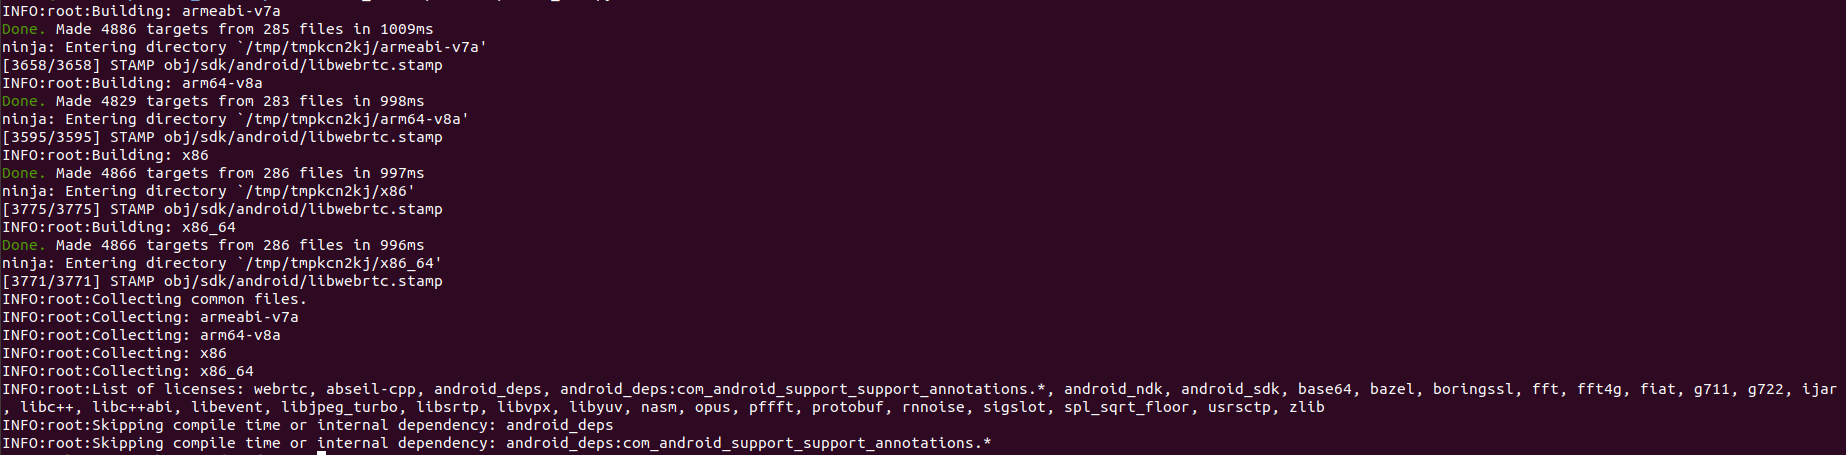
Once the package is compiled, it bundles the native libraries and a .jar file into an *.aar file. Ensure you're in the webrtc_android/src/ directory of your workspace. You can then produce libwebrtc.aar by executing the following command:
1tools_webrtc/android/build_aar.py
This operation may require some time, depending on your computer's specifications and internet connection speed. Once the build is successful, you'll be greeted with the terminal output below, confirming the creation of the libwebrtc.aar file at the webrtc_android/src directory:
Congratulations, you've made it through! Building the WebRTC Android library can be quite a complex and time-consuming process, especially if you're new to it. Expect to invest anywhere from a couple of days to a week to get everything set up. After getting the aar file, you can import the library into your Android project by referencing the Add your AAR or JAR as a dependency guidelines.
Conclusion
Building WebRTC libraries can be a lengthy and demanding process. Patience is key - by following the steps outlined above, you'll successfully build your own WebRTC libraries. Here's a quick recap of all those steps.
1234567891011121314151- git clone https://chromium.googlesource.com/chromium/tools/depot_tools.git

2- export PATH="$PATH:${HOME}/depot_tools"

3- mkdir webrtc_android && cd webrtc_android

4- fetch --nohooks webrtc_android

5- cd src/ && ./build/install-build-deps.sh

6- git checkout origin/master

7- gclient sync

8- tools_webrtc/android/build_aar.py
For those interested in utilizing a prebuilt WebRTC Android library enhanced with features like simulcast support, explore the WebRTC Android GitHub repository.