# Install & setup the app module
yarn add @react-native-firebase/app

# Install the messaging module
yarn add @react-native-firebase/messagingThis is documentation for Stream Chat React Native SDK v3, which is no longer actively maintained. For up-to-date documentation, see the latest version (v9).
Push Notifications
Easiest way to integrate push notifications in your Chat applications is using Firebase. React Native Firebase is the officially recommended collection of packages that brings React Native support for all Firebase services on both Android and iOS apps.
Requirements
- Only members of channel receive Push Notifications
- We only send push notifications, when the user doesn't have any active WebSocket connection (which is established when you call
client.connectUser). - If you are using components from React Native Chat SDK, we automatically drop the WebSocket connection when app goes to background. To disable this behaviour, you can set prop closeConnectionOnBackground= on Chat component, in which case WebSocket will stay active for approximately 15-20 seconds when app goes to background.
Firebase Setup
Follow the steps mentioned on Firebase documentation setup Firebase.
-
Install React Native Firebase.
Integration with Stream
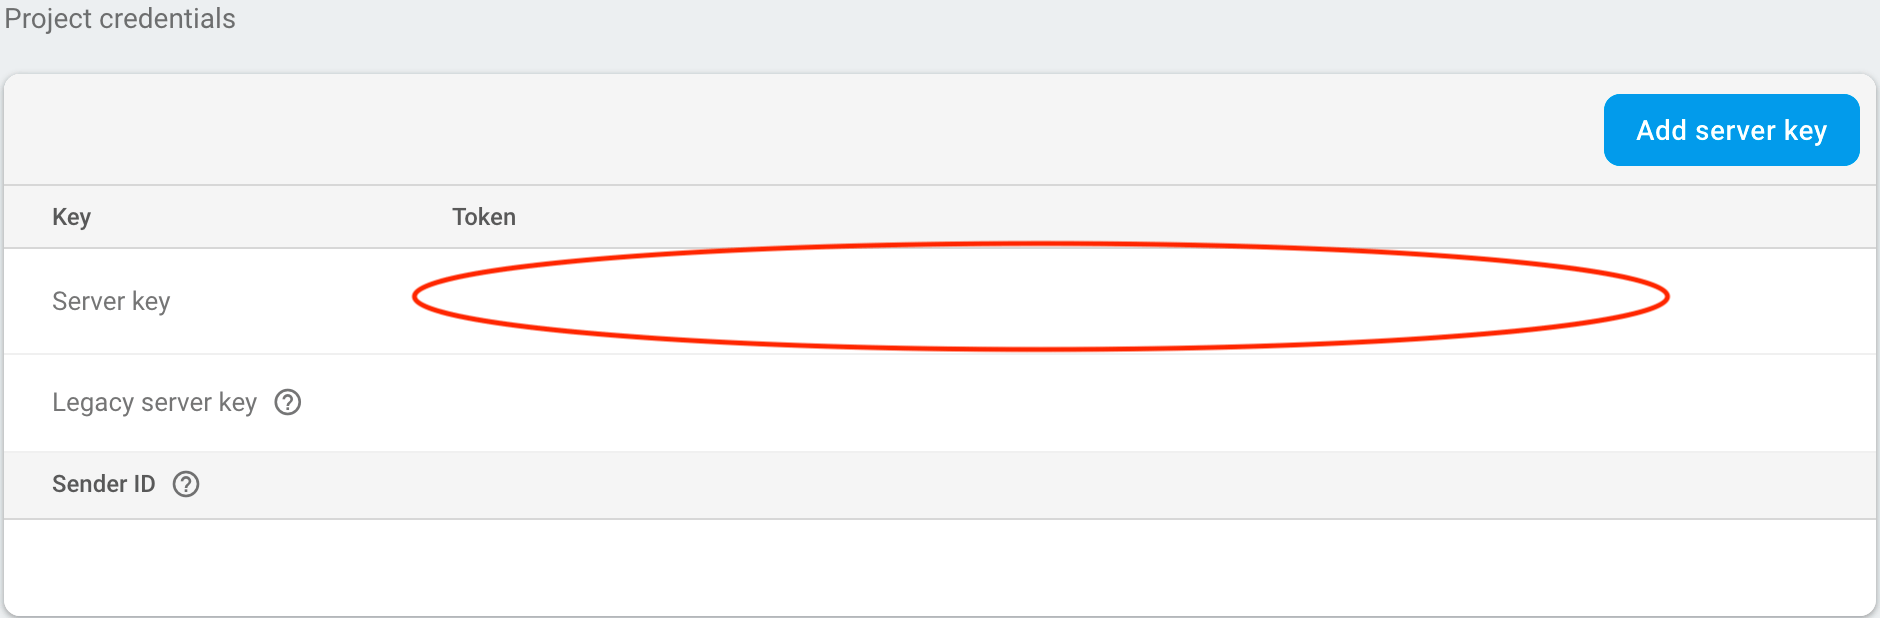
Get the Server Key
- From the Firebase Console, select the project your app belongs to.
- Click on the gear icon next to Project Overview and navigate to Project settings.

- Navigate to the Cloud Messaging tab
- Under Project Credentials, locate the Server key and copy it
Upload Server Key on Stream
You can upload your server key either from dashboard OR using Stream Chat Server side SDK.
Upload FCM Server Key via Chat Dashboard
- Go to the Stream dashboard.
- Select your app.
- Go to Chat Overview page from top navigation.

- Enable Firebase Push notifications toggle.

- You will see a modal when you enable Firebase toggle, where you can enter your FCM Server Key. Or you can click on Edit Settings button to edit/update previously configured FCM Server Key.
Under the modal, you can also update the Firebase Notification Template. Please read more about template on template docs
- Save your push notification settings changes.

Upload FCM Server Key via Stream Chat Server side SDK
You can also upload the Server Key via API call using a backend SDK.
const client = StreamChat.getInstance(API_KEY, API_SECRET);
await client.updateAppSettings({
  firebase_config: {
    server_key: "server_key",
    notification_template: `{"message":{"notification":{"title":"New messages","body":"You have {{ unread_count }} new message(s) from {{ sender.name }}"},"android":{"ttl":"86400s","notification":{"click_action":"OPEN_ACTIVITY_1"}}}}`,
    data_template: `{"sender":"{{ sender.id }}","channel":{"type": "{{ channel.type }}","id":"{{ channel.id }}"},"message":"{{ message.id }}"}`,
  },
});
Registering a device with Stream
Once you configure Firebase server key and set it up on Stream dashboard, a device that is supposed to receive push notifications needs to be registered at Stream backend. This is usually done by listening for Firebase device token.
Please note that, client.addDevice call requires user token to be set on client.
So client.addDevice call should be made after client.connectUser in code.
// Request Push Notification permission from device.
const requestPermission = async () => {
  const authStatus = await messaging().requestPermission();
  const enabled =
    authStatus === messaging.AuthorizationStatus.AUTHORIZED ||
    authStatus === messaging.AuthorizationStatus.PROVISIONAL;

  if (enabled) {
    console.log("Authorization status:", authStatus);
  }
};

const App = () => {
  const [isReady, setIsReady] = useState(false);

  useEffect(() => {
    let unsubscribeTokenRefreshListener;
    // Register FCM token with stream chat server.
    const registerPushToken = async () => {
      const token = await messaging().getToken();
      await client.addDevice(token, "firebase");

      unsubscribeTokenRefreshListener = messaging().onTokenRefresh(
        async (newToken) => {
          await client.addDevice(newToken, "firebase");
        },
      );
    };

    const init = async () => {
      await client.connectUser({ id: USER_ID }, USER_TOKEN);

      await requestPermission();
      await registerPushToken();

      setIsReady(true);
    };

    init();

    return async () => {
      await client?.disconnectUser();
      unsubscribeTokenRefreshListener?.();
    };
  }, []);

  if (!isReady) {
    return null;
  }

  return (
    <View style={styles.container}>
      <Chat client={client}>{/* Child components of Chat go here */}</Chat>
    </View>
  );
};

const styles = StyleSheet.create({
  container: {
    flex: 1,
    alignItems: "center",
    justifyContent: "center",
  },
});
This concludes the setup for push notifications. If you are having trouble receiving push notifications, please check Troubleshooting guide.
Interact with Push Notification
When a user interacts with your notification by pressing on it, the default behavior is to open the application (since notifications via FCM only display when the application is in the background, the application will always open).
On Android, you can set a "click_action": "OPEN_ACTIVITY_1" in Firebase Notification Template
In many cases, it is useful to detect whether the application was opened by pressing on a notification (so you could open a specific screen for example). The React Native Firebase API provides two APIs for handling interaction:
getInitialNotification: When the application is opened from a quit state.onNotificationOpenedApp: When the application is running, but in the background.
You can access the notification data in both these functions. Make sure you have set the correct notification template in dashboard:

Please check Push Template docs for more details on template.
To handle both scenarios, the code can be executed during setup. For example, using React Navigation we can set an initial route when the app is opened from a quit state, and push to a new screen when the app is in a background state:
import React, { useEffect } from "react";
import messaging from "@react-native-firebase/messaging";
import { NavigationContainer } from "@react-navigation/native";
import { createStackNavigator } from "@react-navigation/stack";

const Stack = createStackNavigator();

function App() {
  useEffect(() => {
    // `onNotificationOpenedApp` gets called when app is in background, and you press
    // the push notification.
    //
    // Here its assumed a message-notification contains a "channel" property in the data payload.
    //
    // Please check the docs on push template:
    // /chat/docs/javascript/push_template/
    messaging().onNotificationOpenedApp((remoteMessage) => {
      console.log(
        "Notification caused app to open from background state:",
        remoteMessage,
      );
      const channel = JSON.parse(remoteMessage.data.channel);
      const message = remoteMessage.data.message;

      console.log("This message belongs to channel with id - ", channel.id);
      console.log("Message id is", message);

      // You will add your navigation logic, to navigate to relevant channel screen.
    });

    // `getInitialNotification` gets called when app is in quit state, and you press
    // the push notification.
    //
    //
    // Here its assumed that a message-notification contains a "channel" property in the data payload.
    // Please check the docs on push template:
    // /chat/docs/javascript/push_template/
    messaging()
      .getInitialNotification()
      .then((remoteMessage) => {
        if (remoteMessage) {
          console.log(
            "Notification caused app to open from quite state:",
            remoteMessage,
          );
          const channel = JSON.parse(remoteMessage.data.channel);
          const message = remoteMessage.data.message;

          console.log("This message belongs to channel with id - ", channel.id);
          console.log("Message id is", message);

          // You will add your navigation logic, to navigate to relevant channel screen.
        }
      });
  }, []);

  if (loading) {
    return null;
  }

  return (
    <NavigationContainer>
      <Stack.Navigator initialRouteName={initialRoute}>
        <Stack.Screen name="Home" component={HomeScreen} />
        <Stack.Screen name="ChannelListScreen" component={SettingsScreen} />
        <Stack.Screen name="ChannelScreen" component={SettingsScreen} />
      </Stack.Navigator>
    </NavigationContainer>
  );
}
Troubleshooting
If you are having trouble receiving push notifications, please use our Push Notification Test Application to check if you have setup Push Configuration correctly. Please follow the steps mentioned in README for further instructions
If you are still having trouble with Push Notifications, please contact us.