
Unfortunately, there will always be users who tend toward using profanity within chat. As a developer, there will be a time that will come when you need to moderate this type of behavior. There's simply no way you will be able to manually watch all of the chat rooms and ban users because of their bad behavior. And even if you're ready to implement an automated solution, blacklisting profanities won't cover everything – something will always slip through the cracks.
In this tutorial, we'll be looking at how to add automatic profanity filtering and moderation to a chat app using an off-the-shelf Machine Learning solution for analyzing text. We will be using the Translator Text API from Microsoft Cognitive Services for analyzing text. For chat, we'll use Stream Chat along with React Native to create the app, and Gifted Chat to generate the chat UI. Alternatively, you can also use our React Native Chat components.
Prerequisites
Basic knowledge of React, React Native, and Node.js is required to follow this tutorial.
This tutorial also assumes that you already have prior experience working with Stream Chat in React Native. If you're new to React Native or Stream Chat, be sure to check out my previous tutorial – Using Gifted Chat UI with React Native.
The following package versions were used in creating and testing this tutorial:
- Node 11.2.0
- Yarn 1.13.0
- React Native CLI 2.0.1
- React Native 0.59.9
- Stream Chat 0.13.3 (or above)
You will also need to have an account for the following services:
- Stream Chat - for implementing the chat feature. Sign up for an account if you don't have one already.
- ngrok - we use this to expose the Node.js server (for working with Stream Chat) to the internet.
- Microsoft Azure - allows us to use Cognitive Services. When you sign up for an account.
React Native App Overview
In this tutorial, we will update an existing React Native chat app that was built with Stream Chat and Gifted Chat UI. The current app has the following features:
- Sending and receiving messages.
- Viewing the list of room members and their online presence.
We will then add the following features:
- Masking the profanities.
- Warning the user when they use profanities and banning them from sending messages if they continue.
Here's what the app will look like:

From the gif above, you can see that profanities are masked using asterisks. On the 'user's first and second offense, they get an alert that they will get banned if they continue to use colorful language. On the third offense, they will get banned from sending messages in all the chat rooms that they're a member of.
Banned users will still be able to receive messages, but 'they'll also have a "banned" marker next to their name when viewing the members of the room:

Setting up Webhooks on Stream Chat
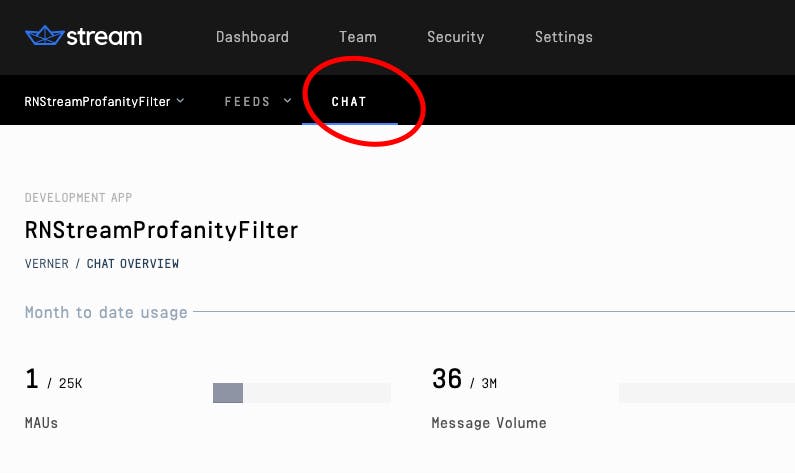
This section assumes that you already have an existing Stream app instance:
Scroll down to the Chat Events section and activate webhooks. At this point, you 'don't have a live URL yet. You can go ahead and expose port 5000 using ngrok and paste the HTTPS URL here:
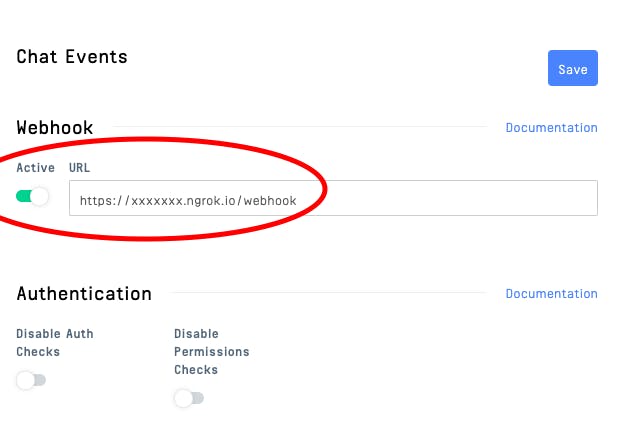
It won't work yet, because nothing is running on port 5000. But that's where we're going to run the server later on, so it should be fine. Once you're done, click on Save to save the changes.
Setting up the Translator Text API
The Translator Text API is part of Microsoft Cognitive Services, a collection of services that brings machine learning capabilities to your apps via a simple API.
It's primarily used for translating text from one language to another. Though it also has a nice feature for dealing with profanity in text. That is what we will be using in this tutorial.
This section assumes that you already have a Microsoft Azure account, and that you're already logged in to the Azure Portal.
The first step is to search for "Cognitive services":

Once you're inside Cognitive Services, click on the Add button:

This allows you to select the specific Cognitive Services API that you want to use. In this case, 'we'll be using Translator Text so go ahead and search for it:

Click on the first dropdown option that shows up, and you'll be redirected to the following page. When you see this, click on the create button:

That will redirect you to the page for creating the resource. Enter the following details:
- Name: RNStream
- Subscription: Pay-As-You-Go
- Pricing Tier: F0 (note: I've selected S0 in the screenshot simply because I already = have an existing resource that has selected F0 for the very same service)
- Resource Group: stream
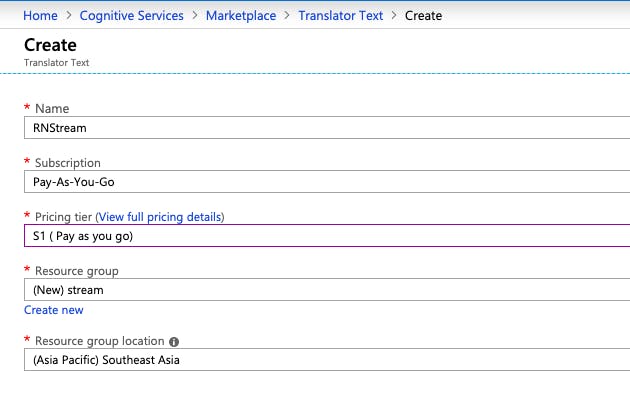
Note that if you don't have an existing resource group, you can click on the Create new link below it and enter its name:

Once the resource is created, you'll see something like this:
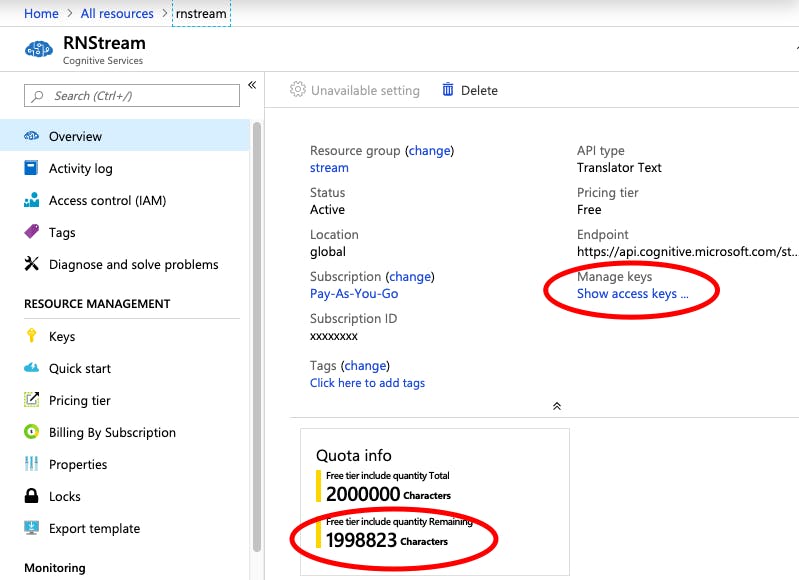
You can view the API key that you can use for making requests by clicking on the Show access keys link. You can also see the quantity remaining for your selected pricing tier. If you're on the free tier, you won't get charged. If you go over the quota, the API will stop working, and you'll receive a notification to switch to another tier.
Bootstrapping the App
Since we will be updating an existing app in this tutorial, I've already prepared a starter project which contains all the code of the current app. Execute the following commands on your terminal to set it up:
git clone https://github.com/anchetaWern/RNStreamProfanityFilter
cd RNStreamProfanityFilter
yarn
react-native eject
react-native link react-native-config
react-native link react-native-gesture-handler
react-native link react-native-video

cd server
yarn
Aside from that, React Native Config also has additional setup necessary.
Next, you need to update the .env and server/.env file with your Stream Chat and Cognitive Services API key.
APP_KEY="YOUR STREAM CHAT APP KEY"APP_KEY="YOUR STREAM CHAT APP KEY"
APP_SECRET="YOUR STREAM CHAT APP SECRET"
COGNITIVE_SERVICES_API_KEY="YOUR TEXT TRANSLATE API KEY"Once that's done, you should be able to follow the instructions on the Running the App section so you can try out the basic chat functionality. Running the app now should also prove useful as you go through this tutorial. That way, you can see the results as 'you're adding the code.
Updating the App
Now, we're ready to update the app. We'll first work on updating the server before we proceed to the actual app.
Updating the Server
The first thing that we need to do is add the axios configuration for making requests to the Translator Text API. This is where we supply the API key via the header:
const COGNITIVE_SERVICES_API_KEY = process.env.COGNITIVE_SERVICES_API_KEY;

const axios_base_instance_opt = {
  baseURL: `https://api.cognitive.microsofttranslator.com`,
  timeout: 3000,
  headers: {
    'Content-Type': 'application/json',
    'Ocp-Apim-Subscription-Key': COGNITIVE_SERVICES_API_KEY
  }
};
Next, we need to update the Express middleware that we use, based on whether the x-signature exists in the header or not. This header value is sent by 'Stream's server whenever the webhook is triggered. Currently, the request body is automatically parsed to a JSON object. That's not going to work because the function provided by Stream's API for verifying whether or not a request came from them requires us to pass the request body as plain text. That's what the code below does. If the x-signature header exists, it uses bodyParser.text(), otherwise, it uses bodyParser.json():
app.use(bodyParser.urlencoded({ extended: false }));

app.use(
  bodyParser.text({
    type: (req) => {
      const is_webhook = req.headers['x-signature'];
      if (is_webhook) {
        return true;
      }
      return false;
    },
  }),
);

app.use(bodyParser.json({Next, we add the route for processing the webhook. 'We've already added it earlier in the Stream Chat app dashboard as webhooks, so we have to use the same name. To determine if it did, indeed, come from 'Stream's server, we use the verifyWebhook() function. This accepts the request body as the first argument and the value of the x-signature header as the second. Only if 'it's valid and 'it's triggered because a new message was sent (message.new), do we continue processing the request:
app.post("/webhook", async (req, res) => {

  try {
    const is_valid = server_side_client.verifyWebhook(req.body, req.headers['x-signature']);
    const event = JSON.parse(req.body);

    if (is_valid && event.type === 'message.new') {
      // next: add code for extracting user and message and filtering profanity
    }
  } catch (err) {
    console.log("webhook error: ", err);
  }
});
Now that we know that the request is valid, we can extract the message from the request body and construct the request to be sent to the Translator Text API. The API expects a JSON string containing an array of objects with the Text property. Where the Text is the text that you want to process. This will be passed as the request body. The options for the request can be given as query parameters:
api-version- the version of the API we want to work with. This is a required parameter. Currently, the latest version is 3.0.to– the language to translate the text to. In this case, we'll assume that the users all speak and write in English, so we set it toen. If you want to handle multiple languages, you can make aGETrequest to the/languagesendpoint of the API to get a list of the supported languages.profanityAction- the action to perform if the API finds profanity in the supplied text. In this case, we want to mask it so that asterisk will show instead. For that, we useMarked.NoActionandDeletedare the two other values you can supply.profanityMarker- the marker that will be used for profanities. This can be eitherAsteriskorTag. We'll useAsteriskso we 'don't have to make any additional processing to the text. This will turn all profanities to triple asterisk (***).
The response that we get back is an array. The number of items in this array corresponds to the number of objects you passed in your request body. In this case, we're only working with one text so it's available on the first index. There can also be many possible translations, but we'll extract the first one since it's the most accurate:
const { message } = JSON.parse(req.body);
const user = message.user;
const text = message.text;

const content = JSON.stringify([{
  'Text': text
}]);

const language = 'en';
const filter_instance = axios.create(axios_base_instance_opt);
const profanity_action = 'Marked';
const profanity_marker = 'Asterisk';
const filter_response = await filter_instance.post(
  `https://api.cognitive.microsofttranslator.com/translate?api-version=3.0&to=${language}&profanityAction=${profanity_action}&profanityMarker=${profanity_marker}`,
  content
);
const filtered_text = filter_response.data[0].translations[0].text;

// next: add code for updating message
Next, we check if there are profanities in the text. Since we already know that they're replaced as a triple asterisk, we can check if that value is within the text that was returned. If it is, then we request Stream Chat's API to update the message with the version where the profanities are already masked with asterisks:
if (filtered_text.includes('***')) {
  const updated_message = { id: message.id, user_id: user.id, text: filtered_text };
  const updated_response = await server_side_client.updateMessage(updated_message);

  // next: add code for dealing with user behavior
}
The last thing that we need to do is check for the user's warn_count. This is a custom value that we're adding to a user if their message has profanities in it. If their warn_count is below 3, we simply increment that number. But by the time it becomes 3, we ban the user from ever sending a message to any room:
let warn_count = (user.warn_count) ? user.warn_count : 0;
warn_count += 1;
if (warn_count < 3) {
  const updated_user_data = await server_side_client.updateUsers([{
    id: user.id,
    warn_count: warn_count
  }]);
} else {
  const ban_data = await server_side_client.banUser(user.id, {
    user_id: user.id,
    // timeout: 5, // you can add this for testing or just unban user
    reason: 'Colorful words',
  });
}
Optionally, you can also add a route for unbanning a user. This would allow the banned user to send messages again:
app.get('/unban', async (req, res) => {
  const user_id = req.query.user_id;
  const unban_data = await server_side_client.unbanUser(user_id);
  console.log('unban: ', unban_data);
  res.send('ok');
});- Warning the user if profanities are detected in their message.
- Alert the user if their message can no longer be sent because 'they're banned.
- In the modal for showing the members of the room, show a "banned" status next to users who got banned.
The first thing that we need to do is to return the custom user field warn_count. This way, we can show a warning when a user receives an updated message (Because an updated message only means one thing: someone in the room has used colorful language):
 getMessage = ({ id, user, text, created_at }) => {
    const data = {
      _id: id,
      text: text,
      createdAt: new Date(created_at),
      user: {
        _id: user.id,
        name: user.name,
        avatar: user.image,
        warn_count: user.warn_count // add this
      }
    }

    return {
      message: data
    }
  }
Next, we need to listen to the event when a message is updated. This gets triggered when the message is updated on the server. Just like in the server, each message contains the user object. Because we update the getMessage() function to return the custom field warn_count, 'it's now also available, so we can check for it and issue the corresponding warning:
channel.on('message.updated', async (event) => {
  const { message } = this.getMessage(event.message);
  if (message.user._id == this.user_id) {
    if (message.user.warn_count < 3) {
      Alert.alert("Profanity warning", "You will be banned indefinitely on the 3rd time you do this.");
    }
  }

  this.setState(state => {
    const messages = state.messages.map((item) => {
      if (item._id == message._id) {
        return { ...item, text: message.text };
      } else {
        return item;
}Next, we update the function for sending a message so that it shows an alert when an error response comes back:
onSend = async ([message]) => {
  const message_response = await this.channel.sendMessage({
    text: message.text
  });

  if (message_response.message.type == 'error') {
    Alert.alert("Error", message_response.message.text);
  }
}

/*
// sample message_response:
{
   "message":{
"id":"xxxxfe5a-xxxx-4a20-xxxx-73xxxxxx009",Lastly, we add the "banned" label to users whose warn_count is greater than two:
renderUser = ({ item }) => {
  const online_status = (item.user.online) ? 'online' : 'offline';

  return (
    <View style={styles.list_item_body}>
      <View style={styles.list_item}>
        <View style={styles.inline_contents}>
          <View style={[styles.status_indicator, styles[online_status]]}></View>
          <Text style={styles.list_item_text}>{item.user.name}</Text>
          { // add these:
            item.user.warn_count > 2 &&
            <View style={styles.banned}>
              <Text style={styles.banned_text}>Banned</Text>
            </View>
}node server.js
./ngrok http 5000Next, update the src/screens/Login.js and src/screens/Chat.js file with the ngrok HTTPS URL.
At this point, we haven't created the channel yet so the app won't work. To set this up, we have to temporarily comment out the code for adding a member into the channel, and the code for subscribing to it:
async componentDidMount() {

    this.props.navigation.setParams({
      showUsersModal: this.showUsersModal
    });

    try {
      const user = await client.setUser(
        {
          id: this.user_id,
          name: this.username,
          image: `https://ui-avatars.com/api/?background=d88413&color=FFF&name=${this.username}`,
        },
        this.user_token
);Once that's complete, you can run the app. Enable live reload and remote debugging so you can see the console.log output. Then, run one of the following commands:
react-native run-android
react-native run-ios
Log in with the user that we will use as the channel creator.
Once the user is logged in, and the code for setting the user is executed (indicated by "user is set!" console.log output) we know that Stream Chat now recognizes the user.
In the server terminal, you should see the user ID outputted in the console. Copy that and access http://localhost:5000/create-channel?user_id=THE_USER_ID in your browser. That will create the channel for us. If it responds with "ok", you can go ahead and remove the comments on the code that we commented out earlier!
At this point, you can now test the app. If you use a new username for logging in, the username will automatically be added as a member of the room, and you can send messages with that user. If you 'don't have another device to test on, hit the following URL to test the receiving of messages: http://localhost:5000/send-message?user_id=THE_USER_ID.
You can test if the profanity filtering and moderation are working by typing any profanity you can think of. It should ban you after the third offense, and you will no longer be able to send messages. If you want to unban a user, you can access http://localhost:5000/unban?user_id=THE_USER_ID to unban them.
Final Thoughts
In this tutorial, you learned how to implement automatic profanity moderation in a chat app created with React Native and Stream Chat. Specifically, you learned how to use the Translator Text API from Microsoft Cognitive Services to detect profanity in text and obscure them from the user's view. You also learned how to ban users from sending a message if they continue engaging in their bad behavior after being warned.
You can view the full code used in this tutorial on this GitHub repo.
