
“Everything is a widget.”
Well, yes - but what is a widget? Widgets used in making Flutter apps can themselves be composed of smaller widgets. Most widgets carry some kind of visual component - either defined by themselves or represented by smaller widgets. Unlike native frameworks, Flutter underneath does not use OS views. Instead, Flutter paints the entire app on a canvas underneath the whole app. The widgets mentioned above can use this canvas to paint their visual representation and define how they want to look on the screen under the constraints provided to them (which they can choose to ignore, but that is a story for another time). While the Canvas underneath the app is not directly available for mutation without creating our RenderObject, the CustomPaint widget provides a Canvas for you to use.
The primary use of the CustomPaint widget is that it provides low-level API access allowing you to create custom designs that would not easily be possible with simple widgets provided out of the box. There is quite a lot of functionality offered by the Canvas API in Flutter, and it is an important topic to know well if you want to create complex designs or RenderObjects in Flutter. For this purpose, this guide intends to provide comprehensive coverage of all the aspects of - and concepts surrounding - the CustomPaint widget (and, by extension, the Canvas API).
Breaking Down the CustomPaint Widget
The CustomPaint widget allows direct access to a Flutter canvas, which can be given a custom size and layout, similar to how usual Flutter widgets work. Additionally, painting on the screen allows complete creative freedom without excessive layout widgets. This, however, does mean that some other aspects of widgets like hit testing may have to be manually implemented.
CustomPaint is split into two parts: the widget and the painter. The widget itself takes in a child widget which determines the size of the CustomPaint widget and the Canvas associated with it. The painter, an implementation of the CustomPainter class, dictates the instructions to perform on the canvas. This can either be supplied with the painter or the foregroundPainter parameter which paints instructions behind or in front of the child widget.
Looking at the basic code for a CustomPaint widget:
class BasicExample extends StatelessWidget{
const BasicExample({Key? key}): super(key: key);
Widget build(BuildContext context) {
return CustomPaint(
painter: DemoPainter(),
child: SizedBox.square(
dimension: 200.0,
),
// For painting on foreground
// foregroundPainter: DemoPainter(),
);
}
}The CustomPaint widget is given an instance of the painter defined by the DemoPainter class. The child widget here only exists to define the size of the Canvas. However, if you intend to have just the painting and do not require a child widget, use the size parameter instead:
class BasicExample extends StatelessWidget{
const BasicExample({Key? key}): super(key: key);
Widget build(BuildContext context) {
return CustomPaint(
painter: DemoPainter(),
size: Size.square(200.0),
// For painting on foreground
// foregroundPainter: DemoPainter(),
);
}
}Additionally, there are also a few ways to optimize the widget by using the isComplex and willChange parameters:
class BasicExample extends StatelessWidget{
const BasicExample({Key? key}): super(key: key);
Widget build(BuildContext context) {
return CustomPaint(
painter: DemoPainter(),
size: Size.square(200.0),
// For painting on foreground
// foregroundPainter: DemoPainter(),
isComplex: true,
willChange: true,
);
}
}The isComplex parameter defines if the painting is complex enough that caching will improve performance. If this is set to false, this does not mean no caching is performed - rather that the compositor will decide if it would likely benefit from caching. On the other hand, if the willChange parameter is set to true, that indicates that the painting is likely to change, and caching would be unnecessary.
Exploring CustomPainter
While the CustomPaint widget has some responsibilities that define the relationship between the child widget and the painting, the CustomPainter implementation defines the actual painting on the Canvas, which is the primary concern of this guide. Let’s look at the DemoPainter from the previous example to start with:
class DemoPainter extends CustomPainter{
void paint(Canvas canvas, Size size) {
//TODO: implement paint
}
bool shouldRepaint(covariant CustomPainter oldDelegate) {
//TODO: implement shouldRepaint
throw UnimplementedError();
}
}There are two main methods to implement in the CustomPainter class: paint() and shouldRepaint().
paint(): This method gives you theCanvastalked about previously as well as the size of the widget - which can be overflowed if needed. This is where you define the painting operations that you intend to perform on theCanvas.shouldRepaint(): Redoing all the operations every time the widget is rebuilt is not considered to be efficient. However, since it is also not obvious when painting should be carried out again, this method allows you to define under what conditions it should be done.
Let’s draw a rectangle with a color taken as a parameter and redraw if the color changes:
class DemoPainter extends CustomPainter{
final Color rectColor;
DemoPainter(this.rectColor);
var rect = Rect.fromCenter(
center: const Offset(100.0, 100.0),
width: 50,
height: 50,
);
void paint(Canvas canvas, Size size) {
canvas.drawRect(rect, Paint()..color = rectColor);
}These are the basic methods that are compulsory to define. However, there is one more which is quite important if you intend to draw a widget with it: hitTest(). Hit testing defines when the figure painted on the screen is considered “tapped.”
As an example, let’s define a rectangle and implement hit testing if the position tapped is within the bounds of the rectangle:
class DemoPainter extends CustomPainter{
var rect = Rect.fromCenter(
center: const Offset(100.0, 100.0),
width: 50,
height: 50,
);
void paint(Canvas canvas, Size size) {
canvas.drawRect(rect, Paint());
}
bool shouldRepaint(covariant CustomPainter oldDelegate) {
return false;Preparing The Paint
The Canvas class whose object is provided by the paint() method is primarily responsible for the painting operations. For this, it contains various operations we go into in sequential order ahead. There are two main types of things you can draw: individual objects such as circles, rectangles, etc., and paths that can define more complex shapes whose boundaries can be made up of several kinds of objects. Painting both types is described ahead - however, before all of that, you need to be familiar with something used everywhere when painting, Paint.
When painting objects or paths on the screen, you need to define how the actual paint on the screen looks. While the obvious meaning of paint would imply color, opacity, and similar aspects, the Paint class goes much further and also concerns stroke widths and joins, whether shapes are filled or hollow, which shader is used, and more. This section details all the aspects of the Paint object that you can modify.
Color
The color property defines the stroke color used to paint objects on the screen. Here is how you would set the color for the stroke:
Paint()..color = Colors.blueAdditionally, you can also invert colors when painting by using the invertColors setter:
Paint()..invertColors = truePaintingStyle
When painting shapes on the screen, they can either be drawn by their boundary or as filled shapes. The style setter, which accepts a PaintingStyle enum type, defines if the shapes are drawn as filled or hollow:
Paint()..style = PaintingStyle.fill // OR PaintingStyle.strokeHere is what stroke vs. filled looks like when drawing a circle:
Filled:

Stroke:

Anti-alias
If there are curves on a screen, the edges may look jagged on lower-resolution screens. To avoid this, anti-aliasing adds extra pixels around the edges, which help add a transition between the curve and the other pixels, making it look smoother.
To modify anti-aliasing in the strokes painted, use the isAntiAlias property in the Paint object:
Paint()..isAntiAlias = trueThe isAntiAlias property is true by default.
Modifying Stroke
Several qualities can be modified with respect to the paint stroke itself. Let’s go through them one by one.
Stroke Width
The stroke width is similar to font weight when drawing characters - it is how large strokes appear in width on the screen. To set this, you can set the strokeWidth setter in the Paint class:
Paint()..strokeWidth = 3.0Here is an example of a line with a large stroke width:

Stroke Cap
The stroke cap deals with the shape at the end of each paint stroke. There are three types available: butt, round, and square. The round stroke cap adds a small segment to the end of the stroke and a semicircle to the end of it. The butt and square types are similar, however, the square type adds a small square segment to the end of each stroke while the butt stroke ends immediately. To set the stroke cap, the strokeCap setter in the Paint class can be used:
Paint()..strokeCap = StrokeCap.roundHere is an example of the round stroke cap using the previous line example:

Stroke Join
When drawing paths, there are various segments that are drawn independently to represent a single figure. Drawing these segments independently may result in weird-looking edges if simply drawn without considering others. The strokeJoin parameter defines how the connections between individual strokes look - sharp, rounded, or beveled (StrokeJoin.miter, StrokeJoin.round, and StrokeJoin.bevel, respectively).
Paint()..strokeJoin = StrokeJoin.bevelHere’s how the bevel joins look:

Stroke Miter Limit
The stroke miter limit is associated with the previous section, where stroke join is set to StrokeJoin.miter. When sharp corners are drawn, there is a limit as to how sharp they can be drawn and extend out before it resets to a square join. The strokeMiterLimit setter is used to define this, which defaults to a value of 4.0:
Paint()..strokeMiterLimit = 6.0Mask Filters
At the time of writing, Flutter only supports one type of mask filter - blur. For example, you can use this to define blurriness for the strokes when drawing shadows. To use this, we can use the maskFilter property:
Paint()..maskFilter = const MaskFilter.blur(BlurStyle.inner, 3.0)The BlurStyle enum defines where the blur is applied, and the sigma value next to it defines the effectiveness of the mask filter.
Here is a shape drawn using the blur mask filter:
Color Filters
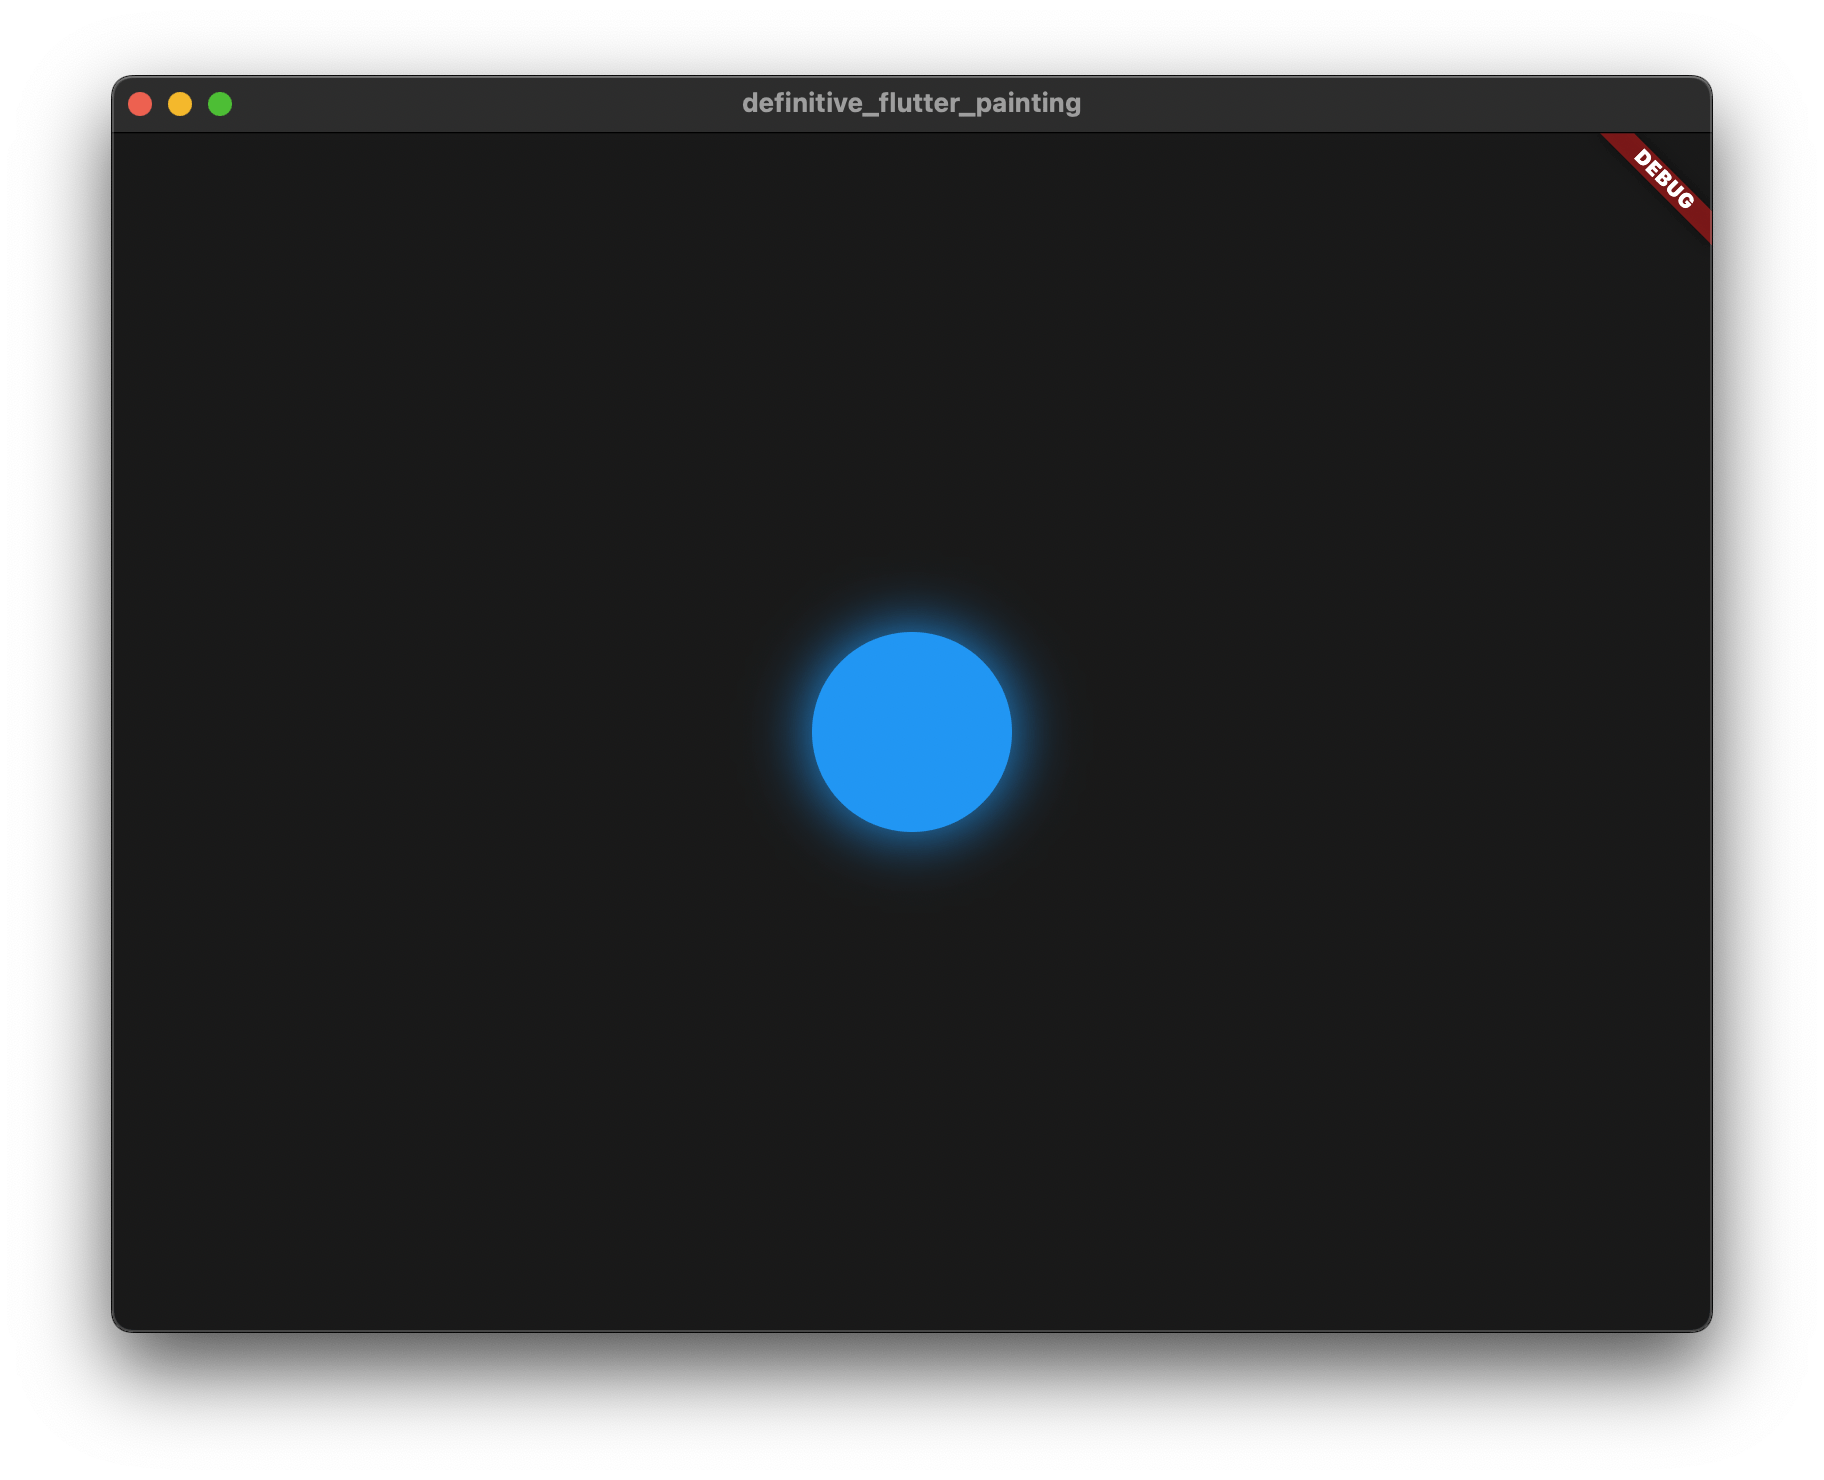
A color filter, in a simple sense, mixes two colors - the source color and the color specified by the filter. Imagine a filter on any photo app that takes the original image and lightens the colors: it takes the source colors and mixes a light color into the source colors of the pixels. The color filter does a similar thing while also allowing you to control how the two colors (the source and the given color) blend by specifying the blend mode. You can specify the color filter by using the colorFilter property of the Paint class:
Paint()..colorFilter = ColorFilter.mode(Colors.purple, BlendMode.plus)Here is a blue circle painted using a purple color filter:
Painting On The Canvas
The Paint class has quite a lot of important customization options - but in the end, we need to do something with it. Once the paint matches expectations, it is time to start painting on the canvas. As mentioned before, there are two main types you can split painting into, objects and paths. In this section, you will learn how to paint various objects on a Canvas.
Before you begin, a couple of points to remember:
- The origin of the coordinate system when painting objects onto the canvas is the top-left of the canvas.
- The positive X-axis goes to the right, while the positive Y-axis goes downward on the canvas.
Drawing Circles
Starting with the basics, you can paint circles on the screen by providing a center and a size for the circle. Alongside this, you also need to provide the appropriate Paint object. You can then use the drawCircle() method of the Canvas to paint the final circle:
void paint(Canvas canvas, Size size) {
var center = Offset(size.width/2, size.height/2);
var radius = 50.0;
var paint = Paint()..color = Colors.blue..style = PaintingStyle.fill;
canvas.drawCircle(center, radius, paint);
}This paints a circle in the middle of the screen (size / 2) and a radius of 50.0. The paint specifies that the circle should be blue and filled.
This is what the end result looks like:

Drawing Lines
For drawing lines, you need the start and end points of the line you intend to draw. You can then use the drawLine() method of the Canvas to paint the final line:
void paint(Canvas canvas, Size size) {
var p1 = const Offset(100.0, 100.0);
var p2 = const Offset(300.0, 300.0);
var paint = Paint()..color = Colors.blue..strokeWidth = 5.0;
canvas.drawLine(p1, p2, paint);
}This draws a simple diagonal line which is painted blue:

Drawing Rectangles
Rectangles are represented by the Rect class in Flutter, which can be created in several ways, such as using the center + width + height, using two opposing vertices of the rectangle, and so on. The class also gives you extra methods to check if two rectangles overlap, if a point is contained within a rectangle, and more. Once you define the rectangle, you can then use the drawRect() method to paint the final rectangle:
void paint(Canvas canvas, Size size) {
var center = Offset(size.width/2, size.height/2);
var rectangle = Rect.fromCenter(center: center, width: 300.0, height: 150.0);
var paint = Paint()..color = Colors.blue..style = PaintingStyle.fill;
canvas.drawRect(rectangle, paint);
}This creates a rectangle with its center at half the size and width and height of 300 and 150, respectively. The end result of this is a filled blue rectangle at the given coordinates:

Drawing Rounded Rectangles
Like the Rect class, rounded rectangles in Flutter are represented by the RRect class. This class carries not only basic information about the rectangle but also information regarding the corner radii. If all corner radii are the same, you can initialize a rounded rectangle using a normal Rect and the corner radius. The drawRRect() method paints the final rounded rectangle to the screen:
void paint(Canvas canvas, Size size) {
var center = Offset(size.width/2, size.height/2);
var roundedRectangle = RRect.fromRectAndRadius(
Rect.fromCenter(center: center, width: 300.0, height: 150.0),
const Radius.circular(32.0),
);
var paint = Paint()
..color = Colors.blue
..style = PaintingStyle.fill;
canvas.drawRRect(roundedRectangle, paint);
}This gives a rectangle with rounded corners:

Drawing Ovals
Ovals are trickier to draw than circles since they can take various shapes and sizes. For this, you can use the same Rect class as before to define the boundaries of the oval and use the drawOval() method to paint it to the screen:
void paint(Canvas canvas, Size size) {
var center = Offset(size.width/2, size.height/2);
var rectangle = Rect.fromCenter(center: center, width: 300.0, height: 150.0);
var paint = Paint()..color = Colors.blue..style = PaintingStyle.fill;
canvas.drawOval(rectangle, paint);
}This paints an oval in the same rectangular space as before:

Drawing Arcs
Similar to ovals, arcs are drawn from a Rect since an arc can be considered a subsection of an oval. To define an arc, you first need to define the enclosing Rect. Next, the starting angle needs to be defined where the arc starts from. The sweep angle defines the angle that the arc subtends - all angles are in radian, not in degrees. The useCenter parameter defines if the arc closes back to the center. If it is true, it traces out a circle sector rather than an arc. Adding all of these things up, you can then use the drawArc() method to paint the arc:
void paint(Canvas canvas, Size size) {
var center = const Offset(200.0, 200.0);
var rectangle = Rect.fromCenter(center: center, width: 100.0, height: 50.0);
var paint = Paint()
..color = Colors.blue;
canvas.drawArc(rectangle, 0.0, pi / 2, true, paint);
}This paints an arc starting from the right-hand side, which traces out 90 degrees (pi / 2 radian) and closes back to the center:

Drawing Paint
The drawPaint() method of the Canvas class simply paints the entire canvas with the given paint:
void paint(Canvas canvas, Size size) {
var paint = Paint()..color = Colors.blue;
canvas.drawPaint(paint);
}Which results in the entire canvas being blue:

Drawing Color
While the drawColor() method seems similar to the last method where paint is applied to the entire canvas, it is different in that this method effectively adds a ColorFilter to the canvas rather than just painting the entire canvas one color. You can also specify the BlendMode to define how the new color and the color on the existing canvas mix. Here is how the code looks:
void paint(Canvas canvas, Size size) {
canvas.drawPaint(Paint()..color = Colors.blue);
canvas.drawColor(Colors.purple, BlendMode.plus);
}This blends with the existing content on the canvas:

Drawing Image
Images can be drawn on a canvas in several ways. One is to use the default size of the image and to specify an offset for the top left corner - this uses the drawImage() method:
class DemoPainter extends CustomPainter{
final ui.Image image;
DemoPainter(this.image);
void paint(Canvas canvas, Size size) {
var offset = const Offset(200.0, 200.0);
var paint = Paint();
canvas.drawImage(image, offset, paint);
}
bool shouldRepaint(covariant CustomPainter oldDelegate) {
return false;
}
}
Another way that allows painting a portion of the image is the drawImageRect() method which takes in the source image rectangle and the destination rectangle which is the part of the image shown
void paint(Canvas canvas, Size size) {
var srcCenter = const Offset(200.0, 200.0);
var dstCenter = const Offset(250.0, 250.0);
var paint = Paint();
var source = Rect.fromCenter(center: srcCenter, width: 100.0, height: 50.0);
var destination =
Rect.fromCenter(center: dstCenter, width: 150.0, height: 125.0);
canvas.drawImageRect(image, source, destination, paint);
}This displays a subset of the image as shown:

Drawing Text
Hidden deep inside the Text widget is a call to drawParagraph() which finally paints the given text on the screen. Most of what the Text widget does has more to do with layout and sizing than rendering the text itself. Here is a basic example to paint ‘Demo Text’ on the screen:
void paint(Canvas canvas, Size size) {
var center = size / 2;
var style = const TextStyle();
final ui.ParagraphBuilder paragraphBuilder = ui.ParagraphBuilder(
ui.ParagraphStyle(
fontSize: style.fontSize,
fontFamily: style.fontFamily,
fontStyle: style.fontStyle,
fontWeight: style.fontWeight,
textAlign: TextAlign.justify,
),
)
..pushStyle(style.getTextStyle())
..addText('Demo Text');
final ui.Paragraph paragraph = paragraphBuilder.build()
..layout(ui.ParagraphConstraints(width: size.width));
canvas.drawParagraph(paragraph, Offset(center.width, center.height));
}As seen from the example, there is a large emphasis on styling, positioning, and constraints related to the text rendered, which is why there are several abstractions to make life easier for developers, such as the RichText and Text widgets.

Drawing Vertices
The drawVertices() method of the Canvas is a neat way to draw connected vertices allowing you to make grids and patterns easily. There are three kinds of patterns that the method can make:
- Triangles: Takes three adjacent points out of the list, creates a triangle and then moves on to the next. (Every point is used once)
- Triangle Strip: Takes every set of three adjacent points and draws a triangle. (Every point may be used more than once)
- Triangle Fan: Uses the first point as the center point and each subsequent point as a triangle vertex. (The first vertex is used in all triangles, all others may be used up to two times)
void paint(Canvas canvas, Size size) {
var vertices = ui.Vertices(VertexMode.triangleStrip, [
Offset(100, 100),
Offset(200, 100),
Offset(350, 300),
Offset(400, 100),
Offset(500, 300),
Offset(700, 200),
]);
canvas.drawVertices(
vertices,
BlendMode.plus,
Paint()..color = Colors.blue,
);
}
Draw Atlas
The canvas.drawAtlas() method is mostly concerned with drawing a part of an image. This can also be done with canvas.drawImageRect() - however, drawAtlas() is better optimized to deal with it. This method is useful with things like Sprite sheets which are used in creating game objects (sprites) in games since they contain a grid of objects (smaller parts of the main image) out of which specific ones can be used.
void paint(Canvas canvas, Size size) {
canvas.drawAtlas(
image,
[
RSTransform.fromComponents(
rotation: 0.0,
scale: 1.0,
anchorX: 0.0,
anchorY: 0.0,
translateX: 0.0,
translateY: 0.0,
)
],
[Rect.fromLTWH(0.0, 0.0, 25.0, 25.0)],Clipping Regions
Similar to painting objects on the screen, you can also clip away shapes from the existing canvas layer. You can either clip a rectangular section of the layer (normal or rounded rectangle) or clip a custom path - which will be seen in the next section concerning paths.
To clip out a rectangle from the layer, it is similar to drawing one - bar the paint:
void paint(Canvas canvas, Size size) {
var center = const Offset(200.0, 200.0);
var rectangle = Rect.fromCenter(center: center, width: 100.0, height: 50.0);
canvas.clipRect(rectangle);
}The clipRect() method also contains options for adding anti-aliasing and defining what happens when multiple clip regions intersect using the clipOp and doAntiAlias parameters, respectively.
Similarly, for rounded rectangles:
void paint(Canvas canvas, Size size) {
var center = const Offset(200.0, 200.0);
var roundedRectangle = RRect.fromRectAndRadius(
Rect.fromCenter(center: center, width: 100.0, height: 50.0),
const Radius.circular(8.0),
);
canvas.clipRRect(roundedRectangle);
}Drawing Paths
Paths are custom shapes that are made of several individual segments and can be used in drawing custom shapes, clipping out a custom path, and more. Paths are used when the built-in shapes in Flutter won’t satisfy the need of the design.
When drawing paths, several kinds of shapes, segments, and curves can be used. Unlike objects where each object is independent, segments in paths are interlinked, and the current position of the path is stored until the path is completed. Paths in Flutter are represented by the Path class.
This section breaks down all the individual operations performed when defining a path and using paths for drawing custom objects and clipping regions.
Starting And Ending Paths
Paths are usually a combination of multiple elements added sequentially. To start creating a path, a Path object needs to be instantiated. Several methods of the Path class are relative - meaning they operate in terms of where the current position of the path is. For this, you may also need to move the current position of the path. Here is how the code for instantiating and moving the current location of the path:
void paint(Canvas canvas, Size size) {
var path = Path();
path.moveTo(100.0, 100.0);
// Other operations
path.close();
}The path.close() operation refers to drawing a straight line from the current position of the path to the start of the path. This is unnecessary, and paths can be used without it.
Adding Lines
To add a line to a path, you do not need two points since one of the points is the current position of the path. Hence, to draw a line, use the path.lineTo() method and supply the position of the end position of the path. Note that this position is in reference to the origin, and it is also possible to define it in relative terms, which will be seen later.
void paint(Canvas canvas, Size size) {
var path = Path();
path.lineTo(100.0, 100.0);
}Adding Basic Shapes
You can add basic shapes similar to how you would normally draw them to a path. These are ovals, arcs, and two kinds of rectangles. Here are examples of adding these shapes to a path:
void paint(Canvas canvas, Size size) {
var path = Path();
var center = const Offset(200.0, 200.0);
var rect = Rect.fromCenter(center: center, width: 100.0, height: 50.0);
path.addOval(rect);
path.addArc(rect, 0.0, pi / 2);
path.addRect(rect);
path.addRRect(RRect.fromRectAndRadius(
rect,
const Radius.circular(8.0),
));
}Adding Polygons
Polygons can be created by defining multiple points and passing them along the path.addPolygon() method. The method also has a boolean that can define if the polygon should be closed after the final defined point. Here is an example:
void paint(Canvas canvas, Size size) {
var path = Path();
var points = [
Offset(100, 100),
Offset(150, 100),
Offset(200, 200),
Offset(150, 200),
Offset(125, 125),
];
path.addPolygon(points, true);
}Adding Complex Curves
For painting complex curves on the canvas, you can use Bézier curves. These approximate real-world curves via endpoints and control points make it easy to draw complex curves without defining mathematical equations. To understand Bézier curves better, we recommend watching this video.
Cubics
A Cubic curve usually has two curves (you may remember the equations with $x^3$ from high school) and therefore needs two control points to define these two curves. Along with this, it also needs an endpoint to define where to stop painting. Here is an example of the path.cubicTo() method used to define a cubic curve:
void paint(Canvas canvas, Size size) {
var path = Path();
var controlPoint1 = Offset(200, 0);
var controlPoint2 = Offset(300, 300);
var endPoint = Offset(500, 150);
path.moveTo(100, 100);
path.cubicTo(
controlPoint1.dx,
controlPoint1.dy,
controlPoint2.dx,
controlPoint2.dy,
Conics
You can also define a conic section with a Bézier curve. Conic sections come in three types: parabolas, hyperbolas, and ellipse. For defining which curve this is, the conic section path.conicTo() method also contains a weight, if the weight:
- is greater than 1, it is a hyperbola
- is less than 1, it is an ellipse
- matches 1 exactly, it is a parabola
void paint(Canvas canvas, Size size) {
var path = Path();
var controlPoint = Offset(200, 500);
var endPoint = Offset(500, 200);
path.moveTo(100, 200);
path.conicTo(
controlPoint.dx,
controlPoint.dy,
endPoint.dx,
endPoint.dy,
1,
);
Quadratic Beziers
Quadratic equations deal with powers of 2 ($x^2$ equations always make parabolas of some kind). Since parabolas have only one curve, you only need one control point to define this curve along with an endpoint. The curve starts at the current position of the path and ends at the defined endpoint by following the curve defined by a control point and is drawn by the path.quadraticBezierTo() method:
void paint(Canvas canvas, Size size) {
var path = Path();
var controlPoint = Offset(200, 500);
var endPoint = Offset(500, 250);
path.moveTo(100, 100);
path.quadraticBezierTo(
controlPoint.dx,
controlPoint.dy,
endPoint.dx,
endPoint.dy,
);

Relative Elements
Since a path stores the current position of drawing, it would be convenient to draw a line to a point (100, 100) units from where the current position is rather than first getting the current position and then adding (100, 100) units to it. For this purpose, the Path object also has methods that do similar operations seen before but with relative units - meaning the absolute position of the points does not need to be specified. Instead, the position specified is relative to the current position of the path itself.
Relative operations have a similar syntax to earlier operations mentioned, with the offsets being offsets from the current position rather than the origin. Without exhaustively covering all operations since the result is the same, here are a few operations done with relative scales:
void paint(Canvas canvas, Size size) {
var path = Path();
path.relativeLineTo(100.0, 100.0);
path.relativeMoveTo(50.0, 50.0);
var controlPoint = Offset(200, 200);
var relativeOffset = Offset(300, 100);
path.relativeConicTo(
controlPoint.dx,
controlPoint.dy,
relativeOffset.dx,
relativeOffset.dy,
1,
);
}Drawing And Clipping Paths
Once the paths are fully built using the various methods described, they can be used for two distinct purposes: to paint the path with specified paint on the screen OR to clip the path given in the layer.
To paint the path on the screen, you can use the canvas.drawPath() method and supply the Paint object to use. Similarly, to clip the path area, use the canvas.clipPath() method. You can also specify if you want to use anti-aliasing which is useful for showing curves on lower resolution screens. It works by transitioning the pixel colors from the paint color to the background color and this creates an effect of smoothening out curves rather than them looking pixelated. Here is how the methods would be used:
void paint(Canvas canvas, Size size) {
var path = Path();
var paint = Paint();
// Add elements to path here
canvas.drawPath(path, paint);
// OR
canvas.clipPath(path, doAntiAlias: true);
}Efficiently Managing Repaint - Animation
A naive approach to animate painting commands would be to create a CustomPaint widget inside a StatefulWidget and then call setState on animation tick and pass in the updated arguments to your CustomPainter object.
A better approach is to make use of the repaint property on CustomPainter. Take a look at the example below:
class DemoPainter extends CustomPainter {
DemoPainter({required this.animation}) : super(repaint: animation);
final Animation<double> animation;
void paint(Canvas canvas, Size size) {
// Use animation.value to determine what to paint
}
bool shouldRepaint(covariant CustomPainter oldDelegate) {
if (animation.status != AnimationStatus.completed) {
return true;
} else {
return false;
}
}
}This will result in the painter repainting whenever repaint notifies its listeners. This example uses an Animation. However, you can use any listenable, for instance, ChangeNotifier.
This approach is cleaner and improves performance as it skips the build phase of the parent widget.
Blend Modes
Blend mode defines the algorithms to use when painting on the canvas. Different algorithms can be used to blend the pixels when drawing a shape or image onto a canvas. See the Flutter documentation for a complete example of blend modes.
Below we’ll look at a basic example, and in later sections, we’ll use blend modes more.
class DemoPainter extends CustomPainter {
DemoPainter() : super();
void paint(Canvas canvas, Size size) {
var centerBlue = Offset(size.width / 2 - 20, size.height / 2);
var radius = 50.0;
var paintBlue = Paint()
..color = Colors.blue
..style = PaintingStyle.fill;
var centerRed = Offset(size.width / 2 + 20, size.height / 2);
var paintRed = Paint()
..color = Colors.red
..style = PaintingStyle.fillThe blue paint uses a blend mode of BlendMode.xor, which applies a bitwise XOR operation to the source and destination images and leaves a transparent intersection between the two.
This creates a blue and red circle, with the intersection between the two being transparent.

Canvas Save and Restore
It is possible to apply operations to the canvas as a whole. For example, you can manipulate the canvas orientation with:
canvas.rotate(radians);
canvas.transform(matrix4);
canvas.translate(dx, dy);
But what if you only want to apply these operations to a subset of paint/draw operations? For that, you’ll need to use canvas.save and canvas.restore.
Let’s explore an example:
void paint(Canvas canvas, Size size) {
  var centerBlue = Offset(size.width / 2 - 20, size.height / 2);
  var radius = 50.0;
  var paintBlue = Paint()
    ..color = Colors.blue
    ..style = PaintingStyle.fill;

  var centerRed = Offset(size.width / 2 + 20, size.height / 2);
  var paintRed = Paint()
    ..color = Colors.red
    ..style = PaintingStyle.fill;

  var centerGreen = Offset(size.width / 2 + 80, size.height / 2);
  var paintGreen = Paint()
..color = Colors.greenThe steps are as follows:
- Save the current transform and clip on the save stack.
- Apply a rotation to the canvas.
- Paint circles on the rotated canvas.
- Restore the canvas to the previous save.
- Paint a circle on the original canvas transform.
The result is a rotated red and blue circle and a normal green circle:

Save Layer
Similar to save is saveLayer. Take a look at the Flutter documentation for more information. Essentially saveLayer allows you to have a given paint's Paint.colorFilter and Paint.blendMode applied to achieve more advanced effects.
Warning: saveLayer is generally an expensive operation and should be used sparingly.
Flutter Support for Shaders
For an easily understandable example and introduction to shaders, please see the introduction page of The Book of Shaders. The book is fantastic if you’re interested in writing your shaders.
In this section, you’ll learn about the current support Flutter has for shaders and how they can be used to create spectacular visual elements.
- We’ll start with the basic built-in shaders and how to apply them to paint operations.
- Then explore how to apply shaders directly to a child widget and apply blend modes.
- Finally, we’ll look into fragment shaders and the best way to create your own.
Painting Shaders
A shader can be easily applied to a Paint object by setting the shader property:
Paint paint = Paint()..shader = YourDesiredShader();At the time of writing, Flutter supports the following shader classes:
- Gradient - that renders a color gradient.
- ImageShader - that tiles an image.
- FragmentProgram - creates Shader objects that run SPIR-V code.
The Gradient and ImageShader classes are provided by Flutter, and the FragmentProgram gives you the capabilities to create your own shader.
Gradient Shader
Let’s take a look at a Gradient shader:
class Painter extends CustomPainter {
void paint(ui.Canvas canvas, ui.Size size) {
canvas.drawPaint(
Paint()
..shader = ui.Gradient.radial(
Offset(size.width / 2, size.height / 2), // center
500, // radius
[Colors.yellow, Colors.blue], // colors
),
);
}
bool shouldRepaint(covariant CustomPainter oldDelegate) {
return true;
}
}In this example, you’re setting the shader value of the Paint object to be a radial gradient:

The above is a simplistic example; however, you’ll be able to achieve some interesting effects by combining these shaders and playing around with different blend and tile modes. In the example above, try setting the gradient’s tileMode to TileMode.mirror and see the difference.
You can also take a look at this video by creativecreatorormaybenot. It’s a good showcase of how to think about effectively using paint, shaders, and blend modes.
The video also discusses limitations and how Flutter can benefit by introducing support for fragment shaders. With the release of Flutter 3.0 this is no longer a limitation, and later we’ll explore fragment shaders in greater detail.
ShaderMask Widget
A ShaderMask allows you to easily apply a shader to any other widget.
A widget that applies a mask generated by a Shader to its child.
All of the shader operations in this section can also be used directly when painting, as we saw above, by setting the paint..shader property.
Gradient Shader
Let’s look at the RadialGradient class and create a “burning text” effect.
return ShaderMask(
  shaderCallback: (bounds) {
    return const RadialGradient(
      center: Alignment.center,
      radius: 1,
      colors: [Colors.yellow, Colors.deepOrange],
      tileMode: ui.TileMode.mirror,
    ).createShader(bounds);
  },
  child: const Center(
    child: Text(
      'Burning text',
      style: TextStyle(
          color: Colors.white, fontWeight: FontWeight.bold, fontSize: 100),
    ),
  ),
);
Here you’re creating a radial gradient in a slightly different way than before. The RadialGradient class abstracts out the arguments to the ui.Gradient.radial constructor you used before.
The default tileMode is also changed to TileMode.mirror.

Can you think of a way to animate this burning text?
Hint: Change the radius, alignment, and colors over time.
Image Shader
From the Flutter documentation, an ImageShader:
Creates an image-tiling shader. The first argument specifies the image to tile. The second and third arguments specify the [TileMode] for the x direction and y direction, respectively. The fourth argument gives the matrix to apply to the effect.
The following code uses an ImageShader to decorate text with leopard skin.
// Await for image to load. Use a future builder, or load image before runApp.
final imageData = await rootBundle.load('assets/leopard.jpeg');
final leopardSkinImage = await decodeImageFromList(imageData.buffer.asUint8List());

...

return ShaderMask(
  shaderCallback: (bounds) {
    return ui.ImageShader(
      leopardSkinImage,
      TileMode.mirror,
      TileMode.mirror,
      Matrix4.identity().storage,
);Your text is looking good!

An argument we haven’t explored is FilterQuality; we recommend reading the Flutter documentation to better understand what this does.
Applying Blend Modes With Shaders
Shaders would be limited in their use if they could not be composited with other images. Luckily this is easy to do using BlendModes.
Let’s take a look at a counter screen example.
class CounterScreen extends StatelessWidget {
const CounterScreen({Key? key}) : super(key: key);
Widget build(BuildContext context) {
return Scaffold(
backgroundColor: Colors.transparent,
appBar: AppBar(
title: const Text('Counter Screen'),
),
body: const Center(
child: Text(
'100',
style: TextStyle(
fontSize: 84,Wrap the screen with the leopard skin ShaderMask:
return ShaderMask(
  shaderCallback: (bounds) {
    return ui.ImageShader(
      leopardSkinImage,
      TileMode.mirror,
      TileMode.mirror,
      Matrix4.identity().storage,
    );
  },
  blendMode: ui.BlendMode.srcATop,
  child: const CounterScreen(),
);
And set the blendMode to BlendMode.srcATop:

This applies the shader to every visible pixel of the child widget. You can see the white because the Scaffold’s background color is set to transparent.
Play around and modify the blend mode, for example, BlendMode.colorBurn:

Combining different blend modes, black and white colors, and opacities is possible to composite images creatively.
Fragment Shaders
In the previous sections, we explored using gradients and image shaders directly in CustomPaint and ShaderMask widgets. These allow us to do a lot, but they are limited.
With fragment shaders, the options are only limited by your imagination and mathematical skills.
In this section, you’ll create your own shader. We’ll only explore the high-level concepts, as it’s quite a complex topic and requires a lot of mathematical operations to achieve certain effects. We’ll provide you with helpful reading material if you’re interested to learn more.
What are Fragment Shaders?
In a basic sense, shaders simply transform an input to an output. Fragment shaders determine the color of every screen pixel and frame. Fragment shaders run on the GPU, and can be computed extremely fast. Any video game you’ve played has probably heavily relied on shaders for graphical computation.
The painting operations that we have seen up until this point rely on the CPU. These operations are performed linearly, operation by operation. As such, there is a logistical cap to how much painting you can do in single animation frame. If you perform too many complex painting operations for Flutter to compute within a single frame, it’ll result in dropped frames, or “jank”.
A free resource to learn more about shaders: The Book of Shaders. There is a page dedicated to what a fragment shader is.
Fragment Shaders in Flutter
For a detailed overview of Flutter shaders and the suggested implementation, see the API design document.
The FragmentProgram class allows you to run a custom SPIR-V shader, by loading the .sprv file.
final program = await ui.FragmentProgram.compile(
    spirv: (await rootBundle.load('assets/shaders/simple.sprv')).buffer,
  );
You can then construct a shader with optional uniforms:
final shader = program.shader(
  floatUniforms: // optional
  samplerUniforms: // optional
);
This method is suitable to being called synchronously, for example, within a widget’s build method. The optional uniforms that you pass in can be used within your shader program’s computation. For example, you can pass in an image, or mouse position.
Here is some example code showing how to update a shader on animation tick:
void _onTick(Duration elapsedTime) {
    setState(() {
      shader = widget.program.shader(
        floatUniforms: Float32List.fromList(
          <double>[
            canvasSize.width,
            canvasSize.height,
            elapsedTime.inMilliseconds / 1000.0
          ],
        ),
        samplerUniforms: [imageShader],
      );
    });
  }
Creating a Spir-V Shader
We’ve seen how to render a shader in Flutter, now we need to create a shader.
Let’s take a look at a simple shader program: simple.glsl:
#version 320 es

// Copyright 2013 The Flutter Authors. All rights reserved.
// Use of this source code is governed by a BSD-style license that can be
// found in the LICENSE file.

precision highp float;

layout(location = 0) out vec4 fragColor;

layout(location = 0) uniform float a;

void main() {
    fragColor = vec4(0.0, a, 0.0, 1.0);
}
OpenGL Shading Language (GLSL) is the principal shading language for OpenGL.
The above program:
- Runs for each pixel in parallel on the GPU.
- Sets the color of each pixel by using the
out vec4 fagColoruniform. - Sets the output color in the
mainmethod with avec4value: RGBA (red, green, blue, alpha). - Takes in a uniform named
awhich is of type float. This is a uniform value that must be passed in from Flutter. In this example theais used to set the green color of the pixel value. Red and blue is set to 0, and the alpha value is set to 1.
In order to run this shader in Flutter, you’ll need to convert it to Spir-V, as that is what Flutter/Skia supports. This article won’t demonstrate this process, but you can find detailed information in this article by Jochum van der Ploeg.
The same author has also created an open-source package to simplify creating and communicating with, shaders in Flutter. The package is called Umbra, and we will use that as a demonstration.
Umbra Package and CLI
The Umbra package simplifies the process of creating and interfacing with a fragment shader using Flutter.
Install Umbra:
# 🎯 Activate from https://pub.dev
dart pub global activate umbra_cli

# 🚀 Install umbra dependencies
umbra install-deps
Once Umbra is installed you can use it to easily create shaders in Flutter. As an example, run the following in your Flutter project:
# 🕶️ Create your first shader
umbra create hello_world

# 📦 Compile your first shader to a Dart file
umbra generate shaders/hello_world.glsl --output lib/shaders/
Make sure the shaders folder exists before running.
The generated hello_world.glsl file should looks something like this:
// Based on https://thebookofshaders.com/03/
vec4 fragment(vec2 uv, vec2 fragCoord) {
    return vec4(uv.x, uv.y, 0.0, 1.0);
}- The uv is the normalized pixel position. Normalized means it is a value between 0 and 1.
- The fragCoord is the current pixel position.
- The function returns a vec4 representing the current pixel's color value.
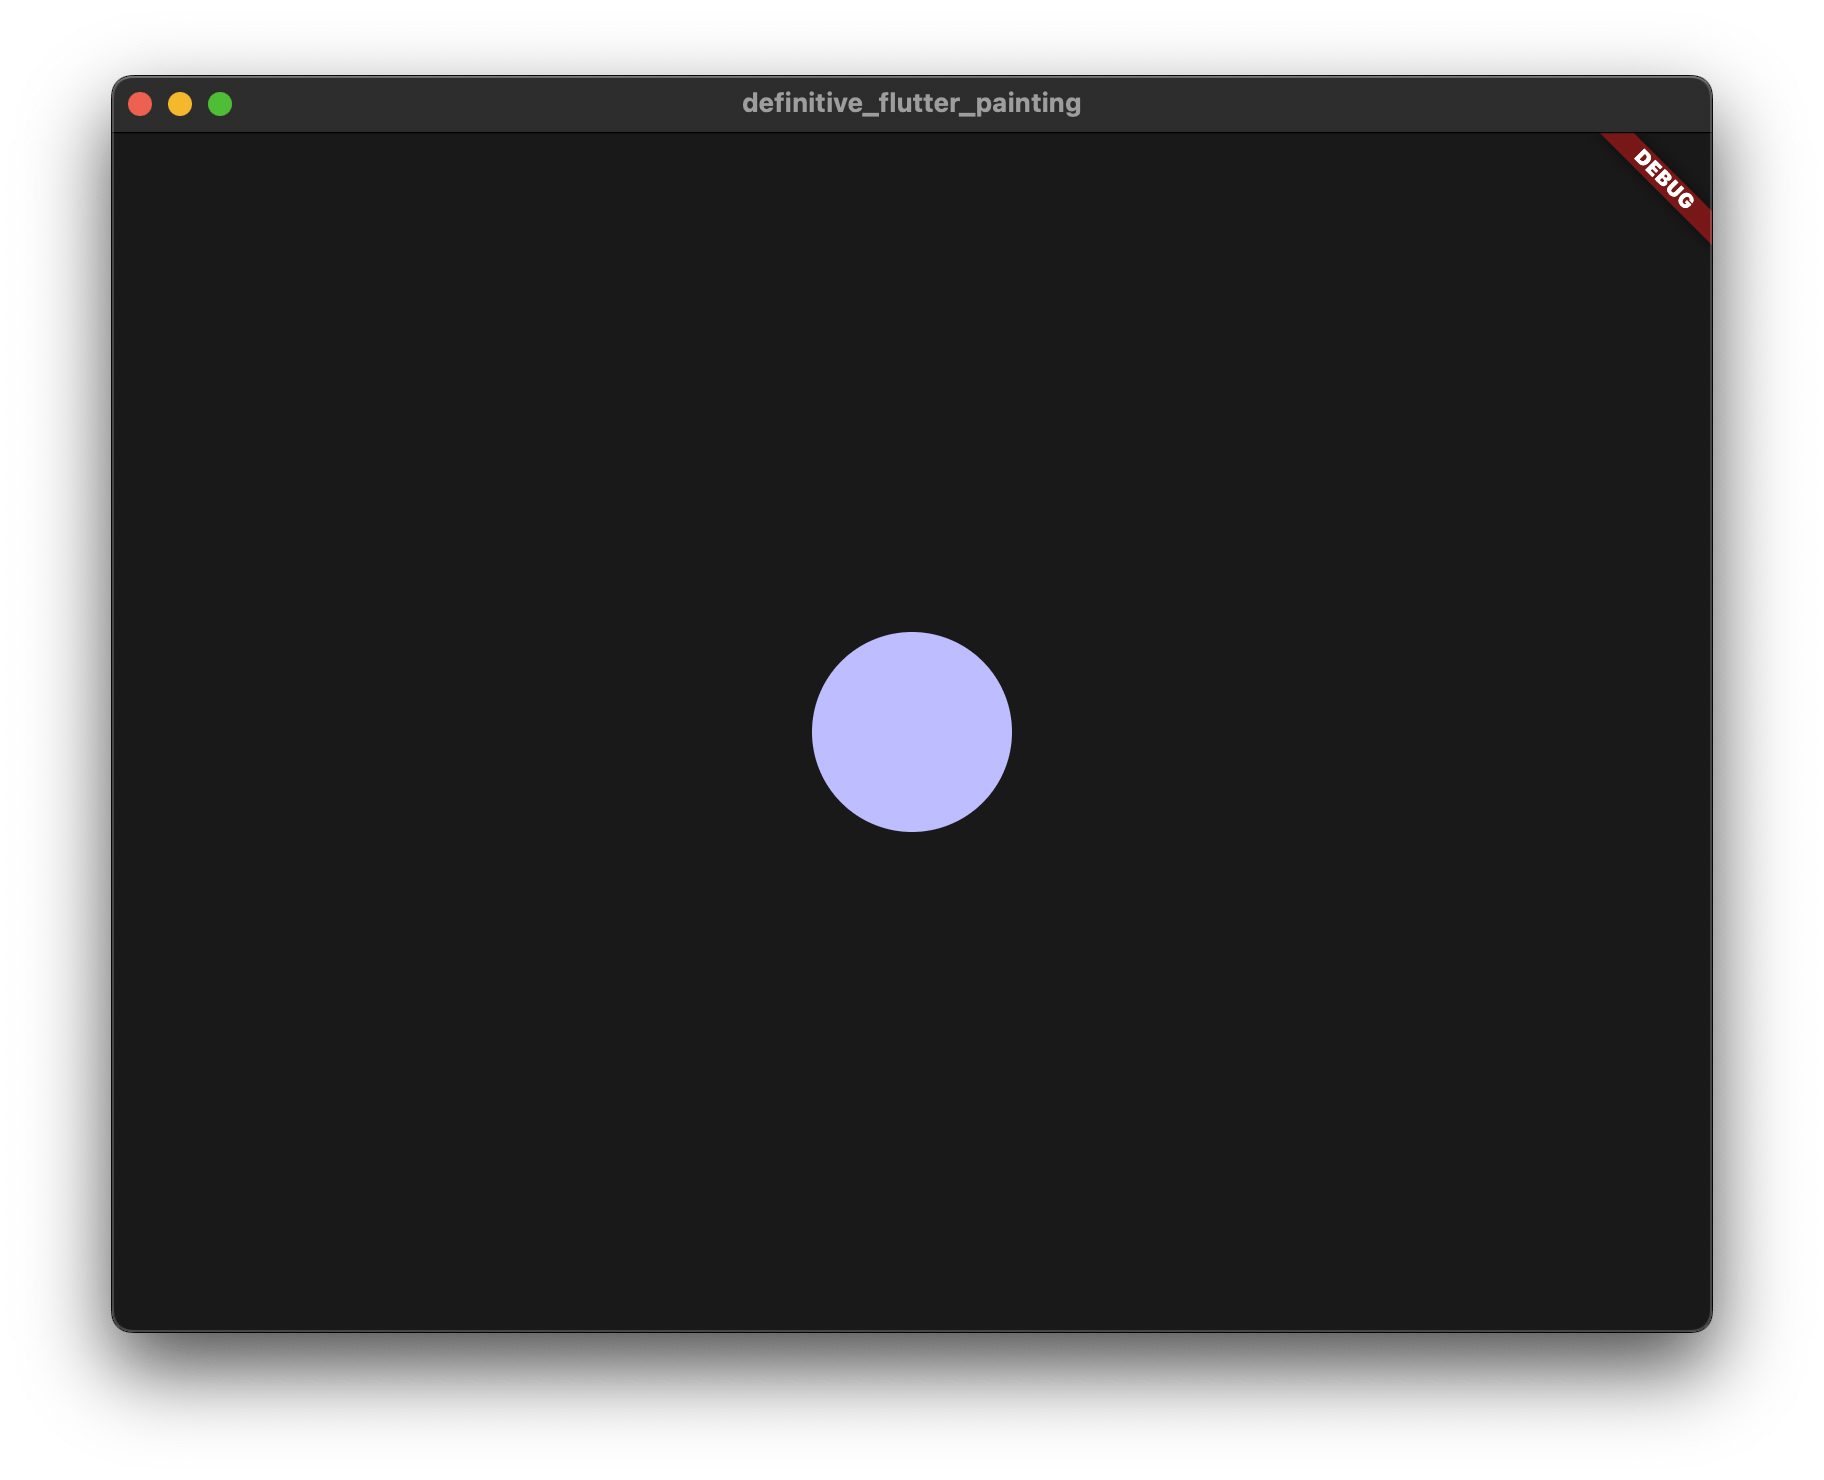
This method sets the color of each pixel to a value dependent on the normalized pixel position. This will create a rainbow effect that you can see down below.
The generated Dart file will look something like this:
import 'dart:convert';
import 'dart:typed_data';

import 'dart:ui';

import 'package:umbra_flutter/umbra_flutter.dart';

/// {@template hello_world}
/// A Dart Shader class for the `hello_world` shader.
/// {@endtemplate}
class HelloWorld extends UmbraShader {
  HelloWorld._() : super(_cachedProgram!);

  /// {@macro hello_world}
static Future<HelloWorld> compile() async {Note: you will need to install the umbra_flutter dependency:
dependencies:
  umbra_flutter: ^0.1.0-dev.1 #latest
You can then use this shader however you want in your Flutter code. Here is an example widget that will display the shader using a ShaderMask:
class HelloWorldWidget extends StatefulWidget {
const HelloWorldWidget({Key? key}) : super(key: key);
State<HelloWorldWidget> createState() => _HelloWorldWidgetState();
}
class _HelloWorldWidgetState extends State<HelloWorldWidget> {
late Future<HelloWorld> helloWorld = HelloWorld.compile();
Widget build(BuildContext context) {
return FutureBuilder<HelloWorld>(
future: helloWorld,
builder: (context, snapshot) {The output for this will be:
Shaders: Additional Resources
You’ve seen the basics of shaders in Flutter. It’s now time to build and explore and see what you can create!
Some additional resources:
- Take inspiration from the community and see the amazing things people have already made.
- Run the Umbra example for more complex shaders to see how to pass in other uniforms and apply custom shaders to images.
- Read about shaders with Flame, an article by Christian Muehle.
Conclusion
Thank you for reading this comprehensive guide on Flutter painting. Applying the lessons learned in this article can lead to some amazing results - as an example, I use the CustomPaint widget to create generative art in Flutter. We would love to see what you make with CustomPaint - feel free to share this with us at @getstream_io.