VideoTheme {
    // observe a local participant
    val me by call.state.me.collectAsState()
    var parentSize: IntSize by remember { mutableStateOf(IntSize(0, 0)) }

    Box(
        contentAlignment = Alignment.Center,
        modifier = Modifier
            .fillMaxSize()
            .background(VideoTheme.colors.appBackground)
            .onSizeChanged { parentSize = it }
    ) {
        // render remote participants
        ..

        // render a floating video UI for the local video participant
        if (me != null) {
            FloatingParticipantVideo(
                modifier = Modifier.align(Alignment.TopEnd),
                call = call,
                participant = me!!,
                parentBounds = parentSize
            )
        }
    }
}FloatingParticipantVideo
The FloatingParticipantVideo can be used to display the video content of the local participant in a video call in a floating way. This means that the component can be moved around within its parent component bounds. The component can be used with any participant, but in our default components, it handles only the local participant.
Let's see how to use the component.
Render a Local Participant
To use the component, FloatingParticipantVideo must be placed in a Box that allows overlaid elements. Here's an example:
In this example, the main point is that the FloatingParticipantVideo is overlaid on top of other UI elements. You should ensure that you do not render other UI elements over the FloatingParticipantVideo and hide it behind them.
The state the FloatingParticipantVideo requires is the following:
call: Used to determine the rest of the information we represent in the UI, based on the call state.participant: The state of the call participant you want to render.parentBounds: Bounds of the parent, used to constrain the component to the parent bounds,
Once you have that provided, you'll see something similar to the following:
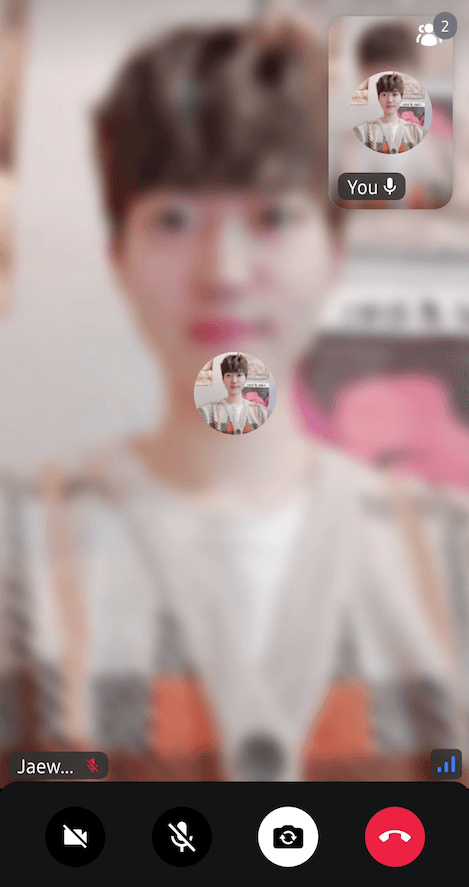
Notice the floating item at the top right corner. The FloatingParticipantVideo represents that container. Given that the container is fairly simple and very specific, it doesn't allow any action handling customization.
However, you can still customize the look and feel. Let's see how.
Customization
When it comes to UI customization, the component exposes the following:
@Composable
public fun BoxScope.FloatingParticipantVideo(
    modifier: Modifier = Modifier,
    call: Call,
    participant: ParticipantState,
    parentBounds: IntSize,
    alignment: Alignment = Alignment.TopEnd,
    style: VideoRendererStyle = RegularVideoRendererStyle(isShowingConnectionQualityIndicator = false),
    videoRenderer: @Composable (ParticipantState) -> Unit = {
        ParticipantVideo(
            modifier = Modifier
                .fillMaxSize()
                .clip(VideoTheme.shapes.dialog),
            call = call,
            participant = participant,
            style = style
        )
    }
)
As you can see the above example, you can customize the video style like the other components, such as ParticipantVideo. For more information, check out UI Cookbook - VideoRenderer.
modifier: Used for styling the component with more UI customization, such as adding a border, elevation and similar.call: The call containing state.participant: The participant to render.parentBounds: Defines the start and end area of the parent component. This parameter is used to ensure that theFloatingParticipantVideocomponent is placed correctly within its parent when using the drag and drop gestures.alignment: Determines where the floating participant video will be placed.style: Defined properties for styling a single video call track.videoRenderer: A single video renderer that renders each individual participant. If you want to use your own video renderer, you can implement your own composable withvideoRenderer.
The component uses the following theme properties for its default appearance:
- Size: Calculated as
VideoTheme.dimens.genericMax * 1.5f(width) byVideoTheme.dimens.genericMax * 2.2f(height) - Padding:
VideoTheme.dimens.spacingS - Shape:
VideoTheme.shapes.dialog
These properties can be customized through the VideoTheme to change the appearance of the floating video without having to build your own UI component that deals with all the gestures and rendering logic.