<?xml version="1.0" encoding="utf-8"?>
<androidx.constraintlayout.widget.ConstraintLayout xmlns:android="http://schemas.android.com/apk/res/android"
    xmlns:app="http://schemas.android.com/apk/res-auto"
    android:layout_width="match_parent"
    android:layout_height="match_parent"
    >

    <io.getstream.chat.android.ui.message.list.header.MessageListHeaderView
        android:id="@+id/messagesHeaderView"
        android:layout_width="0dp"
        android:layout_height="wrap_content"
        app:layout_constraintEnd_toEndOf="parent"
        app:layout_constraintStart_toStartOf="parent"
        app:layout_constraintTop_toTopOf="parent"
        />

    <io.getstream.chat.android.ui.message.list.MessageListView
        android:id="@+id/messageListView"
        android:layout_width="0dp"
        android:layout_height="0dp"
        android:layout_marginHorizontal="0dp"
        android:clipToPadding="false"
        app:layout_constraintBottom_toTopOf="@+id/messageInputView"
        app:layout_constraintEnd_toEndOf="parent"
        app:layout_constraintStart_toStartOf="parent"
        app:layout_constraintTop_toBottomOf="@+id/messagesHeaderView"
        />

    <io.getstream.chat.android.ui.message.input.MessageInputView
        android:id="@+id/messageInputView"
        android:layout_width="0dp"
        android:layout_height="wrap_content"
        app:layout_constraintBottom_toBottomOf="parent"
        app:layout_constraintEnd_toEndOf="parent"
        app:layout_constraintStart_toStartOf="parent"
        app:layout_constraintTop_toBottomOf="@+id/messageListView"
        />

</androidx.constraintlayout.widget.ConstraintLayout>This is documentation for Stream Chat Android SDK v5, which is no longer actively maintained. For up-to-date documentation, see the latest version (v7).
Building a Message List Screen
The SDK provides multiple UI Components which can be used together to build a message list screen. This guide will show you how to combine and customize MessageListHeaderView, MessageListView, and MessageInputView.
This is what a screen made with these three components looks like:
| Light Mode | Dark Mode |
|---|---|
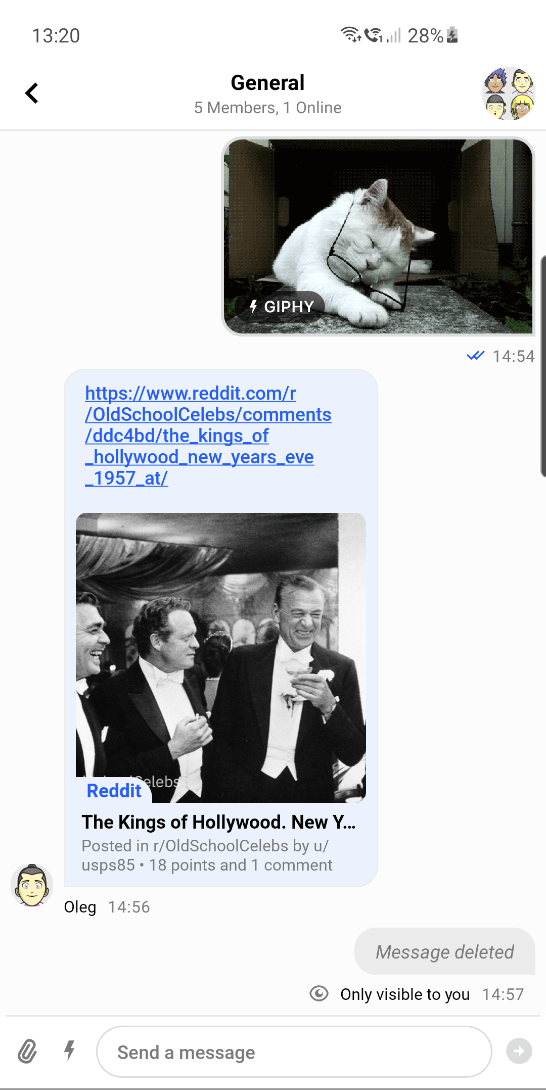 |  |
To add these Views to your app, first create them in an XML layout:
Just like other components, these three views come with ViewModels which are responsible for providing all necessary data for them.
After setting up the ViewModels, this screen also requires some additional setup to pass information between the different chat components.
// Create view models
val factory: MessageListViewModelFactory = MessageListViewModelFactory(cid = "channelType:channelId")
val messageListHeaderViewModel: MessageListHeaderViewModel by viewModels { factory }
val messageListViewModel: MessageListViewModel by viewModels { factory }
val messageInputViewModel: MessageInputViewModel by viewModels { factory }

// Bind view models
messageListHeaderViewModel.bindView(messageListHeaderView, viewLifecycleOwner)
messageListViewModel.bindView(messageListView, viewLifecycleOwner)
messageInputViewModel.bindView(messageInputView, viewLifecycleOwner)

// Let both message list header and message input know when we open a thread
messageListViewModel.mode.observe(this) { mode ->
    when (mode) {
        is MessageListViewModel.Mode.Thread -> {
            messageListHeaderViewModel.setActiveThread(mode.parentMessage)
            messageInputViewModel.setActiveThread(mode.parentMessage)
        }
        MessageListViewModel.Mode.Normal -> {
            messageListHeaderViewModel.resetThread()
            messageInputViewModel.resetThread()
        }
    }
}

// Let the message input know when we are editing a message
messageListView.setMessageEditHandler(messageInputViewModel::postMessageToEdit)

// Handle navigate up state
messageListViewModel.state.observe(this) { state ->
    if (state is MessageListViewModel.State.NavigateUp) {
        // Handle navigate up
    }
}

// Handle back button behaviour correctly when you're in a thread
val backHandler = {
    messageListViewModel.onEvent(MessageListViewModel.Event.BackButtonPressed)
}
messageListHeaderView.setBackButtonClickListener(backHandler)

// You should also consider overriding default Activity's back button behaviourbindView sets listeners on the View and the ViewModel. Any additional listeners should be set after calling bindView.
This gives you a fully functional messaging screen, where you're able to display and send messages, and perform various actions in the message list.