void startSharing() {
    // Checks to ensure the user can share their screen.
    final canShare = call.hasPermission(CallPermission.screenshare);

    if (canShare) {
      // Set screensharing to enabled
      call.setScreenShareEnabled(enabled: true);
    }
}Screen Sharing
Introduction
During the duration of a call, participants may want to share either a portion of their screen, application or their entire screen to other users on the call. Stream Video makes it easy to support screensharing to other users natively on both Android and iOS devices.
In this guide, we will look at the steps required to configure screensharing on both platforms. If you are interested in screensharing for just one platform, you can skip to the Android or iOS section using this link.
iOS
Starting with iOS, there are two main options for screensharing from an iOS device. These are:
- in-app screensharing - In this mode, the app's screen is only shared while the app is active or in the foreground. If the app is not in the foreground, screensharing is paused.
- broadcasting - Using broadcasting mode allows the app to share the contents of the screen even when the application goes into the background.
Both of these options use Apple's framework ReplayKit (via flutter_webrtc) for broadcasting the user's screen.

Before a user can share their screen, the call must have the screensharing capability configured via the Dashboard.
In-app sharing
In-app screensharing only shares the application's screens. While in a call, screensharing can be enabled by calling call.setScreenShareEnabled(enabled: true) method.
If you use our UI components you can also add ToggleScreenShareOption as one of StreamCallControls option.
When the method is invoked, ReplayKit will ask for the user's consent that their screen will be shared. Only after the permission is granted, the screensharing starts.
Broadcasting
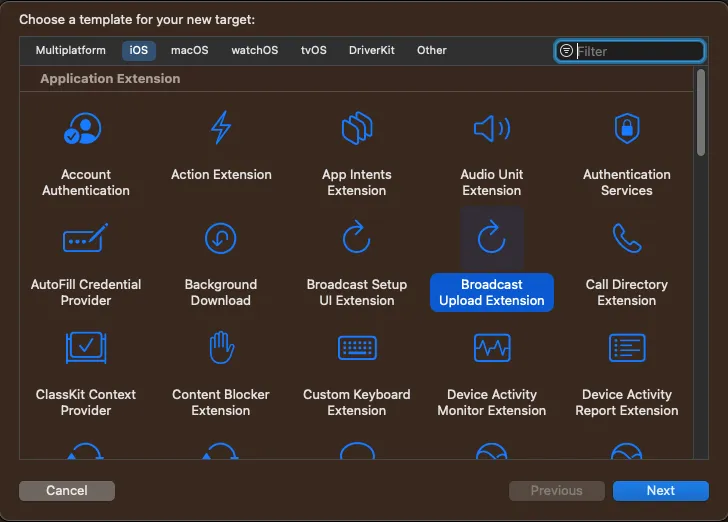
In most cases, you would need to share your screen while the app is in the background, to be able to open other apps. For this, you need to create a Broadcast Upload Extension.
Toggle screen sharing with broadcast mode
If you want to start screen sharing in broadcast mode on iOS you will need to toggle it by setting useiOSBroadcastExtension flag to true in ScreenShareConstraints. You can set the constraints inside ToggleScreenShareOption or when you use call.setScreenShareEnabled() directly.
const constraints = ScreenShareConstraints(
    useiOSBroadcastExtension: true,
);

...

ToggleScreenShareOption(
  ...
  screenShareConstraints: constraints,
),

//or

call.setScreenShareEnabled(enabled: true, constraints: constraints);
Add Broadcast Upload Extension
iOS requires the use of Broadcast Upload Extensions to facilitate screen sharing when your app is in the background. This extension provides the necessary framework to handle capturing and broadcasting the screen content.
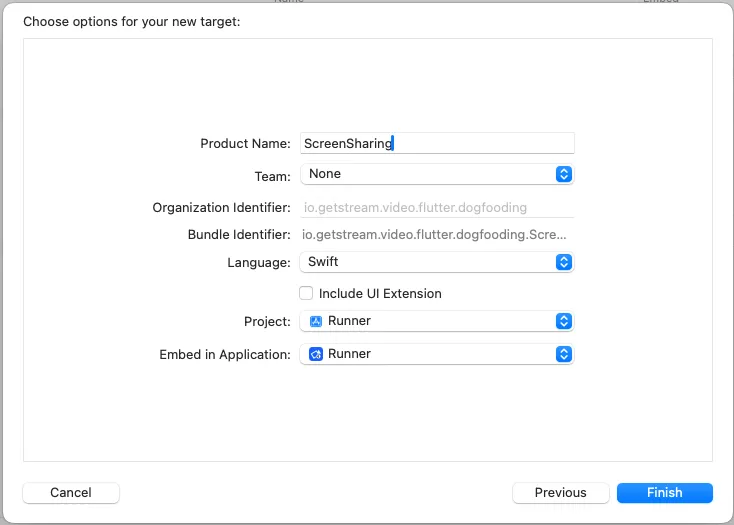
Now add the extension, without UI, to your project in Xcode:


Make sure the deployment target for both your app and broadcast extension is set to iOS 14 or newer.
After you create the extension, there should be a class called SampleHandler, that implements the RPBroadcastSampleHandler protocol. Remove the protocol conformance and the methods, import our stream_video_screen_sharing, and make the SampleHandler a subclass of our class called BroadcastSampleHandler, that internally handles the broadcasting.

To have access to our Handler implementation add stream_video_screen_sharing package to your app's pubspec.yaml file:
dependencies:
  stream_video_screen_sharing: ^<latest_version>
Then for native code to see it, add it as a dependency manually for the extension target in the Podfile file:
target 'YOUR_EXTENSION_NAME' do
  use_frameworks!
  pod 'stream_video_screen_sharing', :path => File.join('.symlinks', 'plugins', 'stream_video_screen_sharing', 'ios')
end
Replace YOUR_EXTENSION_NAME with the name of the extension you created.
Setup app groups
Add your extension to an app group by going to your extension's target in the project. In the Signings & Capabilities tab, click the + button in the top left and add App Groups. If you haven't done so already, add App Groups to your main app as well, ensuring that the App Group identifier is the same for both.
Update Info.plist
Finally, you should add a new entries in the Info.plist files.
In both the app and the broadcast extension, add a key RTCAppGroupIdentifier with a value of the app group id and RTCScreenSharingExtension key with a value of a bundle id of your extension.
With that, the setup for the broadcast upload extension is done.
Android
The Stream Video SDK has support for screen sharing from an Android device. The SDK is using the Android Media Projection API for the capture. To initiate screen sharing, user consent is mandatory.
When using the ToggleScreenShareOption within thestream_video_flutter package, permission handling is seamlessly integrated. However, if you opt to initiate screen sharing via the setScreenShareEnabled() method on the Call object, you will be responsible for securing the necessary permissions and initiating a foreground service. The foreground service is essential for displaying a notification to the user while screen sharing is active.
It is required to start media projection foreground service from Android version 10 onward.
From Android 14 onward, it is also required to actively ask users for a permission to share their screen. You can do this by calling call.requestScreenSharePermission() method.
Below is an example snippet that demonstrates how to use our built in StreamBackgroundService class to manage these requirements:
void startScreemSharing() {
    if (CurrentPlatform.isAndroid) {
      // Check if the user has granted permission to share their screen
      if (!await call.requestScreenSharePermission()) {
        return;
      }

      // Start the screen sharing notification service
      await StreamBackgroundService()
          .startScreenSharingNotificationService(call);
    }

    // Enable screen sharing
    final result = await call.setScreenShareEnabled(
      enabled: true,
    );

    // Stop the screen sharing notification service if the operation failed
    if (CurrentPlatform.isAndroid && result.isFailure) {
      await StreamBackgroundService()
          .stopScreenSharingNotificationService();
    }
  }
Remember to stop the foreground service when the screen sharing is disabled:
void stopScreenSharing() async {
    final result = await call.setScreenShareEnabled(
      enabled: false,
    );

    if (CurrentPlatform.isAndroid) {
      await StreamBackgroundService()
          .stopScreenSharingNotificationService();
    }
  }
Customizing the screen sharing notification
You can customize the screen sharing notification content and behavior by initializing StreamBackgroundService. This allows you to handle notification taps and customize button actions:
StreamBackgroundService.init(
  StreamVideo.instance,
  onNotificationClick: (call) async {
    // Add any custom logic here if needed
  },
  onButtonClick: (call, type, serviceType) async {
    switch (serviceType) {
      case ServiceType.call:
        call.end();
      case ServiceType.screenSharing:
        StreamVideoFlutterBackground.stopService(ServiceType.screenSharing);
        call.setScreenShareEnabled(enabled: false);
    }
  },
);
For more details on customizing notifications, handling notification clicks, and required Android manifest configuration, see the Background modes guide.
Desktop (macOS, Windows, Linux)
For the Flutter Video and Audio SDK we don't officially support desktop, but many things already work out of the box and for some features we've made some small improvements to make it work better. On Desktop, users can have multiple screens, making it important to select what to share rather than sharing everything. Most apps allow users to choose between sharing a whole screen or a window of a single app. When running on web a browser will provide a selection screen for this.
When using the ToggleScreenShareOption your app will automatically show a dialog to select a screen or window to your users. However, you can fully customize this screen if you want to by setting the desktopScreenSelectorBuilder option.
ToggleScreenShareOption(
  ...
  desktopScreenSelectorBuilder: _customDesktopScreenShareSelector,
),
For the screen selector we have a helper class called ScreenSelectorStateNotifier which keeps track of the available screens or windows.
In the _customDesktopScreenShareSelector method we first build a state notifier. The _customDesktopScreenShareSelector will return a Future<DesktopCapturerSource?>. It's a nullable DesktopCapturerSource because we will return null if the screen selection is canceled.
Future<DesktopCapturerSource?> _customDesktopScreenShareSelector(
    BuildContext context) {
  final ScreenSelectorStateNotifier stateNotifier =
  ScreenSelectorStateNotifier(sourceTypes: [SourceType.Screen]);
  ...
}
We initialize the ScreenSelectorStateNotifier with a list of sourceTypes. The default is to share a screen, but you could also initialize the notifier with windows or both.
In this example we only give the user the option to share a screen and directly select the screen when we tap on it. For this we create a bottom sheet with a ValueListenableBuilder to listen to our state notifier.
Future<DesktopCapturerSource?> _customDesktopScreenShareSelector(
    BuildContext context) {
  final ScreenSelectorStateNotifier stateNotifier =
      ScreenSelectorStateNotifier(sourceTypes: [SourceType.Screen]);

  return showModalBottomSheet<DesktopCapturerSource?>(
    context: context,
    builder: (BuildContext context) {
      return ValueListenableBuilder(
        valueListenable: stateNotifier,
        builder:
            (BuildContext context, ScreenSelectorState value, Widget? child) => Container(),
      );
    },
  );
}
Lastly we use the prebuild ThumbnailGrid to show the thumbnails from the screens:
return ValueListenableBuilder(
        valueListenable: stateNotifier,
        builder:
            (BuildContext context, ScreenSelectorState value, Widget? child) =>
                Padding(
          padding: const EdgeInsets.symmetric(horizontal: 16.0),
          child: ThumbnailGrid(
            sources: value.sources.values.toList(),
            selectedSource: value.selectedSource,
            onSelectSource: (source) => Navigator.pop(context, source),
          ),
        ),
      );
The ScreenSelectorState contains the sources, available sourceTypes and the currently selectedSource.
When you add UI to switch between SourceTypes Screen and Window you can use ScreenSelectorStateNotifier.setSourceType() to load other sources.
You can also use ScreenSelectorStateNotifier.setSelectedSource(source) to update the notifier with the selected source. This only has impact on the state of the notifier, not on the actual screen sharing.
Screen audio sharing
Screen audio sharing is currently only available on Android. It requires Android 10 (API level 29) or above.
In addition to sharing your screen visually, you can also share audio playing on your device. This feature uses Android's AudioPlaybackCapture API to capture media playback audio, including sound from music players, video apps, games, and other media applications.
Enabling screen audio capture
To include screen audio when sharing your screen, set captureScreenAudio: true in ScreenShareConstraints:
final result = await call.setScreenShareEnabled(
  enabled: true,
  constraints: const ScreenShareConstraints(
    captureScreenAudio: true,
  ),
);
You can also pass these constraints to the ToggleScreenShareOption widget.
How screen audio works
Screen audio is mixed with microphone audio and transmitted together over the same audio track. This means both your voice and the device audio are sent to other participants simultaneously.
Screen audio sharing requires the microphone to be unmuted. When the microphone is muted, neither microphone nor screen audio will be transmitted.
When sharing music or other high-fidelity audio content, consider disabling noise cancellation temporarily to preserve audio quality.
Screen sharing settings
You can customize the screen sharing behavior by providing ScreenShareConstraints to the ToggleScreenShareOption widget or setScreenShareEnabled() method.
You can specify the following settings:
useiOSBroadcastExtension- Set totrueto enable broadcast mode on iOS.captureScreenAudio- Set totrueto capture audio from the screen.sourceId- The device ID of an audio source, if you want to capture audio from a specific source.maxFrameRate- The maximum frame rate for the screen sharing video.params- The video parameters for the screen sharing video.
For params you can use one of our predefined presets in RtcVideoParametersPresets.