

We use Apple's Accelerate Framework in two of our SDKs, and even more implementations are underway. In this article, we'll share why and how it helped us solve some performance-related challenges, bringing immediate value to our customers and their end-users.
In this article we will provide you with a couple of things:
- A quick introduction on the Accelerate Framework.
- Provide some supporting information about the underlying SIMD processor instructions.
- Explain why you should probably use the Accelerate Framework instread of SIMD directly.
- How we use the Accelerate Framework for an neat audio visualization and video conversion.
If you are looking for the actual usage of the Accelerate Framework, feel free to skip ahead to the section "How Stream Uses the Accelerate Framework".
One feature we are particularly proud of is our Picture-in-Picture (PiP) implementation. In this article, we'll explain how we did this and our audio visualization feature. If you know enough about the Accelerate Framework and SIMD, you can dive right into our implementation.
Otherwise, let's go over some fundamental things first:
What is the Accelerate Framework?
The Accelerate Framework by Apple is a framework that is designed to help developers do the heavy lifting in a number of areas like neural networks, image-processing, signal processing, compression, algebra, and 3D objects using vector-processing.
On top of that, it now also allows access SIMD directly since Swift 5.
It's all centered around vector-processing, which uses the SIMD registers on your CPU to effectively process large sets of data in parallel.
What is SIMD?
SIMD stands for "Single Instruction, Multiple Data". That means it can repeat the same operation on a group of numbers (Integers and Floating point) in one instruction, using parallelism. It excels at processing large, homogenous data sets with a predictable size.
Because it can only work efficiently when there is a constant stream of constant-sized data that needs to be processed in exactly the same way, there are only some (but very important!) problem areas that usually benefit from using SIMD-instructions:
- Audio
- Video
- Graphics
- Games
- Scientific Computing
- Databases
- Compression and Decompression
- Machine Learning
- Cryptography
When we examine all of Accelerate Framework's capabilities, we see that there is a strong overlap between these areas.
Why would you use the Accelerate Framework?
This is a valid question, given that you can now write your own SIMD code using Swift. Plenty of open-source frameworks leverage C++ to do exactly the same.
Remember that C++ is easily bridged to Swift due to its Objective-C++ heritage. Not many languages make this easier than Swift!
So why would you use Accelerate Frameworks over your SIMD code or a third-party open-source framework?
1. Built by Apple for Apple Devices
You can rest assured that Accelerate Framework is optimized for every CPU and hardware configuration Apple uses. It is optimized before any new OS or device launch, giving you the best performance possible on that device from launch day and keeping your application future-proofed.
2. The Most Important Customer for This Framework is Apple
For example, the Camera feature in iOS uses Accelerate Framework a lot, helping them to give you a live, image-corrected feed of what you see through your camera. Then, it's used to post-process the image after you press the shutter button to achieve the best possible image.
The camera is one of the most important features of any smartphone, and combining the most powerful processing hardware with the most optimized software helps Apple keep the iPhone camera's performance top-of-the-league.
They make billions every year because these algorithms are so efficient.
Every feature in Accelerate Framework can be mapped to one or more Apple applications you know. Take, for example, the way the Siri animation responds when you talk or the waveforms we see when we have an ongoing phone call on the dynamic island:

All powered through Accelerate Framework!
3. Support and Integration
Using frameworks that ship with Xcode is always easier than using an external dependency. Even Apple's set of Swift Packages still suffers from the same issues any third-party package might have. It needs to be downloaded and compiled and can break just as easily on a branch switch.
Many competing packages written in C++ have very broad support for maintaining them, but most of them need a Swift wrapper that is usually maintained by one developer. This can cause delays or even force you to update the wrappers yourself in the future.
4. Energy Efficiency
A standout feature of iOS over any other mobile OS is its rigorous approach towards energy consumption. This permeates everything they've built for the platform, including Accelerate Framework. All third-party libraries focus on getting the task done as soon as possible but don't necessarily respect your user's battery much.
This is a very important aspect for us, as we are a third-party library and don't want to impose a sharp penalty in this area for the apps that consume our library!
Using SIMD in Swift
Just in case you are wondering, you can use SIMD directly in Swift since Swift 5.0. Before that we needed to use C or C++ bridged through Objective-C(++) in Swift or the Accelerate framework.
💡 Feel free to skip this section.
We will discus lower level API to make sure you are aware of some of the underlying technologies of the Accelerate Framework.
Here's a quick example of how you can use SIMD instructions in Swift:
// Define two arrays of floats
let array1: [Float] = [1.0, 2.0, 3.0, 4.0]
let array2: [Float] = [5.0, 6.0, 7.0, 8.0]

// Convert arrays to SIMD vectors
let vector1 = SIMD4<Float>(array1)
let vector2 = SIMD4<Float>(array2)

// Perform SIMD addition
let resultVector = vector1 + vector2
The kicker is in the last line of code, where we can now sum up eight numbers in one vector operation instead of 7 separate operations. This parallelism should not be confused with multi-threading, which is another way to parallelize your computing workload. It's possible to use them both simultaneously. Accelerate Framework employs this approach frequently to boost performance even more.
There are Vectors sized between 2 and 64 items, but a higher number doesn't automatically mean higher performance. The current SIMD registers are only 128-bit wide, so no more than 4 regular Floats would fit regardless.
Wherever we can express our code using Vectors like this, we can unlock large performance improvements. These gains often enable us to do things we couldn't do before, or at least not at that scale. In our case we have seen an improvement in the order of 100x or more.
💡 What is
SIMD4<Float>?This is the data type that you need to use to unlock SIMD capabilities using Swift. It helps to just think of them as fixed-size arrays with special capabilities.
The number
4means its size (vector size), and<Float>is the kind of number. In this example, we feed it arrays of 4 Floats. There are a number of possibilities betweenSIMD2andSIMD64that you can pick depending on how well they fit the data structure you're processing.
How Stream Uses the Accelerate Framework
As mentioned before, at the moment, we are using Accelerate Framework for two features:
But we keep finding more and more places where Accelerate Framework can boost us, and we expect to push out more features when we use it soon!
Audio Visualization
The Audio Visualization feature is used whenever the user records a voice message within the chat screen. The captured audio is analyzed and converted to an array of floats representing the volumes for its timeframes.
Every message is divided into the same number of frames; the number of frames for longer messages is just bigger per chunk. This is what it looks like:
![A Screenshot Showing the Voice Message feature of Stream. The message has just been sent, and a waveform representation that reflects the actual audio is displayed.]

The user can see where the silences are in this message, and the shapes of the waveforms are a useful indication of how loud the user who recorded this message was speaking.
The cool thing about the Stream libraries is that they are open-sourced, so you can see exactly how we did it, knowing that this is code that is used by millions of people on a daily basis. If you want to learn how to build your own large-scale resilient applications, you can learn a ton from analyzing this code or code from other colleagues that also work out in the open, like Signal.
How Is This Feature Constructed?
This feature has the following hierarchy:
VoiceRecordingVCis used to display the waveform data of our voice recordingAudioAnalysisEnginetakes theURLwe stored our recording at, prepares the asset and sends it toStreamAudioWaveformAnalyserStreamAudioWaveformAnalyserchanges theAudioAnalysisContextinto aAVAssetReaderand starts streaming and processing the audio chunk by chunkAudioSamplesProcessoris where the actual processing happens using Accelerate Framework
Clone the repo if you want to, and check out how they work together if you are interested in building a similar feature yourself. However, the main focus is on how AudioSamplesProcessor will use Accelerate Framework to analyze the audio.
Let's Take a Look at How Audio Samples Are Processed
While it's well-documented and quite short, at first sight, the code we use here can be quite daunting, even for more experienced developers. This is because we are dropping to a much lower level than usual, managing memory and passing around large in-out arrays through often cryptically named functions.
Let's go over what happens step-by-step:
1. Streaming the Audio File From Disk

After the StreamAudioWaveformAnalyser converted an audio file we've found on a given file URL to a stream using AVAssetReader, it starts to analyze the stream chunk by chunk. We need to do this because some audio recordings might be very large and would consume huge amounts of memory if loaded in their entirety first. Also, when reading chunks from a stream, we can start processing them immediately as they load, starting the conversion earlier so we finish in less time.
2. Conversion to Absolute Float Values
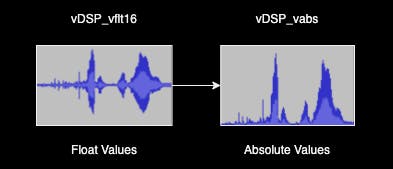
Before we can start operating on this data, we need to convert our entire waveform to Float values. A WAV file is usually a 16-bit integer per sample (but can be up to 64-bit), and that is fine for playback. However, audio processing uses Floats for sub-bit precision until the audio is saved or played back again. We use vDSP_vflt16 for this purpose.
Because we want to end up with a diagram of the volume of a given audio chunk and don't care about sound, we work with absolute values only. Every part of the waveform that dips below 0 is mirrored back up using vDSP_vabs. This gives us the absolute volume of each sample instead of an actual playable waveform.
3. From Linear to Logarithmic Decibel Scale
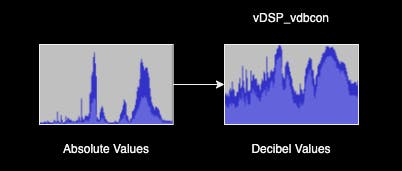
Since our human ear experiences loudness on a logarithmic scale, it's more realistic to convert our volume to the Decibel unit of measure. After applying vDSP_vdbcon we immediately see that the peaks become more rounded, and the quieter parts appear to be louder.
This amplifies a problem that wasn't that visible before: ambient noise. The next step is to clean this up.
4. De-Noising and Limiting

After our conversion to Decibels, the part that was just ambient noise without the user speaking looks significant. To remove the parts where we have no actual voice, we need to apply a noise gate while flattening the waveform a bit at the same time using simple limiter, so the peaks are less pronounced. We use the vDSP_vclip method to clip the lows and high values.
Take a good look at the graphic I've included to understand what happens:
- The top dashed line is the limiter: all peaks above that are squashed to the dotted line.
- The bottom dashed line is the noise gate: all volume below that is set to 0.
If we would apply such aggressive limiting and gating to an audio signal, it would sound pretty bad. But since we're really just cleaning up our graphics, this approach is absolutely fine.
5. Downsample to the Resolution of the Bars
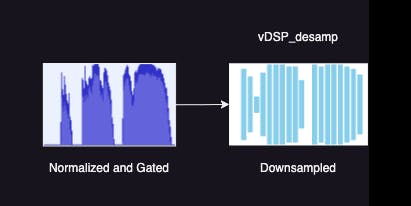
After getting a good clean representation of our volume, we can use vDSP_desamp to resample to the number of bars (in our case 40) that we want to display.
Video Conversion for Picture-in-Picture
The next feature where we implemented Accelerate Framework is our PiP (Picture-in-Picture) feature, which is built upon the existing Apple AVKit PiP libraries, and we adapted it to integrate it with our framework and make it extremely easy to use:
public struct CallView: View {
    @State private var isPictureInPictureEnabled = false

    public var body: some View {
        Button("Picture-in-Picture", systemImage: "pip.enter") {
            isPictureInPictureEnabled = true
        }
        .enablePictureInPicture(isPictureInPictureEnabled)
    }
}
Just one line of SwiftUI modifier code and you're done!
Optimizing Our Video Conversion Performance
To be able to show a WebRTC Video stream in a Picture-in-Picture widget, we needed to transform our buffers from YUV to RGBA. While in some cases, we were able to get a PixelBuffer directly from the video stream, we could not get it reliably on all devices. So, we needed a method to convert outside of the WebRTC library.
We originally built a solution that did all of the conversion natively in Swift, and while it worked we were never satisfied with the results.
All of our frameworks are intensively dogfooded, and when we were running the scalar version of PiP we had issues with its performance. To compensate, we had to skip frames, depending on the size of the input. This introduced unwanted lag and still put quite a strain on even high-end devices.
When we discovered all of the built-in features Accelerate Framework offered for converting images through the vImage APIs we started experimenting with it, and the results were stunning:

We could get completely rid of the frame skipping now while taxing the device much less.
How did it get hundreds of times faster?
- Parallelism: Without writing any multi-threaded code, Accelerate Framework used 8 threads and close to 2 cores at 100% while our Scalar code maxed out just one core on the main thread
- SIMD Performance: Expected performance gains on one single core can be over 20x compared to scalar code
- Memory Efficiency: The scalar Swift solution processed pixel by pixel and moved that into the memory each time. The SIMD solution reads and writes a row of pixels in one fell swoop
The last performance issue we needed to address was coming from people who were sharing (Ultra) High Definition screens. If we leave scaling to Apple's PiP library, it will do a poor job, so we implemented the rescale on our side before rendering the video stream.
With all this in place we discovered that we could actually use the scaling and YUV-to-RGBA conversion logic for every video frame we rendered. This made our code much simpler to maintain for us, with no downside to our end users.
Implementing Our PiP Functionality
Since our solution is open-source, you can find exactly how we implemented it on our GitHub repo. Let's take a look at how all of these parts interact together to understand how it works:
PictureInPictureModifieris what allows you to setenablePictureInPictureon any View. We use it in ourCallView.- When PiP is enabled, a
StreamPictureInPictureViewis added to the background. It is just a SwiftUI container for the ViewController that shows the video StreamAVPictureInPictureVideoCallViewControllerimplements theAVPictureInPictureVideoCallViewControllerfrom Apple, which is their default component for PiP
The other parts involve scaling and transformation of the video frames from WebRTC, which makes PiP possible.
Let me try to walk you through this process step-by-step:
1. The StreamBufferTransformer Converts a WebRTC Video Frame to Core Media
This transformer is a necessary step to obtain a Core Media Sample Buffer from our WebRTC Video Frame Buffer we got from our RTC Video Frame, so the AVKit Video Renderer can render it to our screens. The WebRTC frames are YUV, but our screens work with RGBA, so we always need to convert the frames.
But it also allows us to scale the video to a given target size at the same time, which is exactly what needs to be done when you use PiP. All of this conversion is done using the StreamRTCYUVBuffer.
💡 The acronym WebRTC stands for Web Real-Time Communication, the protocol most real-time audio and video call apps use nowadays to enable direct low-latency streaming directly between two devices. We use a slightly modified version of the Google implementation.
2. RGB From YUV Conversion in StreamRTCYUVBuffer
The real heavy lifting happens here. First, we generate a buffer for every individual YUV channel:
private func buildYpImageBuffer(_ source: RTCI420Buffer) -> vImage_Buffer {
    vImage_Buffer(
        data: UnsafeMutablePointer(mutating: source.dataY),
        height: vImagePixelCount(height),
        width: vImagePixelCount(width),
        rowBytes: Int(source.strideY)
    )
}
There are two more functions that are exactly the same, replacing source.dataY with dataU and dataV respectively. We need those to feed into the converter. We then create a fourth vImage_Buffer to store the result of our conversion in.
let error = vImageConvert_420Yp8_Cb8_Cr8ToARGB8888(
    &YpImageBuffer,
    &CbImageBuffer,
    &CrImageBuffer,
    &output,
    &conversion.output,
    [3, 2, 1, 0],
    255,
    vImage_Flags(kvImageNoFlags)
)
The vImageConvert_420Yp8_Cb8_Cr8ToARGB8888 function looks very cryptic, but it's purpose is very straight-forward. It takes the three individual YUV channels and outputs them as RGBA. The output configuration is standard vImage_YpCbCrToARGB conversion. Because YUV doesn't have an Alpha channel we simply set it to 255 here, and we don't have any special flags either.
The only thing that is out of the ordinary is the [3, 2, 1, 0] array that re-arranges the ARGB channels to BGRA. So the first (0) channel is moved last and the first (3) to the first, exactly in reversed order.
💡 The color model YUV is a color model for images and video. It is composed of one luminance (black and white) component and two color components. The reason for using this color model is that it is easy to compress, and lots of video equipment natively outputs it. This is the standard color space for WebRTC Video.
💡 RGB is a color model for images and video. It stands for Red, Green, and Blue. RGBA adds an Alpha channel to handle transparency. This is the standard color space for computer interfaces.
Conclusion
We had high hopes for Accelerate Framework when we discovered it, but our results exceeded our expectations. While we found the functionality not that easy to discover, as all terminology and naming were geared towards low-level implementations using quite exotic-looking names, the implementations were pretty straightforward.
Finding real-world examples of how to implement the features was not that easy. We feel it's only really known inside Apple and in a small niche of mainly audio and video specialists. We hope this blog post and our code help to give a little bit more much-needed documentation around how to use the Accelerate Framework in two pretty common applications so you can adapt it for your own.
