const call = useCall();
const camera = call.camera;Camera & Microphone
The SDK simplifies working with MediaStream, MediaDeviceInfo, and WebRTC APIs through utility functions and state hooks.
Best Practices
- Await toggle calls - Always await
enable(),disable(), andtoggle()methods - Use optimistic state - Show
optimisticIsMutefor instant UI feedback while toggling - Call callManager.start before join - Configure audio role and device before joining
- Use listener role for livestreams - Set
audioRole: "listener"when users won't publish audio - Handle race conditions - The SDK resolves race conditions; the last call always wins
Camera management
Access the camera object on the call:
Call settings
Default camera state comes from call settings:
import { useCallStateHooks } from "@stream-io/video-react-native-sdk";

const { useCallSettings } = useCallStateHooks();
const settings = useCallSettings();

console.log(settings?.video.camera_default_on);
Make sure, call.get() is called at least once in the application, after the call is created.
Start-Stop Camera
Control video stream publishing with camera.enable(), camera.disable(), or camera.toggle().
import { useCall, useCallStateHooks } from "@stream-io/video-react-native-sdk";

const call = useCall();

const { useCameraState } = useCallStateHooks();
const { camera, isMute } = useCameraState();

console.log(`Camera is ${isMute ? "off" : "on"}`);
await camera.toggle();

// or, alternatively
await camera.enable();
await camera.disable();
Always await these calls. The SDK resolves race conditions (last call wins), making them safe in event handlers.
The status updates after the camera actually enables/disables. Use optimisticIsMute for immediate UI feedback.
Manage Camera Facing Mode
Get camera facing mode:
import { useCallStateHooks } from "@stream-io/video-react-native-sdk";

const { useCameraState } = useCallStateHooks();
const { direction } = useCameraState(); // direction returns 'front' or 'back'.
Toggle between front and back cameras with camera.flip():
import { useCallStateHooks } from "@stream-io/video-react-native-sdk";

const { useCameraState } = useCallStateHooks();
const { camera } = useCameraState();

camera.flip();
Video mute status
Check video mute state via the status from useCameraState:
import { useCallStateHooks } from "@stream-io/video-react-native-sdk";

const { useCameraState } = useCallStateHooks();
const { status } = useCameraState(); // status returns enabled, disabled or undefined
Show Video Preview
Display camera preview using RTCView from @stream-io/react-native-webrtc:
import { useCallStateHooks } from "@stream-io/video-react-native-sdk";
import { RTCView } from "@stream-io/react-native-webrtc";

const { useCameraState } = useCallStateHooks();
const { camera } = useCameraState();

const localVideoStream = camera.state.mediaStream;

return <RTCView streamURL={localVideoStream?.toURL()} />;
Access to the Camera's MediaStream
Access the mediaStream for custom needs (e.g., local recording):
import { useCallStateHooks } from "@stream-io/video-react-native-sdk";

const { useCameraState } = useCallStateHooks();
const { mediaStream } = useCameraState();

const [videoTrack] = mediaStream.getVideoTracks();
Microphone management
Access the microphone object on the call:
const call = useCall();
const microphone = call.microphone;
Call settings
Default microphone state comes from call settings:
import { useCallStateHooks } from "@stream-io/video-react-native-sdk";

const { useCallSettings } = useCallStateHooks();
const settings = useCallSettings();

console.log(settings?.audio.mic_default_on);
Make sure, call.get() is called at least once in the application, after the call is created.
Start-Stop Microphone
Control audio stream publishing with microphone.enable(), microphone.disable(), or microphone.toggle().
import { useCallStateHooks } from "@stream-io/video-react-native-sdk";

const { useMicrophoneState } = useCallStateHooks();
const { microphone, isMute } = useMicrophoneState();

console.log(`Microphone is ${isMute ? "off" : "on"}`);
await microphone.toggle();

// or, alternatively
await microphone.enable();
await microphone.disable();
Always await these calls. The SDK resolves race conditions (last call wins), making them safe in event handlers.
The status updates after the microphone actually enables/disables. Use optimisticIsMute for immediate UI feedback.
Audio mute status
Check audio mute state via the status from useMicrophoneState:
import { useCallStateHooks } from "@stream-io/video-react-native-sdk";

const { useMicrophoneState } = useCallStateHooks();
const { status } = useMicrophoneState(); // status returns enabled, disabled or undefined
Speaking while muted detection
The SDK detects when users speak while muted, enabling notification display or custom logic.
Enabled by default unless the user lacks audio permission or explicitly disables it.
import { useCallStateHooks } from "@stream-io/video-react-native-sdk";

const { useMicrophoneState } = useCallStateHooks();
const { isSpeakingWhileMuted, microphone } = useMicrophoneState();

if (isSpeakingWhileMuted) {
  // your custom logic comes here
  console.log("You are speaking while muted!");
}

// to disable this feature completely:
await microphone.disableSpeakingWhileMutedNotification();

// to enable it back:
await microphone.enableSpeakingWhileMutedNotification();
Access to the Microphone's MediaStream
Access the mediaStream for custom needs (e.g., local recording):
import { useCallStateHooks } from "@stream-io/video-react-native-sdk";

const { useMicrophoneState } = useCallStateHooks();
const { mediaStream } = useMicrophoneState();

const [audioTrack] = mediaStream.getAudioTracks();
Speaker management
The SDK applies the audio.default_device call type setting (speaker or earpiece) for the default audio output.
Device priority:
- Bluetooth Headset or Wired Headset
- Speakerphone or Earpiece.
Override audio.default_device using callManager.start() before call.join(). Useful for livestream scenarios.
import { callManager } from "@stream-io/video-react-native-sdk";

const call = client.call(callType, callId);
// To be called before joining a call
callManager.start({
  audioRole: "communicator", // or "listener"
  deviceEndpointType: "speaker", // or "earpiece"
});
await call.join();- audioRole -
communicator(default) for publishing audio,listenerfor listen-only (livestream audience) - deviceEndpointType -
speakerorearpiece(only withcommunicatorrole). Useearpiecefor phone-call scenarios
As platform-specific methods are necessary to handle audio output, we do not support the useSpeakerState() hook.
Livestream or listener-only audio management
Default communicator role prioritizes low latency with manual device switching. For listen-only calls (livestreams), set audioRole: "listener" to prioritize high-quality audio. Enable stereo output for OBS streams:
import { callManager } from "@stream-io/video-react-native-sdk";

const call = client.call("livestream", callId);
// To be called before joining a call
callManager.start({
  audioRole: "listener",
  enableStereoAudioOutput: true, // or false (default is false)
});
await call.join();
Switching audio output device
Audio switching APIs differ between iOS and Android.
Open the system AVRoutePickerView popover to show available audio devices:
import { callManager } from "@stream-io/video-react-native-sdk";
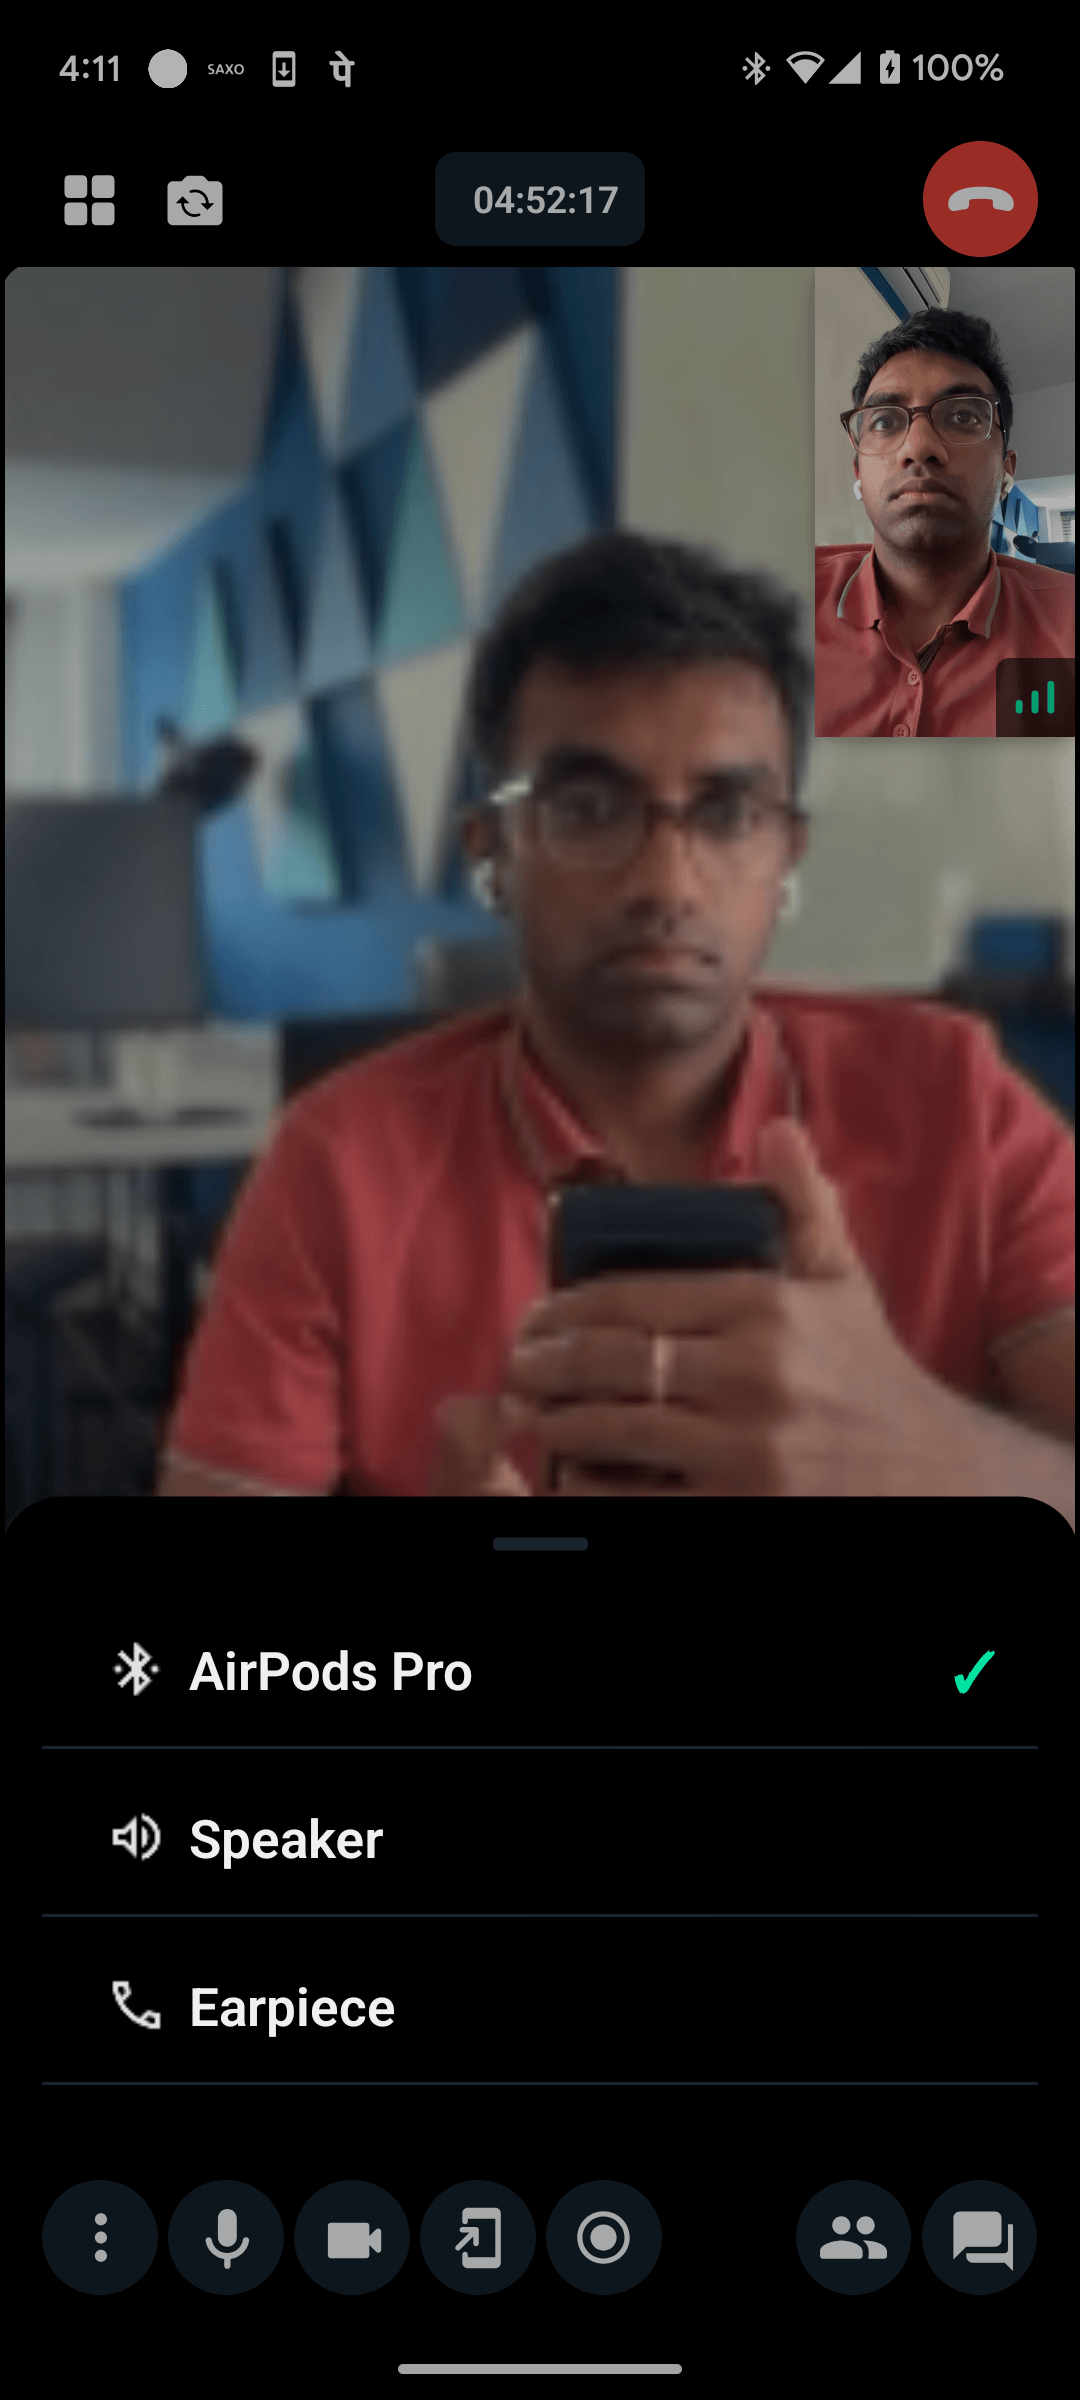
callManager.ios.showDeviceSelector();This displays a popover like:

Force audio through the loudspeaker
Toggle between loudspeaker and earpiece on both iOS and Android:
import { callManager } from "@stream-io/video-react-native-sdk";

// route audio through loud speaker immediately (audio outputs here until a new external device is connected)
callManager.speaker.setForceSpeakerphoneOn(true);

// revert back to default behaviour
callManager.speaker.setForceSpeakerphoneOn(false);
Audio volume control
Control system-wide volume and individual participant volume.
System wide mute and unmute
import { callManager } from "@stream-io/video-react-native-sdk";

// to mute audio
callManager.setMute(true);

// to unmute audio
callManager.setMute(false);
Participant volume control
Set individual participant volume (e.g., 50%):
import {
  StreamVideoParticipant,
  Call,
} from "@stream-io/video-react-native-sdk";

let participant: StreamVideoParticipant; // the intended participant
let call: Call; // the call instance
call.speaker.setParticipantVolume(participant.sessionId, 0.5);On this page: