dependencies:
  flutter:
    sdk: flutter

  # Stream Chat SDK
  stream_chat_flutter: ^latest

  # Stream Video SDK
stream_video_flutter: ^latestBuilding Audio Rooms With In-Call Chat
In this guide, you'll build an Audio Rooms experience with an in-call chat panel using Stream's Video and Chat Flutter SDKs. You'll be able to browse live audio rooms, create a new room, join it, and chat with other participants.
This is a cookbook-style guide: the starter project provides UI scaffolding (widgets, screens) so you can focus on the key SDK calls. You'll fill in the TODOs to wire up Stream clients and actions.
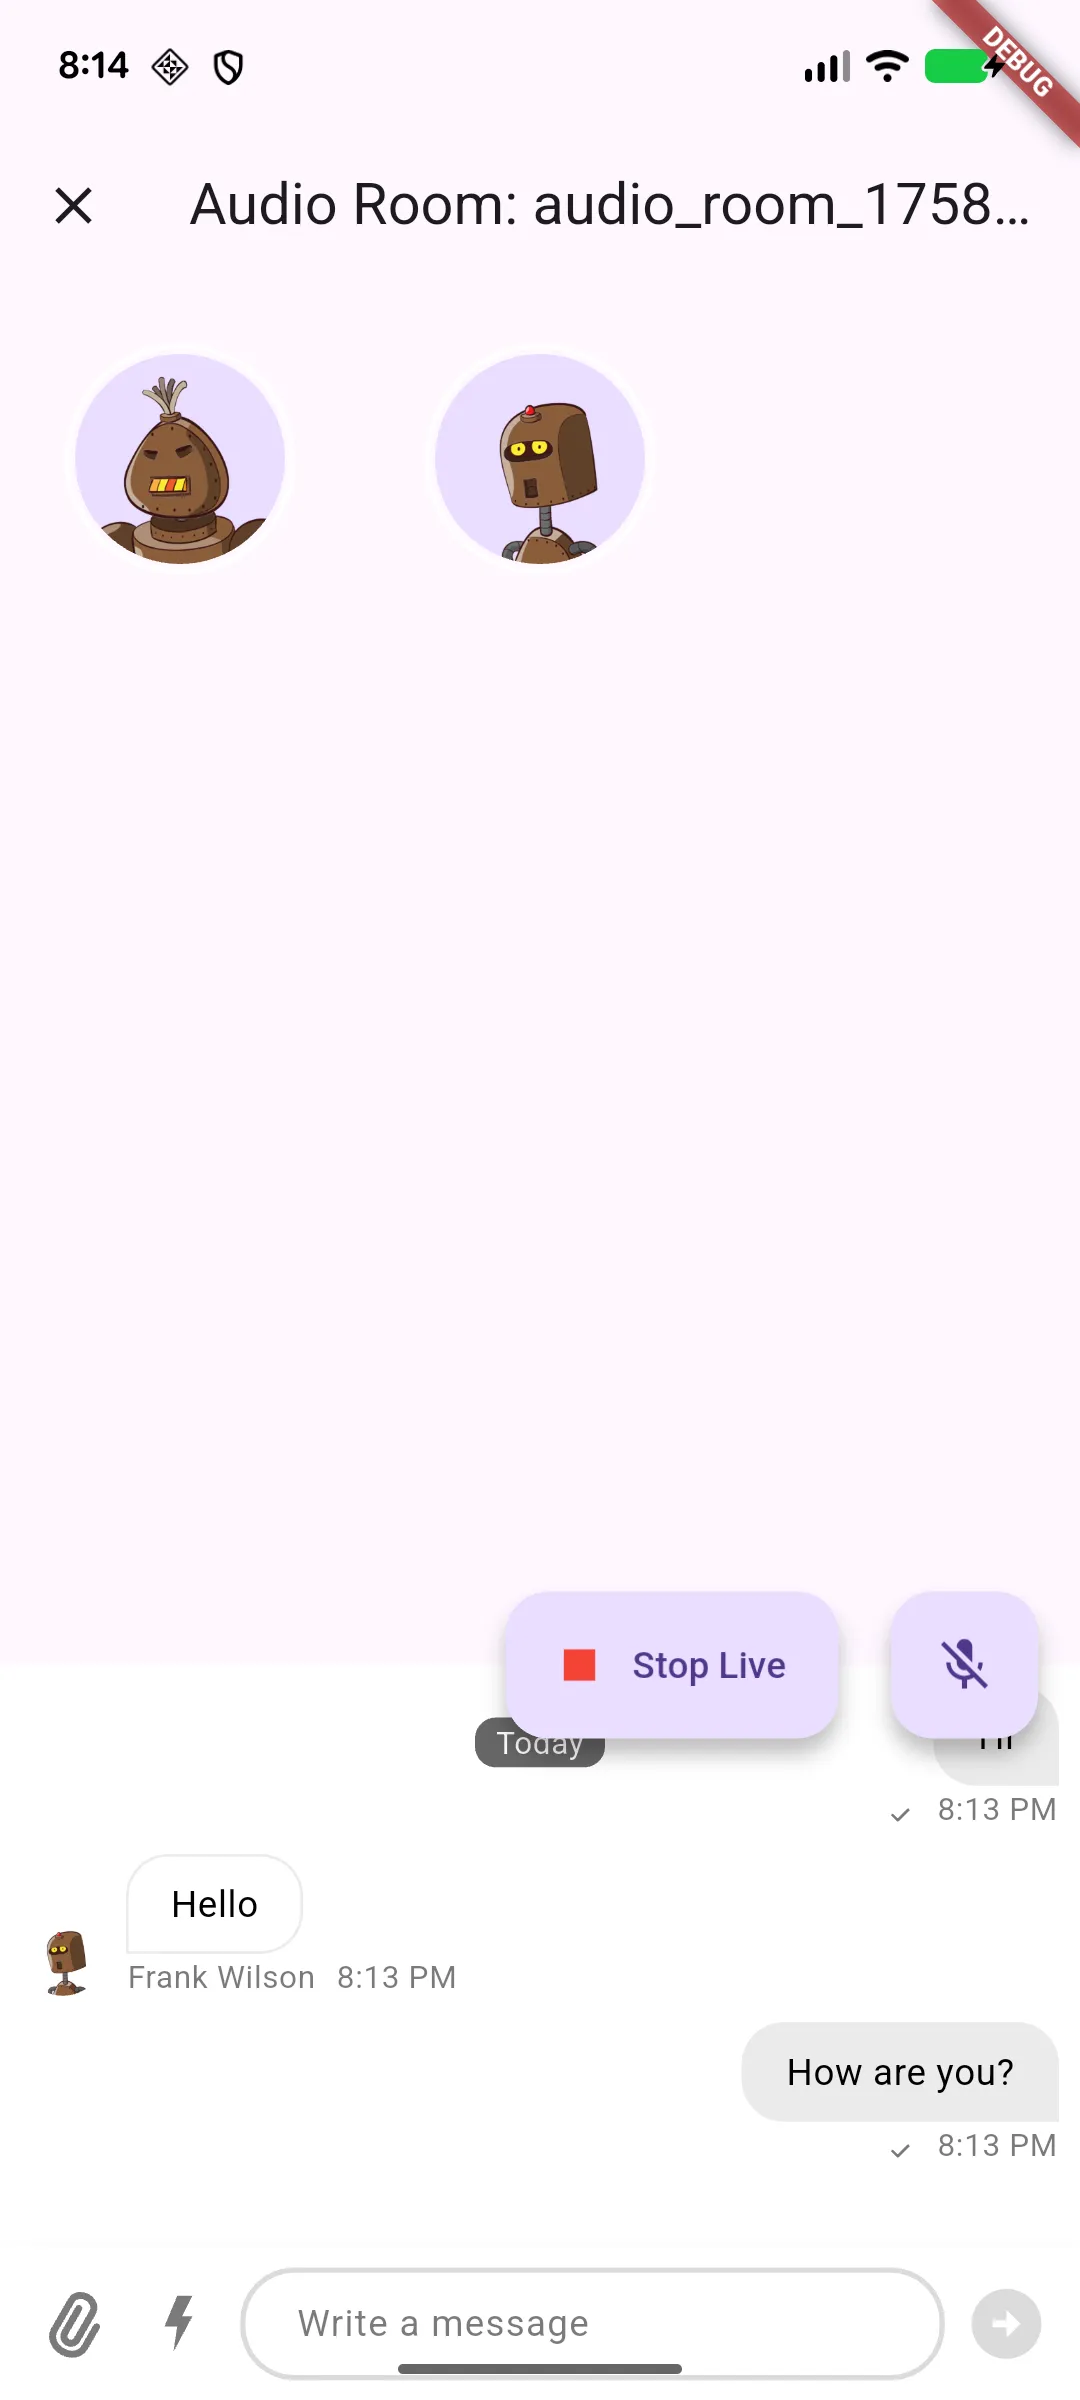
By the end, your app will look like this:
 |
|---|
You'll integrate:
- Creating Stream clients (Chat + Video)
- Authenticating users
- Listing and creating Audio Rooms
- Joining an Audio Room and chatting inside it
Creating the project
The quickest way to get started is with our Starter Kit.
Run flutter pub get to install the dependencies in the starter:
Open the project and run it. You'll see a Login screen scaffold with sample users. The starter includes non-Stream boilerplate so you can focus on integrating the SDKs. Now let’s wire in Chat first, then add Video, and finally build the rooms experience.
Integrating the Chat SDK
To start, initialize StreamChatClient in main.dart and wrap the app with StreamChat.
final client = StreamChatClient(
  Env.streamApiKey,
  logLevel: Level.INFO,
);

runApp(MyApp(chatClient: client));
Here you create the Chat client with your API key and start the app with it, so Chat is available from the very first frame. Make sure Env.streamApiKey is set in lib/env/env.dart.
With the client ready, pass it to the StreamChat widget:
class MyApp extends StatelessWidget {
  const MyApp({
    Key? key,
    required this.chatClient,
  }) : super(key: key);

  final StreamChatClient chatClient;

  @override
  Widget build(BuildContext context) {
    return MaterialApp(
      builder: (context, child) => StreamChat(
        client: chatClient,
        child: child,
      ),
      home: LoginScreen(),
    );
  }
}
This wraps the app with StreamChat so the client is available everywhere in the widget tree, and sets LoginScreen as the home you’ll wire up next.
Logging in a User (Chat)
Now let’s hook up the login flow so picking a user actually connects them to Chat.
Open screens/login_screen.dart and implement _connectChatUser:
Future<void> _connectChatUser(BuildContext context, SampleUser user) async {
  final chatClient = StreamChat.of(context).client;
  await chatClient.connectUser(user.toChatUser(), user.token);
}
This connects the selected sample user to Chat by pulling the client from context and using their token.
Next, add the logout counterpart:
Future<void> _disconnectChatUser(BuildContext context) async {
  final chatClient = StreamChat.of(context).client;
  await chatClient.disconnectUser();
}
This cleanly disconnects the Chat user closing the socket and clearing user state so that you can switch accounts safely.
Integrating the Video SDK
With Chat in place, the next step is adding Video so users can join or start rooms.
Initialize the Video client during login.
Future<void> _connectVideoUser(SampleUser user) async {
  final client = StreamVideo(
    Env.streamApiKey,
    user: user.toVideoUser(),
    userToken: user.token,
  );
  await client.connect();
}
Here you create the Video client for the chosen user and connect it. Creating it that way also exposes the instance as a singleton via StreamVideo.instance. Doing this at login lets users join or start calls immediately.
And add the logout counterpart:
Future<void> _disconnectVideoUser() async {
  // This will disconnect the user and also reset the singleton instance of StreamVideo
  StreamVideo.reset(disconnect: true);
}
With both SDKs initialized and users connected, the next step is the Audio Rooms list. The starter's AudioRoomsScreen already contains a header, refresh pattern, and list UI. You just need to provide data and navigation.
Listing and creating Audio Rooms
Open screens/audio_rooms_screen.dart. Now let’s add the logic to query live audio rooms and create new one. Inside the _AudioRoomsScreenState class add this code:
late Future<QueriedCalls> _roomsFuture;

@override
void initState() {
  super.initState();
  _roomsFuture = _fetchAudioRooms();
}

Future<QueriedCalls> _fetchAudioRooms() async {
  final result = await StreamVideo.instance.queryCalls(
    filterConditions: {
      "type": 'audio_room',
      "live": true,
    },
  );

  return result.getDataOrNull() ?? QueriedCalls(calls: []);
}

Future<Call> _createAudioRoom() async {
    final call = StreamVideo.instance.makeCall(
      id: 'audio_room_${DateTime.now().millisecondsSinceEpoch}',
      callType: StreamCallType.audioRoom(),
    );

    await call.getOrCreate(
      custom: {
        'name': 'Audio Room',
      },
    );

    return call;
}
Also change the _reloadRooms() method to use the fetch code and change the logic in FutureBuilder to use the future we keep in state:
void _reloadRooms() {
  setState(() {
    _roomsFuture = _fetchAudioRooms();
  });
}body: FutureBuilder(
future: _roomsFuture,
builder: (context, snapshot) {
if (snapshot.connectionState == ConnectionState.waiting) {
return const Center(child: CircularProgressIndicator());
}
if (snapshot.hasError) {
return _ErrorState(onRetry: _reloadRooms, error: snapshot.error);
}
final calls = snapshot.data?.calls;
if (calls == null || calls.isEmpty) {
return _EmptyState(onRefresh: _reloadRooms);
}
...
}
)In this section you wire up the rooms screen. On init you query live audio_room calls and provide a helper that creates a new audio room with a unique ID and an optional display name.
Then, pair each room with a livestream Chat channel for in-room chat:
Future<Channel> _createChatChannel(Call call, {bool create = false}) async {
  final channel = StreamChat.of(context).client.channel(
    'livestream',
    id: call.callCid.id,
  );

  if (create) {
    await channel.create();
  }

  await channel.watch();
  return channel;
}
This creates (or reuses) a livestream chat channel that shares the call’s ID, then starts watching it so in-room messages stream in while the call is live.
Finally, wire up navigation to the audio room screen after creating or selecting a room. Change the implementation of the existing mock methods to this:
Future<void> _onCreatePressed() async {
    final call = await _createAudioRoom();
    final channel = await _createChatChannel(call, create: true);
    if (!mounted) return;

    await Navigator.of(context).push(
      MaterialPageRoute(
        fullscreenDialog: true,
        builder: (_) => AudioRoomScreen(
          audioRoomCall: call,
          chatChannel: channel,
        ),
      ),
    );
}

Future<void> _joinCall(StreamCallCid callCid) async {
    final call = StreamVideo.instance.makeCall(
      callType: callCid.type,
      id: callCid.id,
    );

    await call.getOrCreate();
    final channel = await _createChatChannel(call);

    if (!mounted) return;
    await Navigator.of(context).push(
      MaterialPageRoute(
        fullscreenDialog: true,
        builder: (_) => AudioRoomScreen(
          audioRoomCall: call,
          chatChannel: channel,
        ),
      ),
    );
}
Remember to update the invocations of _joinCall with callCid:
_joinCall(call.callCid)The code won't compile for now because we need to add those parameters we want to pass to AudioRoomScreen.
Building the Audio Room screen
Now let’s implement the actual audio room UI that will allow user to speak and chat with other participants. Open audio_room_screen.dart and replace the AudioRoomScreen implementation with this:
class AudioRoomScreen extends StatefulWidget {
  const AudioRoomScreen({
    super.key,
    required this.audioRoomCall,
    required this.chatChannel,
  });

  final Call audioRoomCall;
  final Channel chatChannel;

  @override
  State<AudioRoomScreen> createState() => _AudioRoomScreenState();
}
This sets up a screen that receives an already-prepared Call and its paired Chat Channel. The screen doesn’t own creation, it just drives the in-call UI.
Next, join the call on mount and cache the initial call state inside _AudioRoomScreenState:
late CallState _callState;

@override
void initState() {
  super.initState();
  widget.audioRoomCall.join();
  _callState = widget.audioRoomCall.state.value;
}
Add a close button to the Scaffold's appBar that leaves the call and pops the screen:
appBar: AppBar(
  title: Text('Audio Room: ${_callState.callId}'),
  leading: IconButton(
    onPressed: () async {
      await widget.audioRoomCall.leave();

      if (context.mounted) {
        Navigator.of(context).pop();
      }
    },
    icon: const Icon(
      Icons.close,
    ),
  ),
),
Now it's time to add a participants grid. Add this StreamBuilder as a first element in the Stack widget.
StreamBuilder<CallState>(
  initialData: _callState,
  stream: widget.audioRoomCall.state.valueStream,
  builder: (context, snapshot) {
    if (snapshot.hasError) {
      return const Center(
        child: Text(
          'Something went wrong. Check logs for more details.',
        ),
      );
    }

    if (snapshot.hasData && !snapshot.hasError) {
      var callState = snapshot.data!;

      return Padding(
        padding: const EdgeInsets.only(bottom: 300),
        child: GridView.builder(
          itemBuilder: (BuildContext context, int index) {
            return Align(
              widthFactor: 0.8,
              child: ParticipantAvatar(
                participantState:
                    callState.callParticipants[index],
              ),
            );
          },
          gridDelegate:
              const SliverGridDelegateWithFixedCrossAxisCount(
                crossAxisCount: 3,
              ),
          itemCount: callState.callParticipants.length,
        ),
      );
    }

    return const Center(
      child: CircularProgressIndicator(),
    );
  },
),
This builder listens to live CallState updates and renders a simple grid of participant avatars, with basic loading and error states so the UI remains responsive as people join and leave.
The ParticipantAvatar is part of the starter project. This widget displays a participant avatar with a green border indicating if the participant is speaking.
If you created the room, surface permission requests for speakers. Add this as a second element of the Stack widget:
if (widget.audioRoomCall.state.value.createdByMe)
  Positioned(
    bottom: 300,
    left: 0,
    right: 0,
    child: SafeArea(
      top: false,
      child: Padding(
        padding: const EdgeInsets.only(bottom: 80),
        child: PermissionRequests(
          audioRoomCall: widget.audioRoomCall,
        ),
      ),
    ),
  ),
This snippet shows host-only permission controls via the provided PermissionRequests widget. With it the room creator can approve or deny requests to speak.
If you explore this widget you will see that it sets a onPermissionRequest callback to gather pending permission requests:
@override
void initState() {
  super.initState();

  widget.audioRoomCall.onPermissionRequest = (permissionRequest) {
    setState(() {
      _permissionRequests.add(permissionRequest);
    });
  };
}
Then with grantPermission() API it can grant the permission for a participant:
await widget.audioRoomCall.grantPermissions(
  userId: request.user.id,
  permissions: request.permissions.toList(),
);
Adding the video related actions
Now lets add actions that will allow room creator to go live and all participants to toggle the microphone. Add AudioRoomActions prebuild widget as a floatingActionButton in the Scaffold in audio_room_screen.dart
floatingActionButton: AudioRoomActions(
  audioRoomCall: widget.audioRoomCall,
),
By default the audio-room Call type will start a call in the background mode. This way creator has control over when the call should go live. Only hosts and admins can join calls in backstage mode, other users will have to wait until call goes live.
AudioRoomActions widget does multiple things. Lets examine the code:
onPressed: () async {
  if (callState.isBackstage) {
    await widget.audioRoomCall.goLive();
    await widget.audioRoomCall.update(custom: {"live": true});
  } else {
    await widget.audioRoomCall.stopLive();
    await widget.audioRoomCall.update(custom: {"live": false});
  }
},
The Go Live/Stop Live button controls the backstage mode of the call. It is only visible to call owner (callState.createdByMe). When tapped it will call goLive() or stopLive() API methods and also set a custom flag on the call that allows us to filter audio rooms in the audio_rooms_screen.dart to only show the live once.
Next it allows toggling the microphone:
FloatingActionButton(
  heroTag: 'microphone',
  child: _microphoneEnabled
      ? const Icon(Icons.mic)
      : const Icon(Icons.mic_off),
  onPressed: () {
    if (_microphoneEnabled) {
      widget.audioRoomCall.setMicrophoneEnabled(enabled: false);
      setState(() {
        _microphoneEnabled = false;
      });
    } else {
      if (!widget.audioRoomCall.hasPermission(
        CallPermission.sendAudio,
      )) {
        widget.audioRoomCall.requestPermissions(
          [CallPermission.sendAudio],
        );

        setState(() {
          _waitingForPermission = true;
        });

        ScaffoldMessenger.of(context).showSnackBar(
          const SnackBar(
            content: Text('Permission to speak requested'),
          ),
        );
      } else {
        widget.audioRoomCall.setMicrophoneEnabled(enabled: true);
        setState(() {
          _microphoneEnabled = true;
        });
      }
    }
  },
),
Notice that it also checks permission and if it's not granted requests it from the call owner.
Lastly, in the initState() method it listens to Call events and reacts to StreamCallPermissionsUpdatedEvent. If it is a permission update for the current user and sendAudio permission was granted we inform the user.
_callEventsSubscription = widget.audioRoomCall.callEvents
  .on<StreamCallPermissionsUpdatedEvent>(
    (
      event,
    ) {
      if (event.user.id != StreamVideo.instance.currentUser.id) {
        return;
      }

      if (_waitingForPermission &&
          event.ownCapabilities.contains(CallPermission.sendAudio)) {
        setState(() {
          _waitingForPermission = false;
        });

        ScaffoldMessenger.of(context).showSnackBar(
          const SnackBar(
            content: Text(
              'Permission to speak granted. You can now enable your microphone.',
            ),
          ),
        );
      }
    },
  );
Integrating chat
Finally we can integrate the chat in the audio room screen. In the starter project there already is a placeholder for it implemented in ChatSheet widget. Lets add it as a bottomSheet in the audio room Scaffold:
bottomSheet: const ChatSheet(),Now lets implement the actual chat integration in it. Replace the content of chat_sheet.dart with this:
class ChatSheet extends StatelessWidget {
  const ChatSheet({super.key});

  @override
  Widget build(BuildContext context) {
    return SafeArea(
      top: false,
      child: SizedBox(
        height: 280,
        child: Column(
          children: <Widget>[
            Expanded(
              child: StreamMessageListView(),
            ),
            SafeArea(child: StreamMessageInput()),
          ],
        ),
      ),
    );
  }
}
We use the build-in Stream Flutter Chat SDK components here so the implementation is very simple.
StreamMessageListView widget displays the list of messages and StreamMessageInput widget allows participants to write a message.
One last thing we need to do to make chat functional is to wrap the Scaffold in audio_room_screen.dart with StreamChannel widget that will provide channel to the subtree:
StreamChannel(
  channel: widget.chatChannel,
  child: Scaffold()
)
Troubleshooting and things to remember
- Live rooms list refresh: The Audio Rooms screen shows only calls that are live. One user must create the call and go live for others to see it. If a room doesn’t appear, refresh the list to see it.
- Chat channel type (
livestream): This guide uses thelivestreamchat type, which by default allows all users to send messages. Other channel types have different defaults and may require permission changes in the Stream Dashboard. - Mobile platform permissions: If you create your own project, ensure the required permissions are set in
AndroidManifest.xmlandInfo.plist, mirroring the starter project’s presets (microphone, network, etc.). Missing permissions can prevent joining/speaking. - User tokens: Ensure the sample users' tokens are filled in
lib/env/env.dart(along withEnv.streamApiKey) or the sample will not work. - Documentation: For deeper configuration, capabilities, and troubleshooting, refer to the Stream Video and Stream Chat Flutter documentation and your Stream Dashboard settings.
Wrap-up
You now have a complete Audio Room with in-call chat: users can browse live rooms, go live, manage speaking permissions, and chat seamlessly. From here, tailor roles/capabilities, customize UI components, and extend moderation or analytics to fit your product.
On this page: