import { OverlayProvider, Chat, ThreadList } from "stream-chat-react-native";

const ThreadListScreen = () => {
  return (
    <OverlayProvider>
      <Chat client={client}>
        <ThreadList />
      </Chat>
    </OverlayProvider>
  );
};Custom Thread List
This cookbook shows how to build a custom screen with ThreadList and a banner for unread threads.
Best Practices
- Keep
ThreadListwithinChatso it has access to client state and contexts. - Use
isFocusedto avoid unnecessary updates when the screen is not visible. - Reuse
onThreadSelectso thread navigation stays consistent across the app. - Keep custom
ThreadListItemlightweight to maintain scroll performance. - Pull unread counts from the state store to avoid extra client queries.
Prerequisites
Prereqs: a screen that shows a Thread and a working chatClient. Examples use React Navigation, but any navigation library works.
Creating the screen
Add ThreadList to a new screen:
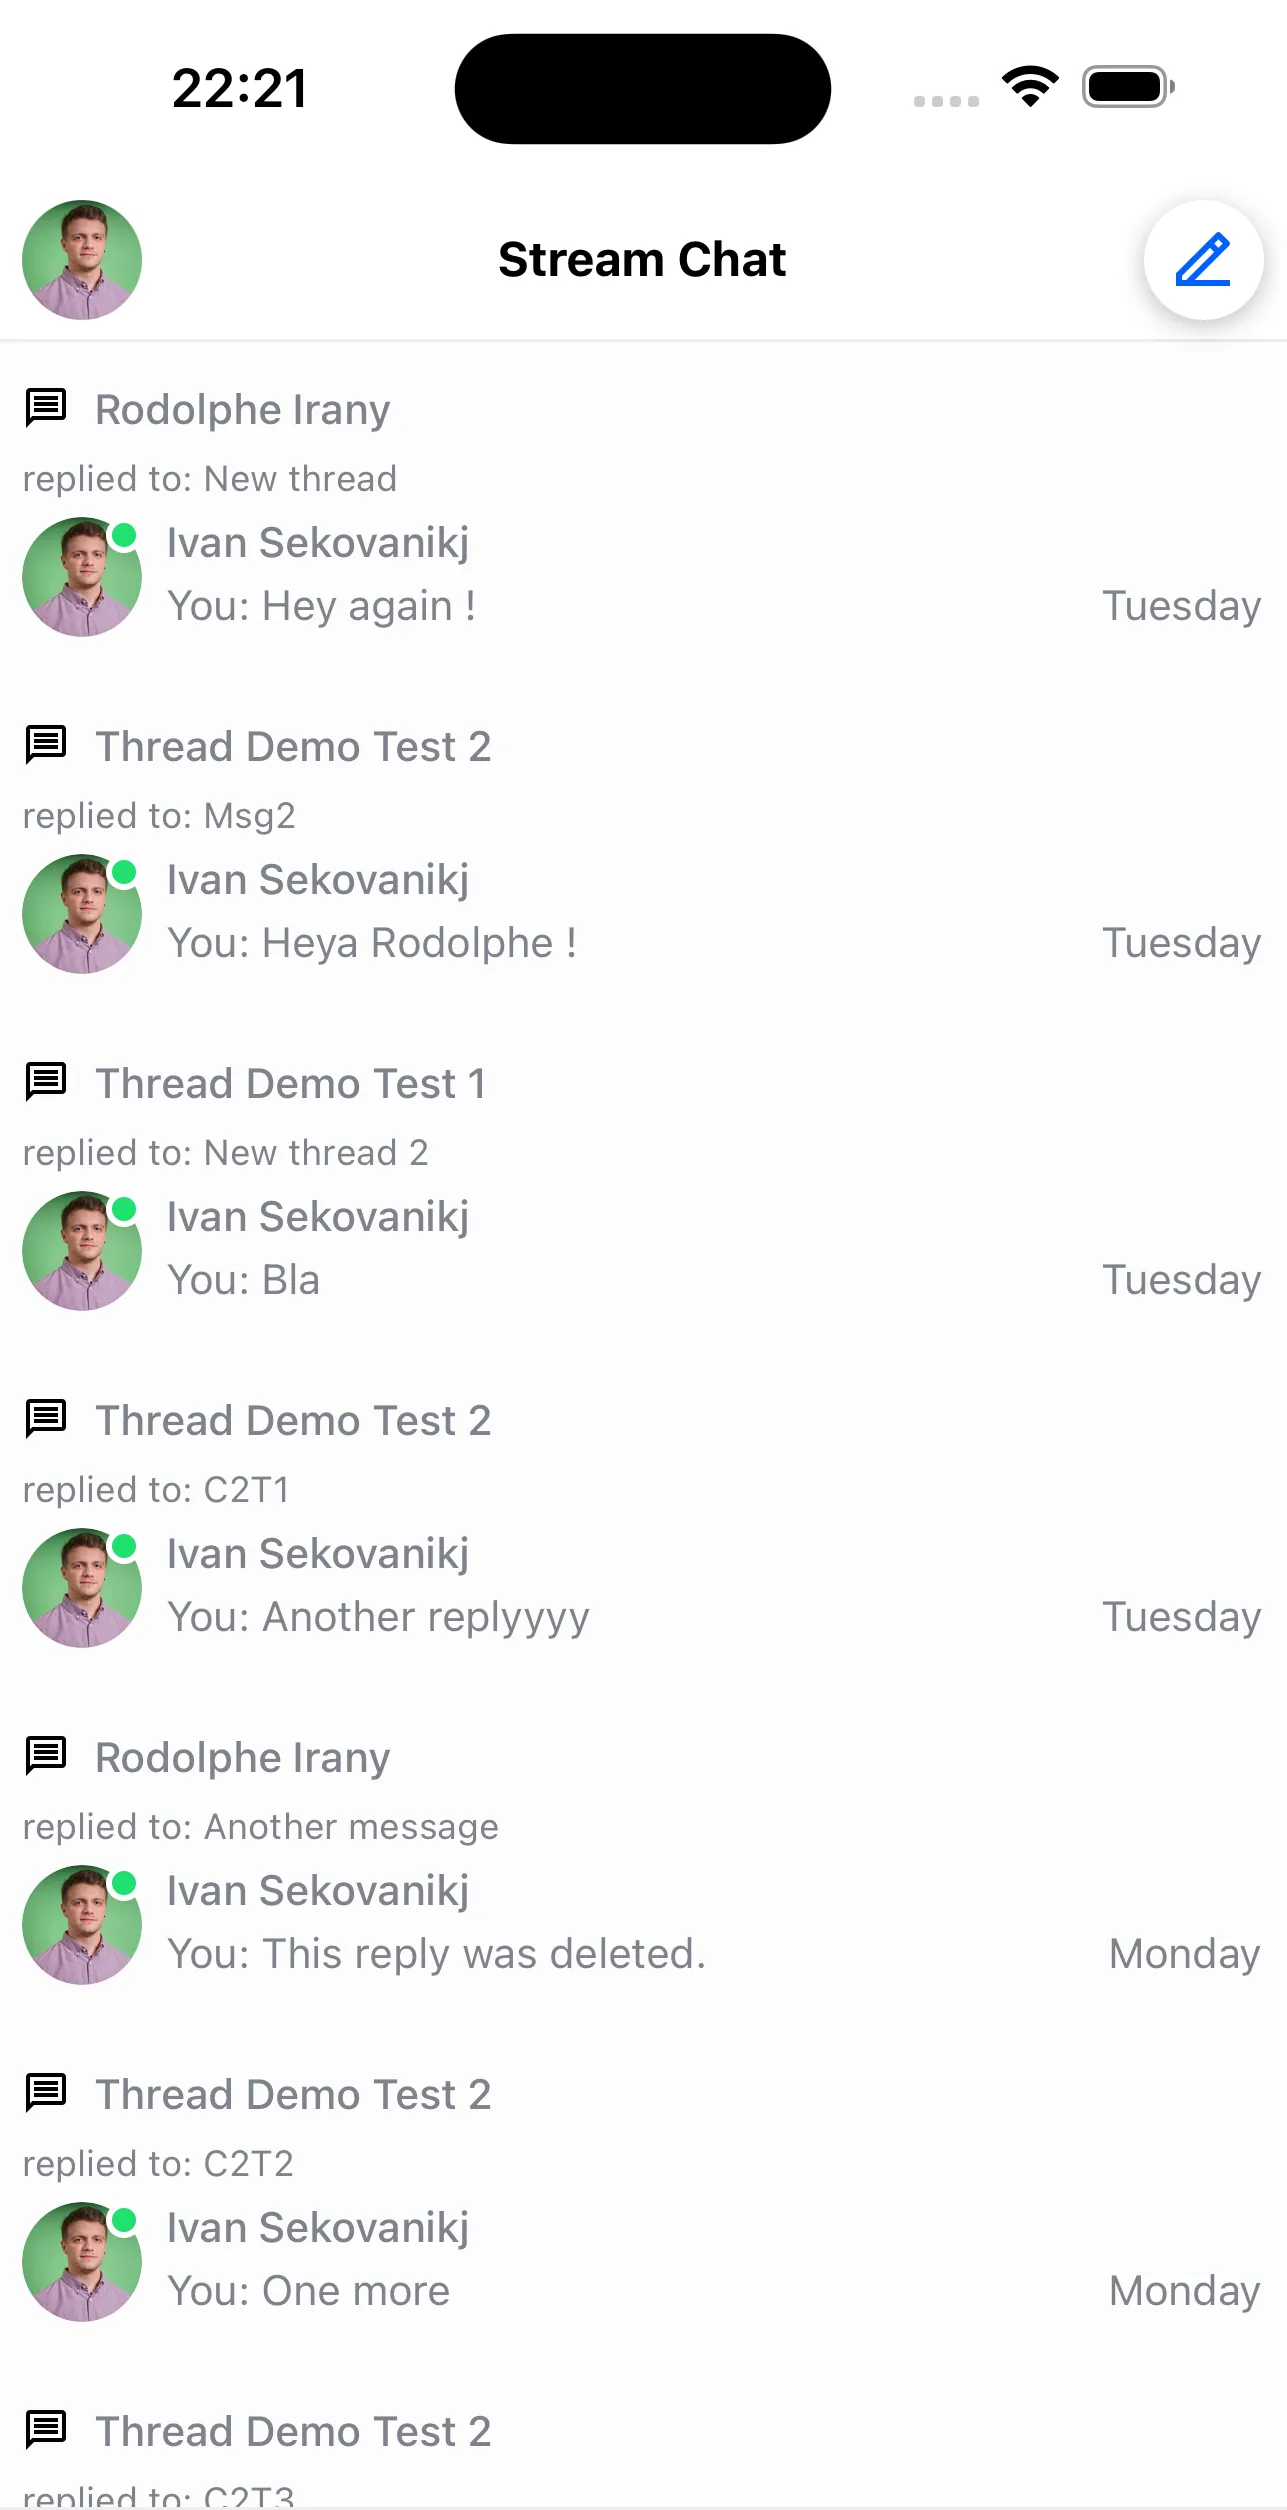
This renders the user's threads with the default UI.
Next, update the list only when the screen is focused using isFocused:
import { OverlayProvider, Chat, ThreadList } from "stream-chat-react-native";
// any navigation library hook/method can be used for this
import { useIsFocused } from "@react-navigation/native";

const ThreadListScreen = () => {
  const isFocused = useIsFocused();
  return (
    <OverlayProvider>
      <Chat client={client}>
        <ThreadList isFocused={isFocused} />
      </Chat>
    </OverlayProvider>
  );
};
This is useful when ThreadList lives in a tab that stays mounted.
Now the list refreshes only when focused. Next, handle item taps and navigate to the thread:
import { OverlayProvider, Chat, ThreadList } from "stream-chat-react-native";
// any navigation library hook/method can be used for this
import { useNavigation, useIsFocused } from "@react-navigation/native";
const ThreadListScreen = () => {
const isFocused = useIsFocused();
const navigation = useNavigation();
return (
<OverlayProvider>
<Chat client={client}>
<ThreadList
isFocused={isFocused}
// here we can reuse the same method as we would in the ChannelList component
onThreadSelect={(thread, channel) => {
navigation.navigate("ThreadScreen", {
thread,
channel,
});
}}
/>
</Chat>
</OverlayProvider>
);
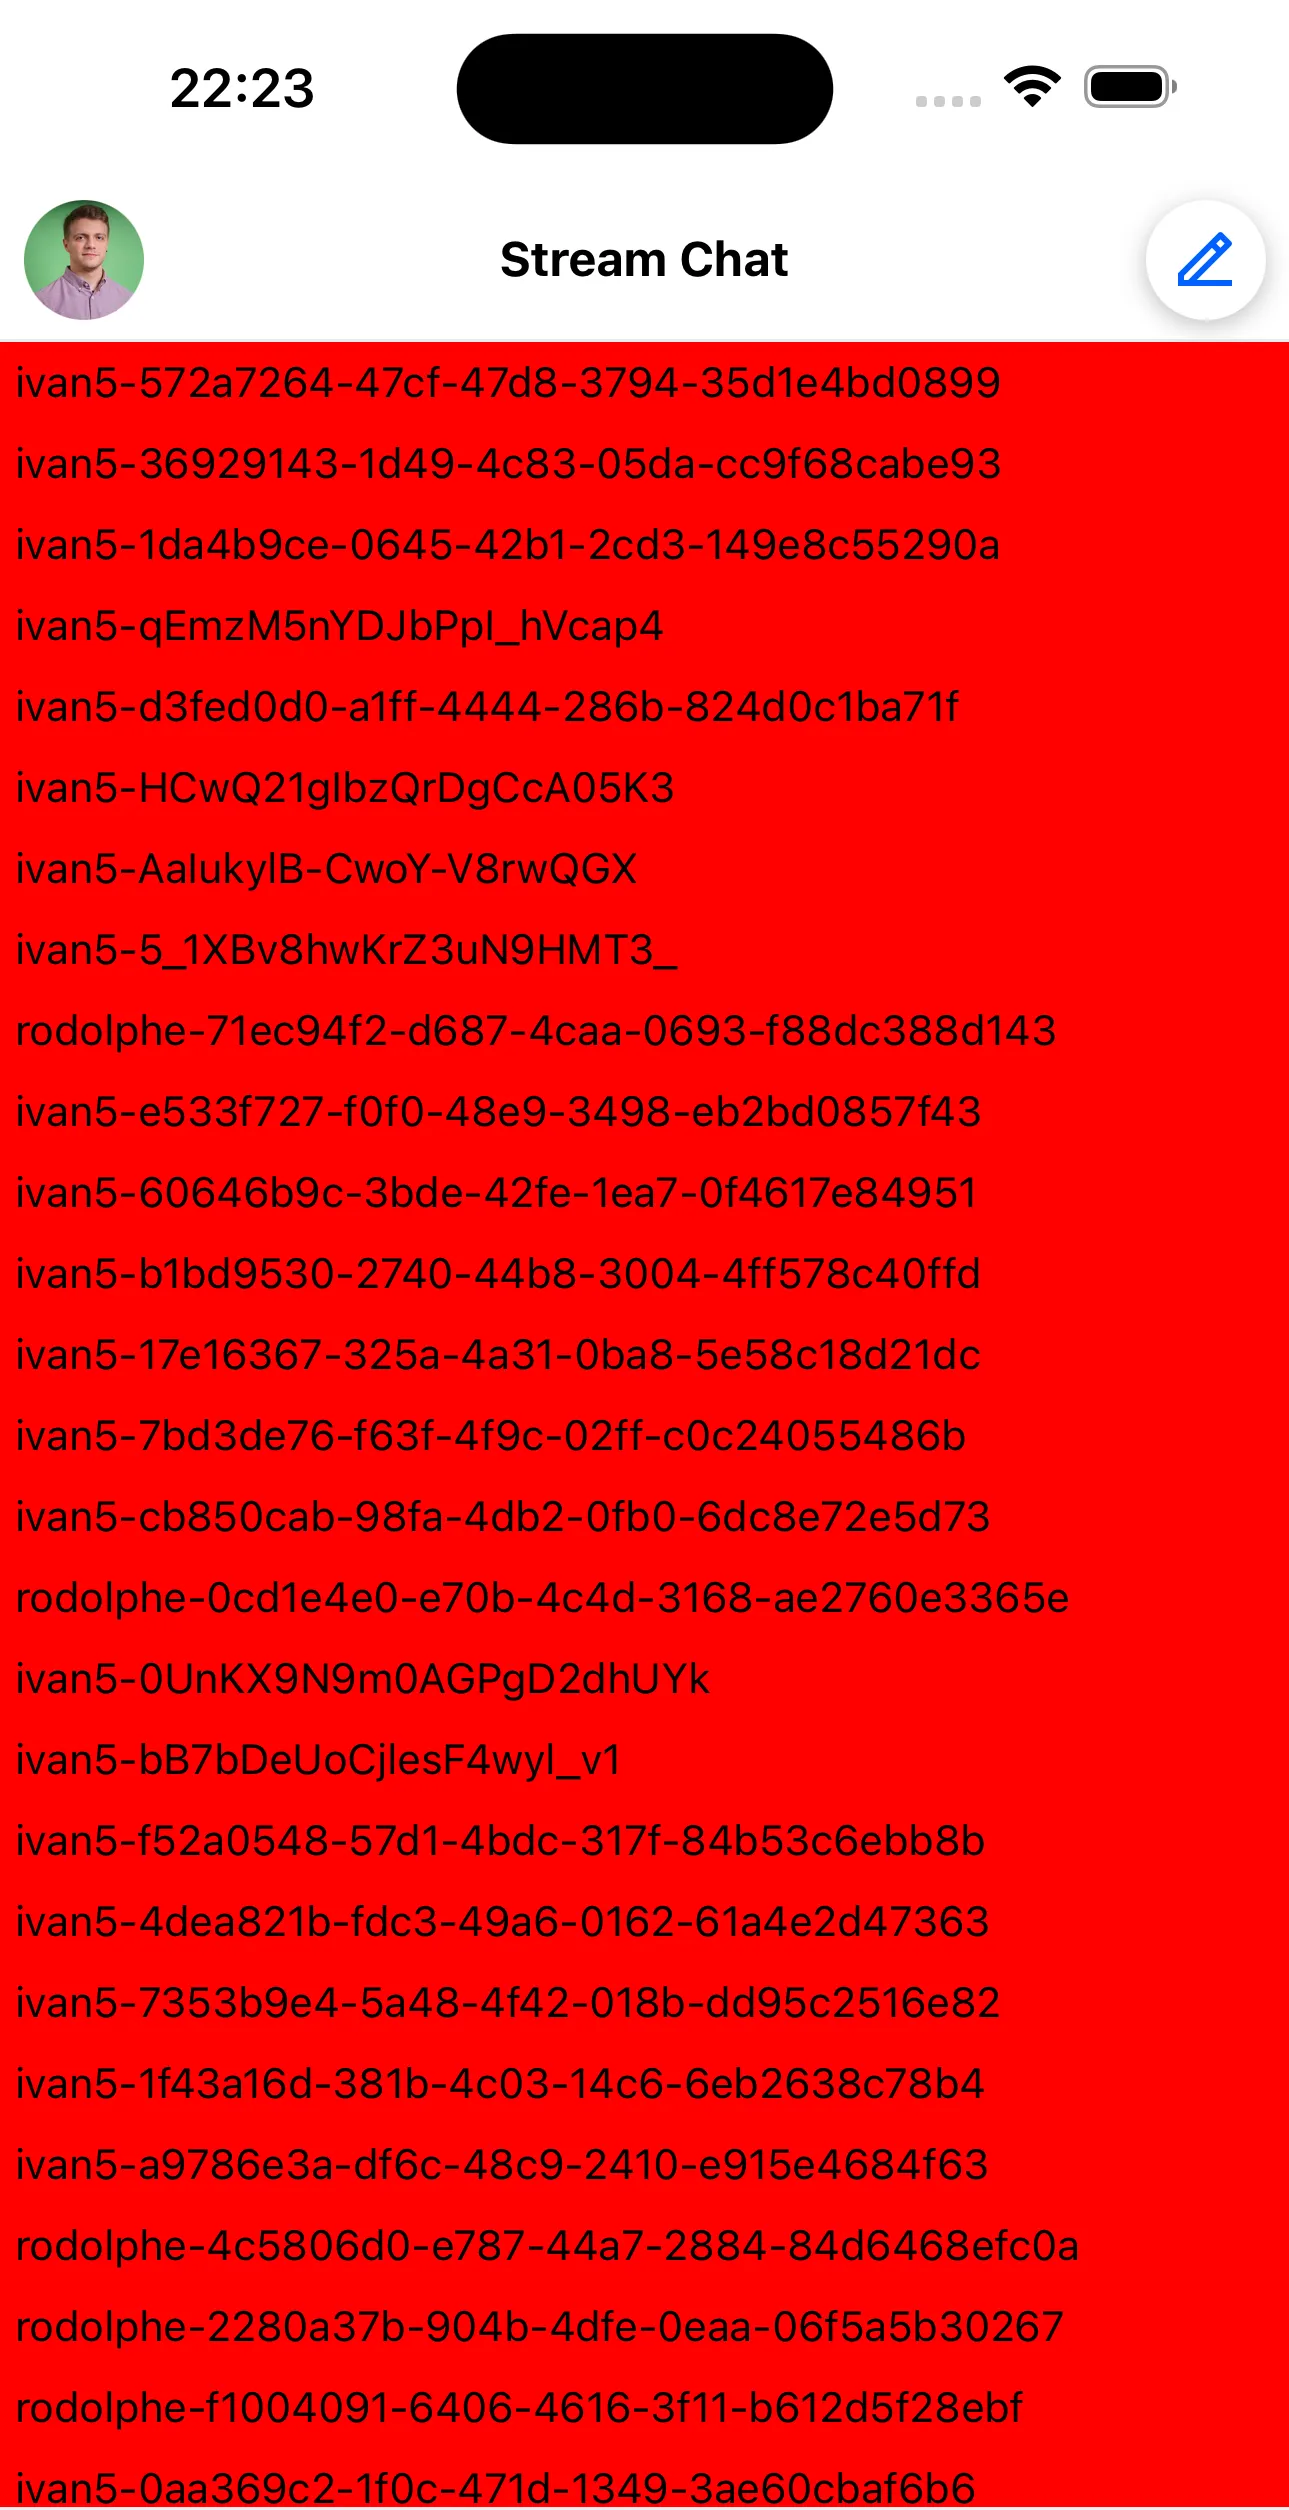
};Now you can navigate to any thread. Next, render only the thread ID per item.
Override ThreadListItem:
import { TouchableOpacity, Text } from 'react-native';
import type { LocalMessage } from 'stream-chat';
import {
  OverlayProvider,
  Chat,
  ThreadList,
  useThreadsContext,
  useThreadListItemContext,
} from 'stream-chat-react-native';

// any navigation library hook/method can be used for this
import { useNavigation, useIsFocused } from '@react-navigation/native';

const ThreadListItem = () => {
  // we grab the definition of the navigation function from the ThreadsContext
  const { onThreadSelect } = useThreadsContext();
  // we grab the actual thread, channel and its parent message from the ThreadListItemContext
  const { channel, thread, parentMessage } = useThreadListItemContext();
  return (
    <TouchableOpacity
      style={{ backgroundColor: 'red', padding: 5 }}
      onPress={() => {
        if (onThreadSelect) {
          // since we are overriding the behaviour of the item it is mandatory to pass the parameters in the
          // below to onThreadSelect()
          onThreadSelect({ thread: parentMessage as LocalMessage, threadInstance: thread }, channel);
        }
      }}
     >
      <Text>{thread?.id}</Text>
    </TouchableOpacity>
  )
}

const ThreadListScreen = () => {
  const isFocused = useIsFocused();
  const navigation = useNavigation();
  return (
    <OverlayProvider>
      <Chat client={client}>
        <ThreadList
          isFocused={isFocused}
          {/* here we can reuse the same method as we would in the ChannelList component */}
          onThreadSelect={(thread, channel) => {
            navigation.navigate('ThreadScreen', {
              thread,
              channel,
            });
          }}
          ThreadListItem={ThreadListItem}
        />
      </Chat>
    </OverlayProvider>
  );
};
Now your custom items should render.
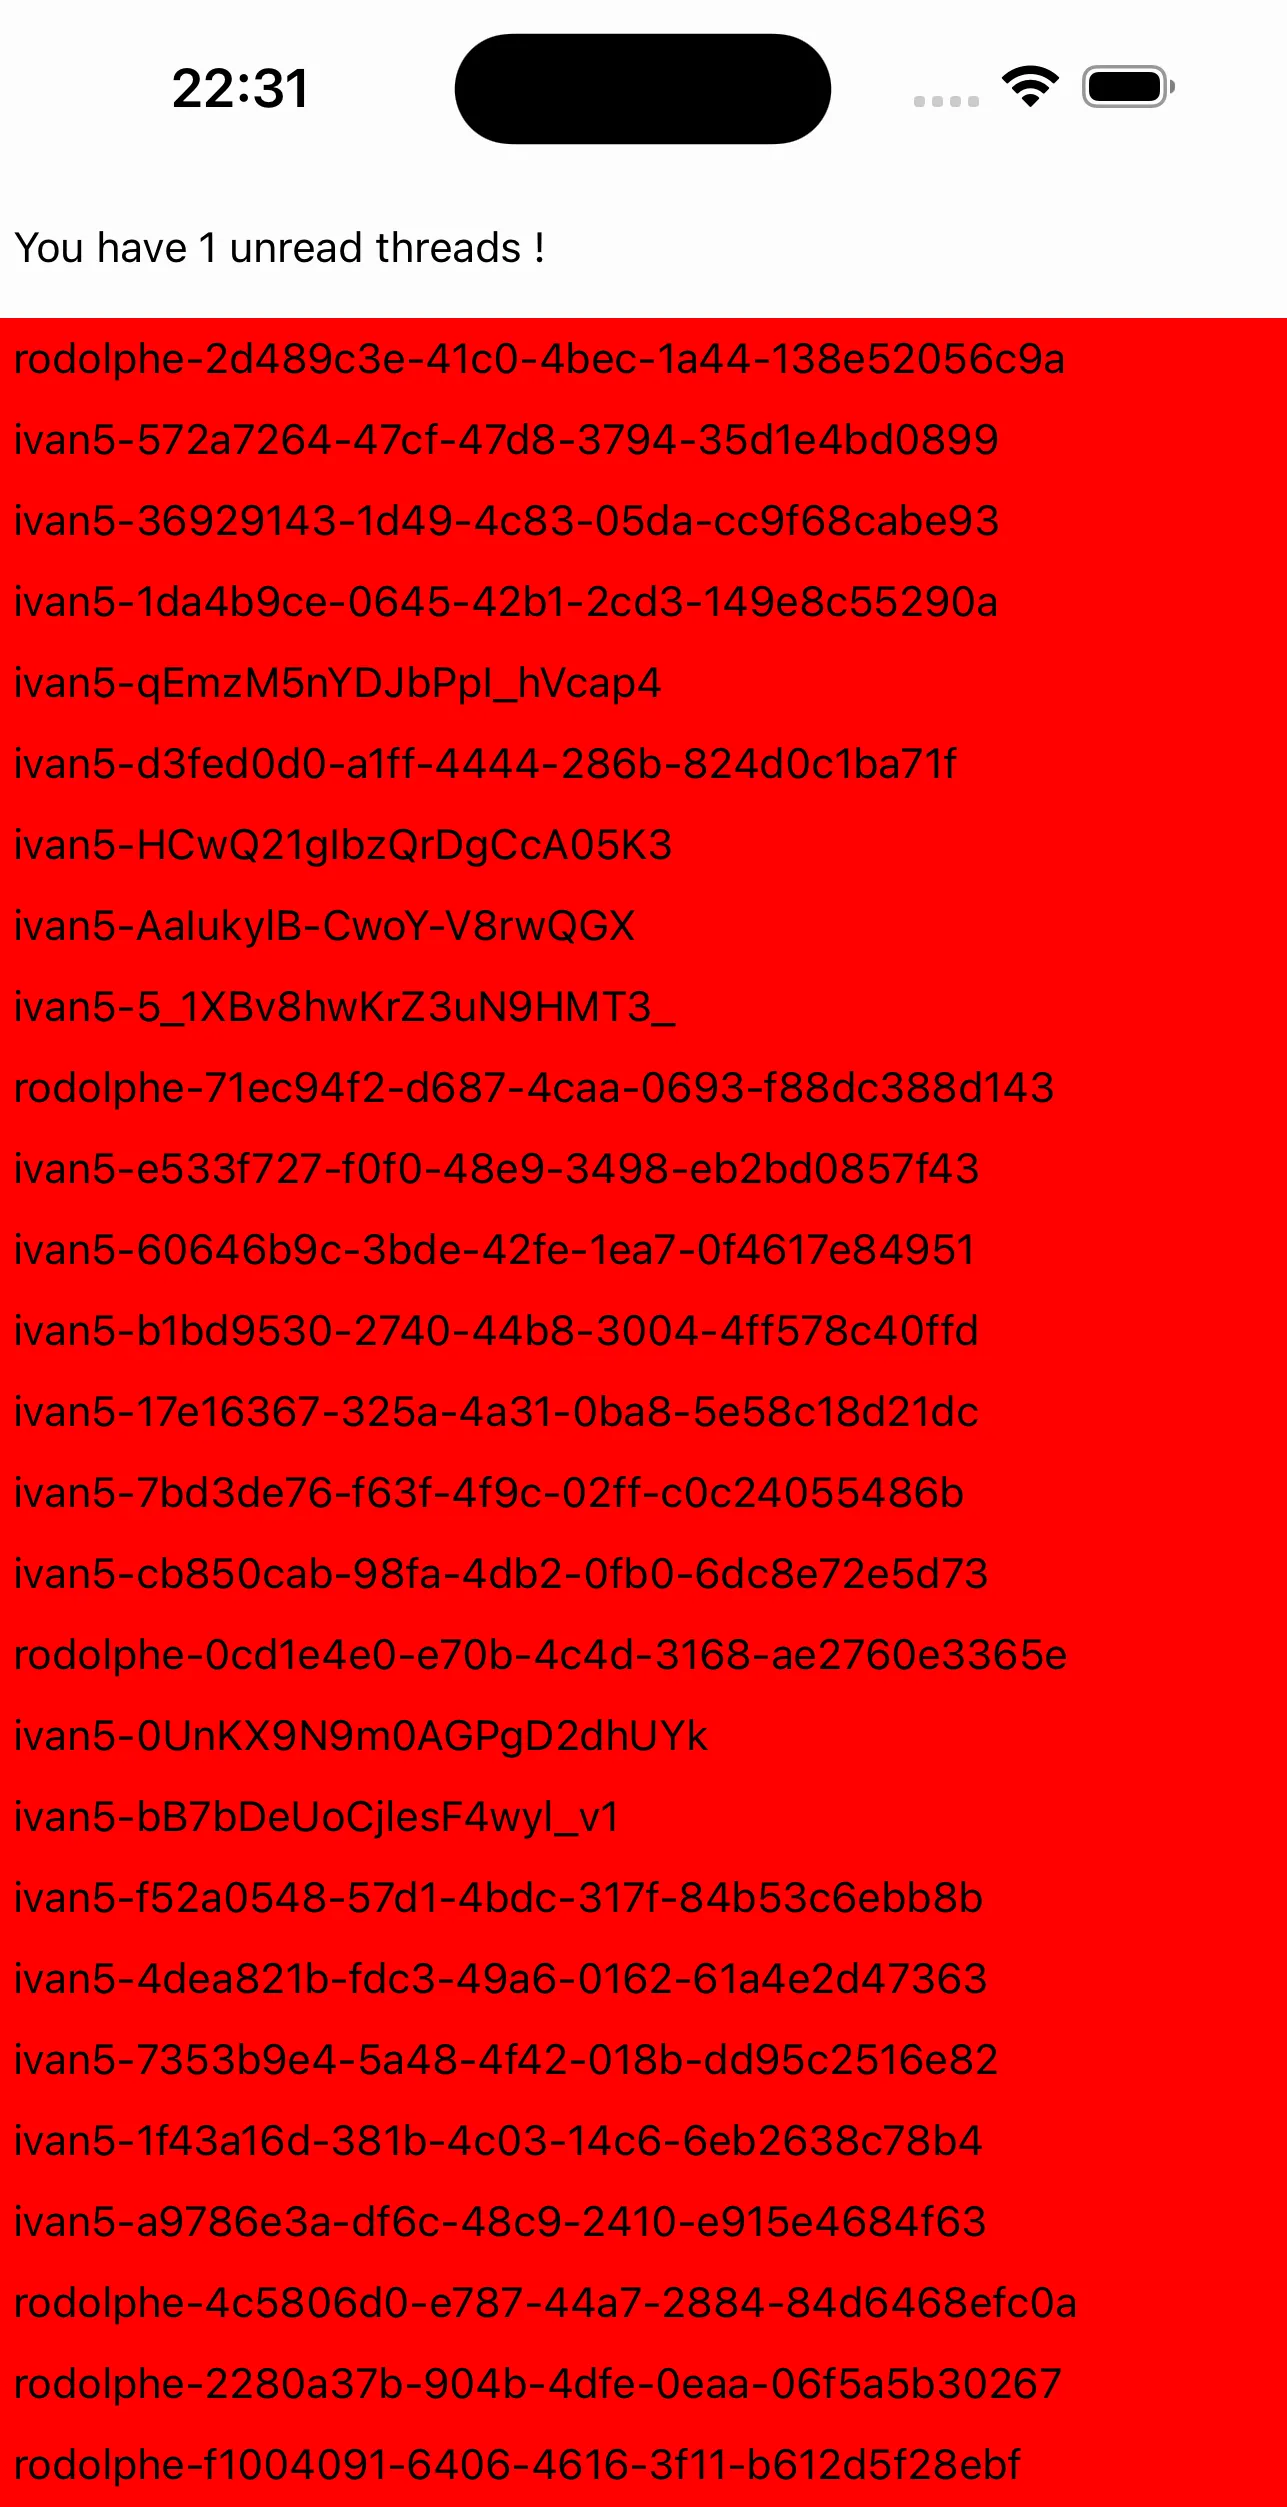
Next, add a banner above the list with the unread thread count.
Use the state store and useStateStore:
import { TouchableOpacity, Text, View } from 'react-native';
import {
  OverlayProvider,
  Chat,
  ThreadList,
  useThreadsContext,
  useThreadListItemContext,
  useStateStore,
} from 'stream-chat-react-native';
import type { LocalMessage } from 'stream-chat';
import { ThreadManagerState } from 'stream-chat';
// any navigation library hook/method can be used for this
import { useNavigation, useIsFocused } from '@react-navigation/native';

// ...

// create a selector for unreadThreadCount
const selector = (nextValue: ThreadManagerState) => [nextValue.unreadThreadCount];

const CustomBanner = () => {
  // use our utility hook to access the store
  const [unreadCount] = useStateStore(client?.threads?.state, selector);

  // display the banner
  return (
     <View style={{ paddingVertical: 15, paddingHorizontal: 5 }}>
       <Text>You have {unreadCount} unread threads !</Text>
     </View>
  );
};

const ThreadListScreen = () => {
  const isFocused = useIsFocused();
  const navigation = useNavigation();
  return (
    <OverlayProvider>
      <Chat client={client}>
        {/* it's important that the banner is also a child of <Chat /> */}
        <CustomBanner />
        <ThreadList
          isFocused={isFocused}
          {/* here we can reuse the same method as we would in the ChannelList component */}
          onThreadSelect={(thread, channel) => {
            navigation.navigate('ThreadScreen', {
              thread,
              channel,
            });
          }}
          ThreadListItem={ThreadListItem}
        />
      </Chat>
    </OverlayProvider>
  );
};
Finally, add 10px spacing using FlatList props via additionalFlatListProps.
Final example:
// ...

const ItemSeparatorComponent = () => <View style={{ paddingVertical: 5 }} />

const ThreadListScreen = () => {
  const isFocused = useIsFocused();
  const navigation = useNavigation();
  return (
    <OverlayProvider>
      <Chat client={client}>
        {/* it's important that the banner is also a child of <Chat /> */}
        <CustomBanner />
        <ThreadList
          isFocused={isFocused}
          {/* here we can reuse the same method as we would in the ChannelList component */}
          onThreadSelect={(thread, channel) => {
            navigation.navigate('ThreadScreen', {
              thread,
              channel,
            });
          }}
          ThreadListItem={ThreadListItem}
          additionalFlatListProps={{
            ItemSeparatorComponent,
          }}
        />
      </Chat>
    </OverlayProvider>
  );
};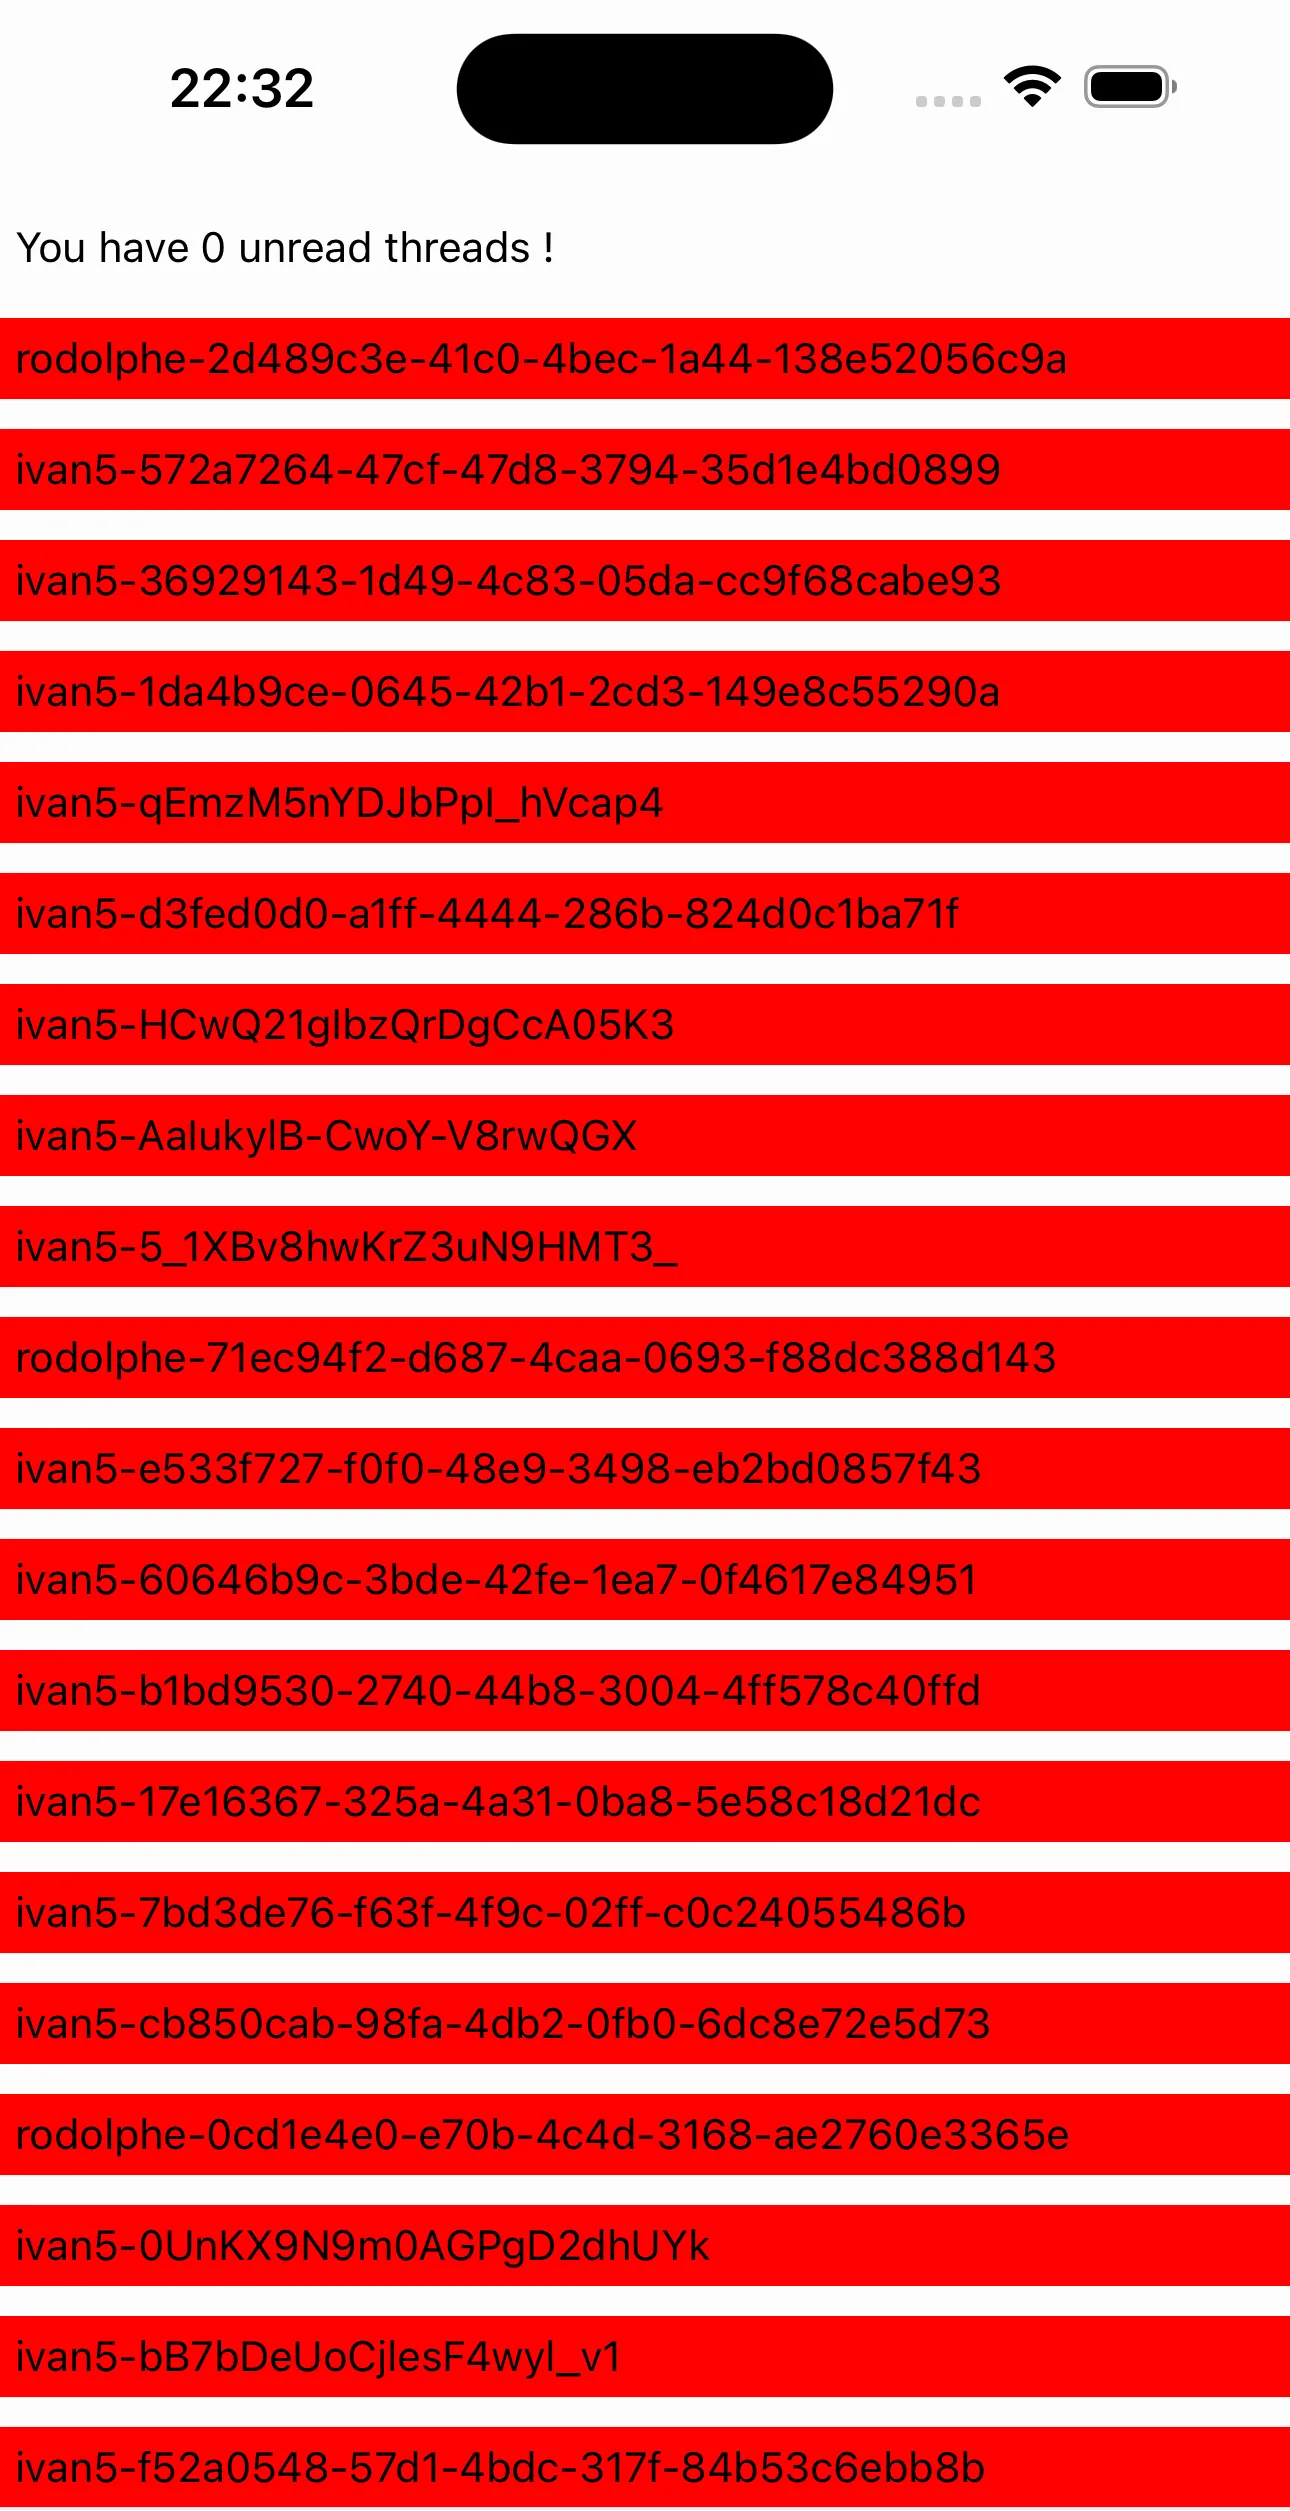
You now have a fully customized ThreadList.