import {
  Channel,
  MessageInput,
  MessageList,
  ThemeProvider,
} from "stream-chat-react-native";
import { ImageBackground } from "react-native";

export const theme = {
  messageList: {
    container: {
      backgroundColor: "transparent",
    },
  },
};

const IMAGE_URI =
  "https://images.unsplash.com/photo-1549125764-91425ca48850?ixlib=rb-1.2.1&ixid=MnwxMjA3fDB8MHxleHBsb3JlLWZlZWR8NjF8fHxlbnwwfHx8fA%3D%3D&auto=format&fit=crop&w=800&q=60";

const ChannelScreen = ({ channel }) => (
  <ThemeProvider style={theme}>
    <Channel channel={channel}>
      <ImageBackground
        style={{ flex: 1 }}
        source={{
          uri: IMAGE_URI,
        }}
      >
        <MessageList />
        <MessageInput />
      </ImageBackground>
    </Channel>
  </ThemeProvider>
);
Custom Channel Background
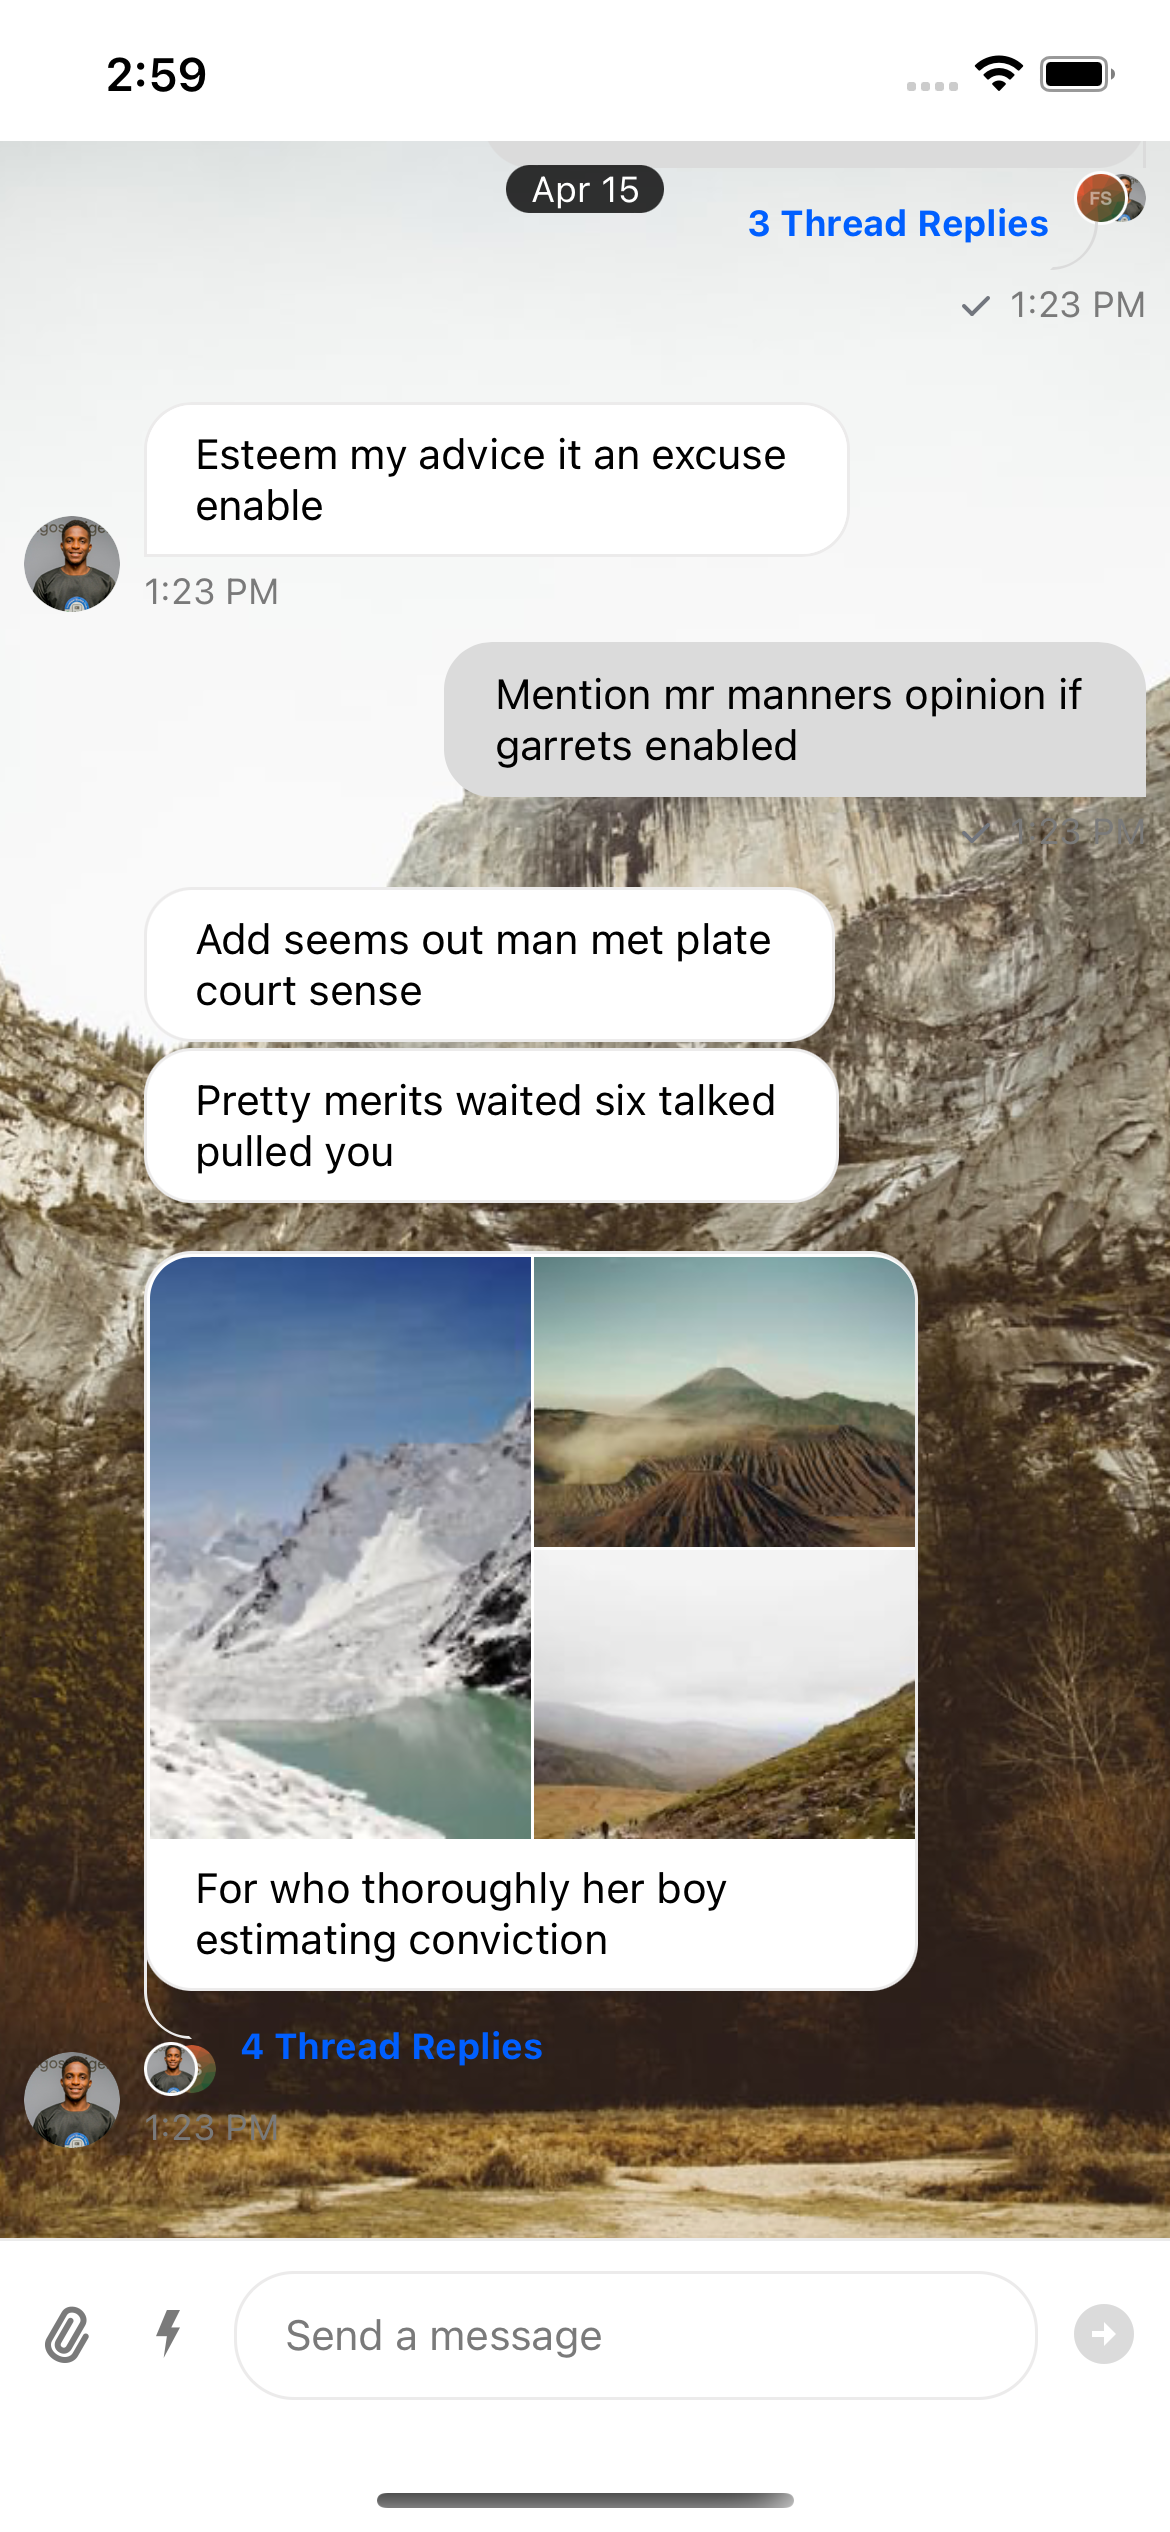
Basic Custom Background
You can change the background statically by wrapping MessageList and MessageInput with the ImageBackground component.

Also make sure you adjust the theme correctly.
Custom Background With Selection Screen
In this step, we will add a button that will navigate to a separate screen, where the user will be able to select their favorite background image for a specific channel.
|
|
| Chat screen with customize background button | Wallpaper overview screen with background image options |
Store and manage channel preferences
To persist the channel preferences (at the moment, only the URI of the selected background), we will need to store some data.
We will do it by using react-native-mmkv, a key-value storage framework.
Follow the installation steps, and let’s get started, shall we?
We will start by creating our ChannelBackgroundView component.
This component will be in charge of rendering the custom background by retrieving it from our key-value store.
We save an object to a key-value store to be scalable and future-proof.
You might want to add other preferences later, such as dimming value, background color, etc.
import type { ViewProps } from "react-native";
import { useMMKVObject } from "react-native-mmkv";

type ChannelPreferences = {
  imageUri: string;
};

const DEFAULT_BACKGROUND_URI = "https://i.redd.it/3jfjc53fsyb61.jpg";

const ChannelBackgroundView = ({
  channelId,
  ...props
}: {
  channelId: string;
} & ViewProps) => {
  const [channelPreferences] = useMMKVObject<ChannelPreferences>(channelId);
  const uri = channelPreferences?.imageUri || DEFAULT_BACKGROUND_URI;

  return <ImageBackground {...props} source={{ uri }} />;
};
We will then use it in our previously built ChannelScreen.
Replace the static ImageBackground with ChannelBackgroundView and pass the channelId.
const ChannelScreen = ({ channel }) => {
  return (
    <ThemeProvider style={theme}>
      <Channel channel={channel}>
        <ChannelBackgroundView channelId={channel?.id} style={{ flex: 1 }}>
          <MessageList />
          <MessageInput />
        </ChannelBackgroundView>
      </Channel>
    </ThemeProvider>
  );
};
Wallpaper overview screen
Let’s now add a screen where the user can choose a wallpaper from a particular predefined list of images.
import { StackNavigationProp } from "@react-navigation/stack";
import { RouteProp } from "@react-navigation/native";
import { useMMKVObject } from "react-native-mmkv";
import { View, SafeAreaView, Pressable, Image, StyleSheet } from "react-native";

const WallpaperOverviewScreen = ({
  navigation: { navigate },
  route: {
    params: { channelId },
  },
}: WallpaperOverviewScreenProps) => {
  const [_, setChannelPreferences] =
    useMMKVObject<ChannelPreferences>(channelId);
  return (
    <SafeAreaView
      style={{
        flex: 1,
        justifyContent: "center",
      }}
    >
      <View style={styles.container}>
        {BRIGHT_IMAGES?.map(({ imageUri = "" }, i) => {
          const handleOnPress = () => {
            setChannelPreferences({ imageUri });
            navigate("Channel");
          };
          return (
            <Pressable
              key={i}
              onPress={handleOnPress}
              style={{
                margin: 1,
                width: GRID_ITEM_WIDTH,
              }}
            >
              <Image style={styles.image} source={{ uri: imageUri }} />
            </Pressable>
          );
        })}
      </View>
    </SafeAreaView>
  );
};

type StackNavigatorParamList = {
  WallpaperOverviewScreen: {
    channelId: string;
  };
};

type WallpaperOverviewScreenProps = {
  navigation: StackNavigationProp<
    StackNavigatorParamList,
    "WallpaperOverviewScreen"
  >;
  route: RouteProp<StackNavigatorParamList, "WallpaperOverviewScreen">;
};

type ChannelPreferences = {
  imageUri: string;
};

const GRID_ITEM_WIDTH = "32.7%";

// Some random images that will get you started
const BRIGHT_IMAGES = [
  "https://images.unsplash.com/photo-1549125764-91425ca48850?ixlib=rb-1.2.1&ixid=MnwxMjA3fDB8MHxleHBsb3JlLWZlZWR8NjF8fHxlbnwwfHx8fA%3D%3D&auto=format&fit=crop&w=800&q=60",
  "https://images.unsplash.com/photo-1549241520-425e3dfc01cb?ixlib=rb-1.2.1&ixid=MnwxMjA3fDB8MHxleHBsb3JlLWZlZWR8ODB8fHxlbnwwfHx8fA%3D%3D&auto=format&fit=crop&w=800&q=60",
  "https://images.unsplash.com/photo-1554226321-24fdcddd5a55?ixlib=rb-1.2.1&ixid=MnwxMjA3fDB8MHxleHBsb3JlLWZlZWR8MjE5fHx8ZW58MHx8fHw%3D&auto=format&fit=crop&w=800&q=60",
  "https://images.unsplash.com/photo-1550006490-9f0656b79e9d?ixlib=rb-1.2.1&ixid=MnwxMjA3fDB8MHxleHBsb3JlLWZlZWR8ODl8fHxlbnwwfHx8fA%3D%3D&auto=format&fit=crop&w=800&q=60",
  "https://images.unsplash.com/photo-1551506448-074afa034c05?ixlib=rb-1.2.1&ixid=MnwxMjA3fDB8MHxleHBsb3JlLWZlZWR8MTEzfHx8ZW58MHx8fHw%3D&auto=format&fit=crop&w=800&q=60",
  "https://images.unsplash.com/photo-1553114835-6f7674d3c2c0?ixlib=rb-1.2.1&ixid=MnwxMjA3fDB8MHxleHBsb3JlLWZlZWR8MTMyfHx8ZW58MHx8fHw%3D&auto=format&fit=crop&w=800&q=60",
  "https://images.unsplash.com/photo-1553075712-453f7213c24f?ixlib=rb-1.2.1&ixid=MnwxMjA3fDB8MHxleHBsb3JlLWZlZWR8MTMzfHx8ZW58MHx8fHw%3D&auto=format&fit=crop&w=800&q=60",
  "https://images.unsplash.com/photo-1551917951-148edcd8ea8d?ixlib=rb-1.2.1&ixid=MnwxMjA3fDB8MHxleHBsb3JlLWZlZWR8MTU3fHx8ZW58MHx8fHw%3D&auto=format&fit=crop&w=800&q=60",
  "https://images.unsplash.com/photo-1553969923-bbf0cac2666b?ixlib=rb-1.2.1&ixid=MnwxMjA3fDB8MHxleHBsb3JlLWZlZWR8MjA3fHx8ZW58MHx8fHw%3D&auto=format&fit=crop&w=800&q=60",
  "https://images.unsplash.com/photo-1553194642-29b272a173b9?ixlib=rb-1.2.1&ixid=MnwxMjA3fDB8MHxleHBsb3JlLWZlZWR8MTcwfHx8ZW58MHx8fHw%3D&auto=format&fit=crop&w=800&q=60",
  "https://images.unsplash.com/photo-1553356084-58ef4a67b2a7?ixlib=rb-1.2.1&ixid=MnwxMjA3fDB8MHxleHBsb3JlLWZlZWR8MTcxfHx8ZW58MHx8fHw%3D&auto=format&fit=crop&w=800&q=60",
  "https://images.unsplash.com/photo-1553526777-5ffa3b3248d8?ixlib=rb-1.2.1&ixid=MnwxMjA3fDB8MHxleHBsb3JlLWZlZWR8MTk4fHx8ZW58MHx8fHw%3D&auto=format&fit=crop&w=800&q=60",
].map((imageUri) => ({
  imageUri,
}));

const styles = StyleSheet.create({
  container: {
    flexDirection: "row",
    flex: 1,
    alignContent: "stretch",
    flexWrap: "wrap",
    padding: 6,
  },
  image: {
    flex: 1,
    width: "100%",
  },
});
Be aware of the fact that channel preferences were implemented with MMKV, a key-value storage framework. There are alternative approaches to achieving the same goal, such as saving the channel preferences as custom data on Stream’s channel object.
Add a configuration button
We will now add a button that will take the user from the Channel screen to our new WallpaperOverview screen.
import { useNavigation } from "@react-navigation/native";
import {
  Channel,
  MessageInput,
  MessageList,
  ThemeProvider,
} from "stream-chat-react-native";
import { Pressable, Text, StyleSheet } from "react-native";

const ChannelScreen = ({ channel }) => {
  const { navigate } = useNavigation();
  const handleMenuOnPress = () =>
    navigate("WallpaperOverviewScreen", { channelId: channel?.id });

  return (
    <ThemeProvider style={theme}>
      <Channel channel={channel}>
        <ChannelBackgroundView channelId={channel?.id} style={{ flex: 1 }}>
          <Pressable style={styles.menuButton} onPress={handleMenuOnPress}>
            <Text>🎨</Text>
          </Pressable>
          <MessageList />
          <MessageInput />
        </ChannelBackgroundView>
      </Channel>
    </ThemeProvider>
  );
};

const styles = StyleSheet.create({
  menuButton: {
    position: "absolute",
    right: 0,
    top: 0,
    backgroundColor: "rgba(255,87,56,0.65)",
    borderRadius: 36,
    padding: 16,
    margin: 16,
    alignItems: "center",
    zIndex: 10,
  },
});

export const theme = {
  messageList: {
    container: {
      backgroundColor: "transparent",
    },
  },
};
Optional: Connect all screens by navigation
If applicable to your use case, add our screens to a Navigation Stack by doing the following:
import { createNativeStackNavigator } from "react-native-screens/native-stack";
import { NavigationContainer } from "@react-navigation/native";

const Stack = createNativeStackNavigator();

export default () => {
  return (
    <SafeAreaProvider>
      <ThemeProvider style={theme}>
        <NavigationContainer>
          <Stack.Navigator initialRouteName="Channel">
            <Stack.Screen
              component={ChannelScreen}
              name="Channel"
              options={noHeaderOptions}
            />
            <Stack.Screen
              component={WallpaperOverviewScreen}
              name="WallpaperOverviewScreen"
            />
          </Stack.Navigator>
        </NavigationContainer>
      </ThemeProvider>
    </SafeAreaProvider>
  );
};
