import {
  OverlayProvider,
  Chat,
  Channel,
  MessageList,
  MessageInput,
} from "stream-chat-react-native";

const ChannelScreen = () => {
  return (
    <OverlayProvider>
      <Chat client={client}>
        <Channel channel={channel}>
          <ChannelHeader />
          <MessageList />
          <MessageInput />
        </Channel>
      </Chat>
    </OverlayProvider>
  );
};Custom Poll Flow
This cookbook shows how to customize a Channel screen with the Poll component and use navigation instead of modals.
Best Practices
- Enable polls at the dashboard level before debugging UI behavior.
- Keep poll screens inside
Channelso they inherit the correct contexts. - Reuse default poll subcomponents and override only the pieces you need.
- Route poll navigation explicitly to avoid mixing modal and stack flows.
- Handle poll state updates through provided hooks instead of manual mutations.
Prerequisites
Prereq: a Channel screen with a MessageList. Polls are tied to messages, so this must be in place first.
Polls are disabled by default. Enable them in the Stream Dashboard by toggling the Poll button.
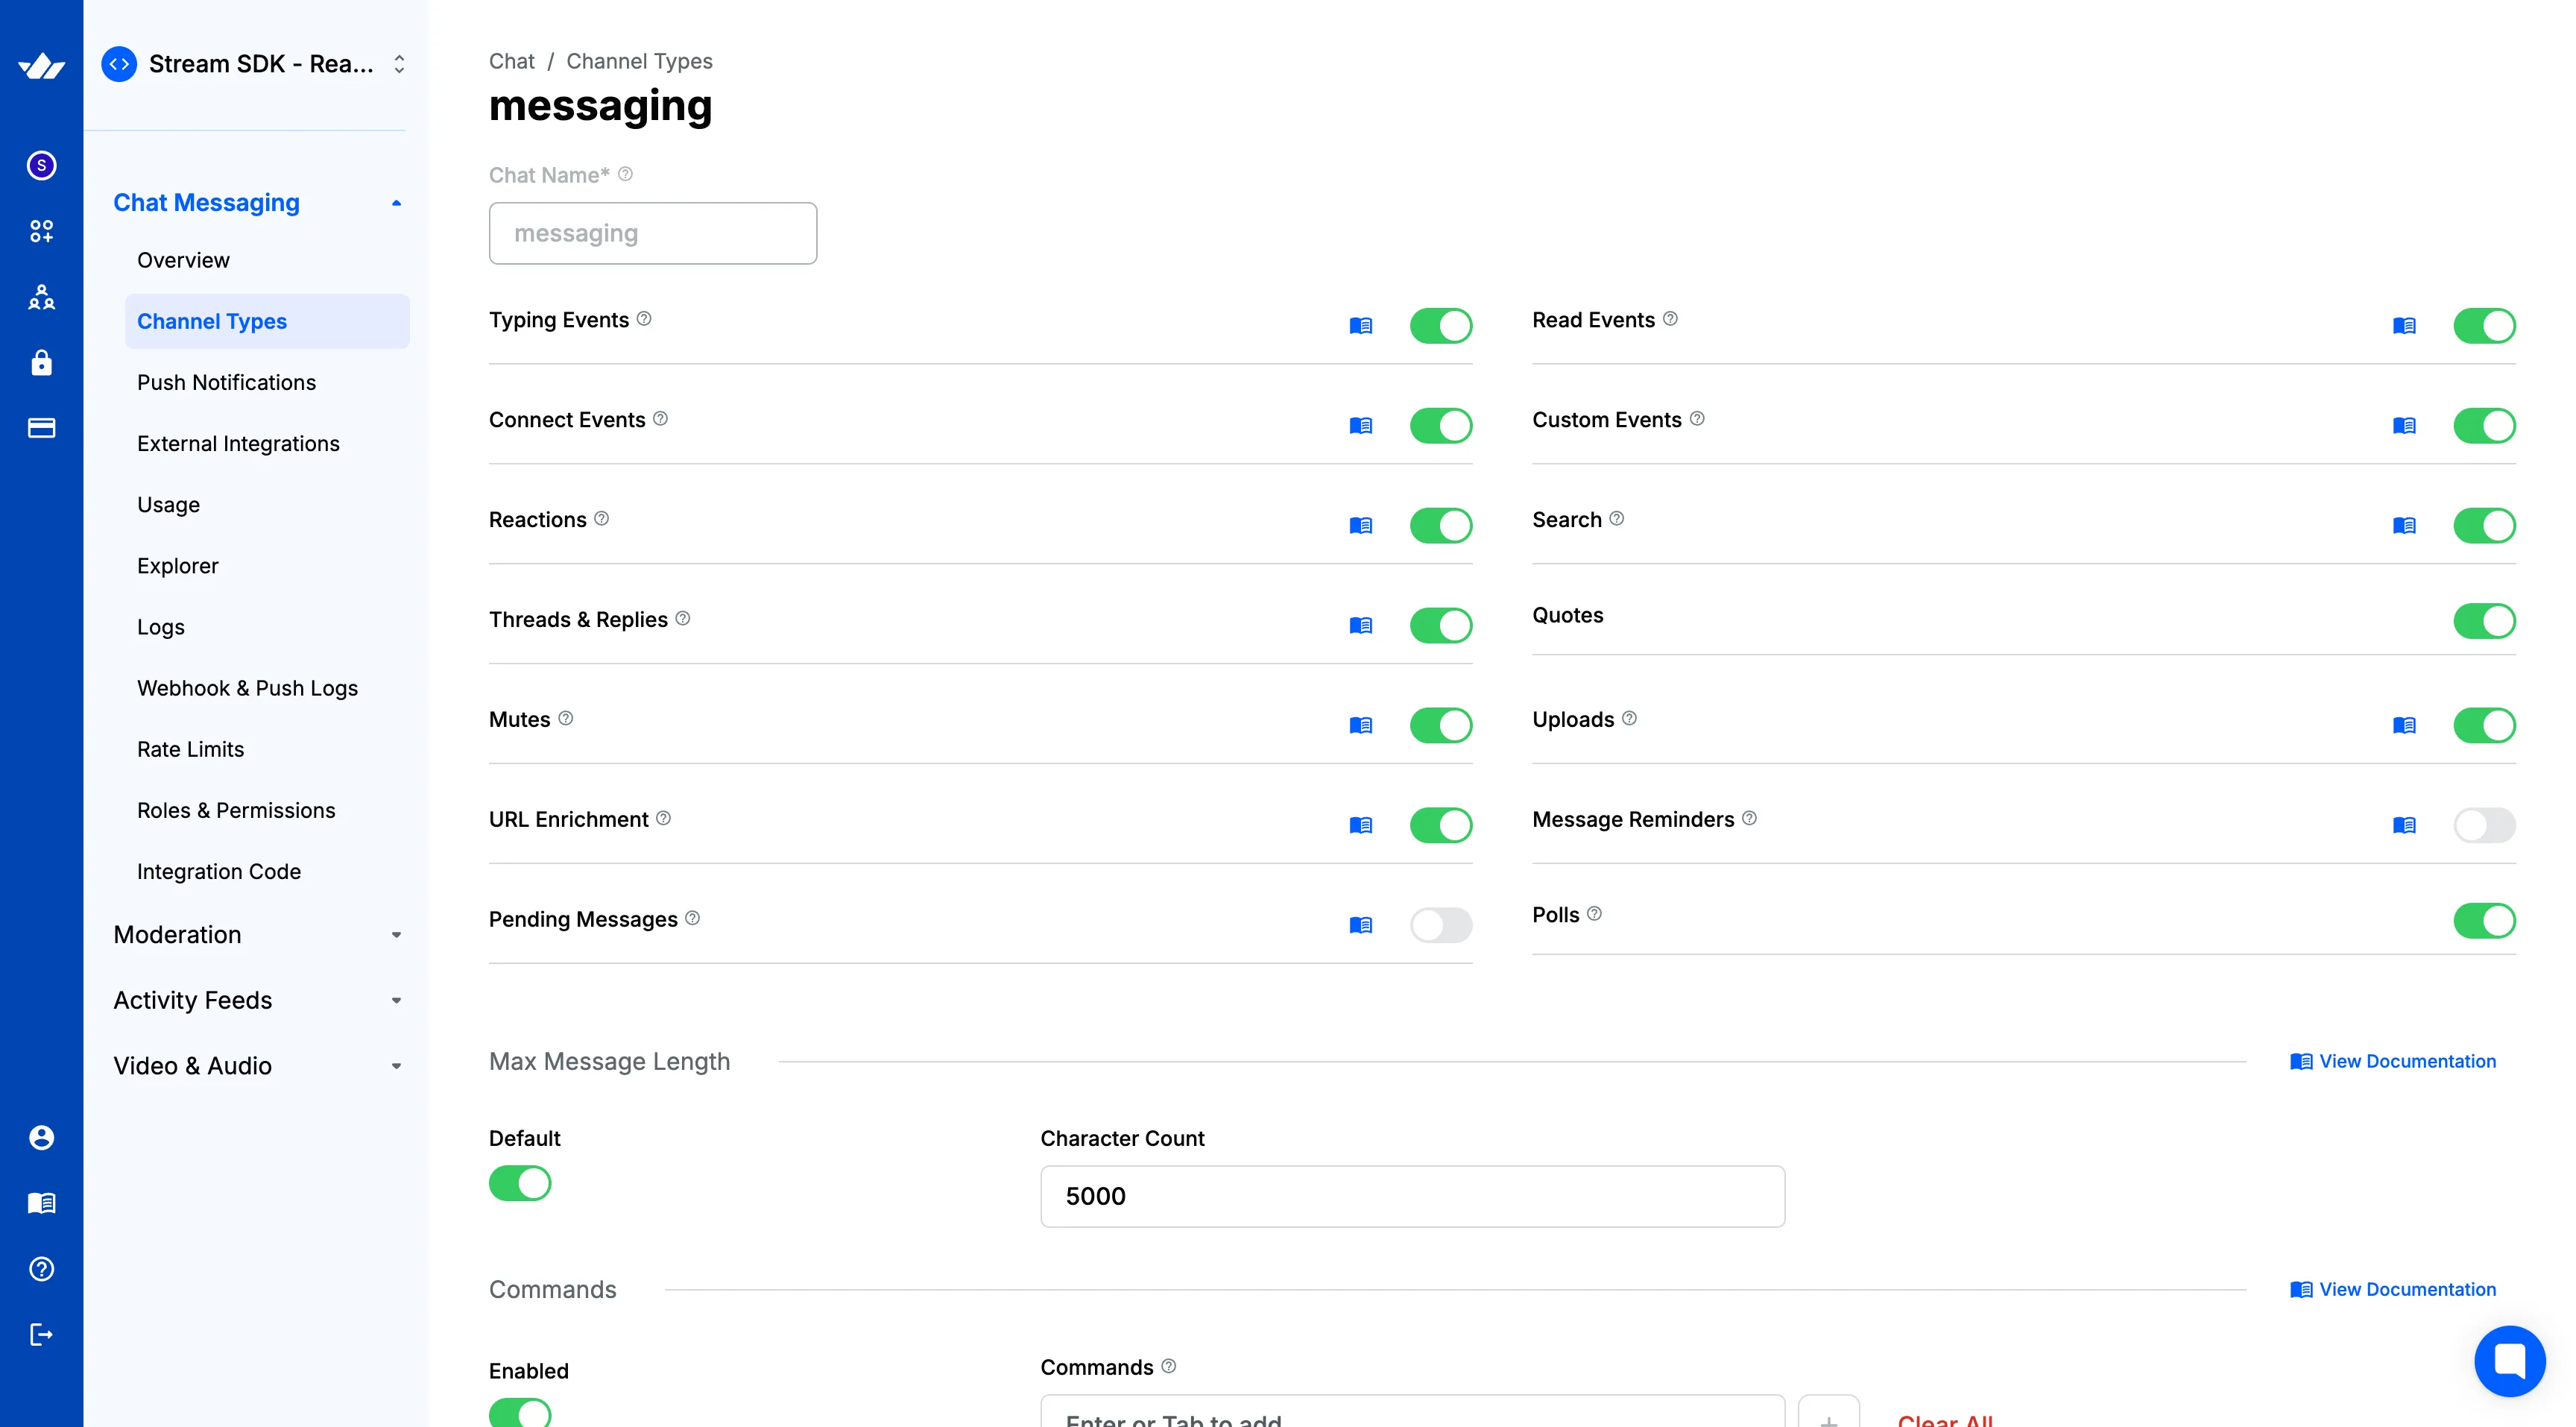
Doing that will include the Poll button in your attachment picker:

You also need a working chatClient. Examples use React Navigation, but any navigation library works.
The initial UI
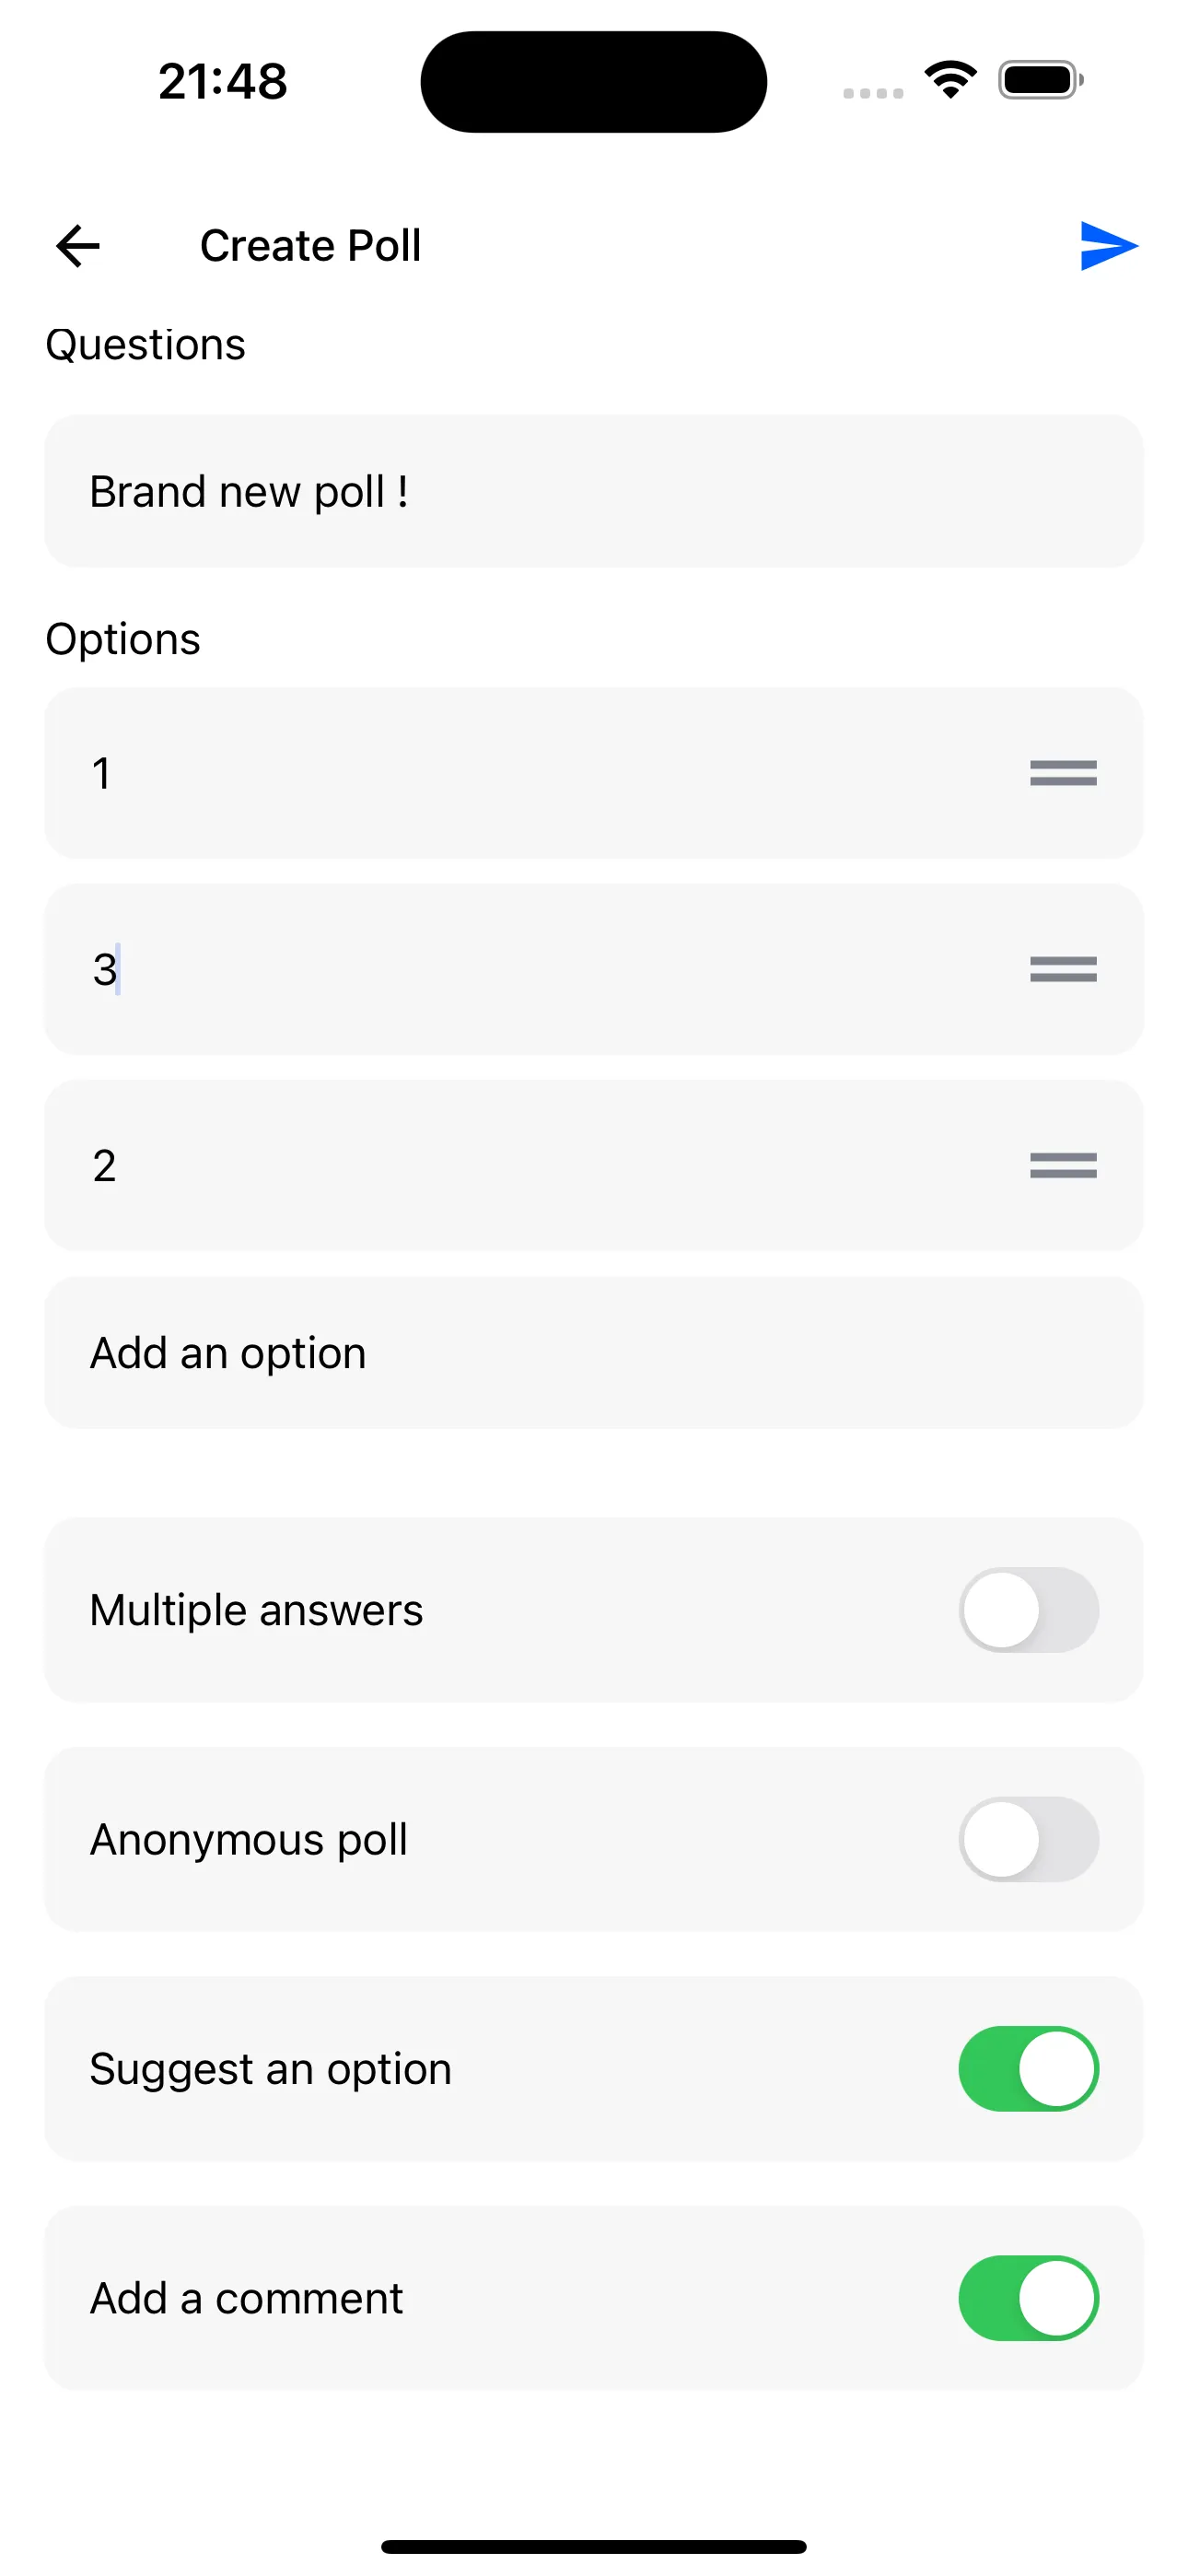
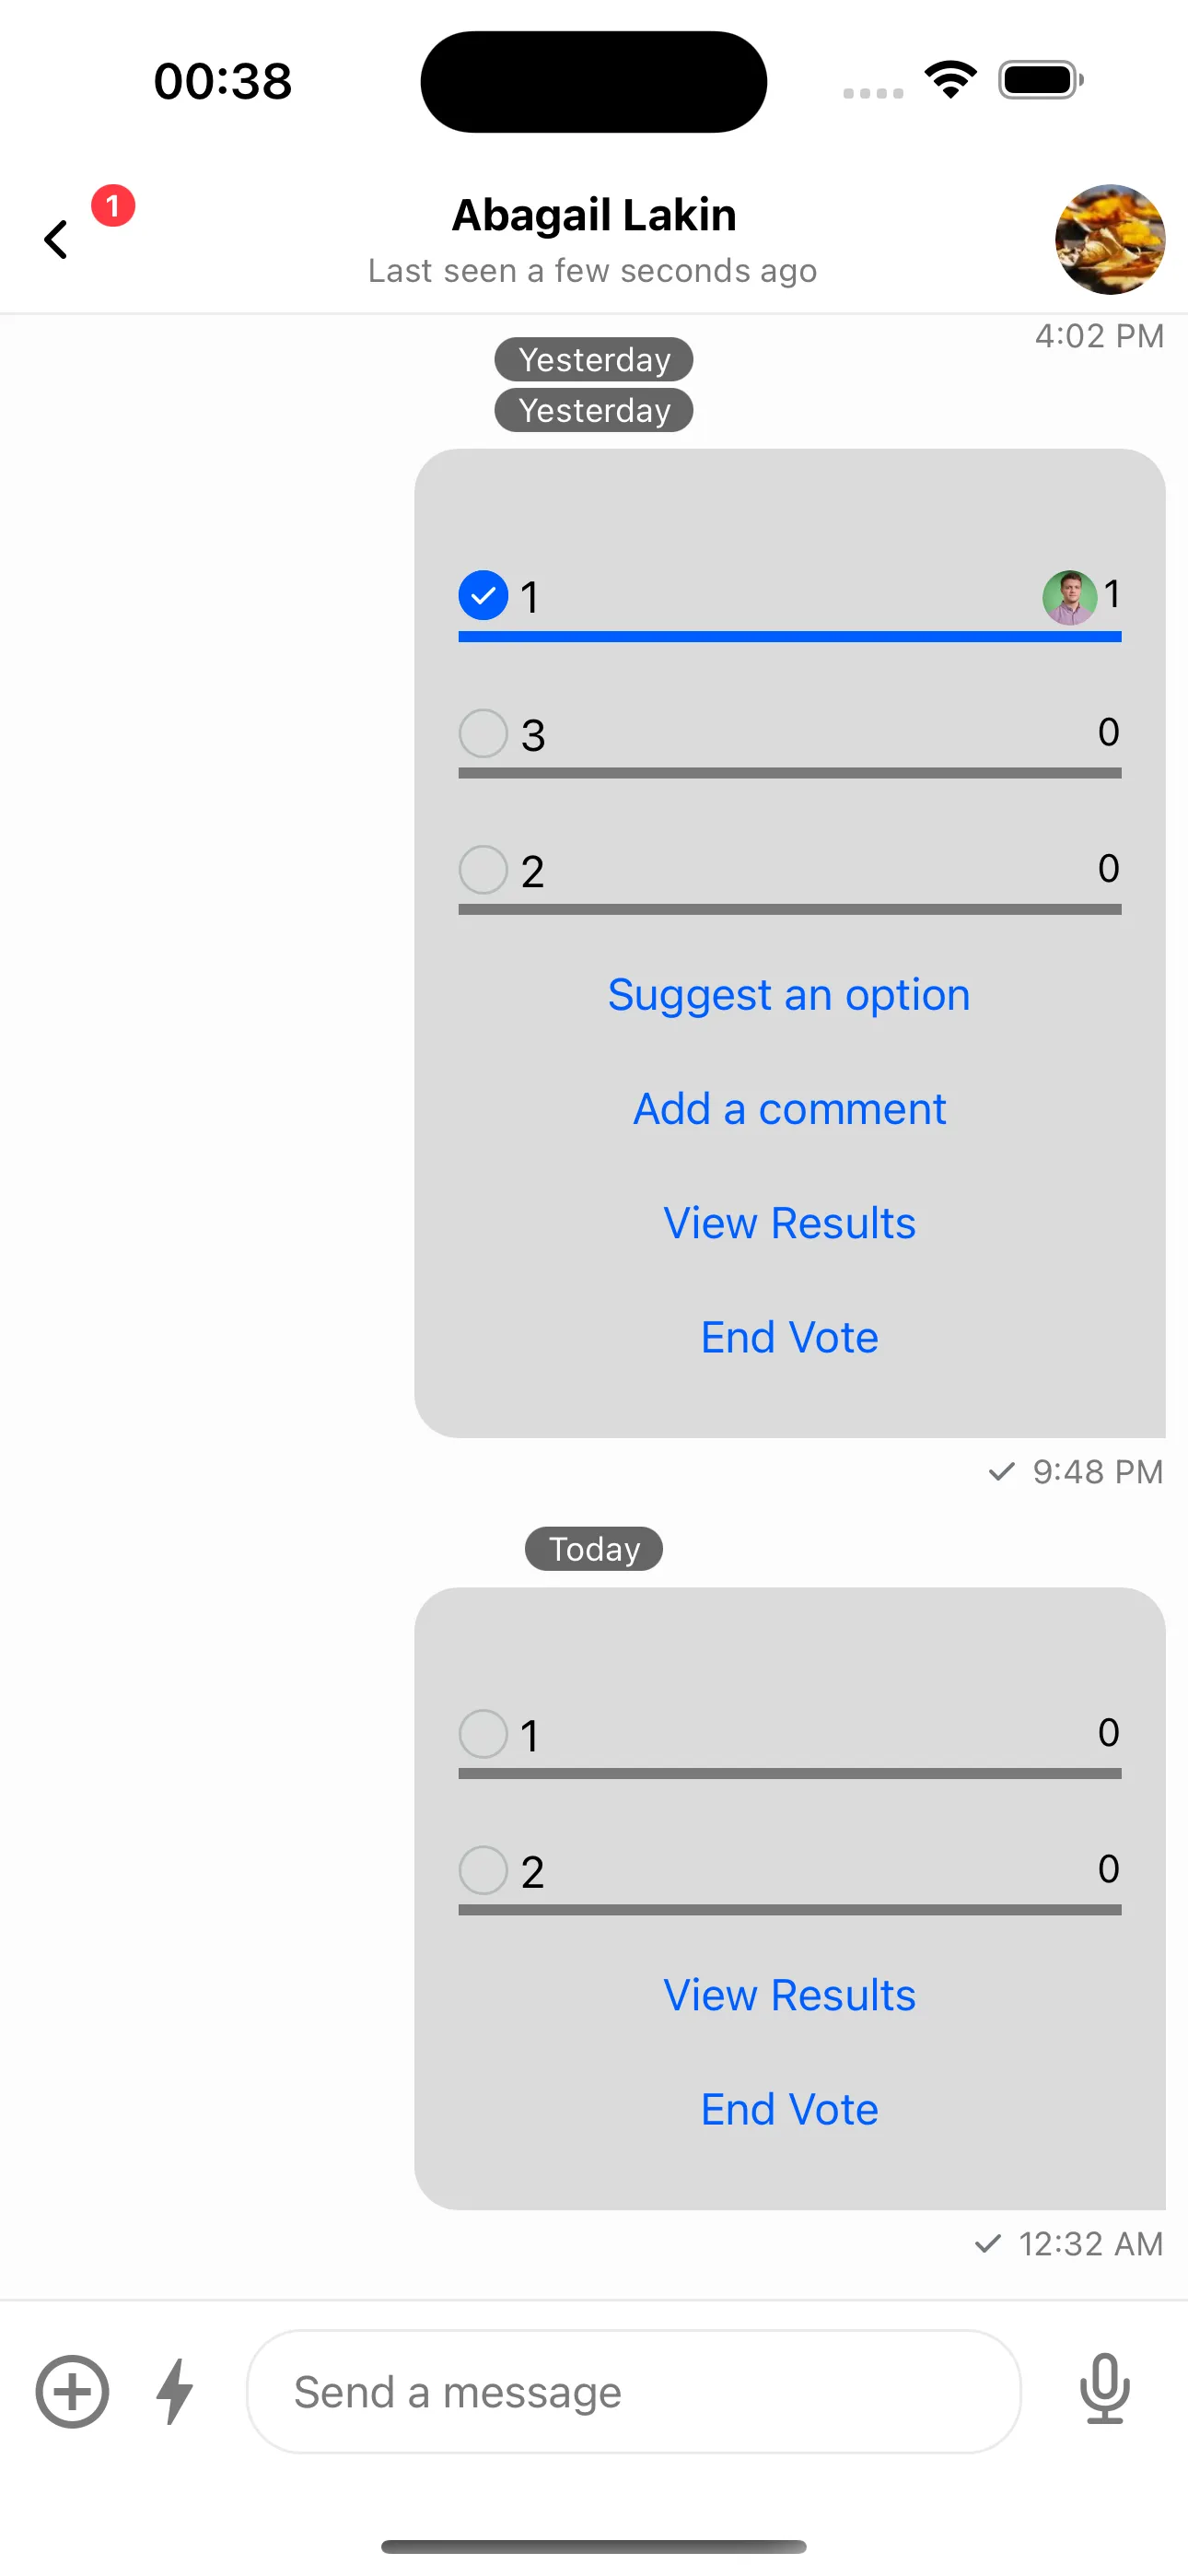
Without doing any form of customization yet, we should have something similar to the following:
The poll creation flow should work out of the box with the default UI:


Next, customize the poll UI inside messages by setting PollContent on Channel.
For now, remove the poll header and adjust the bottom buttons. Reuse the default PollContent and override parts.
You can reuse default buttons and override only what you need.
import {
  OverlayProvider,
  Chat,
  Channel,
  MessageList,
  MessageInput,
  PollContent,
} from "stream-chat-react-native";

const MyPollButtons = () => {
  return (
    <>
      <ShowAllOptionsButton />
      <ViewResultsButton
        onPress={({ message, poll }) =>
          Alert.alert(`Message ID: ${message.id} and Poll ID: ${poll.id}`)
        }
      />
      <EndVoteButton />
    </>
  );
};

const MyPollContent = () => (
  <PollContent PollHeader={() => null} PollButtons={MyPollButtons} />
);

const ChannelScreen = () => {
  return (
    <OverlayProvider>
      <Chat client={client}>
        <Channel channel={channel} PollContent={MyPollContent}>
          <ChannelHeader />
          <MessageList />
          <MessageInput />
        </Channel>
      </Chat>
    </OverlayProvider>
  );
};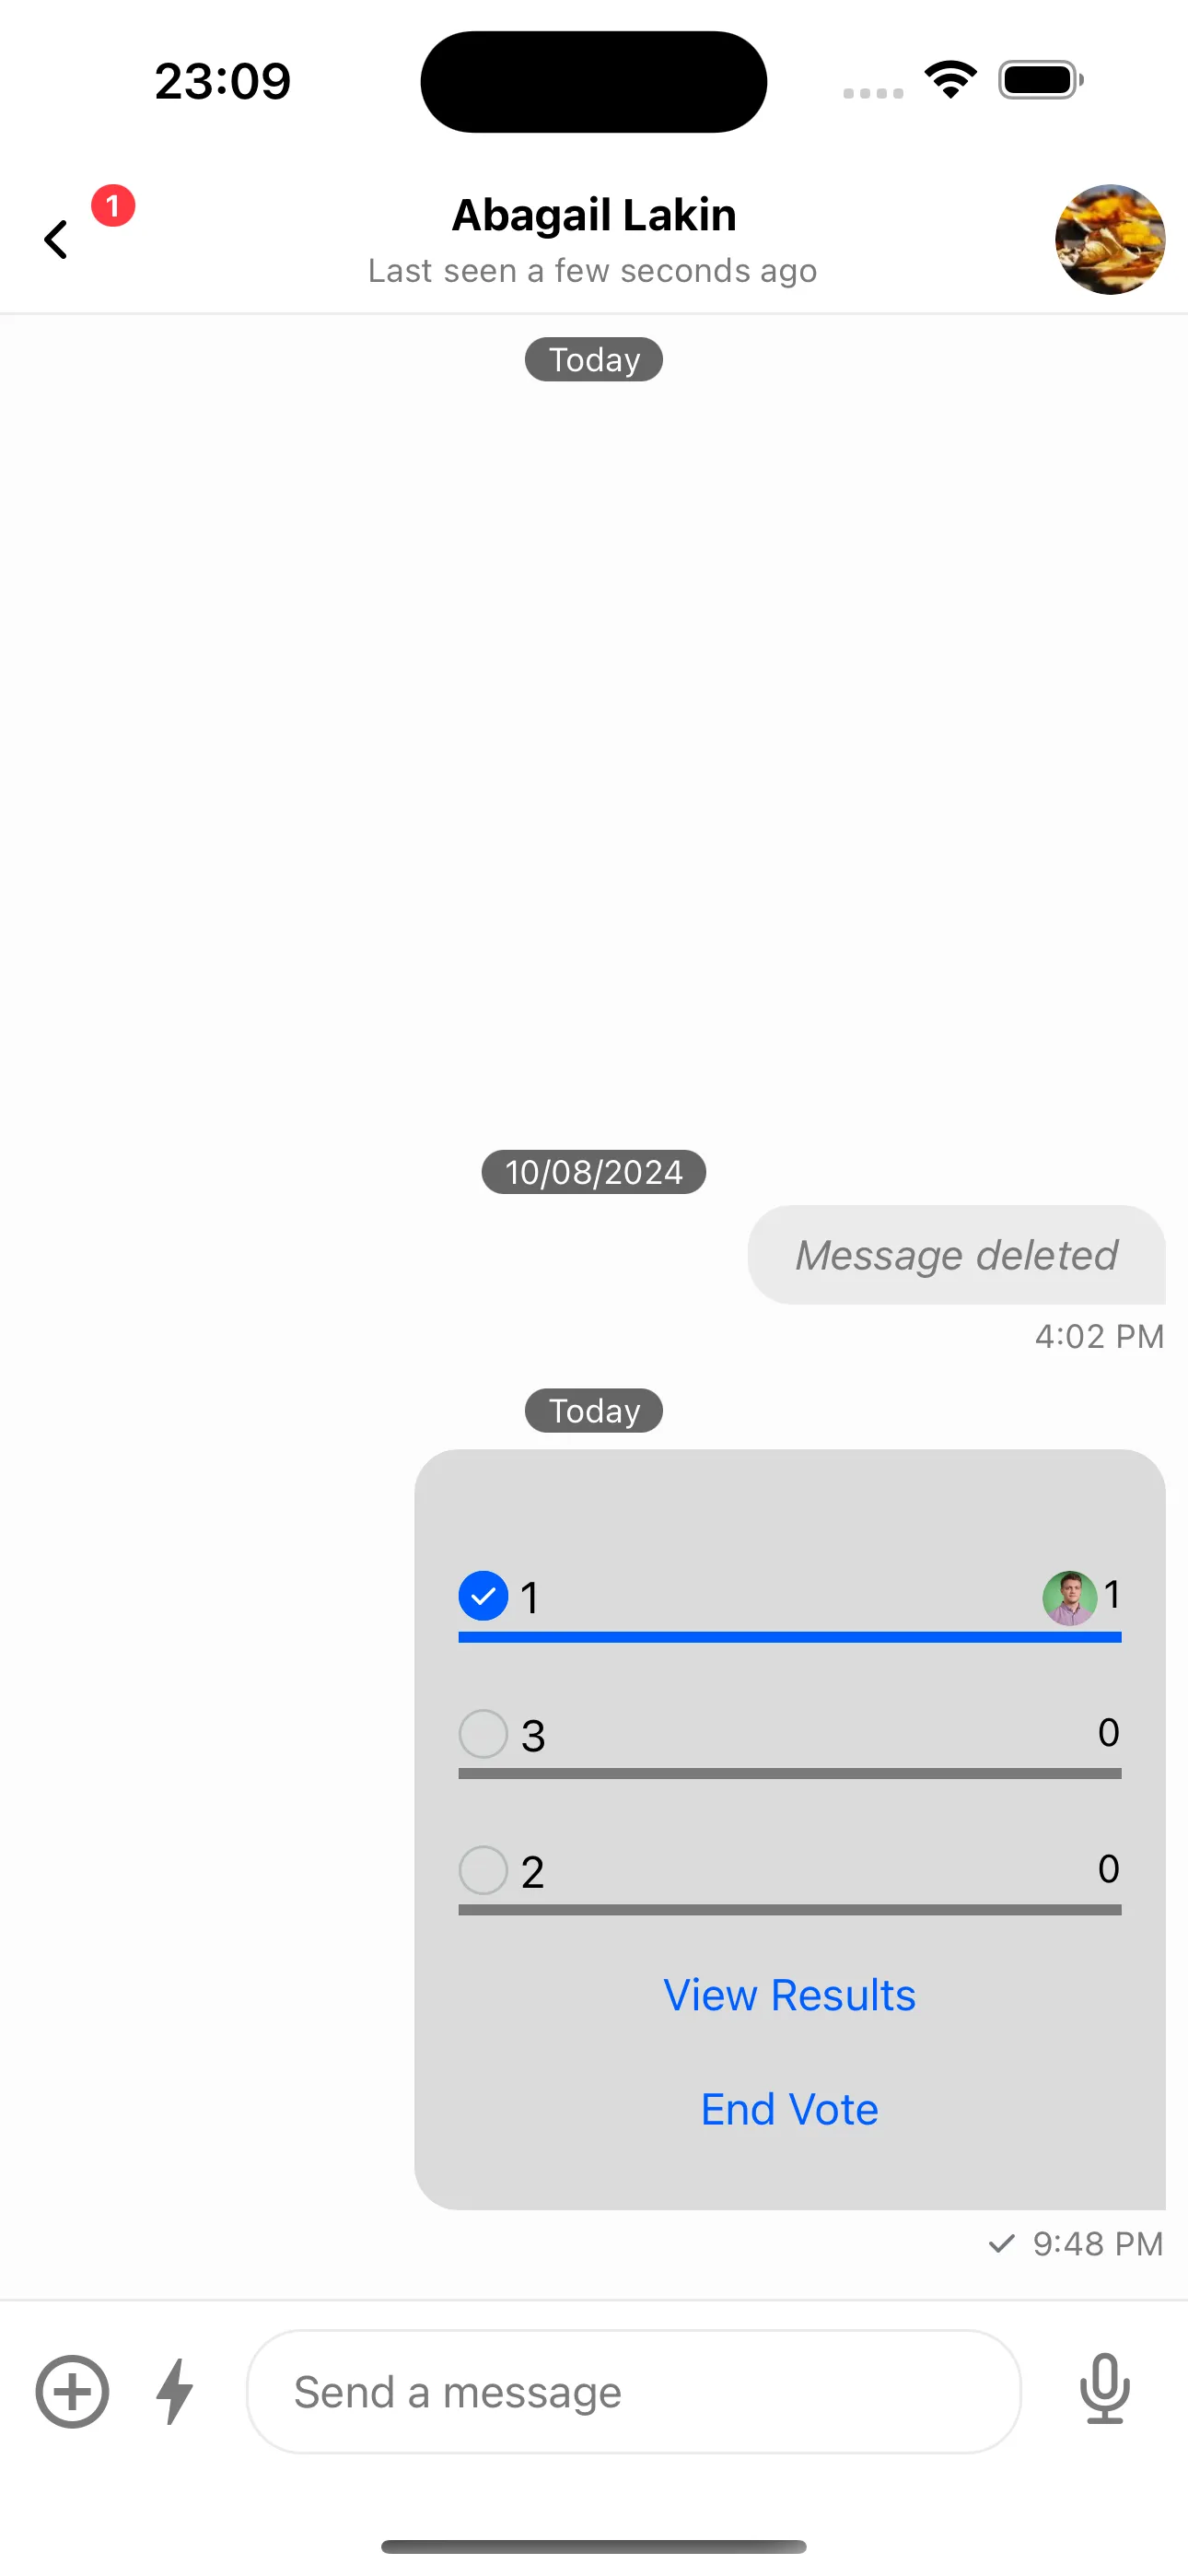
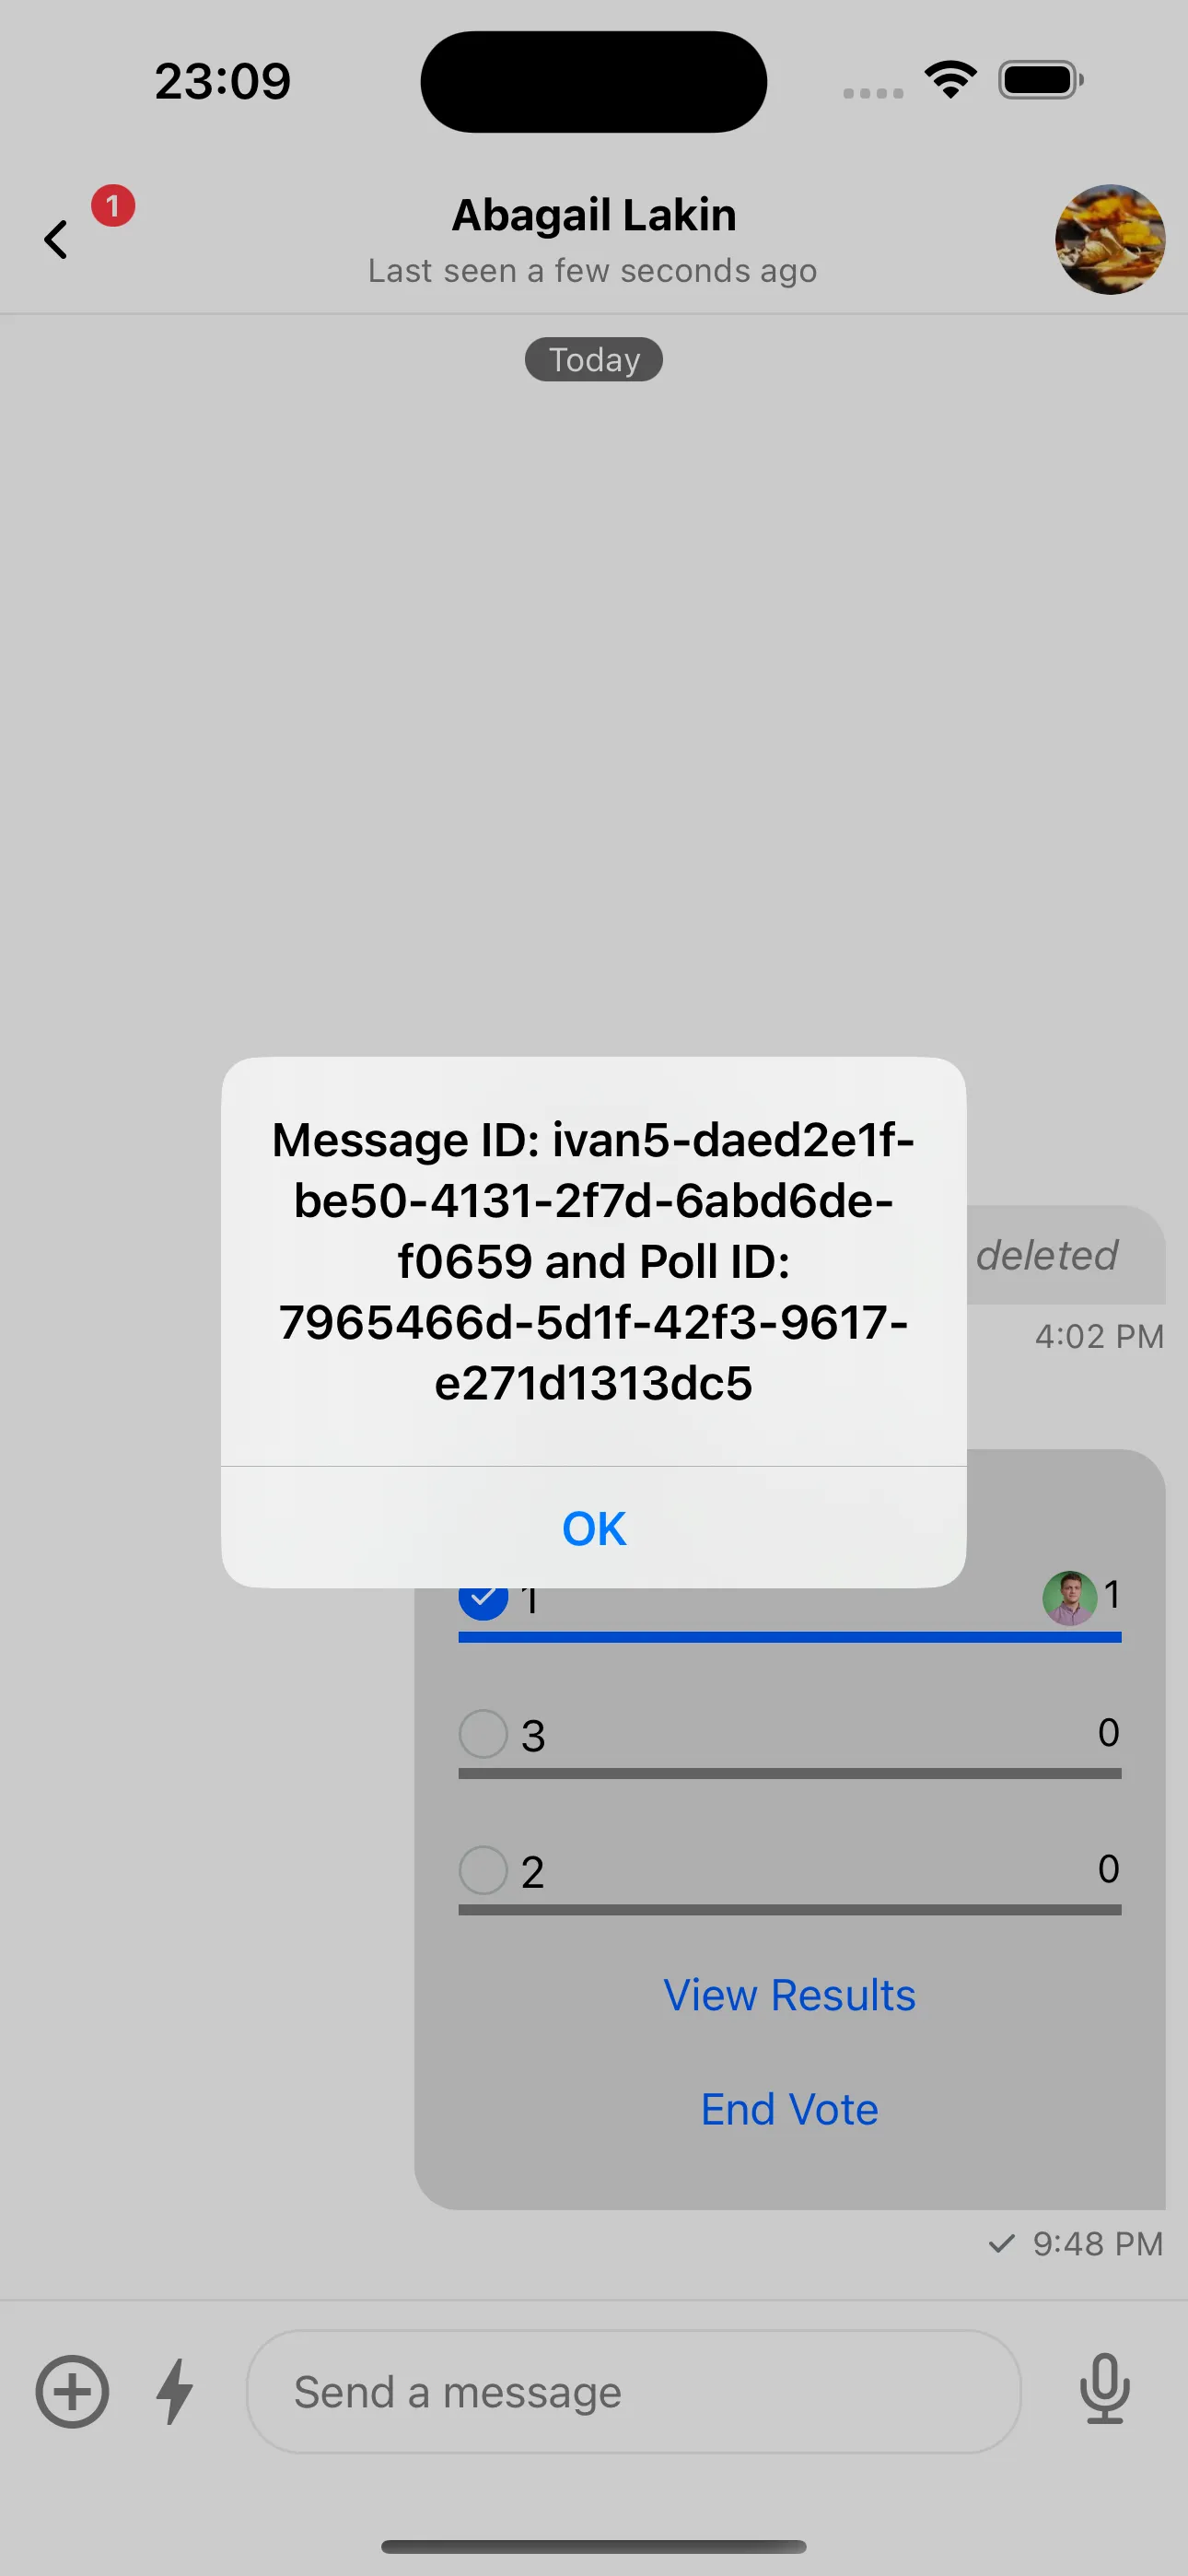
Now only two buttons render (View Results and End Vote). View Results shows an Alert instead of opening the modal.
Next, reintroduce the PollResults screen using your own navigation instead of React Native Modals.
To do this, let's rely on React Navigation. Since we need all of the Poll screens to also be children of the Channel component, we can introduce an additional Stack navigator that would take care of this.
import {
  OverlayProvider,
  Chat,
  Channel,
  MessageList,
  MessageInput,
  PollContent,
} from "stream-chat-react-native";
import { createStackNavigator } from "@react-navigation/stack";

const MyPollButtons = () => {
  return (
    <>
      <ShowAllOptionsButton />
      <ViewResultsButton
        onPress={({ message, poll }) =>
          Alert.alert(`Message ID: ${message.id} and Poll ID: ${poll.id}`)
        }
      />
      <EndVoteButton />
    </>
  );
};

const MyPollContent = () => (
  <PollContent PollHeader={() => null} PollButtons={MyPollButtons} />
);

const ChannelMessageList = () => {
  return (
    <>
      <ChannelHeader />
      <MessageList />
      <MessageInput />
    </>
  );
};

const ChannelStack = createStackNavigator<StackNavigatorParamList>();

const ChannelScreen = () => {
  return (
    <OverlayProvider>
      <Chat client={client}>
        <Channel channel={channel} PollContent={MyPollContent}>
          <ChannelStack.Navigator initialRouteName={"ChannelMessageList"}>
            <ChannelStack.Screen
              name={"ChannelMessageList"}
              options={{ headerShown: false }}
              component={ChannelMessageList}
            />
            <ChannelStack.Screen
              name={"PollResultsScreen"}
              options={{ headerShown: false }}
              component={() => null}
            />
          </ChannelStack.Navigator>
        </Channel>
      </Chat>
    </OverlayProvider>
  );
};
For now, leave PollResultsScreen empty. This stack inside Channel can now host all poll screens.
This keeps channel and other Channel customizations in one place while using your own navigation.
As a next step, let's reconstruct the PollResults screen. For this, we may use the PollModalHeader and PollResults components and get the default UI out of the box.
import {
  OverlayProvider,
  Chat,
  Channel,
  MessageList,
  MessageInput,
  PollContent,
  PollResults,
  PollModalHeader,
} from 'stream-chat-react-native';
import { createStackNavigator } from '@react-navigation/stack';

const MyPollButtons = () => {
  return (
    <>
      <ShowAllOptionsButton />
      <ViewResultsButton
        onPress={({ message, poll }) =>
          navigation.navigate('PollResultsScreen', {
            message,
            poll,
          });
        }
      />
      <EndVoteButton />
    </>
  )
}

// ... rest of the components

const PollResultsScreen = ({
  route: {
    params: { message, poll },
  },
}) => {
  const navigation = useNavigation();
  return (
    <SafeAreaView style={{ flex: 1 }}>
      <PollModalHeader title={'RESULTS'} onPress={() => navigation.goBack()} />
      <PollResults message={message} poll={poll} />
    </SafeAreaView>
  );
};

const ChannelScreen = () => {
  return (
    <OverlayProvider>
      <Chat client={client}>
        <Channel channel={channel} PollContent={MyPollContent}>
          <ChannelStack.Navigator initialRouteName={'ChannelMessageList'}>
            <ChannelStack.Screen
              name={'ChannelMessageList'}
              options={{ headerShown: false }}
              component={ChannelMessageList}
            />
            <ChannelStack.Screen
              name={'PollResultsScreen'}
              options={{ headerShown: false }}
              component={PollResultsScreen}
            />
          </ChannelStack.Navigator>
        </Channel>
      </Chat>
    </OverlayProvider>
  );
};
View Results now navigates to PollResults in the stack instead of a modal.
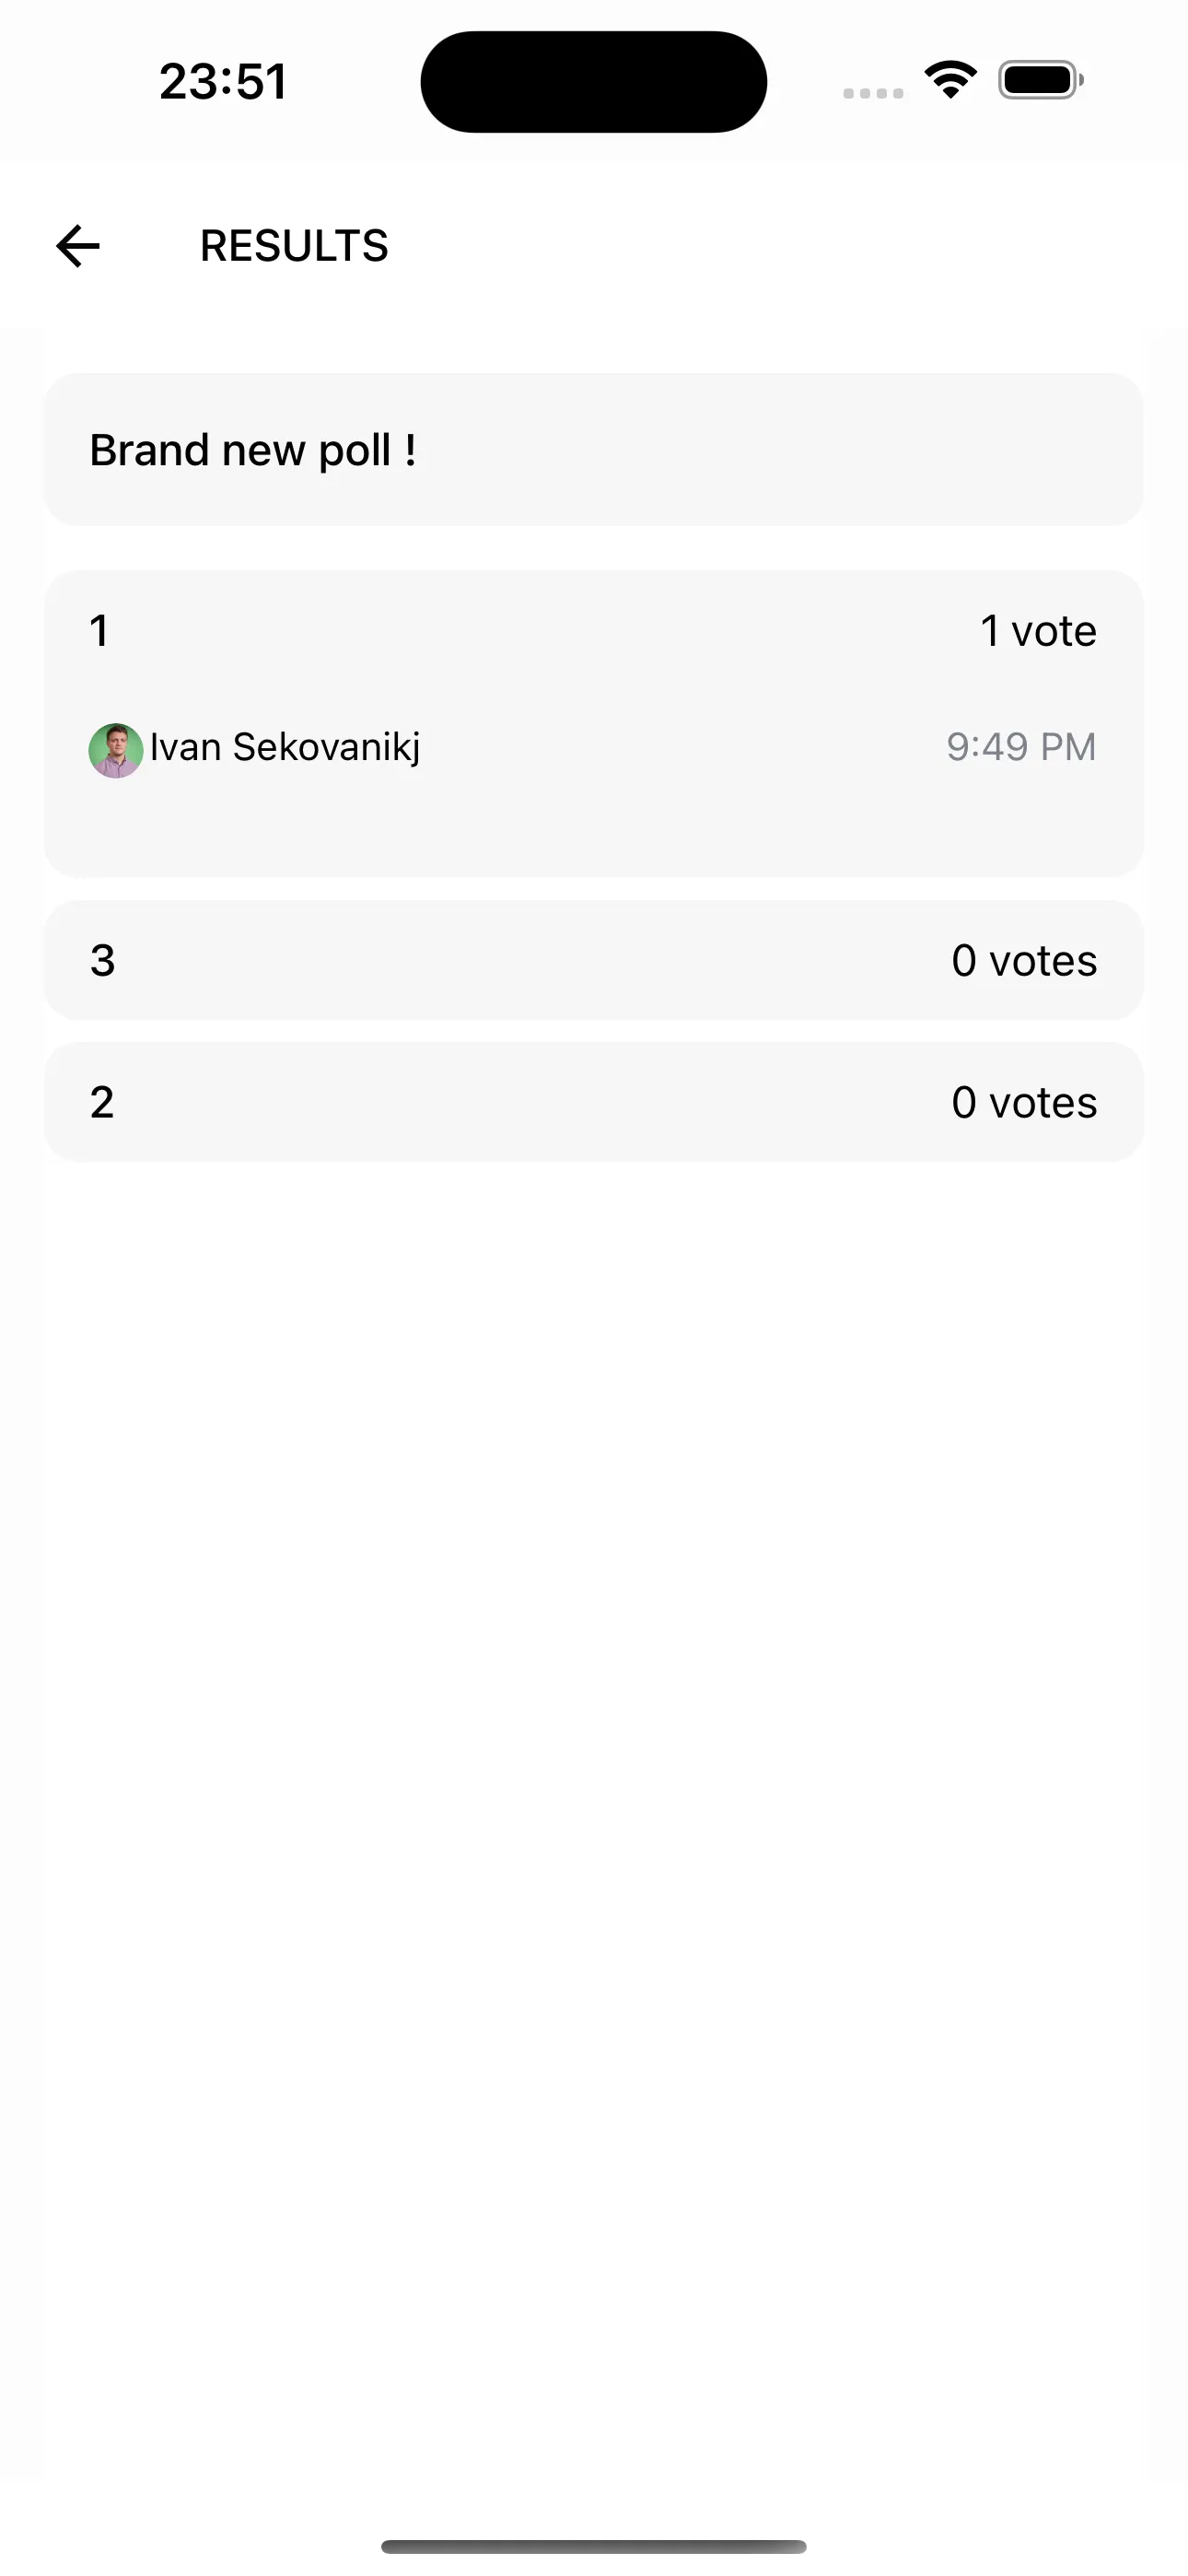
The UI matches the default, but the title is now RESULTS.
Next, pin the poll name at the top for long option lists.
For this purpose, we can use the usePollState hook and the PollResultsContent component.
import {
  // ...rest of the imports
  usePollState,
  PollResultsContent,
} from "stream-chat-react-native";
import { createStackNavigator } from "@react-navigation/stack";

// ... rest of the components

const MyPollResultsContent = () => {
  const { name } = usePollState();
  const navigation = useNavigation();
  return (
    <>
      <PollModalHeader title={name} onPress={() => navigation.goBack()} />
      <PollResultsContent />
    </>
  );
};

const PollResultsScreen = ({
  route: {
    params: { message, poll },
  },
}) => {
  return (
    <SafeAreaView style={{ flex: 1 }}>
      <PollResults
        message={message}
        poll={poll}
        PollResultsContent={MyPollResultsContent}
      />
    </SafeAreaView>
  );
};

const ChannelScreen = () => {
  return (
    <OverlayProvider>
      <Chat client={client}>
        <Channel channel={channel} PollContent={MyPollContent}>
          <ChannelStack.Navigator initialRouteName={"ChannelMessageList"}>
            <ChannelStack.Screen
              name={"ChannelMessageList"}
              options={{ headerShown: false }}
              component={ChannelMessageList}
            />
            <ChannelStack.Screen
              name={"PollResultsScreen"}
              options={{ headerShown: false }}
              component={PollResultsScreen}
            />
          </ChannelStack.Navigator>
        </Channel>
      </Chat>
    </OverlayProvider>
  );
};
Providing us with the following UI:
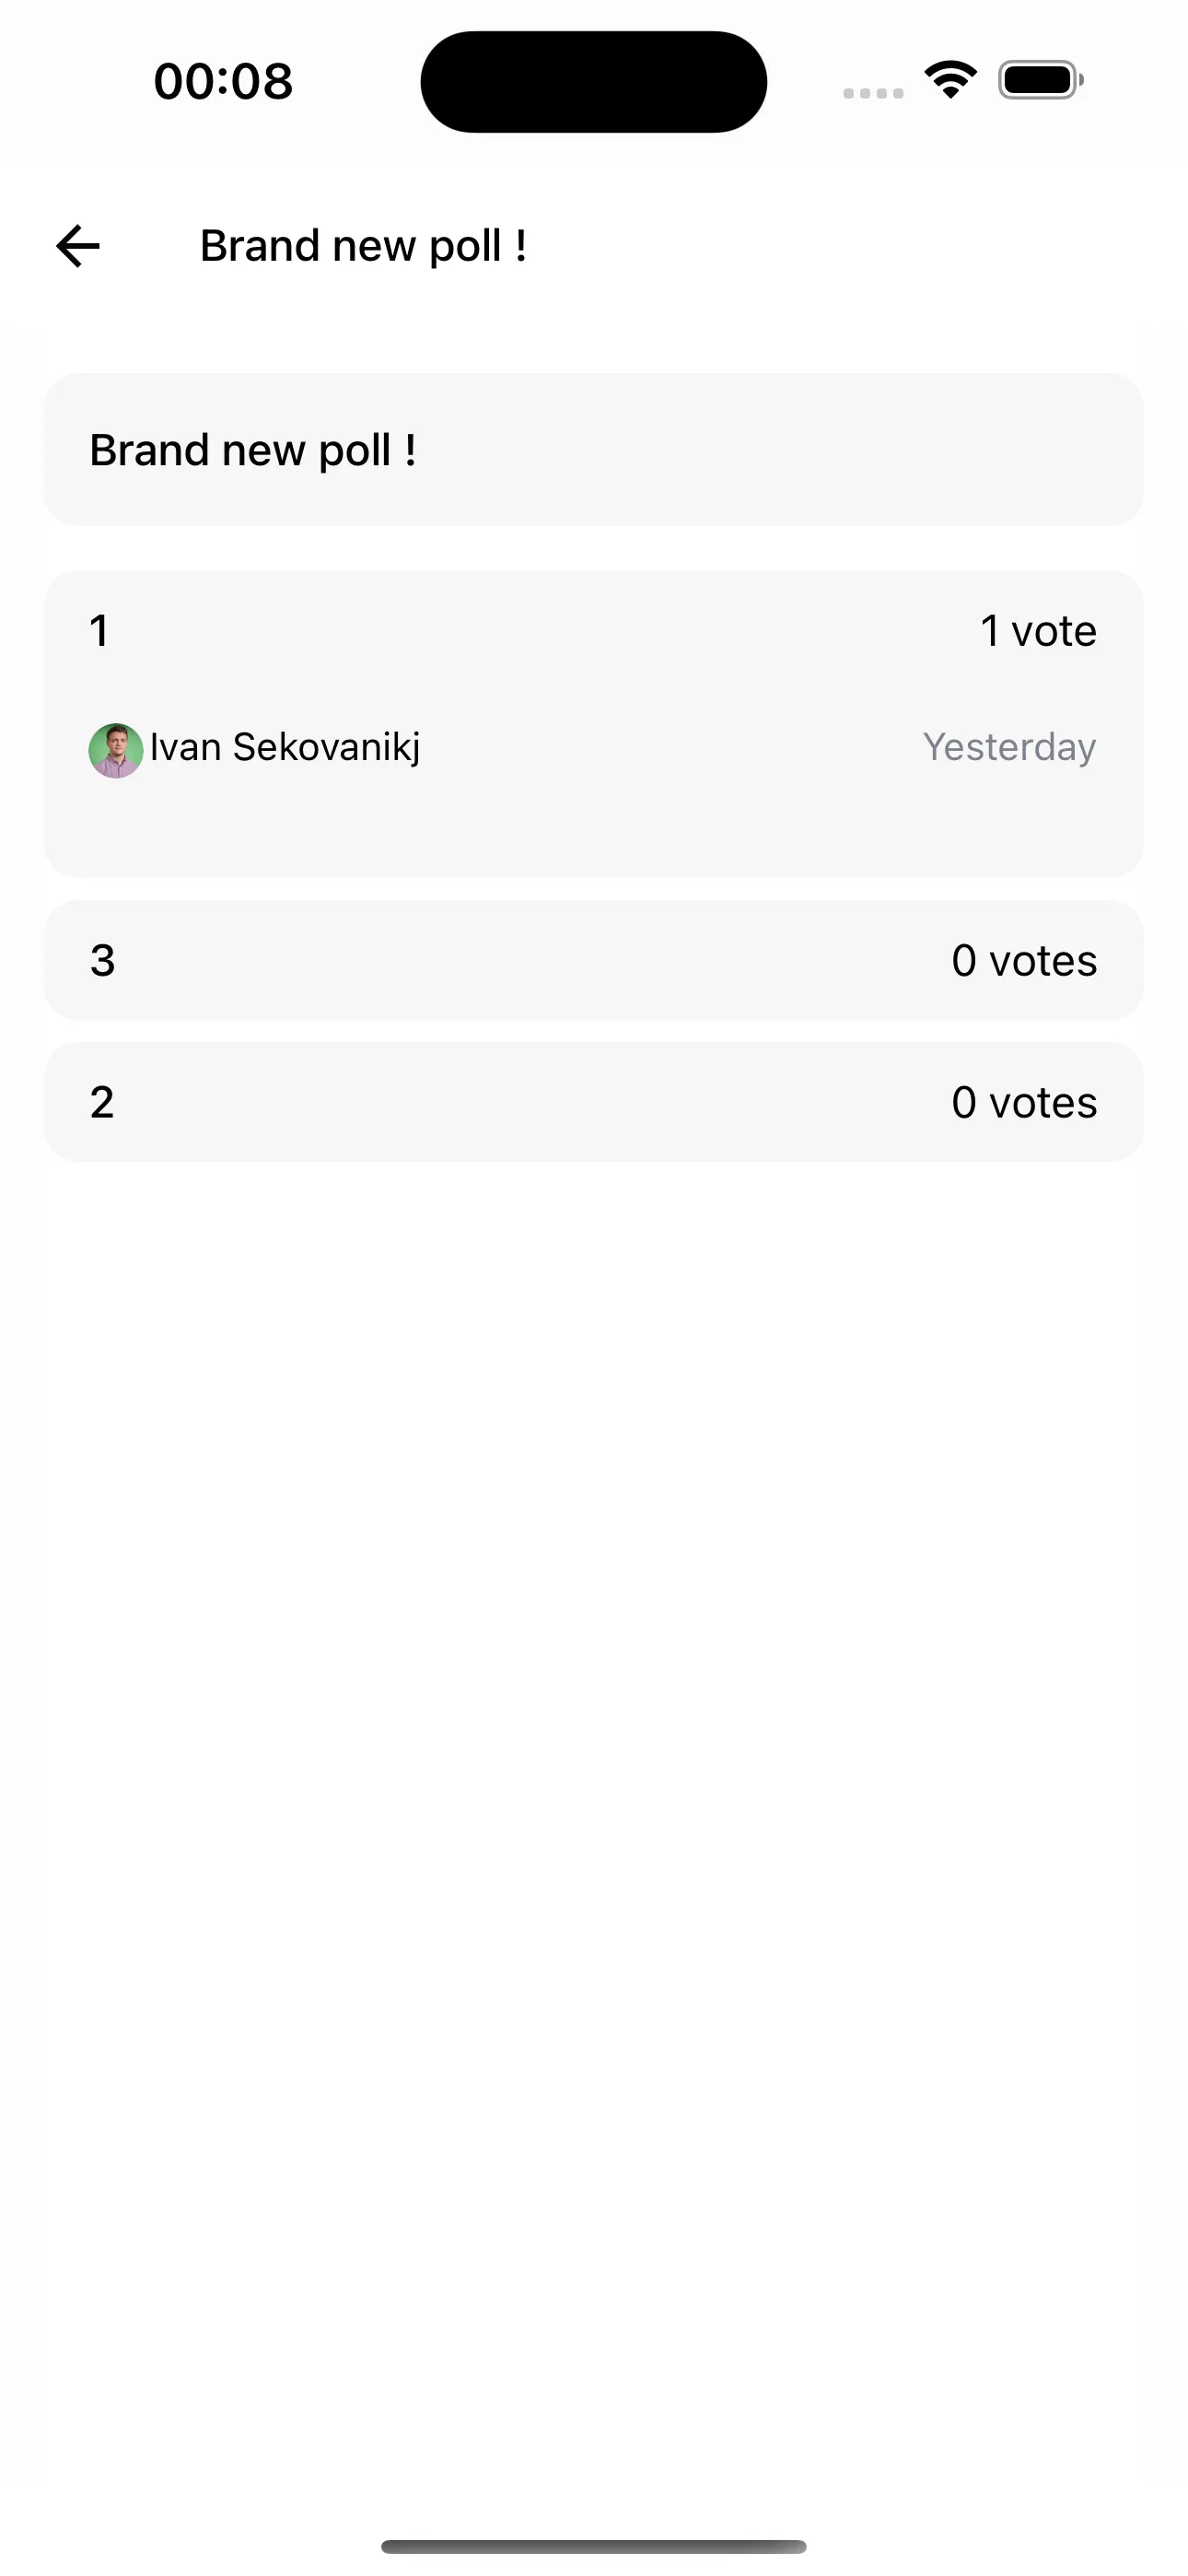
This works because PollResults is wrapped in PollContext, and the button callback provides the data needed to initialize the provider.
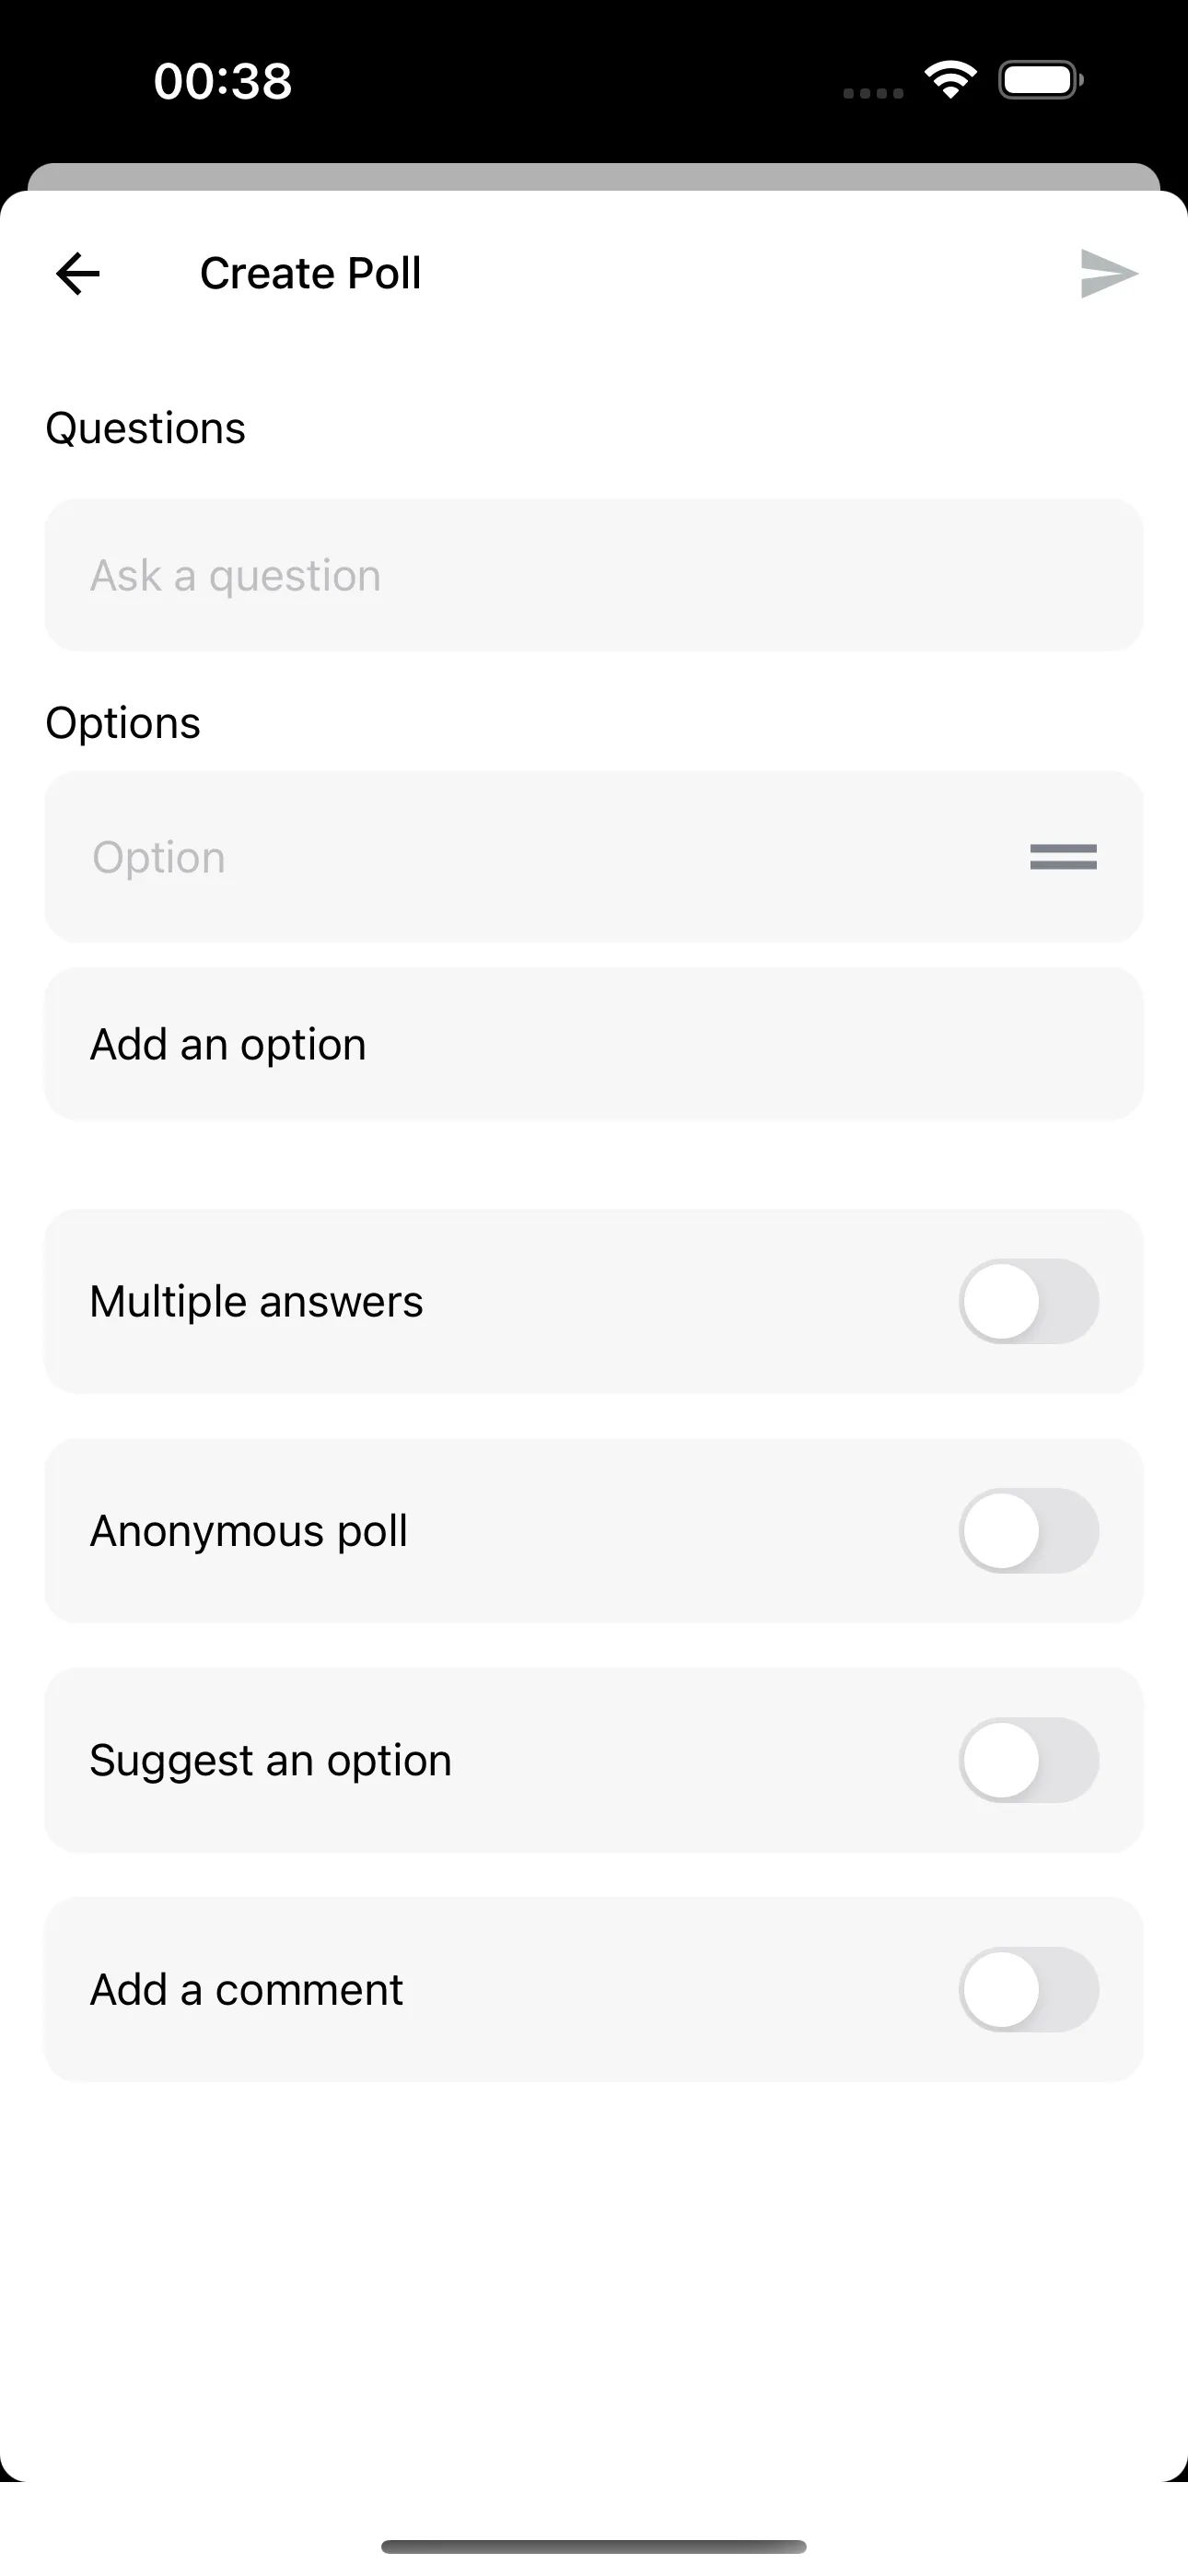
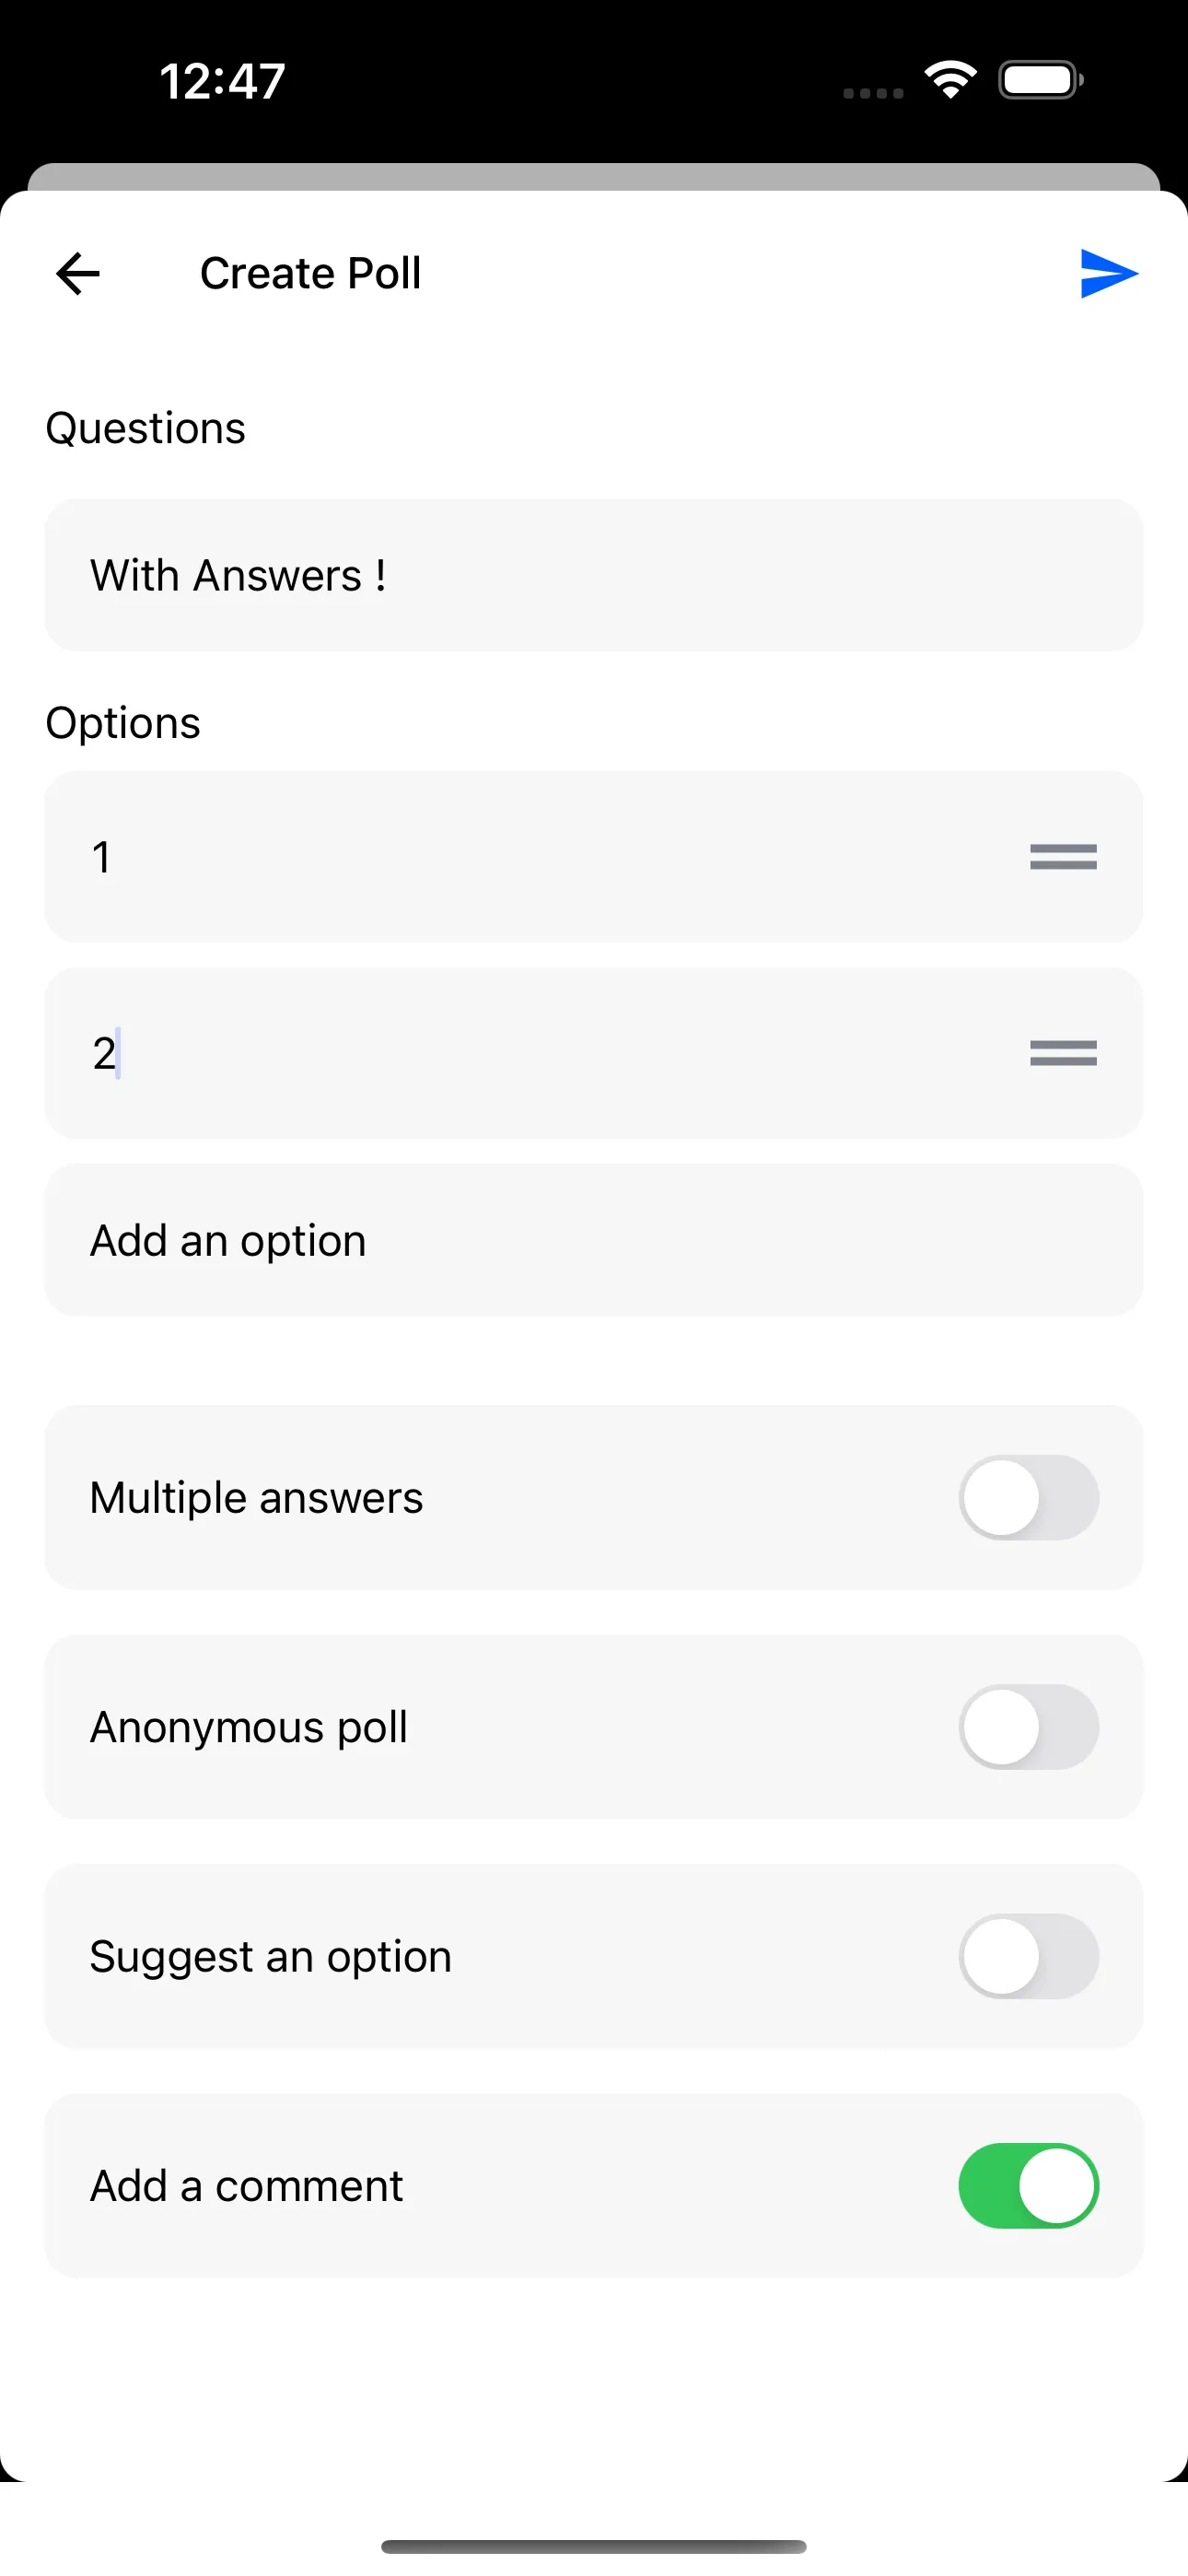
Do the same for poll creation for consistency.
import {
  // ...rest of the imports
  CreatePoll,
} from "stream-chat-react-native";
import { createStackNavigator } from "@react-navigation/stack";

// ... rest of the components

const MyCreatePollContent = ({
  route: {
    params: { sendMessage },
  },
}) => {
  const navigation = useNavigation();
  return (
    <SafeAreaView style={{ flex: 1 }}>
      <CreatePoll
        sendMessage={sendMessage}
        closePollCreationDialog={() => navigation.goBack()}
      />
    </SafeAreaView>
  );
};

const ChannelScreen = () => {
  const navigation = useNavigation();
  return (
    <OverlayProvider>
      <Chat client={client}>
        <Channel
          channel={channel}
          PollContent={MyPollContent}
          openPollCreationDialog={({ sendMessage }) =>
            navigation.navigate("CreatePollScreen", { sendMessage })
          }
        >
          <ChannelStack.Navigator initialRouteName={"ChannelMessageList"}>
            <ChannelStack.Screen
              name={"ChannelMessageList"}
              options={{ headerShown: false }}
              component={ChannelMessageList}
            />
            <ChannelStack.Screen
              name={"PollResultsScreen"}
              options={{ headerShown: false }}
              component={PollResultsScreen}
            />
            <ChannelStack.Group screenOptions={{ presentation: "modal" }}>
              <ChannelStack.Screen
                name={"CreatePollScreen"}
                options={{ headerShown: false }}
                component={MyCreatePollContent}
              />
            </ChannelStack.Group>
          </ChannelStack.Navigator>
        </Channel>
      </Chat>
    </OverlayProvider>
  );
};
Final UI:
Going forward with customizations, let's change the background color of our Polls. Since all Poll components are theme compatible, we can do this by overriding the default theme:
import {
  // ...rest of the imports
  ThemeProvider,
} from "stream-chat-react-native";
import { createStackNavigator } from "@react-navigation/stack";

// ... rest of the components

const myTheme: DeepPartial<Theme> = {
  poll: {
    message: {
      container: {
        backgroundColor: "pink",
      },
    },
  },
};

const ChannelScreen = () => {
  const navigation = useNavigation();
  return (
    <ThemeProvider style={myTheme}>
      <OverlayProvider>
        <Chat client={client}>
          <Channel
            channel={channel}
            PollContent={MyPollContent}
            openPollCreationDialog={({ sendMessage }) =>
              navigation.navigate("CreatePollScreen", { sendMessage })
            }
          >
            <ChannelStack.Navigator initialRouteName={"ChannelMessageList"}>
              <ChannelStack.Screen
                name={"ChannelMessageList"}
                options={{ headerShown: false }}
                component={ChannelMessageList}
              />
              <ChannelStack.Screen
                name={"PollResultsScreen"}
                options={{ headerShown: false }}
                component={PollResultsScreen}
              />
              <ChannelStack.Group screenOptions={{ presentation: "modal" }}>
                <ChannelStack.Screen
                  name={"CreatePollScreen"}
                  options={{ headerShown: false }}
                  component={MyCreatePollContent}
                />
              </ChannelStack.Group>
            </ChannelStack.Navigator>
          </Channel>
        </Chat>
      </OverlayProvider>
    </ThemeProvider>
  );
};
which gives us a changed Poll background:
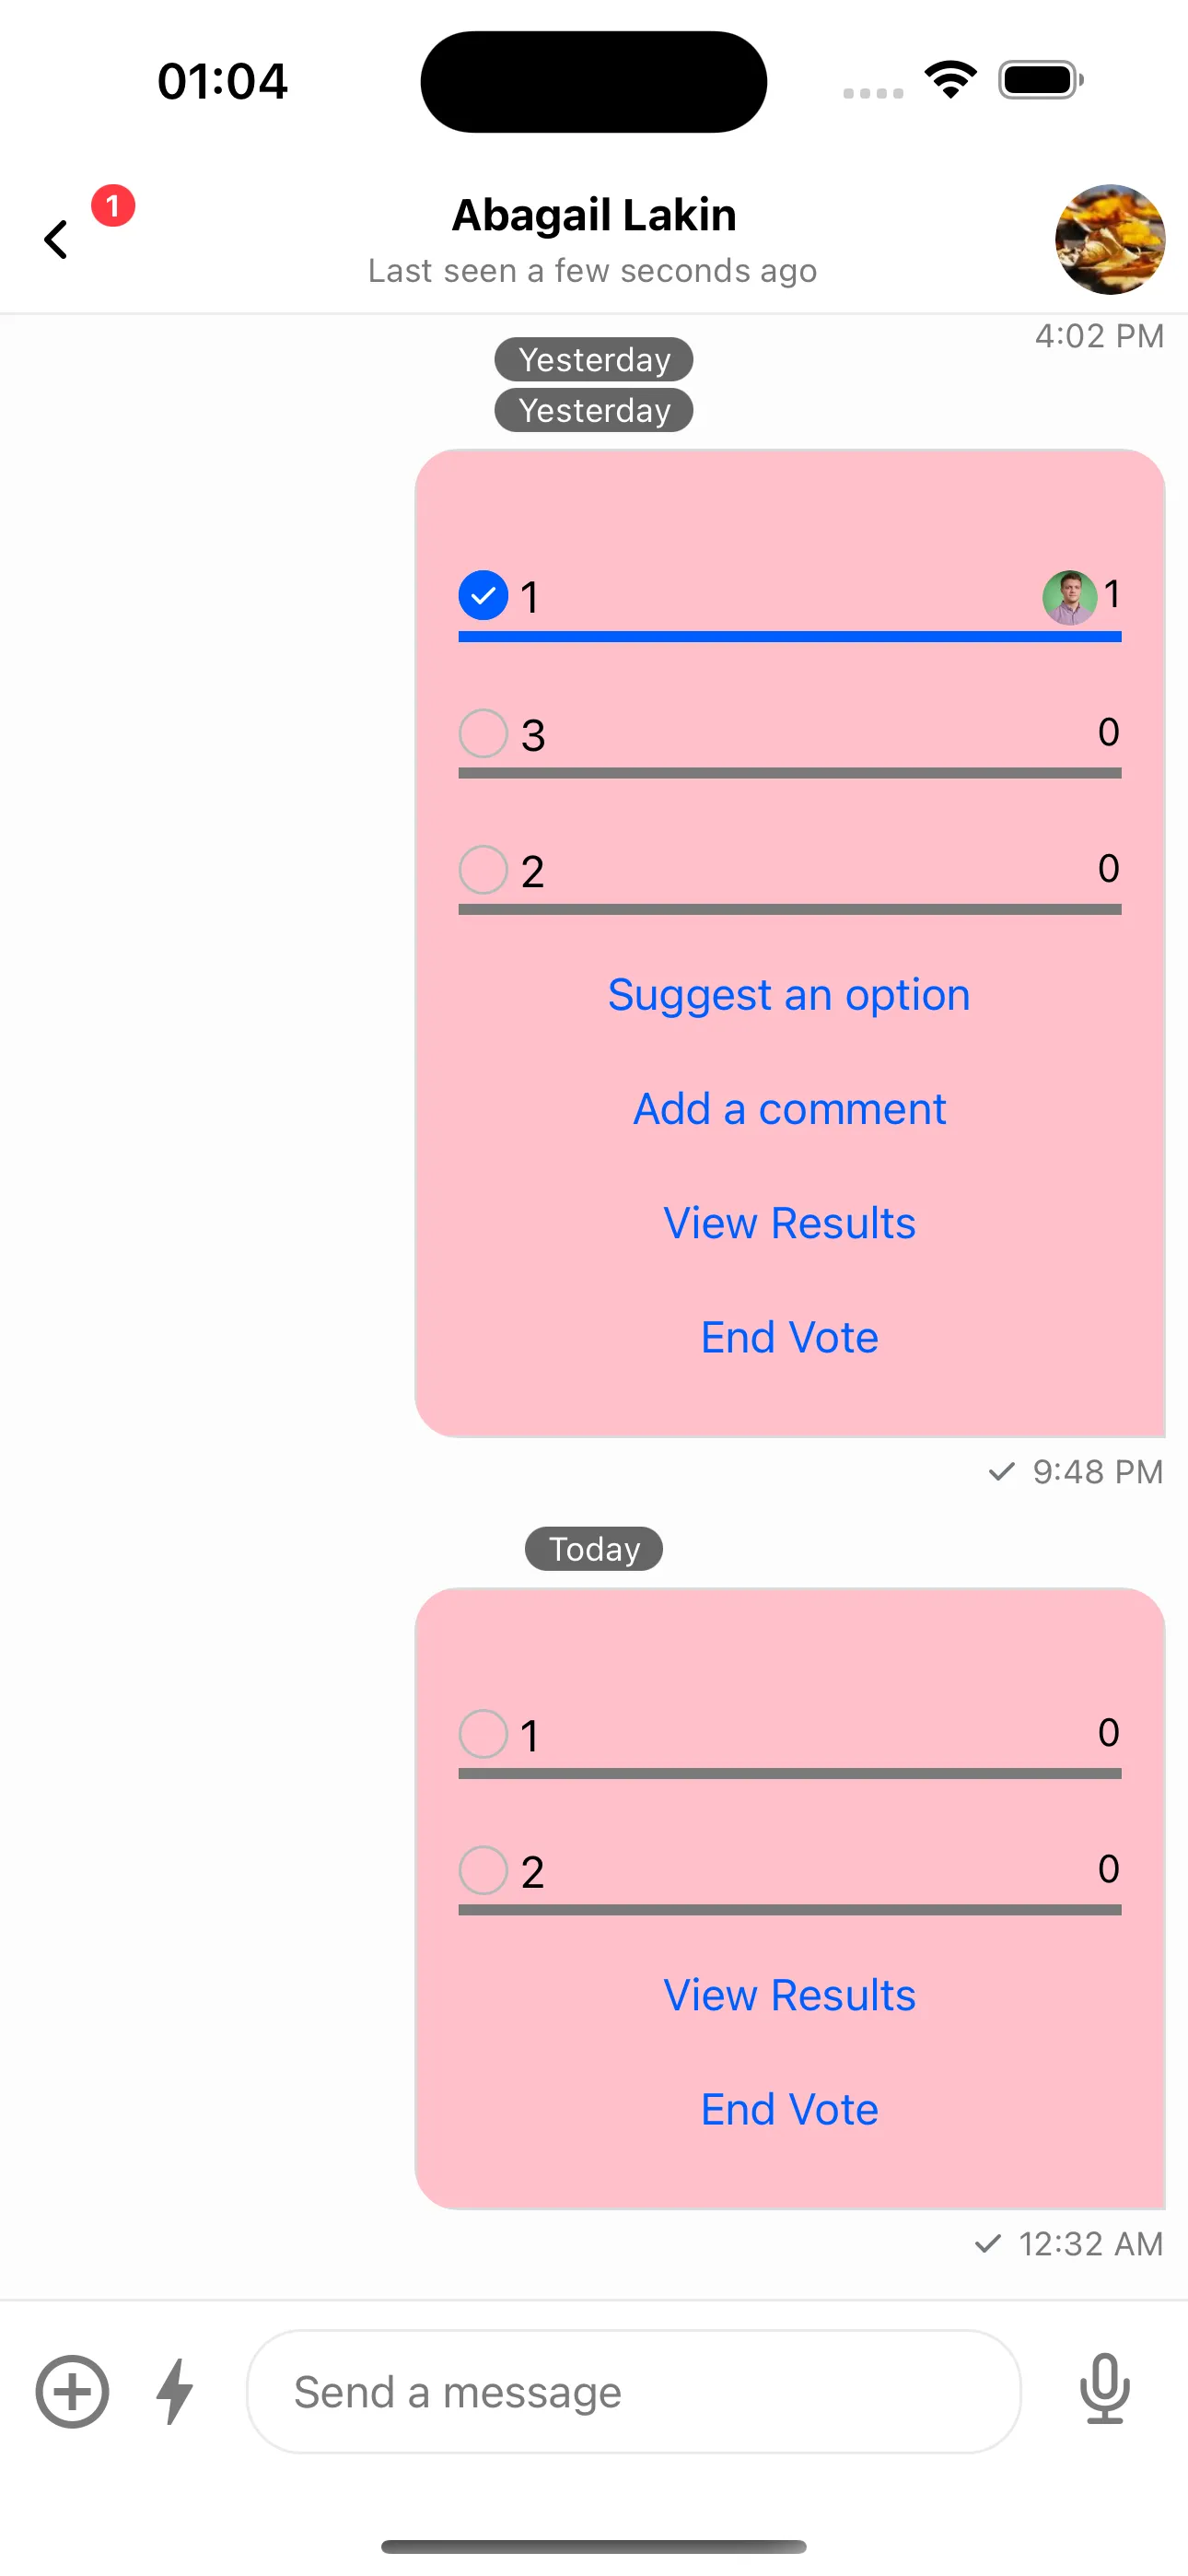
Make sure that the theme is set above your OverlayProvider to make sure that the Poll customizations are also reflected on the message preview whenever it's long pressed.
Finally, if you want a custom PollAnswersList (the default UI doesn't fit), you can replace it.
First, add ShowAllCommentsButton and AddCommentButton to your custom buttons UI:
import {
// ...rest of the imports
ShowAllCommentsButton,
AddCommentButton
} from 'stream-chat-react-native';
import { createStackNavigator } from '@react-navigation/stack';
// ... rest of the components
const MyPollButtons = () => {
return (
<>
<ShowAllOptionsButton />
<ShowAllCommentsButton />
<AddCommentButton />
<ViewResultsButton
onPress={({ message, poll }) =>
navigation.navigate('PollResultsScreen', {
message,
poll,
});
}
/>
<EndVoteButton />
</>
)
}
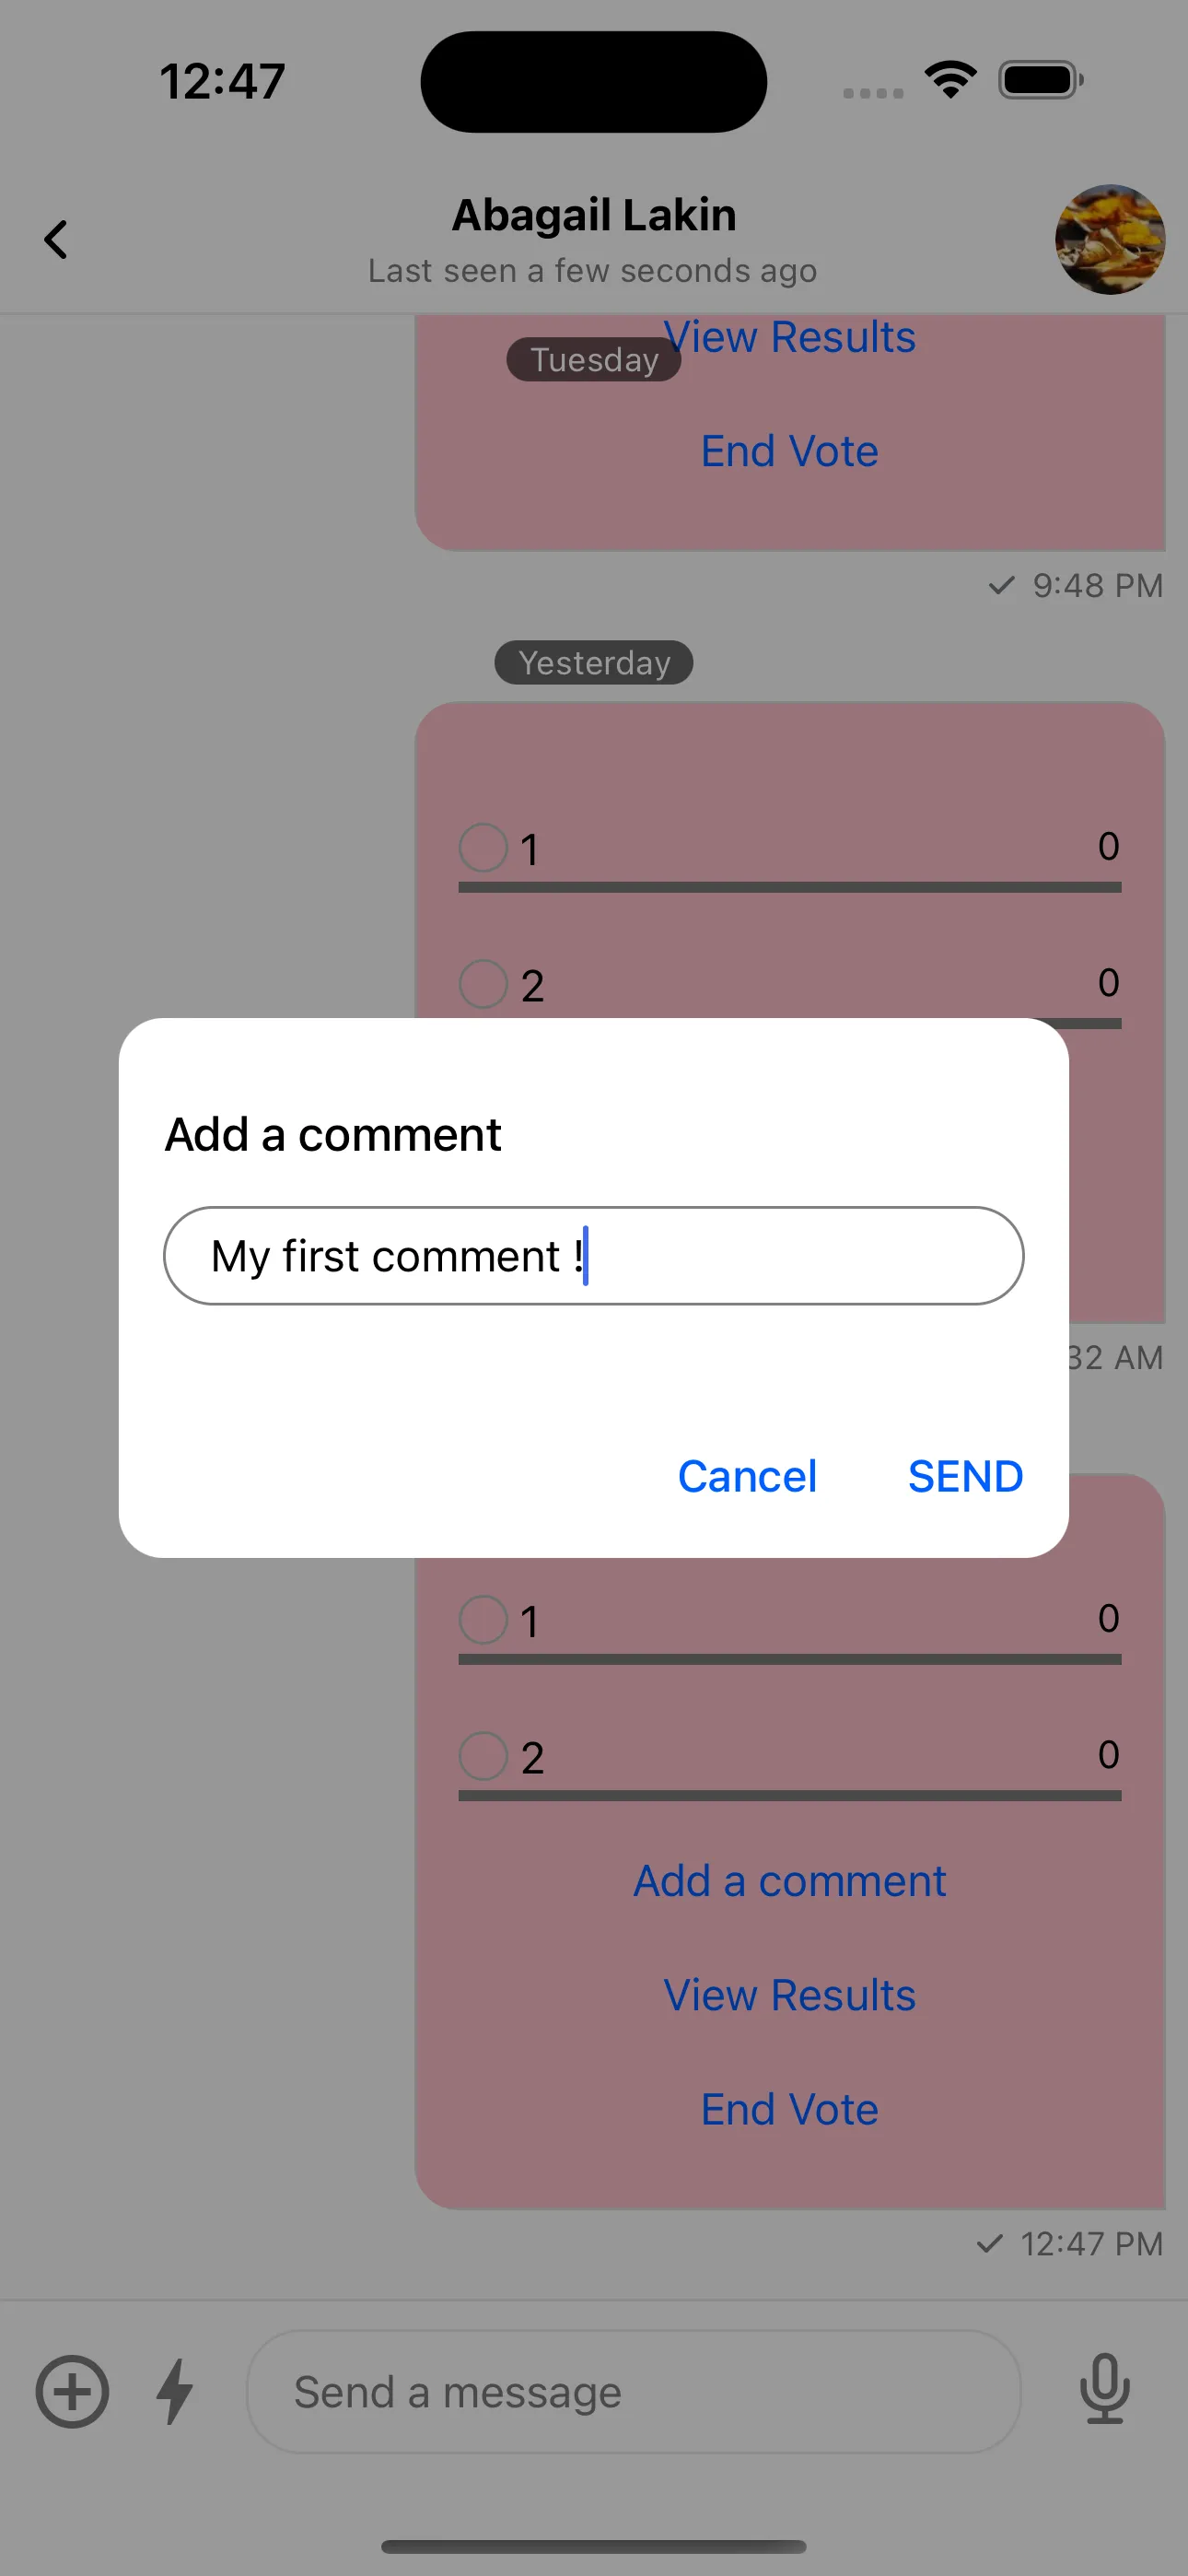
// ... the ChannelScreen componentTo create comments, enable answers/comments when creating the poll, then use the Add Comment button:
As with other screens, add a dedicated navigation screen for AnswersList. For now, use the default UI:
import {
// ...rest of the imports
PollAnswersList,
} from 'stream-chat-react-native';
import { createStackNavigator } from '@react-navigation/stack';
// ... rest of the components
const MyPollButtons = () => {
return (
<>
<ShowAllOptionsButton />
<ShowAllCommentsButton
onPress={({ message, poll }) => {
navigation.navigate('PollAnswersScreen', {
message,
poll,
});
}}
/>
<AddCommentButton />
<ViewResultsButton
onPress={({ message, poll }) =>
navigation.navigate('PollResultsScreen', {
message,
poll,
});
}
/>
<EndVoteButton />
</>
)
}
const PollAnswersScreen = ({
route: {
params: { message, poll },
},
}) => {
const navigation = useNavigation();
return (
<SafeAreaView style={{ flex: 1 }}>
<PollModalHeader title={'All Poll Answers'} onPress={() => navigation.goBack()} />
<PollAnswersList message={message} poll={poll} />
</SafeAreaView>
);
};
const ChannelScreen = () => {
const navigation = useNavigation();
return (
<ThemeProvider style={myTheme}>
<OverlayProvider>
<Chat client={client}>
<Channel
channel={channel}
PollContent={MyPollContent}
openPollCreationDialog={({ sendMessage }) => navigation.navigate('CreatePollScreen', { sendMessage })}
>
<ChannelStack.Navigator initialRouteName={'ChannelMessageList'}>
<ChannelStack.Screen
name={'ChannelMessageList'}
options={{ headerShown: false }}
component={ChannelMessageList}
/>
<ChannelStack.Screen
name={'PollResultsScreen'}
options={{ headerShown: false }}
component={PollResultsScreen}
/>
<ChannelStack.Screen
name={'PollAnswersScreen'}
options={{ headerShown: false }}
component={PollAnswersScreen}
/>
<ChannelStack.Group screenOptions={{ presentation: 'modal' }}>
<ChannelStack.Screen
name={'CreatePollScreen'}
options={{ headerShown: false }}
component={MyCreatePollContent}
/>
</ChannelStack.Group>
</ChannelStack.Navigator>
</Channel>
</Chat>
</OverlayProvider>
</ThemeProvider>
);
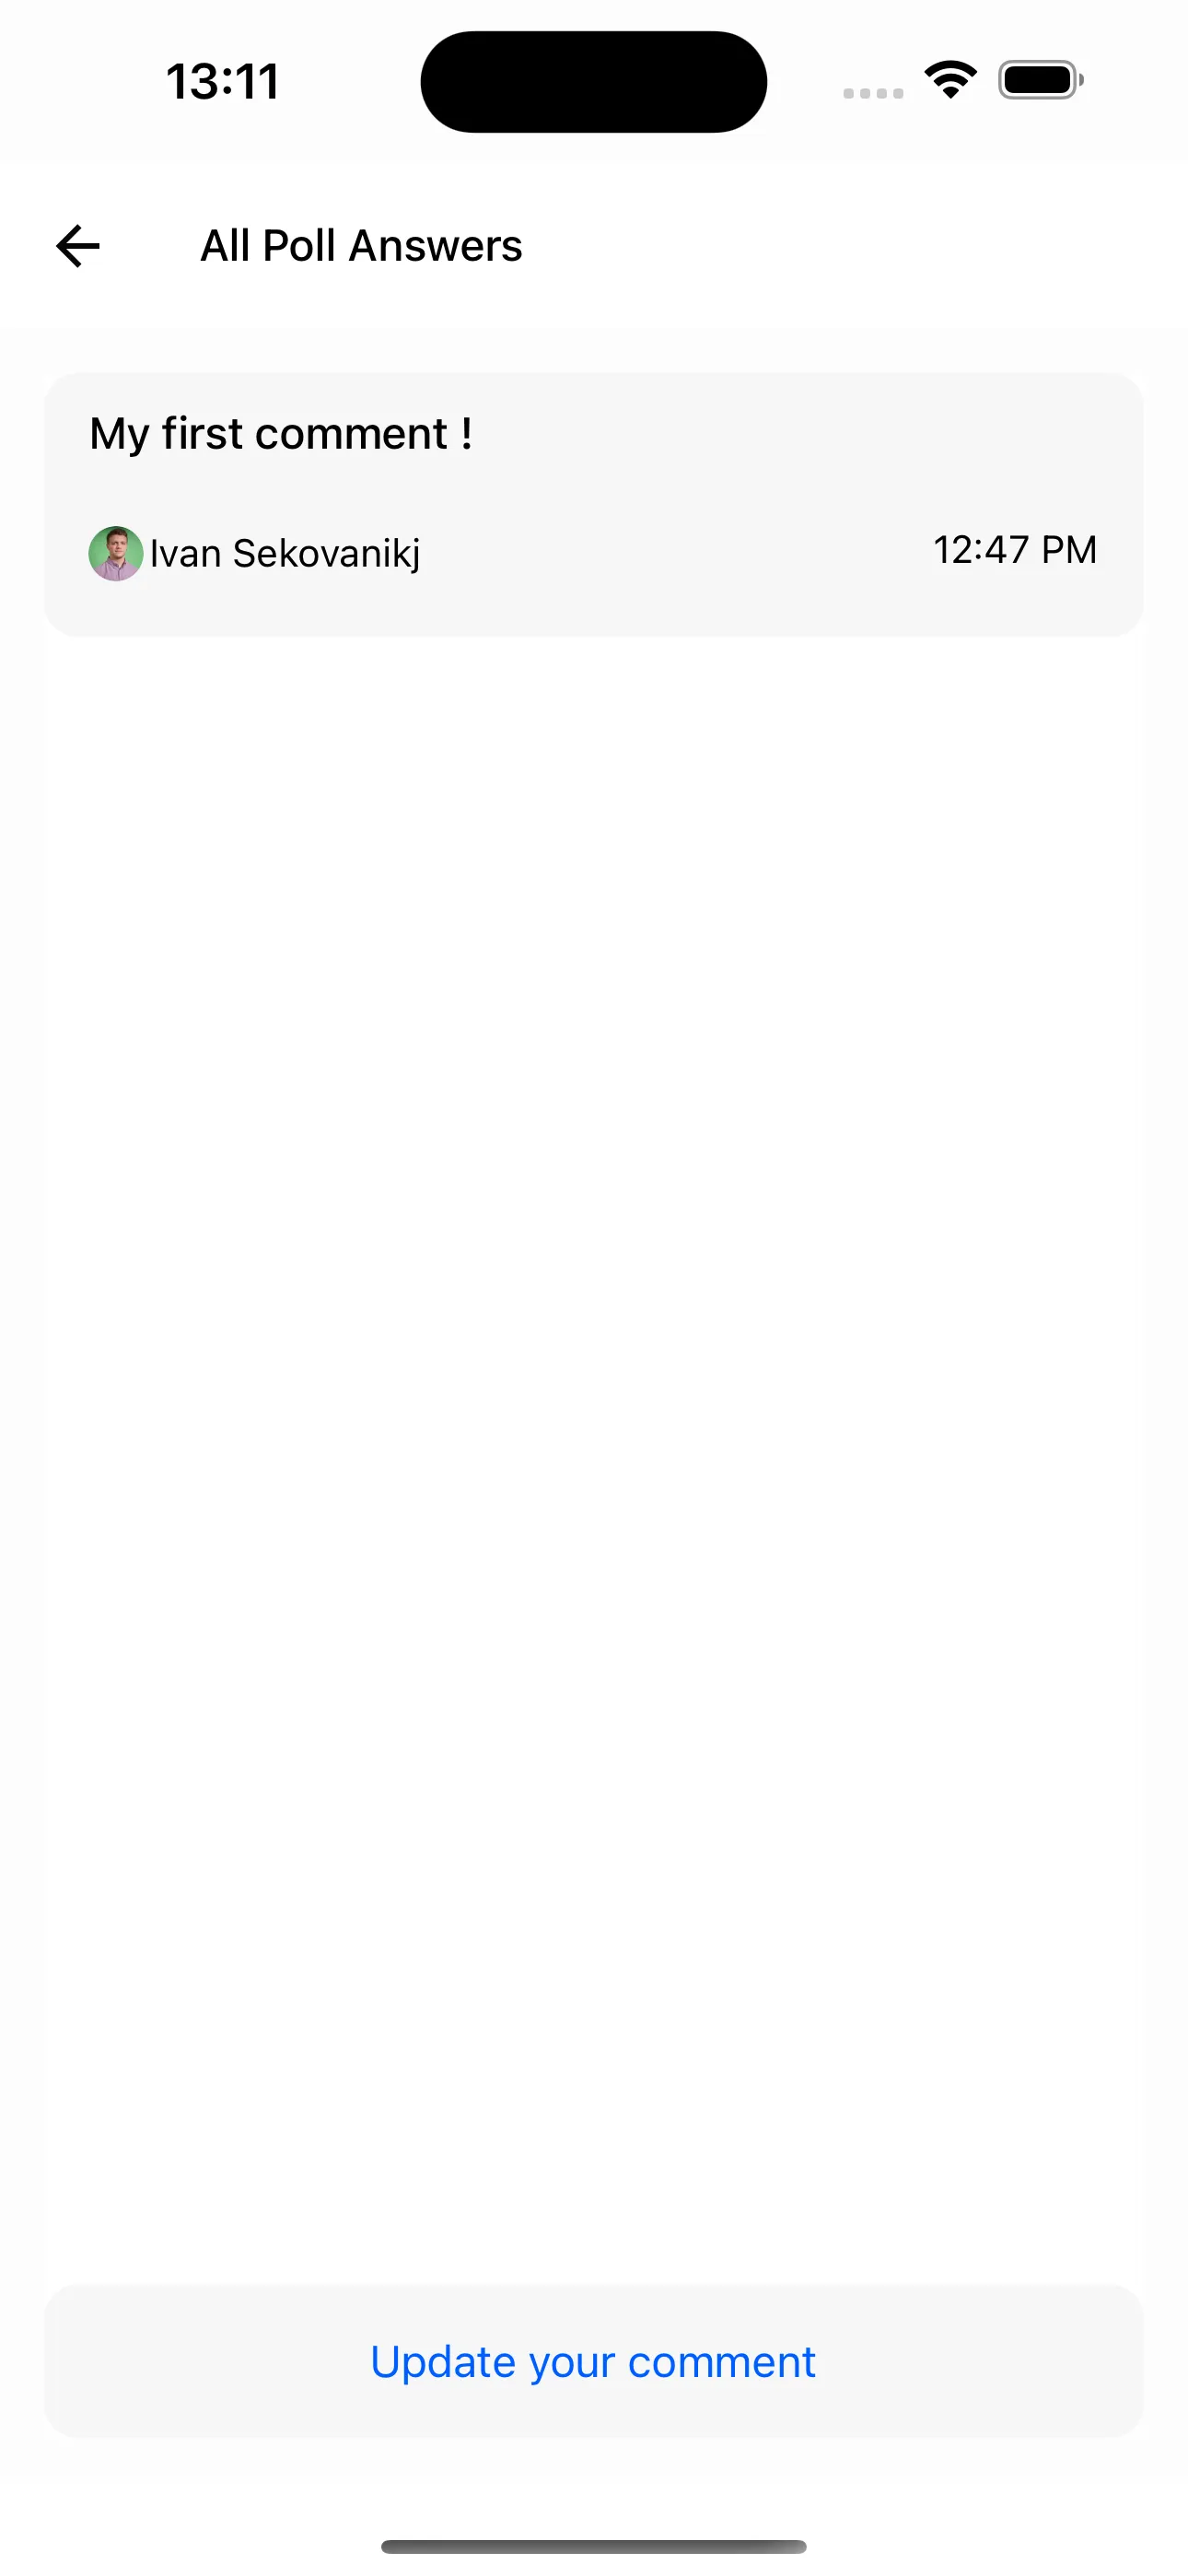
};which will give allow us to navigate to the default PollAnswersList UI:
Now, let's finally customize the UI. To achieve this we can override the PollAnswersListContent of our PollAnswersList.
Since the list of answers can be very large and we want to be able to still display all answers, we will use the usePollAnswersPagination hook to get them:
import {
  // ...rest of the imports
  usePollAnswersPagination,
} from "stream-chat-react-native";
import { createStackNavigator } from "@react-navigation/stack";

// ... rest of the components

const LoadingIndicator = () => {
  /* some LoadingIndicator logic here */
};

const MyItem = ({ item }) => {
  const { answer_text, user } = item;
  return (
    <Text>
      {user.name} commented: {answer_text}
    </Text>
  );
};

const MyPollAnswersContent = () => {
  const { pollAnswers, loading, loadMore } = usePollAnswersPagination();
  return (
    <FlatList
      contentContainerStyle={{ flex: 1, padding: 16 }}
      data={pollAnswers}
      renderItem={MyItem}
      onEndReached={loadMore}
      ListFooterComponent={loading ? <LoadingIndicator /> : null}
    />
  );
};

const PollAnswersScreen = ({
  route: {
    params: { message, poll },
  },
}) => {
  const navigation = useNavigation();
  return (
    <SafeAreaView style={{ flex: 1 }}>
      <PollModalHeader
        title={"All Poll Answers"}
        onPress={() => navigation.goBack()}
      />
      <PollAnswersList
        message={message}
        poll={poll}
        PollAnswersListContent={MyPollAnswersContent}
      />
    </SafeAreaView>
  );
};

// ... the Channel screen
And we get the final content:
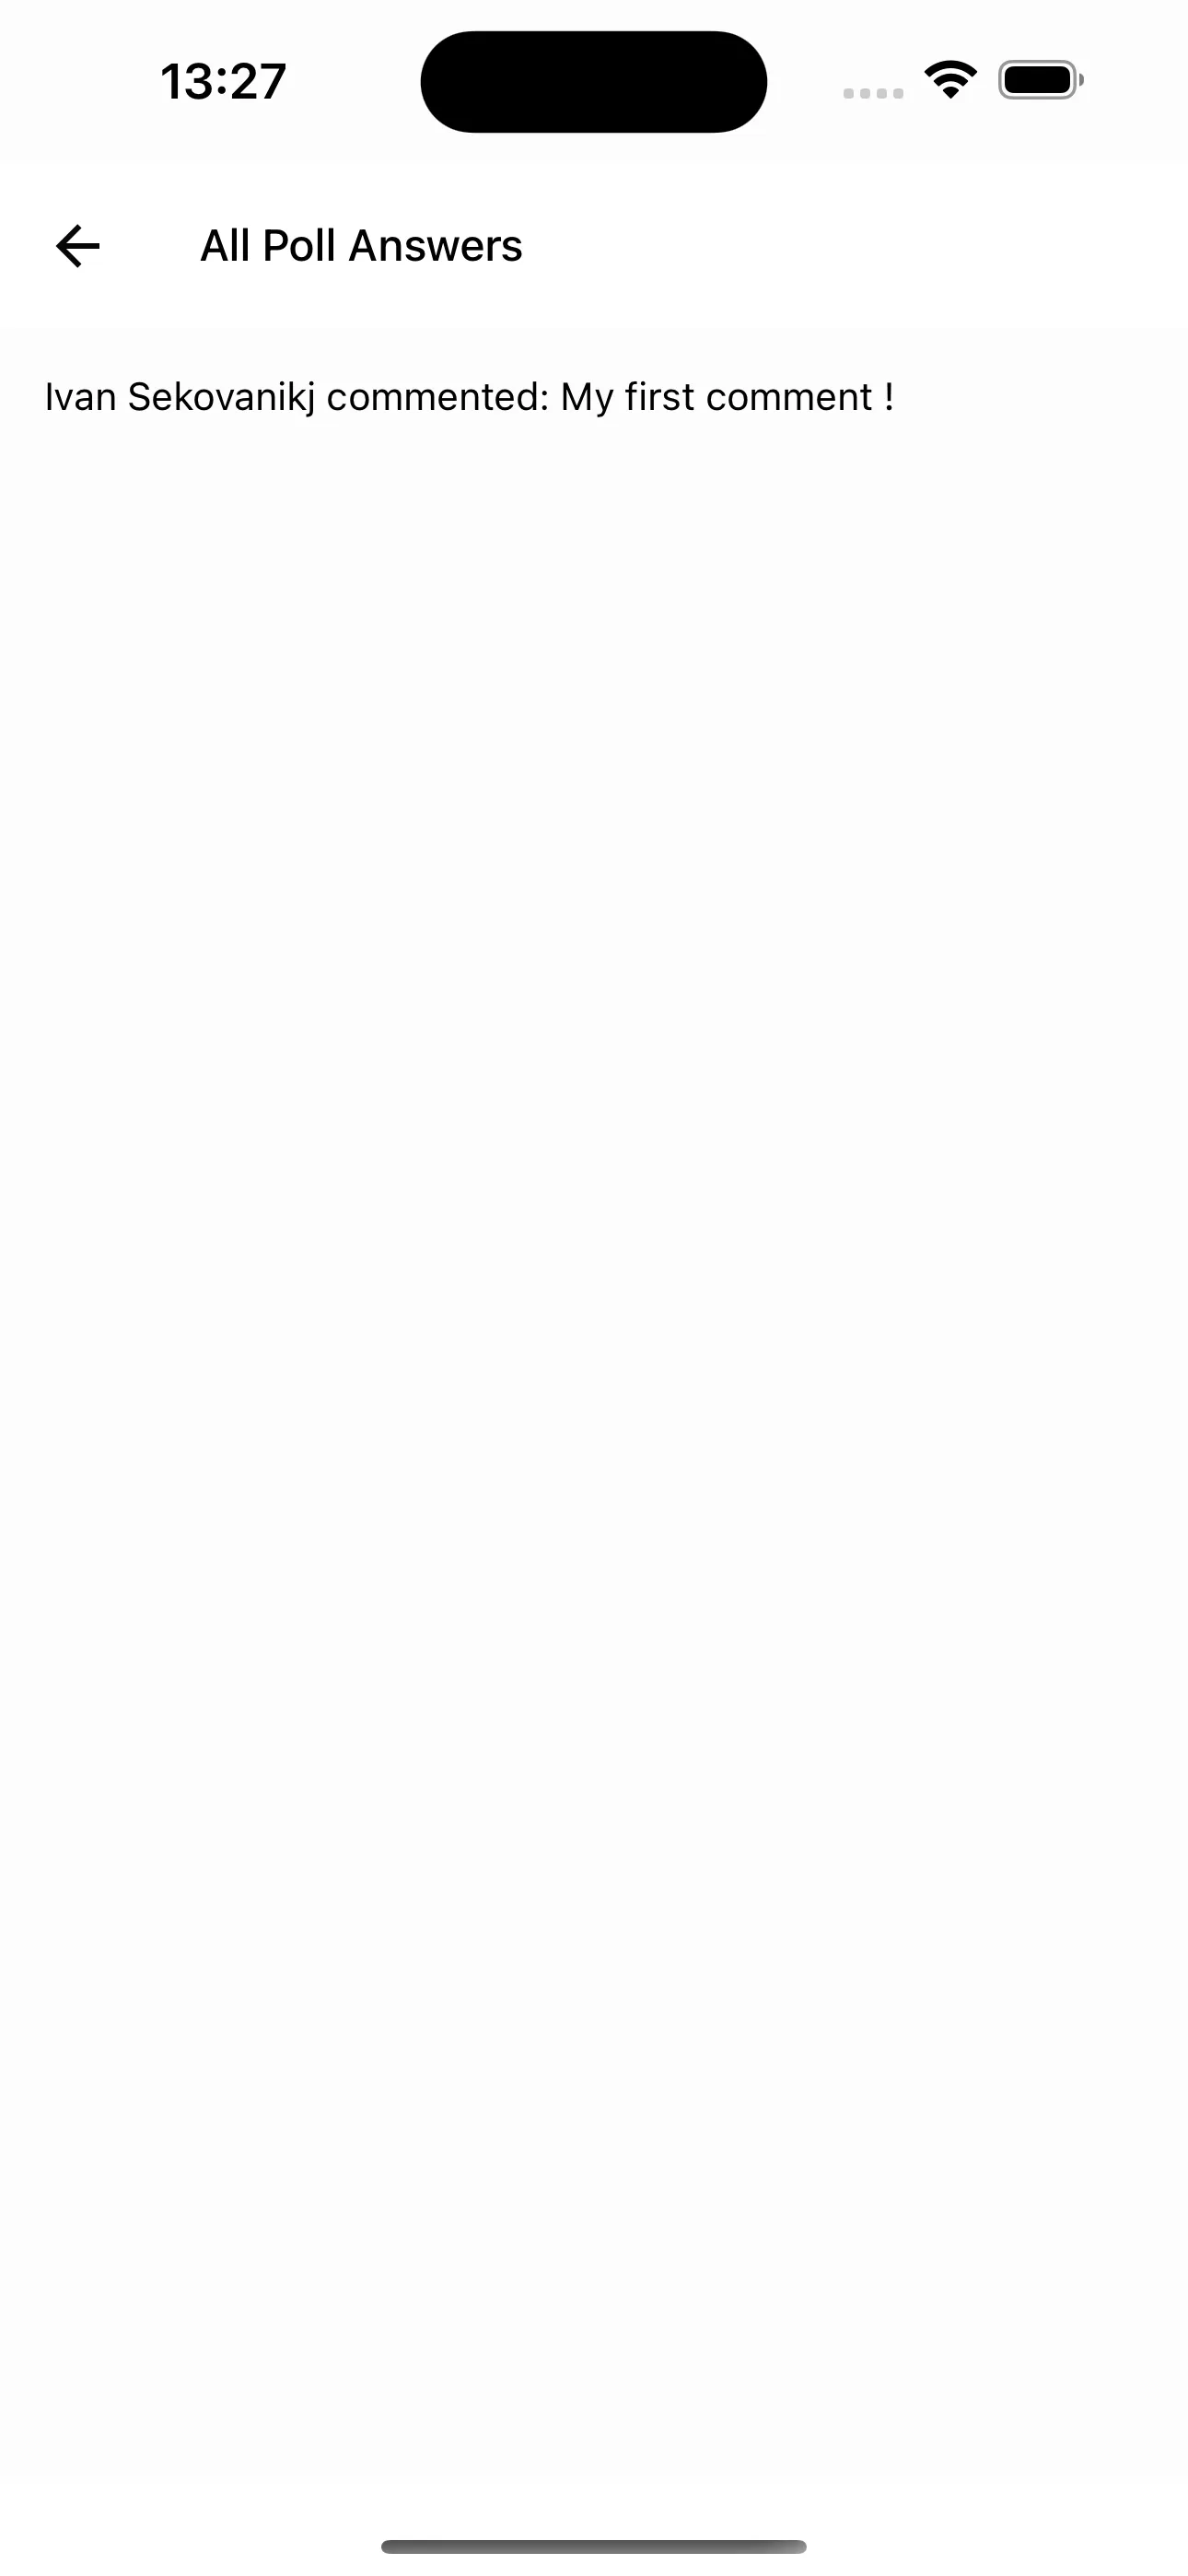
The list will be fully compatible with loading the pagination when scrolling to the bottom and displaying a loading indicator whenever that happens as well.
With that, we have finished the customizations we wanted to do for our polls.
As a last note; any components that you'd like to reuse from the default UI are free to be imported from within the SDK.
An extensive list of these includes:
- All buttons mentioned here
CreatePollContentPollContentPollButtonsPollHeaderPollModalHeaderPollInputDialogCreatePollIconPollOptionPollResultsContentPollResultsItemPollVotePollAllOptionsContent