yarn global add react-native-cliInitial Setup
This documentation is legacy. For the current docs, see the guide in the React Native UI Components Docs.
To try out push notifications on an actual device, you can use React Native to quickly build an app that just receives notifications.
This tutorial is not supported in Expo applications. We need access to the native code to get the device tokens required to send push notifications for Stream Chat. If you are hoping to integrate this into an existing Expo application, you will need to eject.
Shortcut
If you don’t want to jump through all the hoops described in the following sections, we have a mostly preconfigured repository with everything described in this doc on GitHub. Just follow the instructions in the README to get started.
Before getting down to business with React Native, a few things need to be setup first:
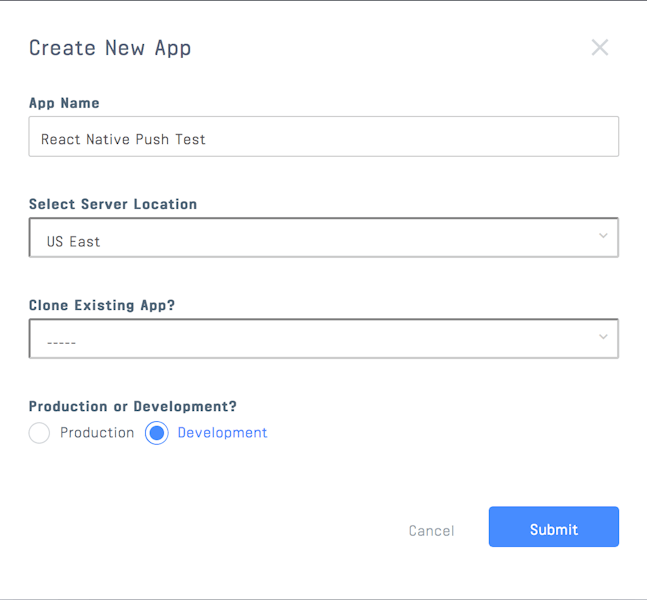
Step 1 - Create a Development App
Make sure you’ve created a development app within the dashboard.
Step 2 - Disable Auth
To make things easier, we are going to disable auth so that we can easily test push messages. Please note that this only suitable for test/dev environments.
From your app’s dashboard, navigate to the Chat tab and then scroll down to Chat Events. Make sure the Disable Auth Checks toggle is On and click on Save.

Step 3 - XCode Setup
Install XCode and the Command Line Tools. More info on that here.
Step 4 - Create the Test Project
Install dependencies and initialize your test project (for this tutorial we’ll use the name chat-push-example )
If you are adding this to an existing React Native project created with Expo or CRNA, you will need to eject. Please note that this ejecting is irreversible ; however, it is required to access native iOS and Android capabilities.
react-native init chat-push-examplecd chat-push-example
yarn add stream-chat react-native-push-notification