
Creating a project
The completed app for each step of the tutorial is available on GitHub.
To get started with the iOS Chat SDK, open Xcode and create a new project. In this tutorial we are going to create a chat app using UIKit. If you prefer using SwiftUI make sure to look at our SwiftUI tutorial.
- Create a new Xcode project in Xcode (14 or later)
- Choose iOS from the list of platforms
- Choose the App template
- Use "ChatDemo" for the product name
- Select Storyboard in the Interface options
- Make sure Swift is selected as the language option and press "Next" button.
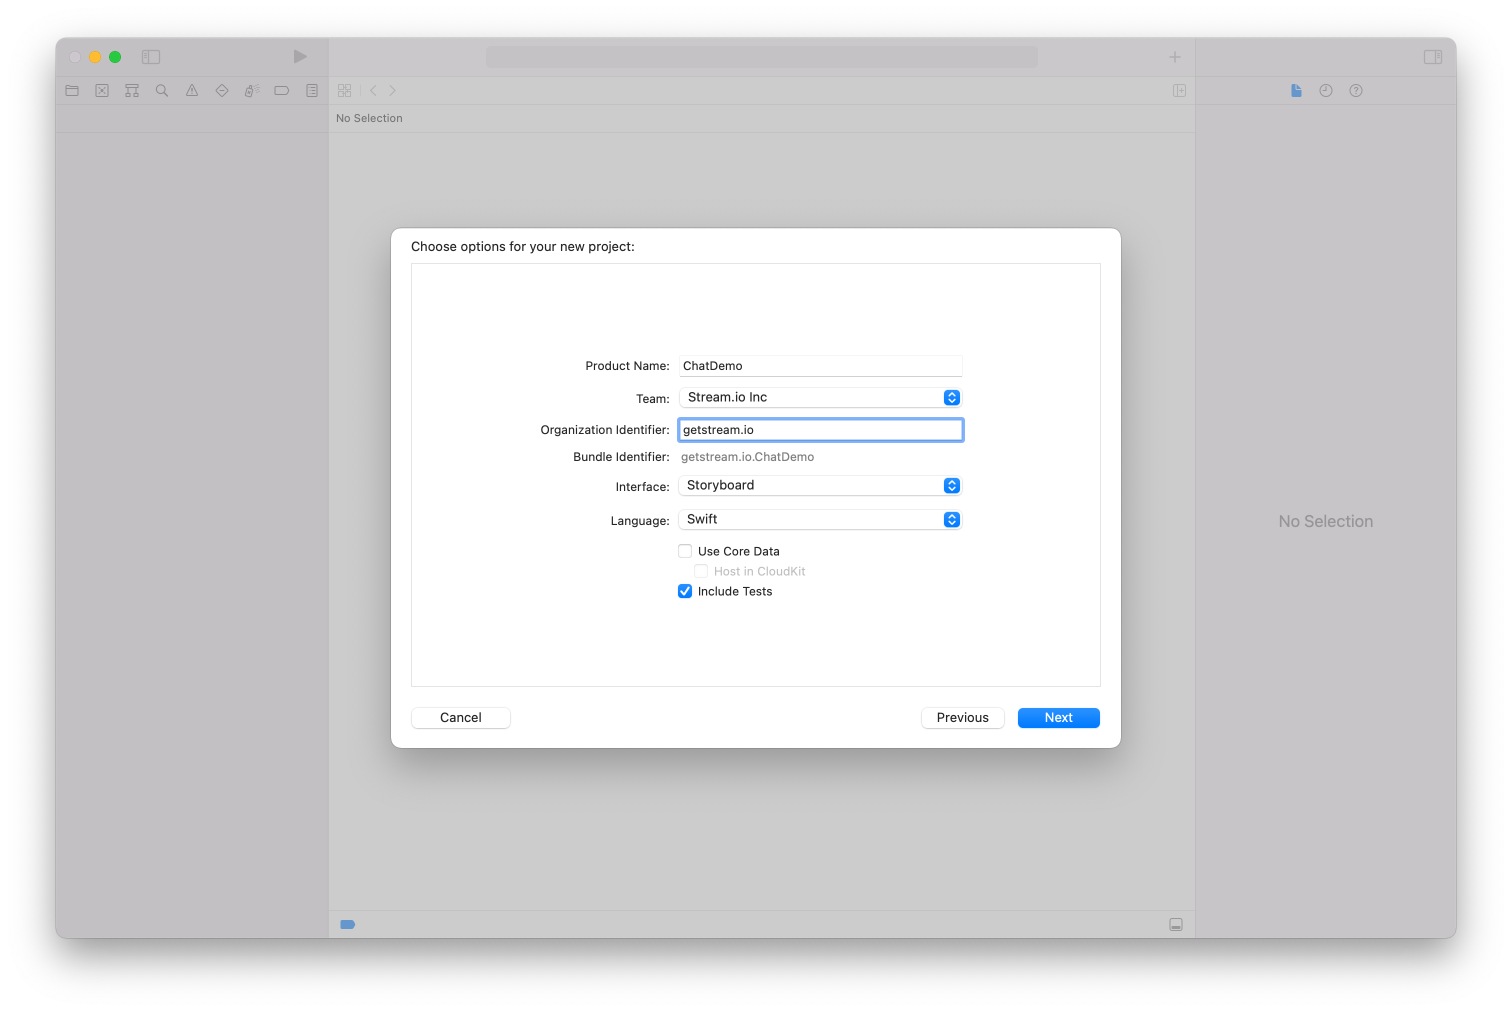
- Select where you want to store your new project and press "Create" button. Your are now ready to start with the tutorial.
In this tutorial we are going to use Swift Package Manager as the dependency manager. The SDK can also be installed with CocoaPods, you can find more information about that on the SDK doc pages.
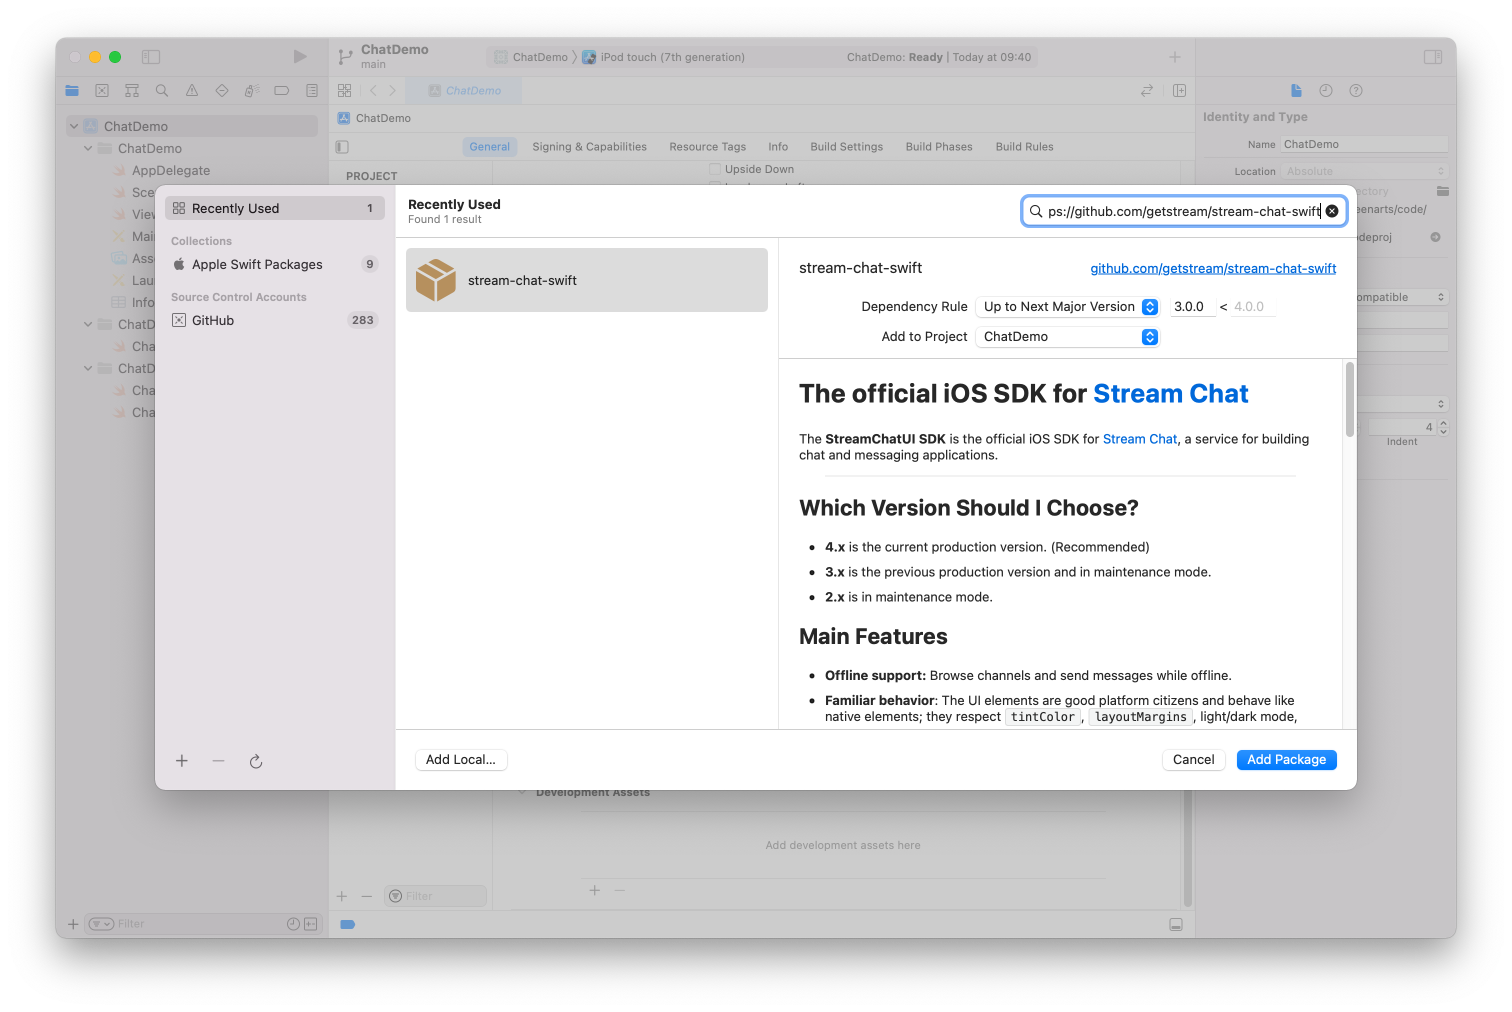
- Go to File > Add Packages...
- Paste the following URL in the search field at the top right: https://github.com/getstream/stream-chat-swift
- Under Dependency Rule go with the "Up to Next Major Version" option and enter
4.0.0as the version - Click the Add Package button
- Add both
StreamChatandStreamChatUIpackages to the project
Displaying a List of Channels
Stream provides a low-level client, offline support, and convenient UI components to help you quickly build your messaging interface. In this section, we'll be using the UI components to quickly display a channel list. The first thing which we will do is to create a globally accessible shared instance of the Stream Chat Client and initialize its connection when the app starts. Next, we will fetch the channels which our user participates in and display it.
First, open the AppDelegate.swift file and add this extension to ChatClient at the top of the file:
12345import StreamChat

extension ChatClient {
    static var shared: ChatClient!
}
Next, open ViewController.swift and change its content to this:
12345import StreamChat
import StreamChatUI
import UIKit

class DemoChannelList: ChatChannelListVC {}
Next, open up SceneDelegate.swift add import StreamChat at the top of the file and change the scene(_ scene: UIScene, willConnectTo session: UISceneSession, options connectionOptions: UIScene.ConnectionOptions) method to the following:
123456789101112131415161718192021222324252627282930313233func scene(
    _ scene: UIScene,
    willConnectTo session: UISceneSession,
    options connectionOptions: UIScene.ConnectionOptions
) {
    let config = ChatClientConfig(apiKey: .init("uun7ywwamhs9"))

    /// user id and token for the user
    let userId = "tutorial-droid"
    let token: Token =
        "eyJhbGciOiJIUzI1NiIsInR5cCI6IkpXVCJ9.eyJ1c2VyX2lkIjoidHV0b3JpYWwtZHJvaWQifQ.WwfBzU1GZr0brt_fXnqKdKhz3oj0rbDUm2DqJO_SS5U"

    /// Step 1: create an instance of ChatClient and share it using the singleton
    ChatClient.shared = ChatClient(config: config)

    /// Step 2: connect to chat
    ChatClient.shared.connectUser(
        userInfo: UserInfo(
            id: userId,
            name: "Tutorial Droid",
            imageURL: URL(string: "https://bit.ly/2TIt8NR")
        ),
        token: token
    )

    /// Step 3: create the ChannelList view controller
    let channelList = DemoChannelList()
    let query = ChannelListQuery(filter: .containMembers(userIds: [userId]))
    channelList.controller = ChatClient.shared.channelListController(query: query)

    /// Step 4: similar to embedding with a navigation controller using Storyboard
    window?.rootViewController = UINavigationController(rootViewController: channelList)
}
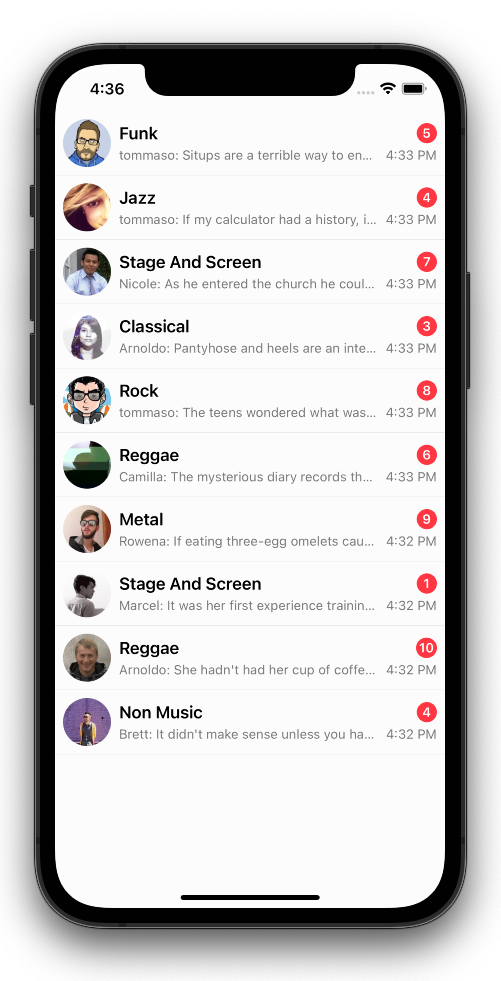
Run the application and you will be able to see a built-in list of channels for the tutorial user, open channels from the list as well and try all built-in chat features.
Let's have a quick look at the different steps in source code shown above:
- We initialize the shared
ChatClientusing an API key. This API key points to a tutorial environment, but you can sign up for a free Chat trial to get your own later. - We create and connect the user using
ChatClient.connectUsermethod and use a pre-generated user token, in order to authenticate the user. In a real-world application, your authentication backend would generate such a token at login / signup and hand it over to the mobile app. For more information, see the Tokens & Authentication page. - We use the
DemoChannelListcomponent and initialize thechannelListControllercontroller with aChannelListQuery. We’re using the default sort option which orders the channels bylast_updated_attime, putting the most recently used channels on the top. For the filter, we’re specifying all channels of typemessagingwhere the current user is a member. The documentation about Querying Channels covers this in more detail. - We set the
channelListas the root of a newUINavigationControllerand make it the root of ourwindow
Project Permissions
Before we launch the app, let's add permissions to our app so that we can access the camera and gallery. Our message input UI component supports this by default.
- Select your project from the Project navigator on the left
- Open the Info tab for the ChatDemo target
- Add a new entry with "Privacy - Camera Usage Description" as key and "ChatDemo camera use" as value
- Add a new entry with "Privacy - Photo Library Usage Description" as key and "ChatDemo photo use" as value
Chat Features
Congrats on getting your chat experience up and running! Stream Chat provides you with all the features you need to build an engaging messaging experience:
- Offline support: send messages, edit messages and send reactions while offline
- Link previews: generated automatically when you send a link
- Commands: type
/to use commands like/giphy - Reactions: long-press on a message to add a reaction
- Attachments: use the paperclip button in
MessageInputViewto attach images and files - Edit message: long-press on your message for message options, including editing
- Threads: start message threads to reply to any message
The Stream messaging API is powered by Go, RocksDB and Raft. The API tends to respond in less than 10ms and powers activity feeds and chat for over a billion end users.
Some features are hard to see in action with just one user online. You can open the same channel on the web and try user-to-user interactions like typing events, reactions, and threads.
Chat Message Customization
Next we will create a DemoChannelVC view controller so that we can show how you can customize the channel screen.
Under File > New > File > Cocoa Touch Class we create a new file called "DemoChannelVC", open it in our editor and make it inherit from ChatChannelVC.
1234import StreamChatUI
import UIKit

class DemoChannelVC: ChatChannelVC {}
Open the SceneDelegate and make these two changes:
- Append this at the top after the other imports
12345import StreamChatUI

func applyChatCustomizations() {
    Components.default.channelVC = DemoChannelVC.self
}
- Call
applyChatCustomizationsright before the initialization ofChatClient
1234/// ...
applyChatCustomizations()
ChatClient.shared = ChatClient(config: config)
/// ...
Let's now look at how we can customize the chat experience:
- Change message styles using attributes
- Create a custom attachment view
- Build your own views on top of the controllers provided by
StreamChat
The first customization is fairly simple, components expose many attributes to handle the most common cases. Changing colors, font and images is very simple. The SDK allows you to make theming changes using the Appearance.default object.
To see this in practice, go back to SceneDelegate.swift and update the applyChatCustomizations function to looks like this:
12345678import StreamChatUI

func applyChatCustomizations() {
    Appearance.default.colorPalette.background6 = .green
    Appearance.default.images.sendArrow = UIImage(systemName: "arrowshape.turn.up.right")!

    Components.default.channelVC = DemoChannelVC.self
}
The Appearance object exposes all colors, fonts and images used by components. This makes it very easy to apply theme changes consistently across the entire application. Similar to Components you need to make changes to theming as early as possible in the application life cycle.

Before moving to the next section, let's look at how we added the channel screen to the application:
- First we added the channel list view controller with a navigation controller. This allows the SDK to navigate from the channel list to the channel screen.
- We added a new view controller and subclassed
ChatChannelVCthe VC that provides the channel functionality - We configured StreamChat to use our
DemoChannelVCclass. The SDK exposes most of the UI configuration on theComponents.defaultobject. These kind of changes are best done when the application is starting.
Creating Custom Attachment Views
There may come a time when you have requirements to include things in your chat experience that we don't provide out-of-the-box. For times like this, we provide two main customization paths: you can either reimplement the entire message component and display a message how you like, or you can use custom attachment views. We'll look at this latter approach now.
You could use this to embed a shopping cart in your chat, share a location, or perhaps implement a poll. For this example, we'll keep it simple and customize the preview for images shared from Imgur. We're going to render the Imgur logo over images from the imgur.com domain.
Download the Imgur logo and drop the file inside Assets.xcassets using Xcode.
Also, for this example we will be using Nuke as our Image loading system dependency. You can add it to your project by going to File > Add Packages..., pasting the following URL in the search field at the top right: https://github.com/kean/Nuke and pressing "Add Package" button.
After that we are going to do the following:
- Create a custom view to display the image, and the Imgur logo overlay
- Create the
AttachmentInjectorViewclass that adds our custom view to the message layout and initialize it with the content - Create a custom
AttachmentViewCatalogclass, this is the class that is responsible for selecting the right view for a message attachment - Register the custom catalog class to the
Componentsobject
The Custom Attachment View
You can place this code in a new file or simply add it to ViewController.swift
12345678910111213141516171819202122232425262728293031323334353637383940414243444546474849505152535455565758596061626364656667import Nuke

class ImgurImageAttachmentView: UIView {
    var content: ChatMessageLinkAttachment? { didSet {
        Task {
                try await updateContent()
            }
        }
    }

    lazy var imagePreview: UIImageView = {
        let view = UIImageView()
        view.contentMode = .scaleAspectFill
        view.layer.cornerRadius = 8
        view.clipsToBounds = true
        view.translatesAutoresizingMaskIntoConstraints = false
        view.isUserInteractionEnabled = false
        return view
    }()

    lazy var imgurLogoView: UIImageView = {
        let view = UIImageView()
        view.translatesAutoresizingMaskIntoConstraints = false
        return view
    }()

    override public init(frame: CGRect) {
        super.init(frame: frame)

        addSubview(imagePreview)

        NSLayoutConstraint.activate([
            imagePreview.topAnchor.constraint(equalTo: topAnchor),
            imagePreview.bottomAnchor.constraint(equalTo: bottomAnchor),
            imagePreview.leadingAnchor.constraint(equalTo: leadingAnchor),
            imagePreview.trailingAnchor.constraint(equalTo: trailingAnchor)
        ])

        let logo = UIImage(named: "imgur_logo")!

        addSubview(imgurLogoView)
        imgurLogoView.image = logo

        let logoWidth: CGFloat = 100
        let logoRatio = logo.size.height / logo.size.width

        NSLayoutConstraint.activate([
            imgurLogoView.bottomAnchor.constraint(equalTo: bottomAnchor),
            imgurLogoView.trailingAnchor.constraint(equalTo: trailingAnchor),
            imgurLogoView.widthAnchor.constraint(equalToConstant: logoWidth),
            imgurLogoView.heightAnchor.constraint(equalToConstant: logoWidth * logoRatio)
        ])
    }

    required init?(coder: NSCoder) {
        super.init(coder: coder)
    }

    func updateContent() async throws {
        guard let url = content?.payload.assetURL else {
            return
        }

        let imageTask = ImagePipeline.shared.imageTask(with: url)
        imagePreview.image = try await imageTask.image
    }
}
Here we added a UIView class called ImgurImageAttachmentView, this view class exposes a computed property content to hold and represent the attachment. Most of the code is just UIKit boilerplate code to render the labels and the Imgur logo on top of the image attachment.
The Custom AttachmentInjectorView
You can place this code right after the ImgurImageAttachmentView code.
1234567891011121314151617181920212223class ImgurImageAttachmentViewInjector: AttachmentViewInjector {
    let imgurImageAttachmentView: ImgurImageAttachmentView = {
        let view = ImgurImageAttachmentView()
        view.translatesAutoresizingMaskIntoConstraints = false
        return view
    }()

    override open func contentViewDidLayout(options: ChatMessageLayoutOptions) {
        contentView.bubbleContentContainer.insertArrangedSubview(
            imgurImageAttachmentView,
            at: 0,
            respectsLayoutMargins: true
        )

        let constraint = imgurImageAttachmentView.widthAnchor.constraint(equalTo: contentView.widthAnchor)
        constraint.priority = .defaultLow
        constraint.isActive = true
    }

    override open func contentViewDidUpdateContent() {
        imgurImageAttachmentView.content = attachments(payloadType: LinkAttachmentPayload.self).first
    }
}
The ImgurImageAttachmentViewInjector is a subclass of AttachmentViewInjector and wraps our custom view class. The two life-cycle methods contentViewDidLayout and contentViewDidUpdateContent are called by the SDK, this is where we set up our custom class with the right layout and with the content.
The Custom AttachmentViewCatalog
You can place this code right after the ImgurImageAttachmentViewInjector code.
12345678910111213141516171819202122232425private func hasImgurLinkAttachment(message: ChatMessage) -> Bool {
    guard let imageAttachment = message.attachments(payloadType: LinkAttachmentPayload.self).first else {
        return false
    }

    guard let host = imageAttachment.assetURL?.host else {
        return false
    }

    return host.hasSuffix("imgur.com")
}

class MyAttachmentViewCatalog: AttachmentViewCatalog {
    override class func attachmentViewInjectorClassFor(
        message: ChatMessage,
        components: Components
    ) -> AttachmentViewInjector
        .Type? {
        if hasImgurLinkAttachment(message: message) {
            return ImgurImageAttachmentViewInjector.self
        }

        return super.attachmentViewInjectorClassFor(message: message, components: components)
    }
}
The SDK uses the AttachmentViewCatalog to pick the appropriate AttachmentViewInjector for each message's attachments. Our subclass first checks if the message has any link attachment with images coming from the 'imgur.com' host and returns the custom injector for them.
Lastly, you need to configure the SDK to use the MyAttachmentViewCatalog. To do this you need to update the applyChatCustomizations function from SceneDelegate.swift.
1234567func applyChatCustomizations() {
    Appearance.default.colorPalette.background6 = .green
    Appearance.default.images.sendArrow = UIImage(systemName: "arrowshape.turn.up.right")!

    Components.default.channelVC = DemoChannelVC.self
    Components.default.attachmentViewCatalog = MyAttachmentViewCatalog.self
}
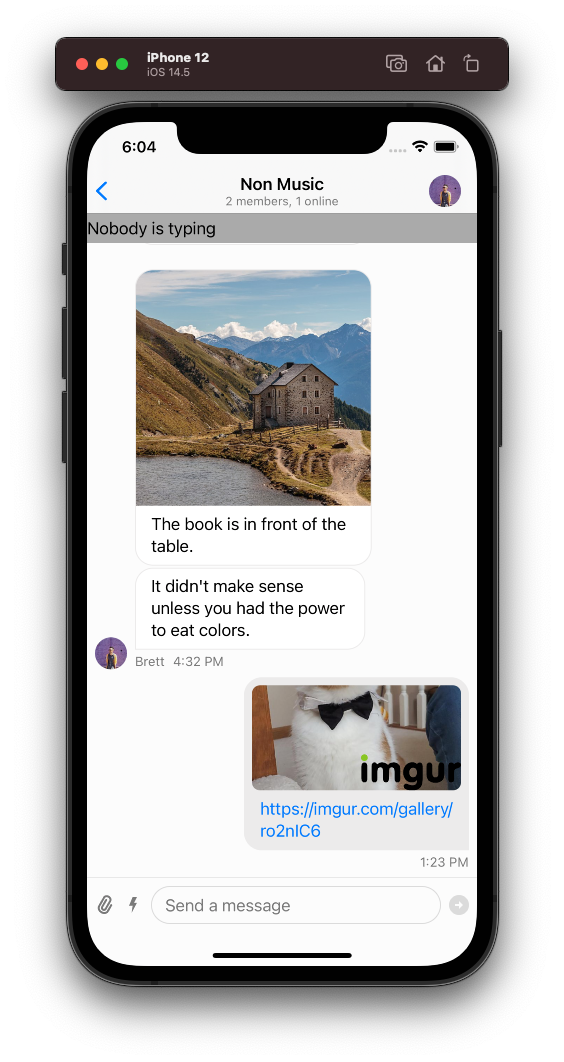
When you run your app, you should now see the Imgur logo displayed over images from Imgur. You can test this by posting an Imgur link like this one: https://imgur.com/gallery/ro2nIC6.
This was, of course, a very simple change, but you could use the same approach to implement a product preview, shopping cart, location sharing, polls, and more. You can achieve lots of your message customization goals by implementing a custom attachment View.
If you need even more customization, you can also implement custom message views for the entire message object.
Creating a Typing Status Component
The channel list component shows typing indicators out of the box, in this example we are going to handle typing events ourselves and show our own.
The ChatChannelVC class is a delegate of the ChatChannelController controller and conforms to the ChatChannelControllerDelegate protocol.
This protocol allows delegates to receive channel updates including changes to the list of typing users, the latter via this method:
1234func channelController(
    _ channelController: ChatChannelController,
    didChangeTypingUsers typingUsers: Set<ChatUser>
)
Now that we know this, we can override the implementation from ChatChannelVC and write our own. This is how the DemoChannelVC.swift file should look like:
12345678910111213141516171819202122232425262728293031323334353637383940414243444546import StreamChat
import StreamChatUI
import UIKit

class TypingIndicator: UILabel {
    func resetText() {
        text = "Nobody is typing"
    }
}

class DemoChannelVC: ChatChannelVC {
    var typingIndicator: TypingIndicator!

    override func setUpLayout() {
        super.setUpLayout()

        typingIndicator = TypingIndicator()
        view.addSubview(typingIndicator)

        typingIndicator.backgroundColor = .lightGray
        typingIndicator.translatesAutoresizingMaskIntoConstraints = false
        typingIndicator.resetText()

        NSLayoutConstraint.activate([
            typingIndicator.topAnchor.constraint(equalTo: view.safeAreaLayoutGuide.topAnchor),
            typingIndicator.heightAnchor.constraint(equalToConstant: 30),
            typingIndicator.leadingAnchor.constraint(equalTo: view.leadingAnchor),
            typingIndicator.trailingAnchor.constraint(equalTo: view.trailingAnchor),
            messageListVC.view.topAnchor.constraint(equalTo: typingIndicator.bottomAnchor)
        ])
    }

    override func channelController(
        _ channelController: ChatChannelController,
        didChangeTypingUsers typingUsers: Set<ChatUser>
    ) {
        let typingUsersWithoutCurrentUser = typingUsers
            .filter { $0.id != self.channelController.client.currentUserId }

        guard let typingUser = typingUsersWithoutCurrentUser.first else {
            typingIndicator.resetText()
            return
        }
        typingIndicator.text = "\(typingUser.name ?? typingUser.id) is typing..."
    }
}
You can open the same channel on the web and try this using a different user.
Enabling Console Logs
By default console logs are disabled. But it's likely whilst you're building your app that you will need to enable logs at some point.
Let's go ahead and enable your console logs now.
123import StreamChat

LogConfig.level = .info
By setting your log level to .info means you will get access to all console logs provided by the SDK.
The SDK supports many more logs, and you can read more about them here.
Congratulations!
In this iOS in-app messaging tutorial, you learned how to build a fully functional chat app with Swift and UIKit. You also learned how easy it is to customize the behavior and build any type of chat or messaging experience.
Remember, you can also check out the completed app for the tutorial on GitHub.
If you want to get started on integrating chat into your own messaging app, sign up for a free Chat trial, and get your own API key to build with!
To recap, our iOS Chat SDK consists of two frameworks which give you an opportunity to interact with Stream Chat APIs on a different level:
- StreamChat - The official low-level Swift SDK for Stream Chat. It allows you to make API calls and receive events whenever something changes on a user or channel that you’re watching.
- StreamChatUI - Builds on top of the low level client and provides fully custom UI, this library is your best starting point.
The underlying chat API is based on Go, RocksDB, and Raft. This makes the in-app chat experience extremely fast with response times that are often below 10ms.
Final Thoughts
In this chat app tutorial we built a fully functioning iOS messaging app with our SDK component library. We also showed how easy it is to customize the behavior and the style of the iOS chat app components with minimal code changes.
Both the chat SDK for iOS and the API have plenty more features available to support more advanced use-cases such as push notifications, content moderation, rich messages and more. You may also want to read our SwiftUI tutorial too.