Video Streaming with WebRTC in Unity
This tutorial dives into WebRTC's practical implementation for Unity Developers. Leveraging the Unity WebRTC library, we will guide you through setting up a peer-to-peer (P2P) connection that facilitates video sharing between two devices on a local network. We'll start off with setting up a simple signaling server, utilizing the websocket-sharp library for signaling. We'll then transition to Unity Engine, where we'll be using the Unity WebRTC package for the video streaming functionality. By the end of this tutorial, you will have a foundational understanding of WebRTC and a functional video streaming application in Unity.
If you're new to WebRTC, starting with our introduction to WebRTC for Unity Developers is a good idea. This guide will help you understand the code we're going to write. But if you prefer to jump straight into coding, that's okay, too. We've added extra comments in the code to make learning easier, and we explain each part of the code in detail after showing it.
The Signaling Server
A signaling server is essential for initiating a P2P connection through WebRTC, as it facilitates the exchange of connectivity information.
In this tutorial, we'll set up a basic signaling server that will simply relay each received message to all connected clients, excluding the sender. This rudimentary functionality will suffice for connecting two peers, which is our current objective. However, for a real-world application, you would typically implement user authentication (possibly using APIs like Steam or Google Play Services) and ensure that only peers within the same session or call are connected.
The websocket-sharp library conveniently includes a WebSocket server feature, which we'll utilize for our signaling server.
Be aware that running the signaling server locally usually restricts access to devices within the same private network. Configuring access from external networks is beyond this tutorial's scope.
The service to resend every received message to all other participants:
            using WebSocketSharp;
using WebSocketSharp.Server;

public class SendToOthersService : WebSocketBehavior
{
    protected override void OnOpen()
    {
        // Log that a new connection was opened
        var session = Sessions.Sessions.First(s => s.ID == ID);
        Console.WriteLine("Connection opened with: " + session.ID);
    }

    protected override void OnMessage(MessageEventArgs e)
    {
        Console.WriteLine("Received message: " + e.Data);

        // Send the received message to all clients except the sender
        foreach (var id in Sessions.ActiveIDs)
        {
            if (id != ID) // ID is the identifier of the current session
            {
                Sessions.SendTo(e.Data, id);
            }
        }
    }
}
The main program:
            using WebSocketSharp.Server;

Console.WriteLine("Starting server application");

// Bootstrap the application
var wssv = new WebSocketServer(8080);
wssv.AddWebSocketService<SendToOthersService>("/");

// Start the server
wssv.Start();
Console.WriteLine("WebSocket Server Running");

// Stop the server when a key is pressed in the console
Console.WriteLine("Press any key to stop the server...");
Console.ReadKey(true);
wssv.Stop();
That’s it!
You can download the complete project from this repository.
Run the project in your IDE (like Visual Studio or Rider). A console window will appear to confirm that the server is running:

The Unity Project
For this tutorial, we'll be working with Unity version 2022.3.18f1 LTS. If you're using a different version, just ensure it's compatible with the Unity WebRTC package.
Open the Starting Unity Project
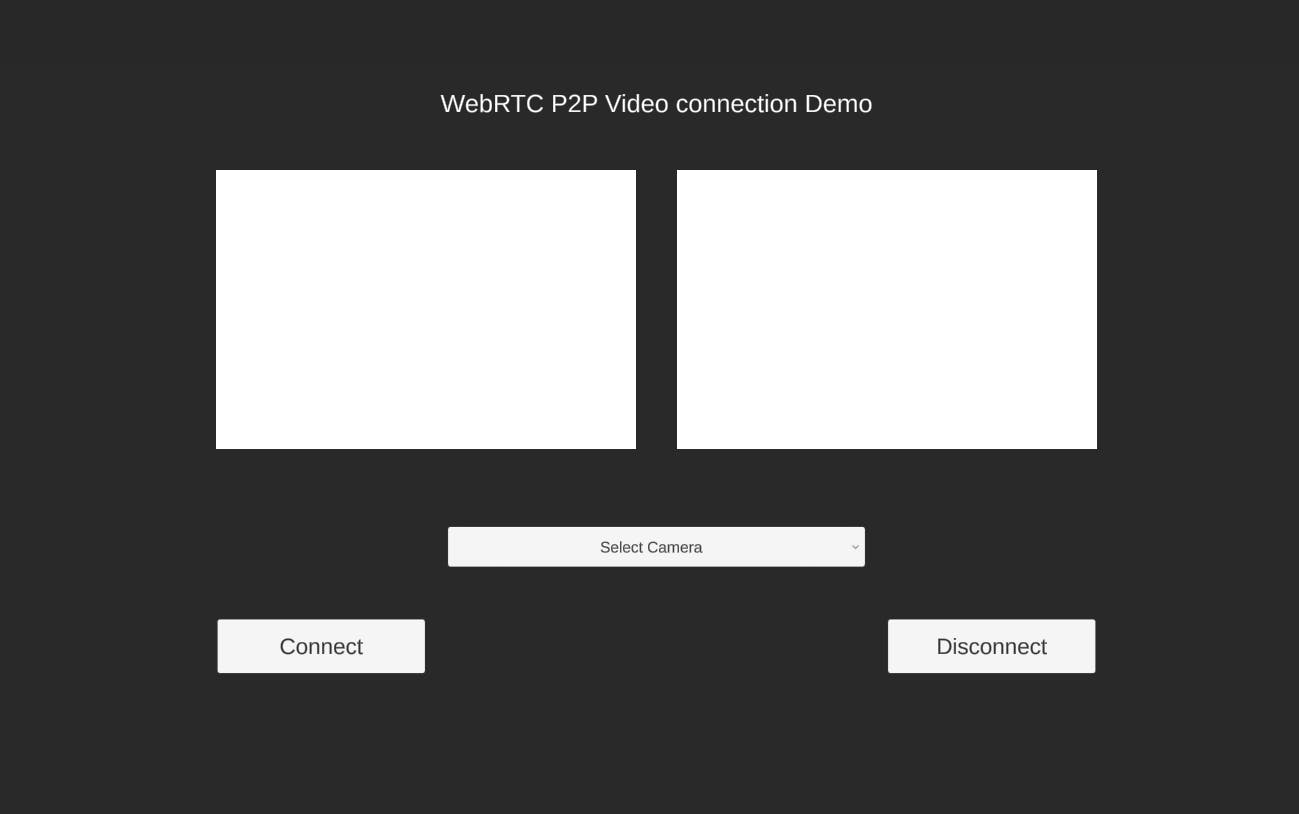
We've set up a simple project for you that includes a basic user interface, which will serve as our foundation for this tutorial:
You can find the starter project in the following GitHub repository. Download it and open the Unity_StartingProject folder in the Unity Editor to get started.
Add the websocket-sharp package
We’ve already covered this step, and the websocket-sharp DLL is placed in theAssets/Plugins/websocket-sharp directory.
Test WebSocket connection
Before proceeding, it's important to confirm that our Unity application can successfully connect to the signaling server.
Start by creating a WebSocketClient.cs script in the Assets/Scripts directory. Open this script in your IDE, and enter the following code:
            using System;
using System.Collections.Concurrent;
using UnityEngine;
using WebSocketSharp;

namespace WebRTCTutorial
{
    public delegate void MessageHandler(string message);

    public class WebSocketClient : MonoBehaviour
    {
        public event MessageHandler MessageReceived;

        public void SendWebSocketMessage(string message) => _ws.Send(message);

        // Called by Unity -> https://docs.unity3d.com/ScriptReference/MonoBehaviour.Awake.html
        protected void Awake()
        {
            // Create WebSocket instance and connect
            var ip = string.IsNullOrEmpty(_serverIp) ? "localhost" : _serverIp;
            var url = $"ws://{ip}:8080";
            _ws = new WebSocket(url);

            // Subscribe to events
            _ws.OnOpen += OnOpen;
            _ws.OnMessage += OnMessage;
            _ws.OnError += OnError;

            // Connect
            _ws.Connect();
        }

        // Called by Unity -> https://docs.unity3d.com/ScriptReference/MonoBehaviour.Update.html
        protected void Update()
        {
            // Process received errors on the main thread - Unity functions can only be called from the main thread
            while (_receivedErrors.TryDequeue(out var error))
            {
                Debug.LogError("WS error: " + error);
            }

            // Process received messages on the main thread - Unity functions can only be called from the main thread
            while (_receivedMessages.TryDequeue(out var message))
            {
                Debug.Log("WS Message Received: " + message);
                MessageReceived?.Invoke(message);
            }
        }

        // Called by Unity -> https://docs.unity3d.com/ScriptReference/MonoBehaviour.OnDestroy.html
        protected void OnDestroy()
        {
            if (_ws == null)
            {
                return;
            }

            // Unsubscribe from events
            _ws.OnOpen -= OnOpen;
            _ws.OnMessage -= OnMessage;
            _ws.OnError -= OnError;

            _ws.Close();
            _ws = null;
        }

        [SerializeField]
        private string _serverIp;

        private WebSocket _ws;

        private readonly ConcurrentQueue<string> _receivedMessages = new ConcurrentQueue<string>();
        private readonly ConcurrentQueue<string> _receivedErrors = new ConcurrentQueue<string>();

        private void OnMessage(object sender, MessageEventArgs e) => _receivedMessages.Enqueue(e.Data);

        private void OnError(object sender, ErrorEventArgs e) => _receivedErrors.Enqueue(e.Message);

        private void OnOpen(object sender, EventArgs e)
        {
            SendWebSocketMessage("Test Message");
        }
    }
}
Let’s go through this script step by step:
- In the
Awakemethod, it initializes aWebSocketinstance, subscribes to relevant events, and attempts to connect to our signaling server. - Event handlers, such as
OnMessageandOnError, enqueue messages and errors toConcurrentQueues to be processed on the main thread. This ensures compatibility with Unity's threading model, as WebSocketSharp operates on separate threads. - The
Updatemethod processes the queues, triggering theMessageReceivedevent for messages, and logging errors. - A public
SendWebSocketMessagemethod is provided to send messages to the server. - The
_serverIpfield, decorated with theSerializeFieldattribute, can be set in the Unity Inspector, allowing us to set the server's IP address. - A test message is sent upon establishing a connection to verify the WebSocket communication.
- The
OnDestroymethod disconnects and cleans up the WebSocket client when the object is destroyed or when the application is closed.
Open the Main scene. Create a new Game Object named WebSocket in the scene hierarchy, and attach the WebSocketClient.cs script to it.
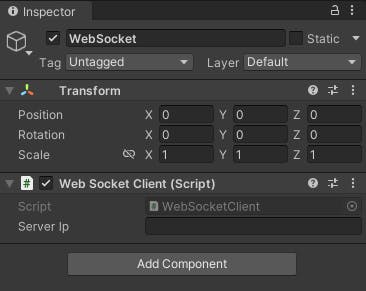
The Server IP
For the purposes of this tutorial, we'll work within a local network. Run the WebSocket server on your local machine and use its local network IPv4 address to connect other devices within the same network.
To find your machine's local IP address, run ipconfig in the Windows Command Prompt or ifconfig on Mac or Linux terminals. Look for the IPv4 address associated with your primary network interface.
For example, the output of ipconfig on a Windows machine might look like this:
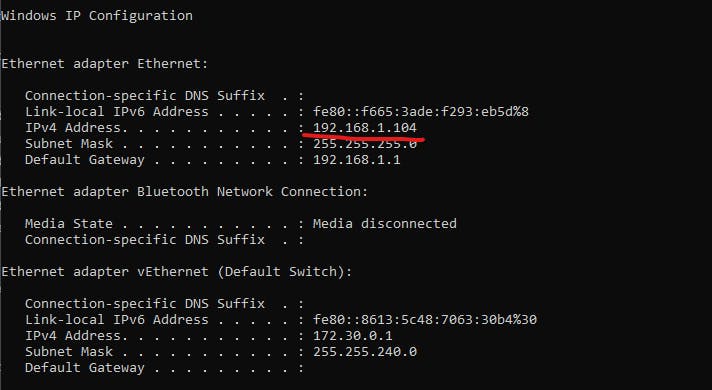
In this example, the machine's local IP address is 192.168.1.104.
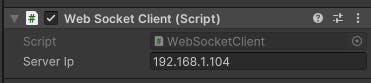
Once you determine your local IPv4 address, paste it into the WebSocketClient component in Unity:
Save the scene and run the project.
Your signaling server's console should display a new connection log, indicating that a WebSocket client has connected and received a test message:

Once you verify the WebSocket connection between your Unity client and the signaling server, the OnOpen method that sends the test message can be removed from the WebSocketClient.cs script:
            private void OnOpen(object sender, EventArgs e)
{
    SendWebSocketMessage("Test Message");
}
Add Unity’s WebRTC package
Next, add the unity’s WebRTC package to the project. You can follow the official documentation for detailed installation steps.
Transferring the data between the peers
In the signaling phase, we exchange [SDP](https://getstream.io/resources/projects/webrtc/basics/sdp-messages/) Offer/Answer and ICE Candidates. It's practical to use object serialization to JSON for this purpose
However, serialization can be challenging with objects from certain libraries, such as WebRTC, due to their complex structures. To resolve this, we implement Data Transfer Objects (DTOs). These simple, lightweight containers carry data types in a format that's easy to serialize.
Let's apply this concept. In the Assets/Scripts directory, create a new subdirectory named DTO. Then, in the Assets/Scripts/DTO/ directory, create the following scripts:
SdpDTO.cs will serialize SDP Offers & Answers:
            using Unity.WebRTC;

namespace WebRTCTutorial.DTO
{
    /// <summary>
    /// DTO (Data Transfer Object) to send/receive SDP Offer or Answer through the network. This DTO maps to <see cref="RTCSessionDescription"/>
    /// </summary>
    [System.Serializable]
    public class SdpDTO
    {
        public int Type;
        public string Sdp;
    }
}
IceCandidateDTO.cs will handle the serialization of ICE Candidates during ICE Trickling:
            namespace WebRTCTutorial.DTO
{
    /// <summary>
    /// DTO (Data Transfer Object) to send/receive ICE Candidate through the network. This DTO maps to <see cref="RTCIceCandidate"/>
    /// </summary>
    [System.Serializable]
    public class ICECanddidateDTO
    {
        public string Candidate;
        public string SdpMid;
        public int? SdpMLineIndex;
    }
}
For ease of deserialization, we'll use a wrapper DTO that includes the serialized data and indicates its type.
Add these scripts to the Assets/Scripts/DTO/ directory as well:
DtoType.cs defines the possible DTO types:
            namespace WebRTCTutorial
{
    public enum DtoType
    {
        ICE,
        SDP
    }
}
DTOWrapper.cs simplifies the deserialization process by wrapping the serialized data along with its type indicator:
            namespace WebRTCTutorial.DTO
{
    /// <summary>
    /// A DTO wrapper to simplify the deserialization. When deserializing an object via FromJson (https://docs.unity3d.com/ScriptReference/JsonUtility.FromJson.html) we need to provide a type.
    /// This object will wrap a serialized object and keep it in the <see cref="Payload"/> and provide the <see cref="Type"/> indicating what type should be the payload deserialized into
    /// </summary>
    [System.Serializable]
    public class DTOWrapper
    {
        public int Type;
        public string Payload;
    }
}
The usefulness of these DTOs and their wrapper will become clear as we proceed with serialization and deserialization.
The Video Manager
Now, let's focus on the primary script that will manage the WebRTC connection.
In the Assets/Scripts/ directory, create a new script named VideoManager.cs and paste the initial structure:
            using System;
using System.Collections;
using System.Threading;
using Unity.WebRTC;
using UnityEngine;
using WebRTCTutorial.DTO;

namespace WebRTCTutorial
{
    public class VideoManager : MonoBehaviour
    {

    }
}
We will develop this class step-by-step to ensure clarity in each segment.
Begin by defining two private fields:
            private WebSocketClient _webSocketClient;
private RTCPeerConnection _peerConnection;
The _webSocketClient is a reference to the WebSocketClient we created earlier. The _peerConnection is an RTCPeerConnection from the WebRTC library, representing the connection between the two peers.
Now, add the Awake method:
            // Called by Unity -> https://docs.unity3d.com/ScriptReference/MonoBehaviour.Awake.html
protected void Awake()
{
    // FindObjectOfType is used for the demo purpose only. In a real production it's better to avoid it for performance reasons
    _webSocketClient = FindObjectOfType<WebSocketClient>();

    StartCoroutine(WebRTC.Update());

    var config = new RTCConfiguration
    {
        iceServers = new RTCIceServer[]
        {
            new RTCIceServer
            {
                urls = new string[]
                {
                    // Google Stun server
                    "stun:stun.l.google.com:19302"
                },
            }
        },
    };

    _peerConnection = new RTCPeerConnection(ref config);

    // "Negotiation" is the exchange of SDP Offer/Answer. Peers describe what media they want to send and agree on, for example, what codecs to use
    // In this tutorial we exchange the SDP Offer/Answer only once when connecting.
    // But in a real production you'd have to repeat the exchange every time the OnNegotiationNeeded event is triggered
    _peerConnection.OnNegotiationNeeded += OnNegotiationNeeded;

    // Triggered when a new network endpoint is found that could potentially be used to establish the connection
    _peerConnection.OnIceCandidate += OnIceCandidate;

    // Triggered when a new track is received
    _peerConnection.OnTrack += OnTrack;

    // Triggered when a new message is received from the other peer via WebSocket
    _webSocketClient.MessageReceived += OnWebSocketMessageReceived;
}
In Awake, we:
- Retrieve the
WebSocketClientcomponent usingFindObjectOfType, which searches the entire scene for this component. While this method is sufficient for our demo, it's generally not recommended for production due to performance implications. - Set up an
RTCConfigurationwith a STUN server URL provided by Google. - Instantiate
RTCPeerConnectionand subscribe to several WebRTC events:OnNegotiationNeeded: Invoked when a session renegotiation is necessary.OnIceCandidate: Fires upon the discovery of a potential network path.OnTrack: Occurs when a new media track is received from the peer.
- Subscribe to the
MessageReceivedevent ofWebSocketClient, which activates upon the arrival of a new WebSocket message.
Next, let’s define event handler methods.
Add the following code to the class:
            private void OnNegotiationNeeded()
{
    Debug.Log("SDP Offer <-> Answer exchange requested by the webRTC client.");
}
In this tutorial, we'll initiate the negotiation when the user clicks the Connect button. However, in a real-life application, negotiation process should be repeated whenever OnNegotiationNeeded event is triggered.
We'll now define code for serializing and sending messages to other peers.
Add the following method:
            private void SendMessageToOtherPeer<TType>(TType obj, DtoType type)
{
    try
    {
        var serializedPayload = JsonUtility.ToJson(obj);

        var dtoWrapper = new DTOWrapper
        {
            Type = (int)type,
            Payload = serializedPayload
        };

        var serializedDto = JsonUtility.ToJson(dtoWrapper);

        _webSocketClient.SendWebSocketMessage(serializedDto);
    }
    catch (Exception e)
    {
        Debug.LogException(e);
    }
}
This generic method handles the serialization of any DTO, along with a DtoType. The DTO is serialized to JSON, placed into the Payload of a DTOWrapper, and the Type is set accordingly. This structured approach simplifies the deserialization process on the receiving end by indicating the exact type of the encapsulated data.
These methods extend the SendMessageToOtherPeer generic method to handle SDP messages and ICE Candidate serialization and sending:
            private void SendIceCandidateToOtherPeer(RTCIceCandidate iceCandidate)
{
    var iceDto = new ICECanddidateDTO
    {
        Candidate = iceCandidate.Candidate,
        SdpMid = iceCandidate.SdpMid,
        SdpMLineIndex = iceCandidate.SdpMLineIndex
    };

    SendMessageToOtherPeer(iceDto, DtoType.ICE);
}

private void SendSdpToOtherPeer(RTCSessionDescription sdp)
{
    var sdpDto = new SdpDTO
    {
        Type = (int)sdp.type,
        Sdp = sdp.sdp
    };

    SendMessageToOtherPeer(sdpDto, DtoType.SDP);
}
Let's proceed to handle incoming WebSocket messages with the OnWebSocketMessageReceived method:
            private void OnWebSocketMessageReceived(string message)
{
    var dtoWrapper = JsonUtility.FromJson<DTOWrapper>(message);
    switch ((DtoType)dtoWrapper.Type)
    {
        case DtoType.ICE:

            var iceDto = JsonUtility.FromJson<ICECanddidateDTO>(dtoWrapper.Payload);
            var ice = new RTCIceCandidate(new RTCIceCandidateInit
            {
                candidate = iceDto.Candidate,
                sdpMid = iceDto.SdpMid,
                sdpMLineIndex = iceDto.SdpMLineIndex
            });

            _peerConnection.AddIceCandidate(ice);
            Debug.Log($"Received ICE Candidate: {ice.Candidate}");

            break;
        case DtoType.SDP:

            var sdpDto = JsonUtility.FromJson<SdpDTO>(dtoWrapper.Payload);
            var sdp = new RTCSessionDescription
            {
                type = (RTCSdpType)sdpDto.Type,
                sdp = sdpDto.Sdp
            };

            Debug.Log($"Received SDP offer of type: {sdp.type} and SDP details: {sdp.sdp}");

            switch (sdp.type)
            {
                case RTCSdpType.Offer:
                    StartCoroutine(OnRemoteSdpOfferReceived(sdp));
                    break;
                case RTCSdpType.Answer:
                    StartCoroutine(OnRemoteSdpAnswerReceived(sdp));
                    break;
                default:
                    throw new ArgumentOutOfRangeException("Unhandled type of SDP message: " + sdp.type);
            }

            break;
        default:
            throw new ArgumentOutOfRangeException();
    }
}
Upon receiving a message, we deserialize it into the DTOWrapper and use the dtoWrapper.Type to know the exact type to which payload should be deserialized. For ICE Candidates, we call the _peerConnection.AddIceCandidate method to update the WebRTC peer connection. When we encounter an SDP message, we initiate the corresponding offer or answer processing sequence by calling OnRemoteSdpOfferReceived or OnRemoteSdpAnswerReceived, which we'll define in the upcoming steps.
Next, we'll implement a coroutine that begins the WebRTC connection process by creating and sending an SDP offer to the other peer:
            private IEnumerator CreateAndSendLocalSdpOffer()
{
    // 1. Create local SDP offer
    var createOfferOperation = _peerConnection.CreateOffer();
    yield return createOfferOperation;

    if (createOfferOperation.IsError)
    {
        Debug.LogError("Failed to create offer");
        yield break;
    }

    var sdpOffer = createOfferOperation.Desc;

    // 2. Set the offer as a local SDP
    var setLocalSdpOperation = _peerConnection.SetLocalDescription(ref sdpOffer);
    yield return setLocalSdpOperation;

    if (setLocalSdpOperation.IsError)
    {
        Debug.LogError("Failed to set local description");
        yield break;
    }

    // 3. Send the SDP Offer to the other Peer
    SendSdpToOtherPeer(sdpOffer);
    Debug.Log("Sent Sdp Offer");
}
This method:
- Invokes
_peerConnection.CreateOffer()to generate the local SDP offer. - Sets the generated offer as the local description of the connection using
_peerConnection.SetLocalDescription. - Sends the SDP offer to the other peer using
SendSdpToOtherPeer, which serializes and transmits it over the WebSocket.
Now, let's construct the coroutine responsible for processing an incoming SDP offer:
            private IEnumerator OnRemoteSdpOfferReceived(RTCSessionDescription remoteSdpOffer)
{
    Debug.Log("Remote SDP Offer received. Set as local offer and send back the generated answer");

    // 1. Set the received offer as remote description
    var setRemoteSdpOperation = _peerConnection.SetRemoteDescription(ref remoteSdpOffer);
    yield return setRemoteSdpOperation;

    if (setRemoteSdpOperation.IsError)
    {
        Debug.LogError("Failed to set remote description");
        yield break;
    }

    // 2. Generate Answer
    var createAnswerOperation = _peerConnection.CreateAnswer();
    yield return createAnswerOperation;

    if (createAnswerOperation.IsError)
    {
        Debug.LogError("Failed to create answer");
        yield break;
    }

    var sdpAnswer = createAnswerOperation.Desc;

    // 3. Set the generated answer as local description
    var setLocalDspOperation = _peerConnection.SetLocalDescription(ref sdpAnswer);
    yield return setLocalDspOperation;

    if (setLocalDspOperation.IsError)
    {
        Debug.LogError("Failed to set local description");
        yield break;
    }

    // 4. Send the answer to the other Peer
    SendSdpToOtherPeer(sdpAnswer);
    Debug.Log("Sent Sdp Answer");
}
Upon receiving an SDP offer, this coroutine will:
- Set the offer as the remote description of the WebRTC connection by calling
_peerConnection.SetRemoteDescription. - Generate an SDP answer by calling
_peerConnection.CreateAnswer. - Apply the created answer as the local description via
_peerConnection.SetLocalDescription. - Send the SDP answer to the initiating peer through
SendSdpToOtherPeer.
Next, we’ll define a coroutine to handle an incoming SDP Answer:
            private IEnumerator OnRemoteSdpAnswerReceived(RTCSessionDescription remoteSdpAnswer)
{
    // 1. Set the received answer as remote description
    var setRemoteSdpOperation = _peerConnection.SetRemoteDescription(ref remoteSdpAnswer);
    yield return setRemoteSdpOperation;

    if (setRemoteSdpOperation.IsError)
    {
        Debug.LogError("Failed to set remote description");
    }
}
This method simply sets the received SDP answer as the remote description with _peerConnection.SetRemoteDescription.
To summarize the whole process:
- Peer A creates an SDP Offer.
- Peer A sets the SDP offer as its local description.
- Peer A sends the offer to Peer B.
- Peer B receives the offer and sets it as its remote description.
- Peer B generates and sets the SDP answer
- Peer B sets the SDP Answer as its local description.
- Peer B sends the answer back to Peer A.
- Peer A receives the answer and sets it as its remote description.
This exchange of offer and answer is the core of the WebRTC signaling process, allowing both peers to agree on the media and connection details before starting the actual media transfer
Next, we'll set up an event handler for ICE Candidates generated by the WebRTC peer connection:
            private void OnIceCandidate(RTCIceCandidate candidate)
{
    SendIceCandidateToOtherPeer(candidate);
    Debug.Log("Sent Ice Candidate to the other peer THREAD  " + Thread.CurrentThread.ManagedThreadId);
}
This handler will transmit each ICE Candidate discovered by the WebRTC engine to the other peer.
Now, let's tackle the handling of received media tracks:
            public event Action<Texture> RemoteVideoReceived;

private void OnTrack(RTCTrackEvent trackEvent)
{
    Debug.Log("OnTrack received, type: " + trackEvent.Track.Kind);

    if (trackEvent.Track is VideoStreamTrack videoStreamTrack)
    {
        videoStreamTrack.OnVideoReceived += OnVideoReceived;
    }
    else
    {
        Debug.LogError(
            $"Unhandled track of type: {trackEvent.Track.GetType()}. In this tutorial, we're handling only video tracks.");
    }
}

private void OnVideoReceived(Texture texture)
{
    Debug.Log($"Video received, resolution: {texture.width}x{texture.height}");
    RemoteVideoReceived?.Invoke(texture);
}
OnTrackis triggered each time a track is received from another peer. Although we're only processing video tracks in this tutorial, audio tracks can be managed similarly.- Upon receiving a video track, we subscribe to the
OnVideoReceivedevent to be notified when the video stream's texture becomes available. RemoteVideoReceivedis an event to which the UI layer will subscribe and set up the rendering of the received texture representing the video stream.
We'll also define a few public members to allow UI interaction with the VideoManager:
            public bool CanConnect
    => _peerConnection?.ConnectionState == RTCPeerConnectionState.New ||
       _peerConnection?.ConnectionState == RTCPeerConnectionState.Disconnected;

public bool IsConnected => _peerConnection?.ConnectionState == RTCPeerConnectionState.Connecting;

public void SetActiveCamera(WebCamTexture activeWebCamTexture)
{
    // Remove previous track
    var senders = _peerConnection.GetSenders();
    foreach (var sender in senders)
    {
        _peerConnection.RemoveTrack(sender);
    }

    var videoTrack = new VideoStreamTrack(activeWebCamTexture);
    _peerConnection.AddTrack(videoTrack);

    Debug.Log("Sender video track was set");
}

public void Connect()
{
    StartCoroutine(CreateAndSendLocalSdpOffer());
}

public void Disconnect()
{
    if (!IsConnected)
    {
        return;
    }

    _peerConnection.Close();
    _peerConnection.Dispose();
}
CanConnectandIsConnectedare properties that will inform the UI about the connection's state, controlling the interactability of theConnectandDisconnectbuttons.SetActiveCameramethod configures the active camera device, utilizing Unity'sWebCamTextureclass.Connectmethod initiates the WebRTC connection setup sequence upon user interaction.Disconnectmethod closes and cleans up the WebRTC connection when the user clicks on theDisconnectbutton to end the session.
The VideoManager class is completed.
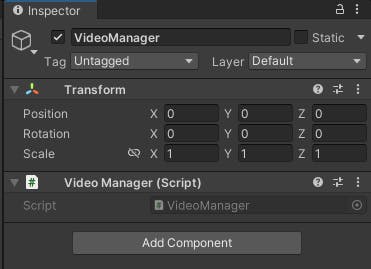
The last step is to attach the VideoManager to a game object. Go to the Main scene, create a new game object, and add the VideoManager script to it:
The UI layer
Let's now focus on constructing the UI layer logic.
Begin by editing the PeerView.cs script to add the following method:
            public void SetVideoTexture(Texture texture)
{
    _videoRender.texture = texture;

    // Adjust the texture size to match the aspect ratio of the video
    var sourceAspectRatio = texture.width * 1f / texture.height;

    var currentSize = _videoRender.rectTransform.sizeDelta;
    var adjustedSize = new Vector2(currentSize.x, currentSize.x / sourceAspectRatio);

    _videoRender.rectTransform.sizeDelta = adjustedSize;
}
This method will be invoked to display the video from the other participant. The Texture argument, coming from WebRTC's OnTrack event, will contain the incoming video stream. Additionally, the method adjusts the dimensions of the RawImage component to maintain the correct aspect ratio of the incoming video.
With PeerView class complete, we can move on to the UIManager.
Open the UIManager script and declare these fields:
            private WebCamTexture _activeCamera;
private VideoManager _videoManager;
The _activeCamera will reference the currently selected camera, while _videoManager references the VideoManager we've previously created.
Next, add the Awake method:
            // Called by Unity -> https://docs.unity3d.com/ScriptReference/MonoBehaviour.Awake.html
protected void Awake()
{
    // FindObjectOfType is used for the demo purpose only. In a real production it's better to avoid it for performance reasons
    _videoManager = FindObjectOfType<VideoManager>();

    // Check if there's any camera device available
    if (WebCamTexture.devices.Length == 0)
    {
        Debug.LogError(
            "No Camera devices available! Please make sure a camera device is detected and accessible by Unity. " +
            "This demo application will not work without a camera device.");
    }

    // Subscribe to buttons
    _connectButton.onClick.AddListener(OnConnectButtonClicked);
    _disconnectButton.onClick.AddListener(OnDisconnectButtonClicked);

    // Clear default options from the dropdown
    _cameraDropdown.ClearOptions();

    // Populate dropdown with the available camera devices
    foreach (var cameraDevice in WebCamTexture.devices)
    {
        _cameraDropdown.options.Add(new TMP_Dropdown.OptionData(cameraDevice.name));
    }

    // Change the active camera device when new dropdown value is selected
    _cameraDropdown.onValueChanged.AddListener(SetActiveCamera);

    // Subscribe to when video from the other peer is received
    _videoManager.RemoteVideoReceived += OnRemoteVideoReceived;
}
- We retrieve the
VideoManagerinstance using Unity’s FindObjectOfType method. This method is known to be slow, but since we’re focusing on WebRTC in this tutorial, it’ll suffice. - We check if any camera devices are available and print error to the console if not. Ensure your camera is accessible by Unity and the error does not show up, otherwise the video streaming feature will not function.
- The
OnConnectButtonClickedand theOnDisconnectButtonClickedcallback methods are added as listeners to theConnectandDisconnectbuttonsonClickevent. - The camera selection dropdown is populated with names from the
WebCamTexture.devicesarray, which enumerates the cameras recognized by the operating system. Keep in mind that a camera might still be inaccessible to Unity. For example, on Windows, Unity will not be able to access the camera device if it's already being used by another application. - The camera dropdown's
onValueChangedevent is linked to theSetActiveCameramethod to switch the active camera. - Finally, we subscribe to
VideoManager'sRemoteVideoReceivedevent to handle incoming video tracks as they are received.
Next, we’ll define the SetActiveCamera method:
            private void SetActiveCamera(int deviceIndex)
{
    var deviceName = _cameraDropdown.options[deviceIndex].text;

    // Stop previous camera capture
    if (_activeCamera != null && _activeCamera.isPlaying)
    {
        _activeCamera.Stop();
    }

    /* Depending on the platform you're targeting you may need to request permission to access the camera device:
        - IOS or WebGL -> https://docs.unity3d.com/2022.3/Documentation/ScriptReference/Application.RequestUserAuthorization.html
        - Android -> https://docs.unity3d.com/Manual/android-RequestingPermissions.html
     */

    // Some platforms (like Android) require 16x16 alignment for the texture size to be sent via WebRTC
    _activeCamera = new WebCamTexture(deviceName, 1024, 768, requestedFPS: 30);

    _activeCamera.Play();

    // starting the camera might fail if the device is not accessible (e.g. used by another application)
    if (!_activeCamera.isPlaying)
    {
        Debug.LogError($"Failed to start the `{deviceName}` camera device.");
        return;
    }

    StartCoroutine(PassActiveCameraToVideoManager());
}
- This method is subscribed to the camera dropdown's
onValueChangedevent, which provides the index of the selected camera. We use_cameraDropdown.options[deviceIndex].textto retrieve the device's name. - If a camera is already active, we stop it before starting the new one.
- We create an instance of WebCamTexture and call Play() to start capturing the video from the camera device.
- We then check the
_activeCamera.isPlayingproperty to verify that the camera device indeed starts. Starting the camera may sometimes fail. For example, an application cannot access a camera device on Windows if another application already uses it. - Finally, the camera is passed to the
VideoManagerusing thePassActiveCameraToVideoManagercoroutine.
Now, add the following coroutine:
            /// <summary>
/// Starting the camera is an asynchronous operation.
/// If we create the video track before camera is active it may have an invalid resolution.
/// Therefore, it's best to wait until camera is in fact started before passing it to the video track
/// </summary>
private IEnumerator PassActiveCameraToVideoManager()
{
    var timeElapsed = 0f;
    while (!_activeCamera.didUpdateThisFrame)
    {
        yield return null;

        // infinite loop prevention
        timeElapsed += Time.deltaTime;
        if (timeElapsed > 5f)
        {
            Debug.LogError("Camera didn't start after 5 seconds. Aborting. The video track is not created.");
            yield break;
        }
    }

    // Set preview of the local peer
    _peerViewA.SetVideoTexture(_activeCamera);

    // Notify Video Manager about new active camera device
    _videoManager.SetActiveCamera(_activeCamera);
}
This method passes the camera to the PeerView, representing the local peer, and to the VideoManager. This is delayed until the camera is updated for the first time. Stating a camera is an asynchronous operation, and it is possible that the first frames will return an invalid texture. To get a sense of why we wait for the camera to start before passing it further, consider the PeerView.SetVideoTexture method - if the passed video texture is invalid, the calculated texture size will most likely be invalid as well.
Next, add the OnRemoteVideoReceived method:
            private void OnRemoteVideoReceived(Texture texture)
{
    _peerViewB.SetVideoTexture(texture);
}
This method is an event handler subscribed to the _videoManager.RemoteVideoReceived event. It’ll pass the received video texture to the remote peer view.
Now, define the click event handlers for the Connect and Disconnect buttons:
            private void OnConnectButtonClicked() => _videoManager.Connect();

private void OnDisconnectButtonClicked() => _videoManager.Disconnect();
Next, add this code:
            // Called by Unity -> https://docs.unity3d.com/ScriptReference/MonoBehaviour.Start.html
protected void Start()
{
    // Enable first camera from the dropdown.
    // We call it in Start to make sure that Awake of all game objects completed and all scripts
    SetActiveCamera(deviceIndex: 0);
}
This ensures the first camera in the dropdown is activated by default upon starting the application.
Finally, implement the Update method:
            // Called by Unity -> https://docs.unity3d.com/ScriptReference/MonoBehaviour.Update.html
protected void Update()
{
    // Control buttons being clickable by the connection state
    // In a real production code you may want to have this event driven instead of per frame operation
    _connectButton.interactable = _videoManager.CanConnect;
    _disconnectButton.interactable = _videoManager.IsConnected;
}
The Update method dynamically updates the interactability of the Connect and Disconnect buttons based on the current connection state. While suitable for our tutorial, a more event-driven approach might be preferable for production to avoid checking the state every frame.
With these additions, the UIManager is fully functional and ready to manage the user interface for our video streaming application.
Complete Project
You can download the complete project from this repository.
Run the project
Everything is now ready to test our application. Make sure the signaling server is running and that the server's IPv4 address is correctly set in the WebSocket component of both clients, as explained in the The Server IP section. Launch the Unity project on two devices and press the Connect button on either device. You should see a video stream being successfully exchanged between them:
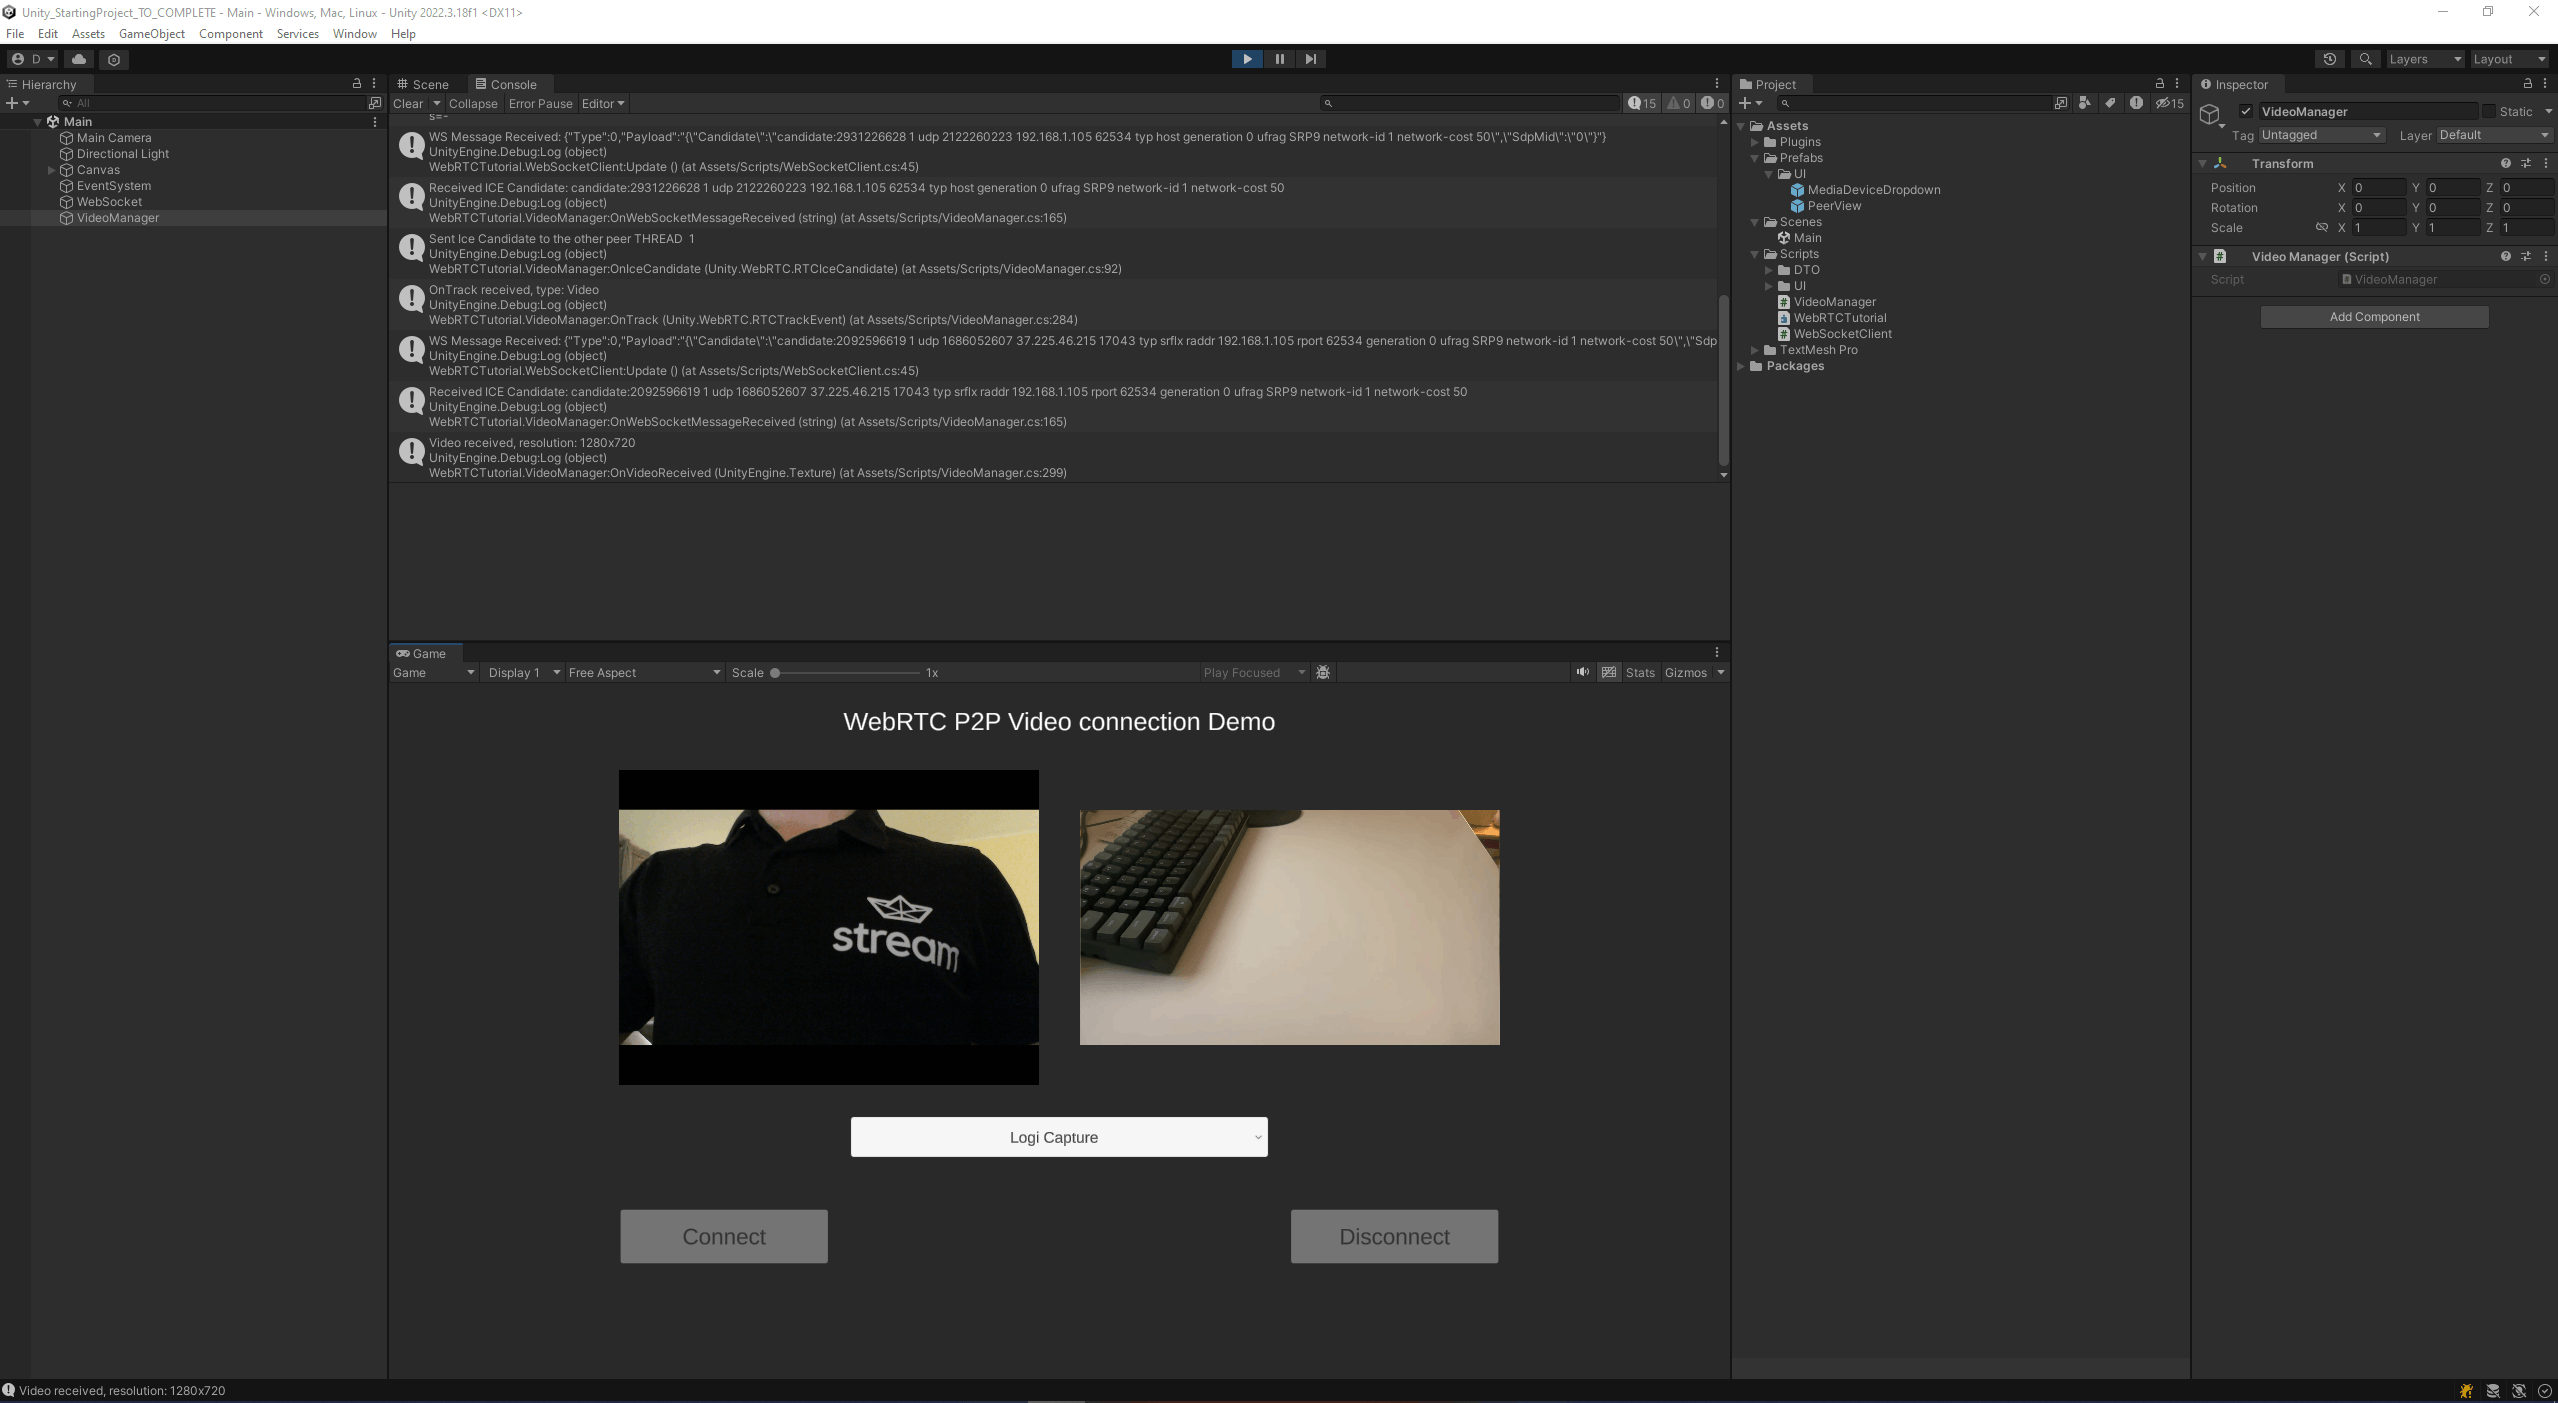
Keep in mind that even within a home network, a peer-to-peer connection might not be established due to specific network configurations. Addressing such connectivity issues falls beyond the scope of this tutorial.
Stream's Video SDK for Unity
While this guide provides a hands-on approach to building video streaming capabilities from scratch using WebRTC and Unity, we understand the complexity and time investment required to create a robust real-time communication solution. For developers seeking a more streamlined, ready-to-use option that minimizes integration efforts, Stream's Video SDK for Unity might be a suitable option.
To kickstart your development with Stream's Video SDK for Unity, we recommend exploring the following tutorials tailored to specific use cases:
- Video-Calling App Tutorial: Ideal for developers aiming to integrate video-sharing experience into their Unity applications.
- Audio-Room Tutorial: Perfect for those interested in creating any form of audio interaction.
Conclusion
In this tutorial, we've taken a deep dive into implementing real-time video streaming in Unity using WebRTC, focusing on the practical steps necessary to set up a peer-to-peer video-sharing connection. We started by establishing a basic signaling server using the websocket-sharp library, which is crucial for initiating the WebRTC connection between peers. We then transitioned to Unity, utilizing the Unity WebRTC package to handle the video streaming functionality. With this knowledge, you're now equipped to explore the vast potential of interactive media in your Unity projects.