
Livestream Quickstart
In this tutorial we'll quickly build a low-latency in-app livestreaming experience. The livestream is broadcasted using Stream's edge network of servers around the world.
This tutorial is structured into two parts:
Part 1: Building a Livestreaming Android App
- Creating a livestream on the Stream dashboard
- Setting up RTMP input with OBS software
- Viewing the livestream on an Android device
- Building custom livestream viewer UI
Part 2: Creating an Interactive Livestreaming App
- Publishing a livestream from an Android device with WebRTC
- Implementing backstage and go live functionality
Let's get started! If you have any questions or feedback, please let us know via the feedback button.
Part 1 - Building a Livestreaming Android app
In part one we will create a livestreaming app and view a livestream directly from Android
Step 1 - Create a livestream in the dashboard
First, let's create our livestream using the dashboard. To do this, open the dashboard and select "Video & Audio" -> "Overview".
In that screen, you will see three buttons that allow you to create different types of calls, as shown in the image below.
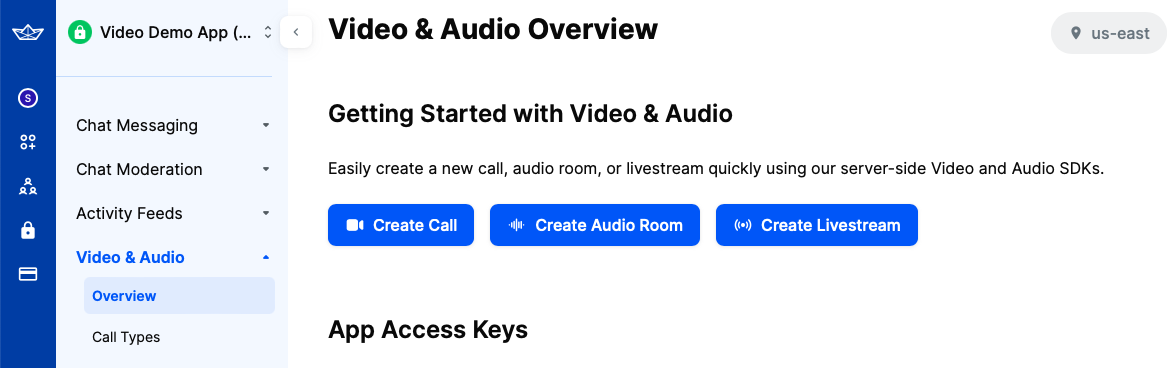
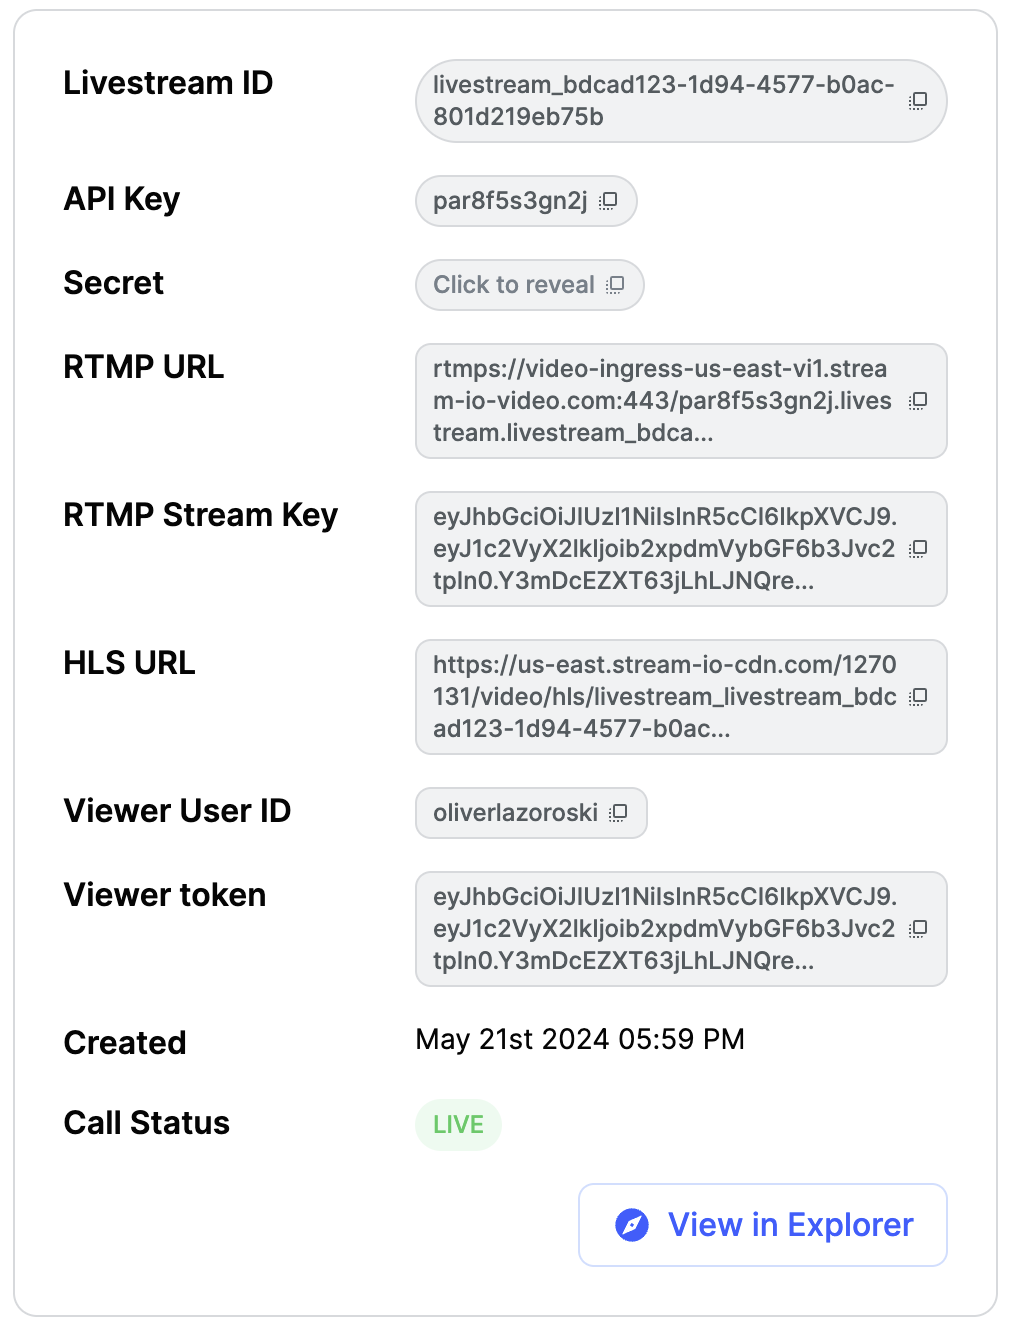
Click on the third one, the "Create Livestream" option. After you do this, you will be shown the following screen, which contains information about the livestream:
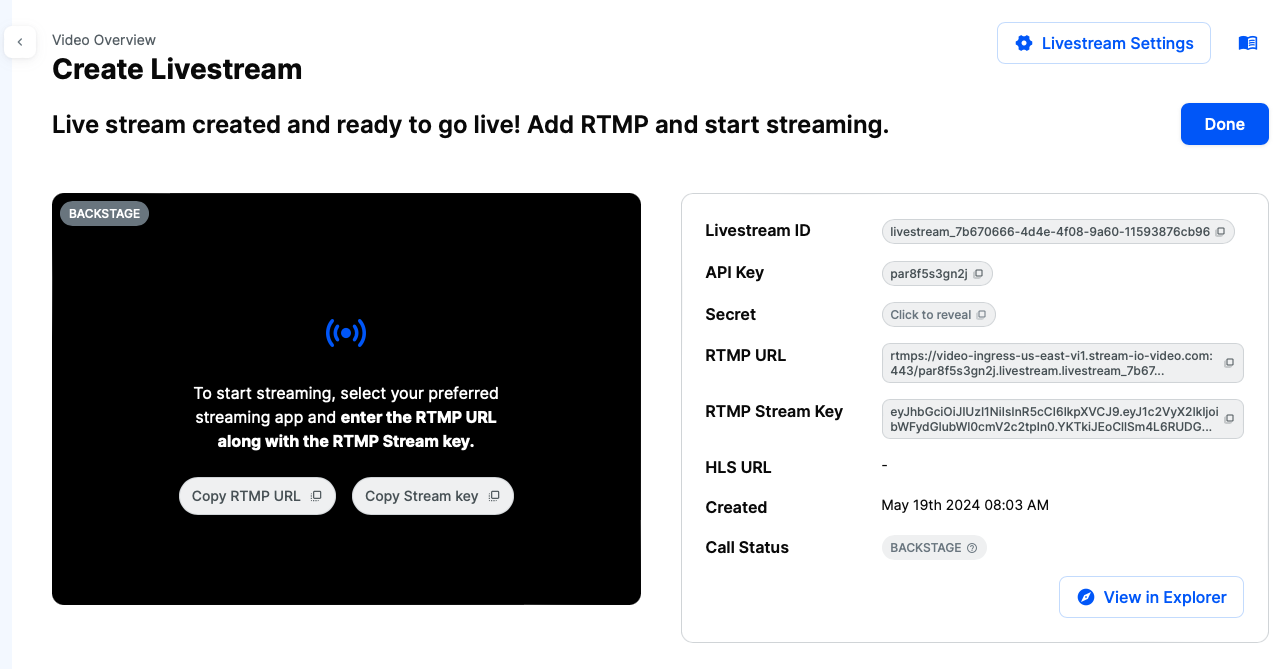
You will need the RTMP URL and RTMP Stream Key from this page, which are needed to set up the livestream in OBS software.
Copy these values for now, and we will get back to the dashboard a bit later.
Step 2 - Setup the livestream in OBS
OBS is one of the most popular livestreaming software packages and we'll use it to explain how to publish video with RTMP.
After you download and install the software using the instructions provided on the link, you should setup the capturing device and the livestream data.
First, let's setup the capturing device, which can be found in the sources section:
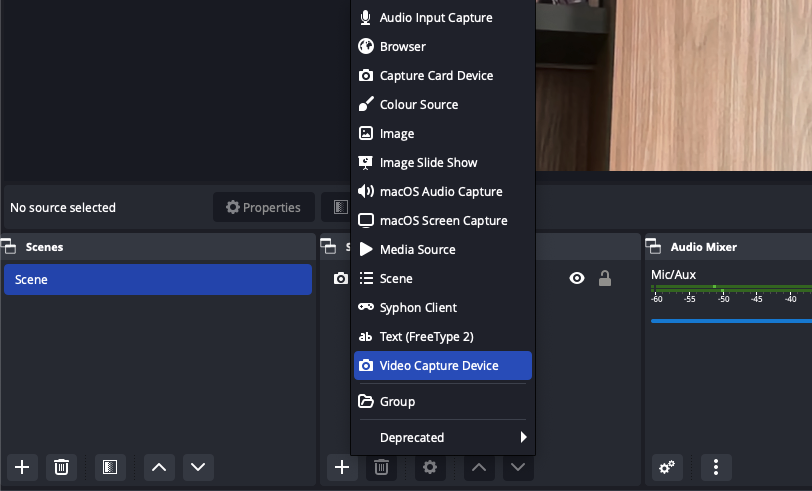
Select the "Video Capture Device" option to stream from your computer's camera. Alternatively, you can choose other options, such as "macOS Screen Capture," to stream your screen.
Next, we need to provide the livestream credentials from our dashboard to OBS. To do this, click on the "Settings" button located in the "Controls" section at the bottom right corner of OBS.
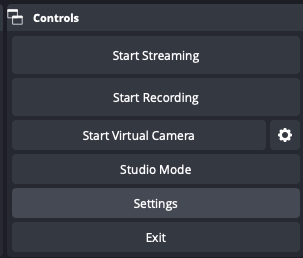
This will open a popup. Select the second option, "Stream". For the "Service" option, choose "Custom". In the "Server" and "Stream Key" fields, enter the values you copied from the dashboard in Step 1.

With that, our livestream setup is complete. Before returning to the dashboard, press the "Start Streaming" button in the "Controls" section.
Now, let's go back to the dashboard. If everything is set up correctly, you should see the OBS livestream in the dashboard, as shown in this screenshot:
Note that by default, the livestream starts immediately. However, you can change this setting in the dashboard and enable backstage for the "livestream" call type.
Step 3 - Build the livestreaming app
Now that we have our livestream configured and running, it's time to build our Android app to view the livestream.
- Open Android Studio and create a new project.
- Select Phone & Tablet -> Empty Activity and click Next.
- Name your project LivestreamApp.
- Click Finish to create your project.
Step 3.1: Add the Stream SDK
Add the Stream SDK to your project using Gradle:
- Open your project's
build.gradlefile. - Add the Stream SDK dependency:
1234567891011dependencies {
    // Stream Video Compose SDK
    implementation("io.getstream:stream-video-android-ui-compose:<latest_version>")

    // Jetpack Compose (optional/ Android Studio typically adds them when you create a new project)
    implementation(platform("androidx.compose:compose-bom:2023.10.01"))
    implementation("androidx.activity:activity-compose:1.7.2")
    implementation("androidx.compose.ui:ui")
    implementation("androidx.compose.ui:ui-tooling-preview")
    implementation("androidx.compose.material3:material3")
}
Replace <latest-version> with the version number indicated below. Also, you can check the Releases page.

Make sure you add the INTERNET permission in the AndroidManifest.xml file, before the application tag:
1<uses-permission android:name="android.permission.INTERNET" />
You can now sync your project.
Step 3.2: Initialize the SDK
Create a new class called: LivestreamApplication.
Initialize the SDK in your application's onCreate method:
123456789101112131415161718192021import android.app.Application
import io.getstream.video.android.core.StreamVideoBuilder
import io.getstream.video.android.model.User
import io.getstream.video.android.model.UserType

class LivestreamApplication : Application() {
    override fun onCreate() {
        super.onCreate()
        initializeSDK()
    }

    private fun initializeSDK() {
        // Initialize StreamVideo. For a production app, we recommend adding the client to your Application class or DI module.
        val client = StreamVideoBuilder(
            context = this,
            user = User.anonymous(),
            apiKey = "YOUR_API_KEY", // API key
            token = "YOUR_VIEWER_TOKEN"
        ).build()
    }
}
Note: You can omit the user parameter and it will automatically default to an anonymous user.
Step 3.3: Set the Application Class in the Manifest
Update the AndroidManifest.xml file to use LivestreamApplication as the application class:
- Open your
AndroidManifest.xmlfile. - Add the
android:nameattribute to the<application>tag to specify theLivestreamApplicationclass.
1234567891011121314151617<application
    android:name=".LivestreamApplication"
    android:allowBackup="true"
    android:icon="@mipmap/ic_launcher"
    android:label="@string/app_name"
    android:roundIcon="@mipmap/ic_launcher_round"
    android:supportsRtl="true"
    android:theme="@style/Theme.LivestreamApp">
    <activity
        android:name=".MainActivity"
        android:exported="true">
        <intent-filter>
            <action android:name="android.intent.action.MAIN" />
            <category android:name="android.intent.category.LAUNCHER" />
        </intent-filter>
    </activity>
</application>
Step 3.4: View a Livestream on an Android Device
Now that we have our SDK initialized and the application class set up, it's time to create the UI for viewing a livestream on an Android device.
The following code shows you how to create a livestream player that will play the stream we created above on Android. Let's open MainActivity.kt and replace the MainActivity class with the following code:
1234567891011121314151617181920212223242526272829303132import android.os.Bundle
import androidx.activity.ComponentActivity
import androidx.activity.compose.setContent
import androidx.compose.runtime.Composable
import io.getstream.video.android.compose.permission.LaunchCallPermissions
import io.getstream.video.android.compose.theme.VideoTheme
import io.getstream.video.android.compose.ui.components.livestream.LivestreamPlayer
import io.getstream.video.android.core.Call
import io.getstream.video.android.core.StreamVideo

class MainActivity : ComponentActivity() {
    override fun onCreate(savedInstanceState: Bundle?) {
        super.onCreate(savedInstanceState)
        val client = StreamVideo.instance()
        val call = client.call("livestream", "YOUR_CALL_ID")
        setContent {
            VideoTheme {
                LiveAudience(call)
            }
        }
    }
}

@Composable
fun LiveAudience(call: Call) {
    // Ensure the call has the correct permissions to run
    LaunchCallPermissions(call = call, onAllPermissionsGranted = {
        // Join the livestream.
        call.join()
    })
    LivestreamPlayer(call = call)
}
Before running the app, you should replace the placeholders with values from the dashboard. For the YOUR_API_KEY, use the API Key value from your livestream page in the dashboard. Replace the YOUR_VIEWER_TOKEN value with the Viewer Token value in the dashboard, and the YOUR_CALL_ID with Livestream ID.
That is everything that's needed to play a livestream on Android. The LivestreamPlayer component from the StreamVideo Compose SDK allows you to play livestreams easily, by just specifying the call id and call type.
If you now run the app, you will see the livestream published from the OBS software.
Step 3.5: Customizing the UI
The default player UI for the livestream viewer is a good starting point.
To customize the LivestreamPlayer, you can supply separate overlayContent or a new renderer.
Customizing Overlay Content
You can provide custom content to the overlayContent parameter to display additional information, such as participant counts, live stream duration, or device settings controls.
123456789101112131415161718192021222324252627282930313233343536import androidx.compose.foundation.layout.Arrangement
import androidx.compose.foundation.layout.Column
import androidx.compose.foundation.layout.Spacer
import androidx.compose.foundation.layout.fillMaxWidth
import androidx.compose.foundation.layout.height
import androidx.compose.foundation.layout.padding
import androidx.compose.material3.Text
import androidx.compose.ui.Alignment
import androidx.compose.ui.Modifier
import androidx.compose.ui.graphics.Color
import androidx.compose.ui.unit.dp
import io.getstream.video.android.core.Call

@Composable
fun CustomOverlayContent(call: Call) {
    val count by call.state.participantCounts.collectAsState()
    Column(
        modifier = Modifier
            .fillMaxWidth()
            .padding(16.dp),
        horizontalAlignment = Alignment.CenterHorizontally,
        verticalArrangement = Arrangement.Top
    ) {
        Text(text = "Custom overlay Live Stream", style = VideoTheme.typography.bodyL, color = Color.Red)
        Spacer(modifier = Modifier.height(8.dp))
        Text(text = "Viewers: $count", color = Color.White)
    }
}

@Composable
fun CustomLivestreamPlayer(call: Call) {
    LivestreamPlayer(
        call = call,
        overlayContent = { CustomOverlayContent(call = call) }
    )
}
Customizing Renderer Content
You can also provide custom content to the rendererContent parameter to change how the video stream is rendered.
By providing custom overlayContent and rendererContent, you can create a user livestreaming experience more tailored to your and the needs to your users.
To use these customizations, replace the LivestreamPlayer with CustomLivestreamPlayer in the LiveAudience composable.
State & Participants
Call.state exposes all the StateFlow objects you need.
To customize the UI you can use the following parameters to obtain various data from the call:
call.state.connection- to show if we're connected to the realtime video. You can use this for implementing a loading interface.call.state.backstage- a boolean that returns if the call is in backstage mode or notcall.state.duration- how long the call has been runningcall.state.totalParticipants- the number of participants watching the livestreamcall.state.localParticipant- the state of the participant on this device
Also, call.state.participants can be used to access all participant-related state. It contains more information about who's watching the stream.
If you have multiple people broadcasting video this also contain the video tracks.
Each participant has many
participant.name: the user's nameparticipant.image: the user's imageparticipant.videoTrack: the video for this userparticipant.roles: the roles for the participant. it enables you to have co-hosts etc
There are many possibilities and the participant state docs explain this in more detail.
Writing a Fully Custom CustomLivestreamPlayer
There is also the possibility to write a fully custom CustomLivestreamPlayer to have complete control over the livestreaming experience. This allows you to integrate more advanced features and tailor the UI to meet specific needs.
See how to use our video renderer for this purpose and provide a fully custom content on top of it, using the CallState and various other api's from the Call object to get the data needed.
Lets build a custom player that will display the video and on top of it will display the number of participants and duration.
We are going to use a Scaffold view to manage a topBar and the video content.
We can do this by creating a new CustomLivestreamPlayer composable as shown in the code snippet bellow:
12345678910111213141516171819202122232425262728293031323334353637383940414243444546474849505152535455565758596061626364656667686970import androidx.compose.foundation.background
import androidx.compose.foundation.layout.Box
import androidx.compose.foundation.layout.fillMaxSize
import androidx.compose.foundation.layout.fillMaxWidth
import androidx.compose.foundation.layout.padding
import androidx.compose.foundation.shape.RoundedCornerShape
import androidx.compose.material3.Scaffold
import androidx.compose.material3.Text
import androidx.compose.runtime.Composable
import androidx.compose.runtime.collectAsState
import androidx.compose.runtime.getValue
import androidx.compose.ui.Alignment
import androidx.compose.ui.Modifier
import androidx.compose.ui.draw.clip
import androidx.compose.ui.graphics.Color
import androidx.compose.ui.unit.dp
import io.getstream.video.android.compose.theme.VideoTheme
import io.getstream.video.android.compose.ui.components.video.VideoRenderer
import io.getstream.video.android.core.Call

@Composable
private fun CustomLivestreamPlayer(call: Call) {
    val totalParticipants by call.state.totalParticipants.collectAsState()
    val duration by call.state.duration.collectAsState()
    val livestream by call.state.livestream.collectAsState()
    Scaffold(
        modifier = Modifier
            .fillMaxSize()
            .background(VideoTheme.colors.baseSheetPrimary)
            .padding(6.dp),
        contentColor = VideoTheme.colors.baseSheetPrimary,
        topBar = {
            Box(
                modifier = Modifier
                    .fillMaxWidth()
                    .padding(6.dp),
            ) {
                Text(
                    modifier = Modifier
                        .align(Alignment.CenterEnd)
                        .background(
                            color = VideoTheme.colors.brandPrimary,
                            shape = RoundedCornerShape(6.dp),
                        )
                        .padding(horizontal = 12.dp, vertical = 4.dp),
                    text = "Live $totalParticipants",
                    color = Color.White,
                )

                Text(
                    modifier = Modifier.align(Alignment.Center),
                    text = "Live for $duration",
                    color = VideoTheme.colors.brandPrimaryDk,
                )
            }
        },
    ) {
        VideoRenderer(
            modifier = Modifier
                .fillMaxSize()
                .padding(it)
                .clip(RoundedCornerShape(6.dp)),
            call = call,
            video = livestream,
            videoFallbackContent = {
                // Content for when the video is not available.
            },
        )
    }
}
Part 2: Creating an Interactive Livestreaming App
In the first part of this tutorial, we built a simple livestream app, where we published a livestream using RTMP. The authentication was done using the Dashboard. In a real application, you want to generate tokens programmatically using a server-side SDK.
The second part of this tutorial expands our app to include interactive functionality such as streaming from end-user devices.
Step 4: Live streaming from Android devices
We are going to send video from an Android device directly using WebRTC and use the backstage functionality.
Step 4.1: Permissions setup
Publishing a livestream requires camera and microphone access, so you need to request permissions to use them in your app. To do this, add the following permissions to your AndroidManifest.xml file:
12<uses-permission android:name="android.permission.CAMERA" />
<uses-permission android:name="android.permission.RECORD_AUDIO" />
For the camera you also need to add the feature declaration
1<uses-feature android:name="android.hardware.camera" android:required="false" />
For the livestream to work you need these permissions to be granted. We'll see a bit later in the tutorial how this can be done using Stream components. Or you can ensure that permissions are granted yourself.
Step 4.2: Broadcasting a livestream
This step involves replacing the existing code for the viewer experience with new code that enables broadcasting from your device.
We'll create a simple broadcasting screen using the Stream SDK. This screen will allow the user to start broadcasting their video and audio to the livestream.
Next, we will integrate this component into our main activity and define the necessary composable functions to manage the broadcasting state.
Let's start by updating the initializeSDK function in our LivestreamApplication class to include a predefined userId and userToken:
12345678910111213141516171819202122232425262728293031import android.app.Application
import io.getstream.video.android.core.StreamVideoBuilder
import io.getstream.video.android.model.User

class LivestreamApplication : Application() {
    override fun onCreate() {
        super.onCreate()
        initializeSDK()
    }

    private fun initializeSDK() {
        val userId = "REPLACE_WITH_USER_ID"
        val userName = "Broadcaster"
        val userToken = "REPLACE_WITH_TOKEN"

        // Step 1 - Create a user.
        val user = User(
            id = userId, // predefined string
            name = userName, // Name and image are used in the UI
            role = "admin",
        )

        // Step 2 - Initialize StreamVideo. For a production app, we recommend adding the client to your Application class or DI module.
        val client = StreamVideoBuilder(
            context = this,
            apiKey = "REPLACE_WITH_API_KEY",
            user = user,
            token = userToken,
        ).build()
    }
}
Lets also replace the MainActivity content to now display the host UI.
123456789101112131415161718import android.os.Bundle
import androidx.activity.ComponentActivity
import androidx.activity.compose.setContent
import androidx.compose.material3.Text
import io.getstream.video.android.compose.theme.VideoTheme


class MainActivity : ComponentActivity() {
    override fun onCreate(savedInstanceState: Bundle?) {
        super.onCreate(savedInstanceState)

        setContent {
            VideoTheme {
                Text(text = "TODO: Render host content")
            }
        }
    }
}
If you run the application now, you will see TODO: Render host content
Creating the call
The most important step to review is how we create the call. Stream uses the same call object for livestreaming, audio rooms and video calling. Have a look at the code snippet below:
1234val call = StreamVideo.instance().call("livestream", "REPLACE_WITH_CALL_ID")
lifecycleScope.launch {
    call.join(create = true)
}
To create the call object, specify the call type as livestream and provide a unique callId. The livestream call type comes with default settings that are usually suitable for livestreams, but you can customize features, permissions, and settings in the dashboard. Additionally, the dashboard allows you to create new call types as required.
Finally, using call.join(create = true) will not only create the call object on our servers but also initiate the real-time transport for audio and video. This allows for seamless and immediate engagement in the livestream.
Note that you can also add members to a call and assign them different roles. For more information, see the call creation docs.
Rendering the UI
Next, continue by creating a new composable function called LiveHostContent, which will be responsible for setting up the video rendering and managing the broadcasting state. Unlike watching a livestream, the Stream SDK does not provide a default component for broadcasting.
To create a LiveHostContent composable function using the Stream Video SDK, follow these steps:
Define the Composable Function
Create a new file LiveHostContent and in it a composable function in your named LiveHostContent that takes a Call object as a parameter.
1234@Composable
fun LiveHostContent(call: Call) {
 //  We will define our content here
}
You can copy all the imports we are going to need by expanding the section below:
12345678910111213141516171819202122232425import androidx.compose.foundation.background
import androidx.compose.foundation.layout.Box
import androidx.compose.foundation.layout.fillMaxSize
import androidx.compose.foundation.layout.fillMaxWidth
import androidx.compose.foundation.layout.padding
import androidx.compose.foundation.shape.RoundedCornerShape
import androidx.compose.material3.Button
import androidx.compose.material3.ButtonDefaults
import androidx.compose.material3.Scaffold
import androidx.compose.material3.Text
import androidx.compose.runtime.Composable
import androidx.compose.runtime.collectAsState
import androidx.compose.runtime.getValue
import androidx.compose.runtime.rememberCoroutineScope
import androidx.compose.ui.Alignment
import androidx.compose.ui.Modifier
import androidx.compose.ui.draw.clip
import androidx.compose.ui.graphics.Color
import androidx.compose.ui.unit.dp
import io.getstream.video.android.compose.permission.LaunchCallPermissions
import io.getstream.video.android.compose.theme.VideoTheme
import io.getstream.video.android.compose.ui.components.video.VideoRenderer
import io.getstream.video.android.core.Call
import io.getstream.video.android.core.RealtimeConnection
import kotlinx.coroutines.launch
Collect State Properties
Track various state properties from the Call object to keep the UI updated. These include connection status, participant count, backstage mode, local participant info, video stream, and call duration.
As mentioned before, for more options, check the participant state docs.
In our example we are going to use, add this code in the LiveHostContent composable:
1234567val connection by call.state.connection.collectAsState()
val totalParticipants by call.state.totalParticipants.collectAsState()
val backstage by call.state.backstage.collectAsState()
val localParticipant by call.state.localParticipant.collectAsState()
val video = localParticipant?.video?.collectAsState()
val duration by call.state.duration.collectAsState()
val scope = rememberCoroutineScope()
Set Up the Scaffold
Use the Scaffold component to structure the UI with a top bar, bottom bar, and main content area.
12345678910111213141516Scaffold( modifier = Modifier .fillMaxSize() .background(VideoTheme.colors.baseSheetPrimary) .padding(6.dp), contentColor = VideoTheme.colors.baseSheetPrimary, topBar = { // Will define the topBar content here }, bottomBar = { // Will define bottomBar content here }, ) { // Main content, will be the VideoRenderer (ignore the padding warning) } }
Create the Top Bar
Define the topBar to show the live status, participant count, and duration if connected. Display "The livestream is not started yet" if in backstage mode and "Connection failed" if the connection fails.
12345678910111213141516171819202122232425262728293031323334353637if (connection == RealtimeConnection.Connected) {
    if (!backstage) {
        Box(
            modifier = Modifier
                .fillMaxWidth()
                .padding(6.dp),
        ) {
            Text(
                modifier = Modifier
                    .align(Alignment.CenterEnd)
                    .background(
                        color = VideoTheme.colors.brandPrimary,
                        shape = RoundedCornerShape(6.dp),
                    )
                    .padding(horizontal = 12.dp, vertical = 4.dp),
                text = "Live $totalParticipants",
                color = Color.White,
            )

            Text(
                modifier = Modifier.align(Alignment.Center),
                text = "Live for $duration",
                color = VideoTheme.colors.basePrimary,
            )
        }
    } else {
        Text(
            text = "The livestream is not started yet",
            color = VideoTheme.colors.basePrimary,
        )
    }
} else if (connection is RealtimeConnection.Failed) {
    Text(
        text = "Connection failed",
        color = VideoTheme.colors.basePrimary,
    )
}
Create the Bottom Bar
Include a button in the bottomBar to start or stop the broadcast based on the backstage state.
12345678910111213141516Button(
    colors = ButtonDefaults.buttonColors(
        contentColor = VideoTheme.colors.brandPrimary,
        containerColor = VideoTheme.colors.brandPrimary
    ),
    onClick = {
        scope.launch {
            if (backstage) call.goLive() else call.stopLive()
        }
    },
) {
    Text(
        text = if (backstage) "Start Broadcast" else "Stop Broadcast",
        color = Color.White,
    )
}
Render the Video Content
Use the VideoRenderer component to display the video feed from the call, providing fallback content when the video is not available.
1234567891011VideoRenderer(
    modifier = Modifier
        .fillMaxSize()
        .padding(it)
        .clip(RoundedCornerShape(6.dp)),
    call = call,
    video = video?.value,
    videoFallbackContent = {
        // Content for when the video is not available.
    },
)
Following these steps, you can create a responsive UI for live video calls that updates in real-time with the call's state changes using the Stream Video SDK.
Now let's integrate this LiveHostContent composable into the MainActivity:
In our MainActivity we'll create a LiveHost() composable and add a permission request into it.
123456789101112131415161718192021222324252627282930313233343536373839404142import android.os.Bundle
import androidx.activity.ComponentActivity
import androidx.activity.compose.setContent
import androidx.compose.runtime.Composable
import androidx.compose.runtime.LaunchedEffect
import io.getstream.video.android.compose.permission.LaunchPermissionRequest
import io.getstream.video.android.compose.theme.VideoTheme
import io.getstream.video.android.core.Call
import io.getstream.video.android.core.StreamVideo


class MainActivity : ComponentActivity() {
    override fun onCreate(savedInstanceState: Bundle?) {
        super.onCreate(savedInstanceState)
        val call = StreamVideo.instance().call("livestream", "REPLACE_WITH_CALL_ID")
        setContent {
            VideoTheme {
                LiveHost(call)
            }
        }
    }

    @Composable
    fun LiveHost(call: Call) {
        LaunchPermissionRequest(
            permissions = listOf(
                android.Manifest.permission.RECORD_AUDIO,
                android.Manifest.permission.CAMERA
            )
        ) {
            AllPermissionsGranted {
                LaunchedEffect(call) {
                    call.join(create = true)
                }
                LiveHostContent(call = call)
            }
            NoneGranted {
                // Handle permission explanation
            }
        }
    }
}
Step 5 - Backstage and GoLive
The backstage functionality makes it easy to build a flow where you and your co-hosts can set up your camera and equipment before going live. Only after you call call.goLive() will regular users be allowed to join the livestream.
This is convenient for many livestreaming and audio-room use cases. If you want calls to start immediately when you join them, that's also possible. Simply go to the Stream dashboard, click the livestream call type, and disable the backstage mode.
As seen in the implementation of our LiveHostContent to handle the backstage state, you can use the backstage property of the Call object. When backstage is true, you can display a setup screen with a button to go live. Once the user clicks the button, call call.goLive() to start the livestream.
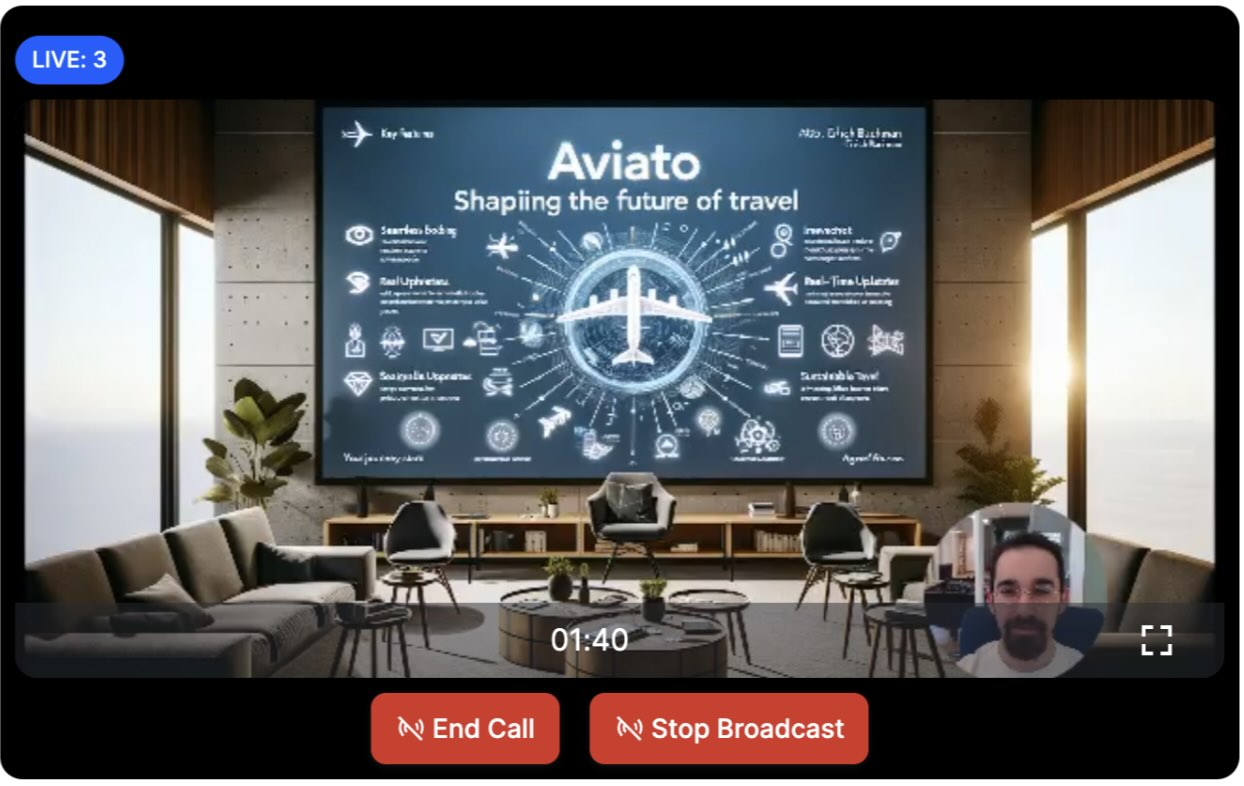
Step 6 - Preview using React
Now let's press Go live in the Android app. Upon going live, you will be greeted with an interface that looks like this:

You can also click the link below to watch the video in your browser.
Advanced Features
This tutorial covered the steps required to watch a livestream using RTMP-in and OBS software, as well as how to publish a livestream from an Android device.
There are several advanced features that can improve the livestreaming experience:
- Co-hosts You can add members to your livestream with elevated permissions. So you can have co-hosts, moderators etc. You can see how to render multiple video tracks in our video calling tutorial.
- Permissions and Moderation You can set up different types of permissions for different types of users and a request-based approach for granting additional access.
- Custom events You can use custom events on the call to share any additional data. Think about showing the score for a game, or any other realtime use case.
- Reactions & Chat Users can react to the livestream, and you can add chat. This makes for a more engaging experience.
- Notifications You can notify users via push notifications when the livestream starts.
- Recording The call recording functionality allows you to record the call with various options and layouts.
- HLS Another way to watch a livestream is using HLS. HLS tends to have a 10 to 20 seconds delay, while the WebRTC approach is realtime. The benefit that HLS offers is better buffering under poor network conditions.
Recap
It was fun to see just how quickly you can build in-app low latency livestreaming. Please do let us know if you ran into any issues. Our team is also happy to review your UI designs and offer recommendations on how to achieve it with Stream.
To recap what we've learned:
- WebRTC is optimal for latency, HLS is slower but buffers better for users with poor connections
- You set up a call: (
val call = streamVideo.call(callType = "livestream", callId = callId)) - The call type "livestream" controls which features are enabled and how permissions are set up
- When you join a call, realtime communication is set up for audio & video: (
call.join()) - Observable objects in
call.stateandcall.state.participantsmake it easy to build your own UI - You can easily publish your own video from an Android device
Calls run on Stream's global edge network of video servers. Being closer to your users improves the latency and reliability of calls. The SDKs enable you to build livestreaming, audio rooms and video calling in days.
We hope you've enjoyed this tutorial and please do feel free to reach out if you have any suggestions or questions.