
Having a full range of colors that can be shared and reused in different Xcode projects improves efficiency and workflow because it removes the time wasted in looking for colors that will work together for your projects. Additionally, it ensures consistency of color usage within your apps and projects.
Historically, developers and designers create color palettes using design tools such as Adobe Illustrator, Sketch, and Figma. It turns out that Swift developers can build these color collections and manage them directly inside Xcode using the built-in color picker. In this article, you will discover how to create a set of colors called DuoChroma to use later to customize the look and feel of a sample Stream Chat SwiftUI app. The techniques, tips, and tricks you learn in this article will assist you in building coherent color schemes for your future Xcode projects.
Getting started
To follow along and get the best out of this tutorial, install Xcode on your Mac. If you do not have Xcode yet, you can download and install it from the Mac App Store. Download the completed color scheme from GitHub or create a blank SwiftUI project with Xcode and let’s begin.
Launch Xcode, create a new SwiftUI project, and name it duoChromaPalette. Next, rename the Swift file ContentView in your project navigator to duoColorSet. You will use this file soon to access the color picker.
The color picker
The color picker provides color drawers/wells and controls that allow you to select system colors or build your own color sets. It is available in other Mac applications such as Final Cut Pro and Apple Motion. You can find it in most third-party Mac apps such as Kite Compositor and ScreenFlow. However, this article focuses mainly on the color picker in Xcode.
During the research phase of writing this article, several Swift developers were asked how they use the color picker in Xcode. All the developers knew how to use it to set colors in their projects. However, none of them knew its obscured features. As a result, we designed the tutorial to give you the key to unlocking the hidden gems and capabilities of the color picker. You will master the craft of building shareable and reusable color palettes that can be shared with your team or used in future Xcode projects.
How to access the color picker in Xcode
To use the color picker in Xcode, you can access it in two ways:
- Go to the Xcode’s toolbar and click Edit -> Format -> Show Colors. After showing the picker, you can click Hide Colors to dismiss it.

-
To make it available via code, you should use color literal. Define the constant
let deviceBg = #colorLiteral(red: 0, green: 0.3725490196, blue: 1, alpha: 1)in the Swift file duoColorSet or replace the content of the file with the sample code below.swift// Color literal definition let deviceBg = #colorLiteral(red: 0, green: 0.3725490196, blue: 1, alpha: 1) var body: some View { ZStack { Color(deviceBg) .ignoresSafeArea() VStack { Image("streamLogoMark") .resizable() .frame(width: 64, height: 32) Text("Hello, **Stream**!") } } } - This creates a color chip that can be clicked to present the color picker as shown in the image below.

Touring the color categories
Click the color chip from the literal’s definition to open the color wells. Then, click Other at the bottom center of the window to present the color categories.

The colors window has three sections:
- Color picker buttons: Located at the top of the window
- Controls: Located in the middle section
- Color drawers/wells and preview: Located at the bottom section of the window.

Using the default colors
Click the color button on the top to switch between the pickers. There are five categories of pickers and these are:
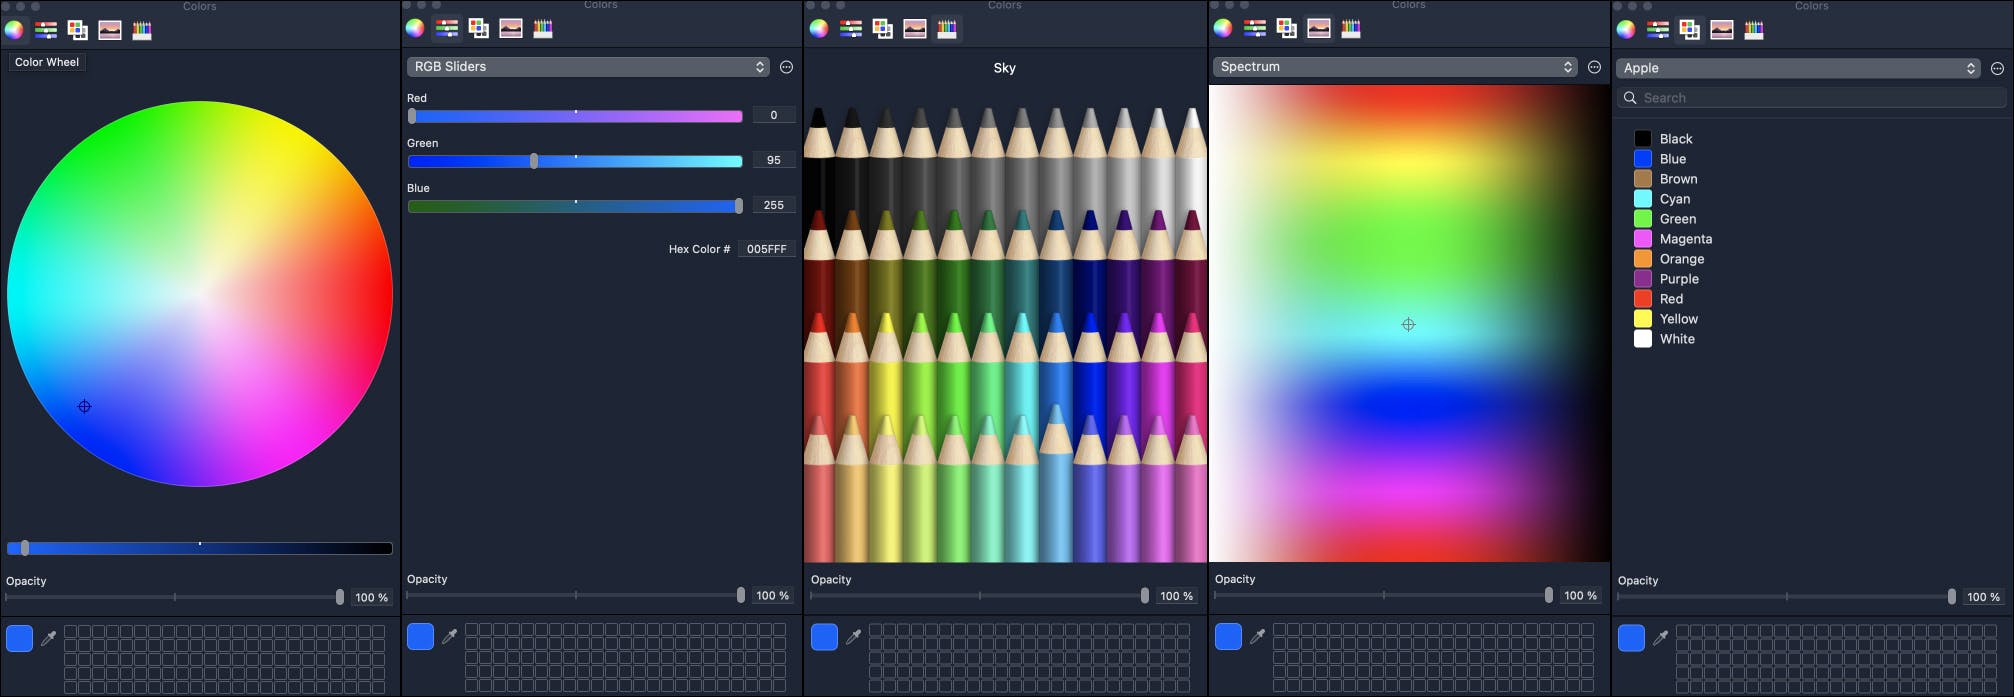
- Color wheel (first from the left): Using the color wheel allows you to select from a wide range of colors by dragging the wheel. It has a brightness slider to adjust the darkness and brightness of colors.
- Color sliders (second from the left): You can use the color sliders to create RGB and HSB colors.
- Pencils (third from the left): This offers a wide range of system colors. Clicking the pencils will update the color you have selected in the code.
- Image Palettes (fourth from the left): This allows you to create a set of custom colors from an image. It provides the option to add images to sample colors.
- Color Palettes (firth from the left): This contains system color swatches. It also provides the option to build your own custom palettes.
Create a custom palette using the Color Palettes category
In this section, you will learn how to build custom-made color palettes by sampling colors from interface elements. To create your color scheme in Xcode, you should use the categories of the Color Palettes and Image Palettes.
In the Swift file duoColorSet:
- Define the color constant
let addColor = #colorLiteral(red: 0.5409796238, green: 0.776439786, blue: 0.2311589718, alpha: 0).
// Color literal definition
    let deviceBg =  colorLiteral(red: 0, green: 0.3725490196, blue: 1,
                    alpha: 1)

    var body: some View {
        ZStack {
            Color(deviceBg)
                .ignoresSafeArea()

            VStack {
                Image("streamLogoMark")
                    .resizable()
                    .frame(width: 64, height: 32)
                Text("Hello, **Stream**!")
            }
        }
    }
}- Double-click the color chip and select Other. This adds a color that has zero opacity. Select the Color Palettes from the top buttons.

When you choose Apple from the color options, a window similar to the image above will be presented with default system colors from Apple. The bottom part of the window has the color preview, eyedropper, and color wells.
To create a sample palette:
- Drag the color preview (black and white square) at the bottom-left to the drawers on the bottom right.
- Click the eye dropper icon and move to anywhere on the Xcode interface to pick a color. The color preview will update immediately. Drag this color and drop it in the first drawer. Repeat this step to add as many colors to the drawers as possible.
- The drawers serve as temporary color storage. You must create a new color space to save the newly added colors. Click the reveal more (three dots) button on the top-right and select New as shown in the image below.

- Drag all the colors in the drawers/wells to the middle section and double-click each to rename it. Rename the color group by clicking the reveal more (three dots) button on the top-right and selecting Rename. Change it to SampleCustomSet. Once you save the colors, they are permanently stored at the macOS system level.

- Now, you have saved all the sample colors in the palette SampleCustomSet. You can delete all the colors in the drawers/wells by selecting each and pressing the backspace or delete on the keyboard.

- To delete a color from the palette, select it and click the minus - icon on the top right, as seen in the image above. You can also create variants of color by selecting it and clicking the plus + icon on the top right. Using the opacity slider on the bottom, you can adjust the transparency of the color. To delete the palette, click the reveal more (three dots) icon on the top-right corner and select Remove.
You now have a custom-made Xcode color palette that can be used in future projects or shared with other team members to use. You may ask, how can the palette be exported from Xcode and shared?. Keep reading to find out.
Create a custom palette using the Image Palettes category
In this section, you will build a color palette called DuoChroma using an image of the Duolingo character cloned in Figma. You can follow along with your image to complete the following steps.
- Click the color chip of the constant addColor you defined in the Swift file duoChroma.swift.
- Below the swatches, click Other and switch to the Image Palletes category.
- To sample colors from the spectrum, you can drag the crosshead anywhere on the image spectrum.
- To specify your image to sample colors from, click the menu icon (three dots) on the window's top-right corner and select New from File….

- Pick an image of your choice and move the cross-head that appears on the image to the different colors you want to sample.
- To save the colors temporarily in the color wells, position the crosshead on the different color variations on the image.
- Then, drag the color preview of your favorite colors into the wells.

- Switch to the Color Palletes category. Then, click the menu icon (the three dots) on the top-right corner of the window and select New.
- Drag all the colors you have sampled from the wells to the middle section.

- Click the menu icon on the top-right corner and rename it. In this example, the palette has been renamed DuoChroma. Finally, double-click the individual colors to rename them. Congratulations! You have now created another color palette in Xcode using an image.

Sharing, installing, and reusing color palettes
In the previous section, we created a color palette called DuoChroma. This palette will be automatically available in other Xcode projects you create using your Mac. However, to share the color palette file with others to reuse, you need to find out where it is located on your system. You can jump to Spotlight or the macOS finder to look for the palette you just created. When you try to search it using the Spotlight shortcut cmd + spacebar, the result will show related files instead of the actual color palette file, as shown in the image below. That is strange, huh!!.

Don’t worry, the file is still on your Mac but hidden. Whenever you create a custom color palette in Xcode, it will be stored as an Apple Color List (CLR) with the extension .clr in the system’s library. So, the file name of the palette becomes DuoChroma.clr. It is a binary property list (Plist) file. So it will be hidden by default.
You can find it with the command line (Terminal or Hyper) using the standard search path ~/Library/Colors.

Once you locate the file in ~/Library/Colors, you can copy and paste it to any location on your system. For example, you can use the command cp DuoChroma.clr ~/Desktop to copy it to the Desktop as shown in the image below.

Now that you have successfully saved the file DuoChroma.clr to a location, you can send it to anyone to reuse in other Xcode projects. To do that, you should follow the steps below:
- In Xcode, go to Edit, select Format and click Show Colors
- When the colors window opens, switch to the Color Palettes category
- Click the menu icon (three dots) in the window's top-right corner and select Open.
- Navigate to where you saved the palette file to open and start using it in Xcode.

Where do I go next?
Congratulations! You now know how to create color palettes in Xcode. You have learned to share and reuse the palettes you build in other Xcode projects. Start building awesome palettes in Xcode to ensure harmonious color usage in your apps and projects. If you are new to Stream Chat SwiftUI, check out the getting started tutorial. To learn more about Xcode and SwiftUI, subscribe to the Stream Developers YouTube channel.